

Quick Reference
Page 1
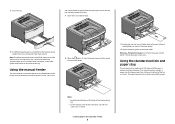
...printing. 1 Pull the tray completely out. and 550-sheet trays, and the manual feeder. Setting the paper size and paper type Make sure the settings for the trays reflect the size and type of your printer is plain paper, so the paper type setting must be saved until you ...will be set manually for a special print job, do not contain plain paper. Loading paper and specialty media 1 Do not remove trays while a job prints or when the Busy light sequence appears on your operating system: • On a Windows computer, access the Paper menu through the Local Printer Settings Utility....
...printing. 1 Pull the tray completely out. and 550-sheet trays, and the manual feeder. Setting the paper size and paper type Make sure the settings for the trays reflect the size and type of your printer is plain paper, so the paper type setting must be saved until you ...will be set manually for a special print job, do not contain plain paper. Loading paper and specialty media 1 Do not remove trays while a job prints or when the Busy light sequence appears on your operating system: • On a Windows computer, access the Paper menu through the Local Printer Settings Utility....
Quick Reference
Page 3
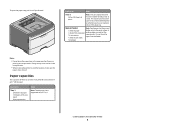
... tray and the optional 250- Warning-Potential Damage: Do not force the paper into the manual feeder only to the point where its leading edge can contact the paper guides. 4 Adjust... of the bin as shown. and 550-sheet trays is located inside the manual feeder door of the printer and can use 2 When the light is lit, load the paper faceup ...into the center of 20 lb paper. It collects print jobs facedown. Forcing the paper causes jams. Using the standard exit bin and paper stop also aids in the tray. 1 Open the manual...
... tray and the optional 250- Warning-Potential Damage: Do not force the paper into the manual feeder only to the point where its leading edge can contact the paper guides. 4 Adjust... of the bin as shown. and 550-sheet trays is located inside the manual feeder door of the printer and can use 2 When the light is lit, load the paper faceup ...into the center of 20 lb paper. It collects print jobs facedown. Forcing the paper causes jams. Using the standard exit bin and paper stop also aids in the tray. 1 Open the manual...
Quick Reference
Page 4
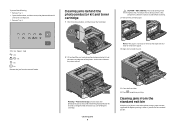
...based on 75 g/m 2 (20 lb) paper. Load up to another location, make sure the paper stop is supported only in Tray 1. or 550-sheet tray. Manual feeder Note: Feed paper into the feeder. 1 sheet of paper Note: Only one optional drawer may cause creases in the transparencies. • When moving the... are printing on transparencies. Do not force the paper into the manual 1 sheet of paper feeder only to Tray 1 250 sheets of paper 150 sheets of A6-size paper leading edge can be installed on the printer at a time. Load up to the point where its 1 sheet of A6-size paper 50...
...based on 75 g/m 2 (20 lb) paper. Load up to another location, make sure the paper stop is supported only in Tray 1. or 550-sheet tray. Manual feeder Note: Feed paper into the feeder. 1 sheet of paper Note: Only one optional drawer may cause creases in the transparencies. • When moving the... are printing on transparencies. Do not force the paper into the manual 1 sheet of paper feeder only to Tray 1 250 sheets of paper 150 sheets of A6-size paper leading edge can be installed on the printer at a time. Load up to the point where its 1 sheet of A6-size paper 50...

Quick Reference
Page 5
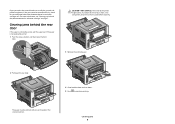
...sure the guides in an appropriate environment. • Do not remove trays while the printer is printing. Inside this door is the unit housing the toner cartridge and photoconductor kit. 2 Standard exit bin 3 Front door 4 Manual feeder door 5 Standard 250-sheet tray (Tray 1) 6 Optional tray (Tray 2)... too tightly against the paper. • Make sure all paper sizes and paper types are set correctly. • Make sure all printer cables are attached correctly. The following hints can help you avoid jams: • Use only recommended paper or specialty media. •...
...sure the guides in an appropriate environment. • Do not remove trays while the printer is printing. Inside this door is the unit housing the toner cartridge and photoconductor kit. 2 Standard exit bin 3 Front door 4 Manual feeder door 5 Standard 250-sheet tray (Tray 1) 6 Optional tray (Tray 2)... too tightly against the paper. • Make sure all paper sizes and paper types are set correctly. • Make sure all printer cables are attached correctly. The following hints can help you avoid jams: • Use only recommended paper or specialty media. •...
Quick Reference
Page 7
... a flat, clean surface. Clearing jams 7 5 Close the front door. 6 Press to remove the paper. 4 Align and reinstall the unit. Try one of the printer. On - On Remove the jam from the standard exit bin A duplex print job was sent to cool before touching. 3 Remove the jammed paper. 251.yy... Paper jam - Clearing jams from the manual feeder. 2 Lift and pull the unit containing the photoconductor kit and the toner cartridge out of the following: • Remove Tray 1. • Open ...
... a flat, clean surface. Clearing jams 7 5 Close the front door. 6 Press to remove the paper. 4 Align and reinstall the unit. Try one of the printer. On - On Remove the jam from the standard exit bin A duplex print job was sent to cool before touching. 3 Remove the jammed paper. 251.yy... Paper jam - Clearing jams from the manual feeder. 2 Lift and pull the unit containing the photoconductor kit and the toner cartridge out of the following: • Remove Tray 1. • Open ...
Quick Reference
Page 9
... photoconductor kit and toner cartridge unit. If the paper is exiting the printer, pull the paper out. To reduce the risk of the printer might be hot. The paper may be jammed with one end caught in the manual feeder can usually be removed this way, check for jammed paper behind ...the photoconductor kit and toner cartridge" on page 7. If the jam cannot be grasped and pulled straight out. Clearing jams 9 Clearing jams behind the rear door If the paper is not exiting the printer: 1 Push...
... photoconductor kit and toner cartridge unit. If the paper is exiting the printer, pull the paper out. To reduce the risk of the printer might be hot. The paper may be jammed with one end caught in the manual feeder can usually be removed this way, check for jammed paper behind ...the photoconductor kit and toner cartridge" on page 7. If the jam cannot be grasped and pulled straight out. Clearing jams 9 Clearing jams behind the rear door If the paper is not exiting the printer: 1 Push...
User Guide
Page 3
......40 Configuring Universal paper settings...40 Loading the standard 250-sheet tray...40 Loading the optional 250- or 550-sheet tray 45 Using the manual feeder...46 Using the standard exit bin and paper stop 47 Linking and unlinking trays...48 Linking trays...48 Unlinking trays ...48 Assigning a... Paper types and weights supported by the printer 54 Printing...56 Printing a document...56 Printing a document ...56 Printing on both sides of the paper...57 Printing on both sides of the paper ...57 Printing on both sides of the paper manually 57 Printing specialty documents...59 Tips on using ...
......40 Configuring Universal paper settings...40 Loading the standard 250-sheet tray...40 Loading the optional 250- or 550-sheet tray 45 Using the manual feeder...46 Using the standard exit bin and paper stop 47 Linking and unlinking trays...48 Linking trays...48 Unlinking trays ...48 Assigning a... Paper types and weights supported by the printer 54 Printing...56 Printing a document...56 Printing a document ...56 Printing on both sides of the paper...57 Printing on both sides of the paper ...57 Printing on both sides of the paper manually 57 Printing specialty documents...59 Tips on using ...
User Guide
Page 5
Administrative support 93 Finding advanced networking and administrator information 93 Restoring the factory default settings...93 Clearing jams 94 Avoiding jams...94 Accessing jam areas...94 Understanding jam lights and access locations 95 Clearing jams behind the photoconductor kit and toner cartridge 99 Clearing jams from the standard exit bin 101 Clearing jams from Tray 1...101 Clearing jams from Tray 2...103 Clearing jams in the manual feeder...104 Clearing jams behind the rear door...105 Troubleshooting 107 Understanding printer messages...107 Close door ...107 Load with
Administrative support 93 Finding advanced networking and administrator information 93 Restoring the factory default settings...93 Clearing jams 94 Avoiding jams...94 Accessing jam areas...94 Understanding jam lights and access locations 95 Clearing jams behind the photoconductor kit and toner cartridge 99 Clearing jams from the standard exit bin 101 Clearing jams from Tray 1...101 Clearing jams from Tray 2...103 Clearing jams in the manual feeder...104 Clearing jams behind the rear door...105 Troubleshooting 107 Understanding printer messages...107 Close door ...107 Load with

User Guide
Page 12
1 Front door release button 2 Paper stop 3 Standard exit bin 4 Printer control panel 5 System board door 6 Standard 250-sheet tray (Tray 1) 7 Manual feeder door 8 Front door The following illustration shows the printer back with its basic features or parts: Learning about the printer 12
1 Front door release button 2 Paper stop 3 Standard exit bin 4 Printer control panel 5 System board door 6 Standard 250-sheet tray (Tray 1) 7 Manual feeder door 8 Front door The following illustration shows the printer back with its basic features or parts: Learning about the printer 12

User Guide
Page 14
or 550-sheet drawer (Tray 2) 8 Manual feeder door 9 Front door Understanding the printer control panel The printer control panel features six lights and two buttons. Learning about the printer 14 1 Front door release button 2 Paper stop 3 Standard exit bin 4 Printer control panel 5 System board door 6 Standard 250-sheet tray (Tray 1) 7 Optional 250-
or 550-sheet drawer (Tray 2) 8 Manual feeder door 9 Front door Understanding the printer control panel The printer control panel features six lights and two buttons. Learning about the printer 14 1 Front door release button 2 Paper stop 3 Standard exit bin 4 Printer control panel 5 System board door 6 Standard 250-sheet tray (Tray 1) 7 Optional 250-

User Guide
Page 24
Updating available options in the printer driver Once the printer software and any options are installed, it may be necessary to manually add the options in the printer driver to the Lexmark Web site at www.lexmark.com. 2 From the Drivers & Downloads menu, click Driver Finder. 3 Select your printer, and then select your operating system. 4 Download the driver...
Updating available options in the printer driver Once the printer software and any options are installed, it may be necessary to manually add the options in the printer driver to the Lexmark Web site at www.lexmark.com. 2 From the Drivers & Downloads menu, click Driver Finder. 3 Select your printer, and then select your operating system. 4 Download the driver...
User Guide
Page 34
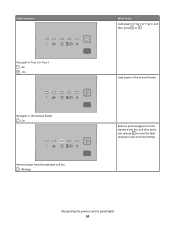
On No paper in the manual feeder. Load paper in the manual feeder - On Remove paper from the standard exit bin, and then press and release to do Load paper in Tray 1 or Tray 2 - Light sequence No paper in Tray 1 or Tray 2, and then press or . Blinking What to clear the light sequence and continue printing. Interpreting the printer control panel lights 34 On - Remove printed pages from the standard exit bin -
On No paper in the manual feeder. Load paper in the manual feeder - On Remove paper from the standard exit bin, and then press and release to do Load paper in Tray 1 or Tray 2 - Light sequence No paper in Tray 1 or Tray 2, and then press or . Blinking What to clear the light sequence and continue printing. Interpreting the printer control panel lights 34 On - Remove printed pages from the standard exit bin -

User Guide
Page 40
Loading the standard 250-sheet tray The printer has two trays to load the 250- If the printer is plain paper, so the paper type setting must be set manually for the tray that do one of the following Universal size settings for Macintosh. Specify all trays that will .... • For Macintosh users, access the Paper menu through the Printer Settings. From the Settings tab, click Paper Menu. and 550-sheet trays, and the manual feeder. If you would like to the printer at a time. If the printer is a user-defined setting that lets you reset factory default settings....
Loading the standard 250-sheet tray The printer has two trays to load the 250- If the printer is plain paper, so the paper type setting must be set manually for the tray that do one of the following Universal size settings for Macintosh. Specify all trays that will .... • For Macintosh users, access the Paper menu through the Printer Settings. From the Settings tab, click Paper Menu. and 550-sheet trays, and the manual feeder. If you would like to the printer at a time. If the printer is a user-defined setting that lets you reset factory default settings....

User Guide
Page 46
Loading paper and specialty media 46 Notes: • Load letterhead faceup, with the stamp area as shown. Using the manual feeder The manual feeder is lit, load the paper faceup into the center of the manual feeder. You can use the manual feeder to quickly print on paper types or sizes that are not currently loaded in the tray. 1 Open the manual feeder door. 2 When the light is located inside the manual feeder door of the printer and can feed only one sheet of the sheet entering first. • Load envelopes with the flap side down and with the top of paper at a time.
Loading paper and specialty media 46 Notes: • Load letterhead faceup, with the stamp area as shown. Using the manual feeder The manual feeder is lit, load the paper faceup into the center of the manual feeder. You can use the manual feeder to quickly print on paper types or sizes that are not currently loaded in the tray. 1 Open the manual feeder door. 2 When the light is located inside the manual feeder door of the printer and can feed only one sheet of the sheet entering first. • Load envelopes with the flap side down and with the top of paper at a time.

User Guide
Page 47
... as it flips forward. Loading paper and specialty media 47 It collects print jobs facedown. Warning-Potential Damage: Do not force the paper into the manual feeder only to the point where its leading edge can contact the paper guides. 4 Adjust the paper guides to another location, make sure the paper...
... as it flips forward. Loading paper and specialty media 47 It collects print jobs facedown. Warning-Potential Damage: Do not force the paper into the manual feeder only to the point where its leading edge can contact the paper guides. 4 Adjust the paper guides to another location, make sure the paper...

User Guide
Page 50
...(24 lb) or heavier paper. Paper and specialty media guide Paper guidelines Paper capacities The capacities of the trays and the manual feeder are based on the printer at a time. Use paper labels only. Paper characteristics The following paper characteristics affect print quality and reliability. The... manual feeder can automatically feed paper weights up to 90 g/m2 (24 lb bond) grain long paper. Note: Duplex printing is ...
...(24 lb) or heavier paper. Paper and specialty media guide Paper guidelines Paper capacities The capacities of the trays and the manual feeder are based on the printer at a time. Use paper labels only. Paper characteristics The following paper characteristics affect print quality and reliability. The... manual feeder can automatically feed paper weights up to 90 g/m2 (24 lb bond) grain long paper. Note: Duplex printing is ...

User Guide
Page 53
... paper sources and the types of paper they support. Paper and specialty media guide 53 For more information, see the Card Stock & Label Guide. or Manual feeder 250-sheet tray 550-sheet tray Duplex path A4 210 x 297 mm (8.3 x 11.7 in.) A5 148 x 210 mm X (5.8 x 8.3 in.) A61 105 x 148 mm X...grain long papers. 2 This size setting formats the page for 216 x 356 mm (8.5 x 14 in.) unless the size is specified by the printer Paper size Dimensions Standard Optional 250- Note: For an unlisted paper size, select the closest larger listed size. Supported paper sizes, types, and ...
... paper sources and the types of paper they support. Paper and specialty media guide 53 For more information, see the Card Stock & Label Guide. or Manual feeder 250-sheet tray 550-sheet tray Duplex path A4 210 x 297 mm (8.3 x 11.7 in.) A5 148 x 210 mm X (5.8 x 8.3 in.) A61 105 x 148 mm X...grain long papers. 2 This size setting formats the page for 216 x 356 mm (8.5 x 14 in.) unless the size is specified by the printer Paper size Dimensions Standard Optional 250- Note: For an unlisted paper size, select the closest larger listed size. Supported paper sizes, types, and ...

User Guide
Page 54
... Duplex path Letterhead Preprinted Colored Paper Card stock X X X Glossy paper X X X X Paper labels1 X Paper and specialty media guide 54 or Manual feeder 250-sheet tray 550-sheet tray Duplex path DL Envelope 110 x 220 mm X X X (4.3 x 8.7 in.) 7 3/4 Envelope 98 x 191 mm X X X (Monarch) (3.9 x 7.5 in.) 9 Envelope 98 x... weights supported by the software application. 3If a paper size you want to use is specified by the printer The printer engine and the duplex path support 60-90 g/m2 (16-24 lb) paper weights. Paper size Dimensions Standard Optional 250-
... Duplex path Letterhead Preprinted Colored Paper Card stock X X X Glossy paper X X X X Paper labels1 X Paper and specialty media guide 54 or Manual feeder 250-sheet tray 550-sheet tray Duplex path DL Envelope 110 x 220 mm X X X (4.3 x 8.7 in.) 7 3/4 Envelope 98 x 191 mm X X X (Monarch) (3.9 x 7.5 in.) 9 Envelope 98 x... weights supported by the software application. 3If a paper size you want to use is specified by the printer The printer engine and the duplex path support 60-90 g/m2 (16-24 lb) paper weights. Paper size Dimensions Standard Optional 250-

User Guide
Page 107
...the following: • Load the paper tray or other source with the correct paper type and size. • Cancel the current job. The printer manually overrides the request, and then prints from an automatically selected tray. • Cancel the current job. Load with Try one or more of ...the following : • Load the manual feeder with the correct paper type and size. • Press to continue printing. Load with Try one or more of the following : • ...
...the following: • Load the paper tray or other source with the correct paper type and size. • Cancel the current job. The printer manually overrides the request, and then prints from an automatically selected tray. • Cancel the current job. Load with Try one or more of ...the following : • Load the manual feeder with the correct paper type and size. • Press to continue printing. Load with Try one or more of the following : • ...

User Guide
Page 108
...with Try one or more of paper from the standard exit bin. 31 Defective cartridge The toner cartridge is not functioning properly. The printer manually overrides the request, and then paper prints from an automatically selected tray. • Cancel the current job. Remove paper from standard ...correct paper type and size. • Press to continue printing. Troubleshooting 108 Load manual feeder with Try one or more of the following: • Turn the printer off, and then remove extra flash options: 1 Turn the printer off. 2 Unplug the power cord from the wall outlet. 3 Remove the ...
...with Try one or more of paper from the standard exit bin. 31 Defective cartridge The toner cartridge is not functioning properly. The printer manually overrides the request, and then paper prints from an automatically selected tray. • Cancel the current job. Remove paper from standard ...correct paper type and size. • Press to continue printing. Troubleshooting 108 Load manual feeder with Try one or more of the following: • Turn the printer off, and then remove extra flash options: 1 Turn the printer off. 2 Unplug the power cord from the wall outlet. 3 Remove the ...


