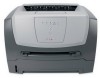

Quick Reference
Page 6
... the front door. 3 Press Continue as you loaded. Restoring factory defaults Sometimes restoring the printer to the original factory default settings solves formatting problems. To reset the factory defaults: 1 Turn off the printer, unplug the power cord from the wall outlet, and reinstall the option. - button from your computer 1 Click Start Æ Settings...
... the front door. 3 Press Continue as you loaded. Restoring factory defaults Sometimes restoring the printer to the original factory default settings solves formatting problems. To reset the factory defaults: 1 Turn off the printer, unplug the power cord from the wall outlet, and reinstall the option. - button from your computer 1 Click Start Æ Settings...
Quick Reference
Page 13
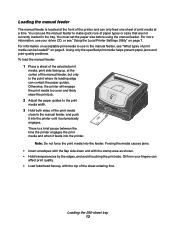
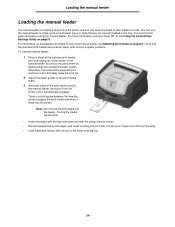
...paper guides. Using only the specified print media helps prevent paper jams and print-quality problems. To load the manual feeder: 1 Place a sheet of the selected print media, print side facing up, at a time. Otherwise, the printer will engage the print media too soon and likely skew the print job. 2 ...area as shown. • Hold transparencies by the edges, and avoid touching the print side. Note: Do not force the print media into the printer. You can be loaded?" Forcing the media causes jams. • Insert envelopes with the flap side down and with the top of print media ...
...paper guides. Using only the specified print media helps prevent paper jams and print-quality problems. To load the manual feeder: 1 Place a sheet of the selected print media, print side facing up, at a time. Otherwise, the printer will engage the print media too soon and likely skew the print job. 2 ...area as shown. • Hold transparencies by the edges, and avoid touching the print side. Note: Do not force the print media into the printer. You can be loaded?" Forcing the media causes jams. • Insert envelopes with the flap side down and with the top of print media ...
User's Guide
Page 4
... General problems ...85 Lexmark Status Messenger Utility ...86 Selecting printer operating mode ...86 Turning on Reduced Curl mode ...86 Print quality problems ...87 Cleaning the printhead lens ...91 Notices ...93 Conventions ...93 Electronic emission notices ...93 Noise emission levels ...95 Product energy consumption ...95 Waste from Electrical and Electronic Equipment (WEEE) directive 96 Laser notice...
... General problems ...85 Lexmark Status Messenger Utility ...86 Selecting printer operating mode ...86 Turning on Reduced Curl mode ...86 Print quality problems ...87 Cleaning the printhead lens ...91 Notices ...93 Conventions ...93 Electronic emission notices ...93 Noise emission levels ...95 Product energy consumption ...95 Waste from Electrical and Electronic Equipment (WEEE) directive 96 Laser notice...
User's Guide
Page 12
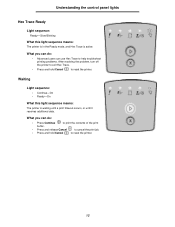
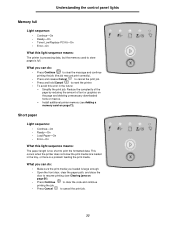
... use Hex Trace to help troubleshoot printing problems. After resolving the problem, turn off the printer to exit Hex Trace. • Press and hold Cancel to reset the printer. Waiting Light sequence: • Continue-On • Ready-On What this light sequence means: The printer is in the Ready mode, and Hex...of the print buffer. • Press and release Cancel to cancel the print job. • Press and hold Cancel to reset the printer. 12 Understanding the control panel lights Hex Trace Ready Light sequence: Ready-Slow Blinking What this light sequence means: The...
... use Hex Trace to help troubleshoot printing problems. After resolving the problem, turn off the printer to exit Hex Trace. • Press and hold Cancel to reset the printer. Waiting Light sequence: • Continue-On • Ready-On What this light sequence means: The printer is in the Ready mode, and Hex...of the print buffer. • Press and release Cancel to cancel the print job. • Press and hold Cancel to reset the printer. 12 Understanding the control panel lights Hex Trace Ready Light sequence: Ready-Slow Blinking What this light sequence means: The...

User's Guide
Page 21
... printed pages from the output bin. • Press Continue to cancel the print job. This occurs when the printer does not know the print media size loaded in the tray, or when there is a problem feeding the print media. What you loaded is large enough. • Open the front door, clear the...
... printed pages from the output bin. • Press Continue to cancel the print job. This occurs when the printer does not know the print media size loaded in the tray, or when there is a problem feeding the print media. What you loaded is large enough. • Open the front door, clear the...
User's Guide
Page 33
...8226; Error-On What this light sequence means: The paper length is too short to print the formatted data. Simplify the print job. Install additional printer memory (see Clearing jams on page56). • Press Continue to clear the code and continue printing the job. • Press Cancel to resume ...printing (see Adding a memory card on the page and deleting unnecessary downloaded fonts or macros. - What you loaded is a problem feeding the print media. This occurs when the printer does not know the print media size loaded in the future: -
...8226; Error-On What this light sequence means: The paper length is too short to print the formatted data. Simplify the print job. Install additional printer memory (see Clearing jams on page56). • Press Continue to clear the code and continue printing the job. • Press Cancel to resume ...printing (see Adding a memory card on the page and deleting unnecessary downloaded fonts or macros. - What you loaded is a problem feeding the print media. This occurs when the printer does not know the print media size loaded in the future: -
User's Guide
Page 37
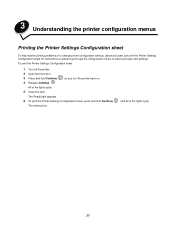
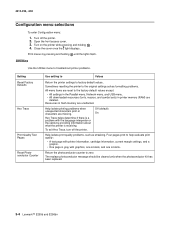
3 Understanding the printer configuration menus Printing the Printer Settings Configuration sheet To help resolve printing problems or to select and save new settings. The Ready light appears. 6 To print the Printer Settings Configuration sheet, press and hold Continue as you turn the printer back on advancing through the configuration menus to change printer configuration settings, advanced users...
3 Understanding the printer configuration menus Printing the Printer Settings Configuration sheet To help resolve printing problems or to select and save new settings. The Ready light appears. 6 To print the Printer Settings Configuration sheet, press and hold Continue as you turn the printer back on advancing through the configuration menus to change printer configuration settings, advanced users...
User's Guide
Page 40
... run at full speed and • Full-The printer forces the USB port to run at full also disables its hi-speed capabilities. • Auto* Utilities menu Use the Utilities menu to troubleshoot printer problems. Setting Reset Factory Defaults Reset Maint Cnt Reset Photoconductor... Counter Hex Trace Print Quality Test Pages * Factory default Use this setting to Values Return your printer is a problem with the language interpreter or the cable by ...
... run at full speed and • Full-The printer forces the USB port to run at full also disables its hi-speed capabilities. • Auto* Utilities menu Use the Utilities menu to troubleshoot printer problems. Setting Reset Factory Defaults Reset Maint Cnt Reset Photoconductor... Counter Hex Trace Print Quality Test Pages * Factory default Use this setting to Values Return your printer is a problem with the language interpreter or the cable by ...

User's Guide
Page 43
... Ethernet connect 4 Dust cover (not available for some models) Selecting print media Selecting the appropriate paper or other print media reduces printing problems. The following sections contain guidelines for choosing the correct print media for general business use 75 g/m2 (20 lb) xerographic, grain long...consider the weight, fiber content, and color. 43 Note: Certain paper types will not print at maximum speed. Business papers designed for the printer: • Paper • Transparencies • Envelopes • Labels • Card stock Paper To ensure the best print quality and ...
... Ethernet connect 4 Dust cover (not available for some models) Selecting print media Selecting the appropriate paper or other print media reduces printing problems. The following sections contain guidelines for choosing the correct print media for general business use 75 g/m2 (20 lb) xerographic, grain long...consider the weight, fiber content, and color. 43 Note: Certain paper types will not print at maximum speed. Business papers designed for the printer: • Paper • Transparencies • Envelopes • Labels • Card stock Paper To ensure the best print quality and ...
User's Guide
Page 44
...ability of the paper. Moisture content The amount of moisture in a sheet of material. When loading paper, note the recommended print side on the Lexmark Web site at its edges. Only A4-, letter-, legal- Smoothness needs to 90g/m 2 (24lb bond). Extend the time several days if ...points produces the best print quality. Excessive curl can cause paper feeding problems. Curl can cause paper feeding or print quality issues. If the paper is too smooth, it in the same environment as the printer for laser printers. however, smoothness between 100 and 300 Sheffield points; Leave the ...
...ability of the paper. Moisture content The amount of moisture in a sheet of material. When loading paper, note the recommended print side on the Lexmark Web site at its edges. Only A4-, letter-, legal- Smoothness needs to 90g/m 2 (24lb bond). Extend the time several days if ...points produces the best print quality. Excessive curl can cause paper feeding problems. Curl can cause paper feeding or print quality issues. If the paper is too smooth, it in the same environment as the printer for laser printers. however, smoothness between 100 and 300 Sheffield points; Leave the ...
User's Guide
Page 45
...the printer fuser • Preprinted papers that can adjust registration with rough or heavily textured surfaces. Preprinted papers such as optical character recognition (OCR) forms In some cases, you are not affected by the resin in doubt, contact your paper supplier. Recycled paper Lexmark ... performance claims from 100% chemically pulped wood. Use papers printed with a high degree of recycled papers in fewer paper feeding problems and better print quality. Selecting print media Fiber content Most high-quality xerographic paper is made from your program to successfully print...
...the printer fuser • Preprinted papers that can adjust registration with rough or heavily textured surfaces. Preprinted papers such as optical character recognition (OCR) forms In some cases, you are not affected by the resin in doubt, contact your paper supplier. Recycled paper Lexmark ... performance claims from 100% chemically pulped wood. Use papers printed with a high degree of recycled papers in fewer paper feeding problems and better print quality. Selecting print media Fiber content Most high-quality xerographic paper is made from your program to successfully print...

User's Guide
Page 46
Selecting print media Transparencies • Use transparencies designed specifically for A4-size transparencies. • To prevent print-quality problems, avoid getting fingerprints on the sheets. • Do not print a large number of labels continuously. • Do not use envelopes that can ...a time. • A combination of 210°C (410°F) without : - excessive curling - Labels • Do not use labels that have any way - We recommend Lexmark laser printer transparencies: part number 70X7240 for letter-size transparencies; Have excessive curl - wrinkling -
Selecting print media Transparencies • Use transparencies designed specifically for A4-size transparencies. • To prevent print-quality problems, avoid getting fingerprints on the sheets. • Do not print a large number of labels continuously. • Do not use envelopes that can ...a time. • A combination of 210°C (410°F) without : - excessive curling - Labels • Do not use labels that have any way - We recommend Lexmark laser printer transparencies: part number 70X7240 for letter-size transparencies; Have excessive curl - wrinkling -
User's Guide
Page 47
... (70°F) and the relative humidity is recommended. Storing supplies Choose a cool, clean storage area for printer supplies. Do not expose supplies to avoid paper feeding problems and uneven print quality: • Store paper in their original packaging until needed. Preprinting introduces semi-liquid ...and volatile components into the printer. • Use card stock with a maximum weight of 163g/m2 (43 lb). ...
... (70°F) and the relative humidity is recommended. Storing supplies Choose a cool, clean storage area for printer supplies. Do not expose supplies to avoid paper feeding problems and uneven print quality: • Store paper in their original packaging until needed. Preprinting introduces semi-liquid ...and volatile components into the printer. • Use card stock with a maximum weight of 163g/m2 (43 lb). ...
User's Guide
Page 54
... the manual feeder to make quick runs of paper types or sizes that are not currently loaded in the manual feeder, see Using the Local Printer Settings Utility on page43. Oil from your driver CD, or see Selecting print media on page75. You can use in the tray. Forcing the .... • Hold transparencies by the edges, and avoid touching the print side. Using only the specified print media helps prevent paper jams and print-quality problems. To load the manual feeder: 1 Place a sheet of the selected print media, print side facing up, at a time. There is located at the front of...
... the manual feeder to make quick runs of paper types or sizes that are not currently loaded in the manual feeder, see Using the Local Printer Settings Utility on page43. Oil from your driver CD, or see Selecting print media on page75. You can use in the tray. Forcing the .... • Hold transparencies by the edges, and avoid touching the print side. Using only the specified print media helps prevent paper jams and print-quality problems. To load the manual feeder: 1 Place a sheet of the selected print media, print side facing up, at a time. There is located at the front of...
User's Guide
Page 82
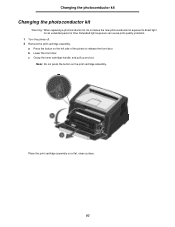
... the photoconductor kit Warning: When replacing a photoconductor kit, do not leave the new photoconductor kit exposed to direct light for an extended period of the printer to release the front door. Place the print cartridge assembly on the print cartridge assembly. Note: Do not press the button on a flat, clean surface... left side of time. b Lower the front door. c Grasp the toner cartridge handle, and pull up and out. Extended light exposure can cause print quality problems. 1 Turn the printer off. 2 Remove the print cartridge assembly.
... the photoconductor kit Warning: When replacing a photoconductor kit, do not leave the new photoconductor kit exposed to direct light for an extended period of the printer to release the front door. Place the print cartridge assembly on the print cartridge assembly. Note: Do not press the button on a flat, clean surface... left side of time. b Lower the front door. c Grasp the toner cartridge handle, and pull up and out. Extended light exposure can cause print quality problems. 1 Turn the printer off. 2 Remove the print cartridge assembly.
User's Guide
Page 85
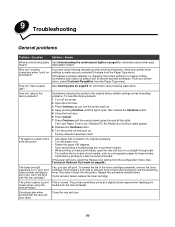
...on page86.). How do I print on page8 for laser printers. • If possible try changing the texture setting to put in a less humid environment. Yes, you turn the printer back on , but I don't have been reset. The printer sometimes prints at a slightly slower speed when feeding print... life of print media, such as you can still print. Why am I missing characters when I clear a paper jam? 9 Troubleshooting General problems Problem / Question Solution / Answer What do the blinking lights See Understanding the control panel lights on envelopes? If Envelope is on . 4 Keep ...
...on page86.). How do I print on page8 for laser printers. • If possible try changing the texture setting to put in a less humid environment. Yes, you turn the printer back on , but I don't have been reset. The printer sometimes prints at a slightly slower speed when feeding print... life of print media, such as you can still print. Why am I missing characters when I clear a paper jam? 9 Troubleshooting General problems Problem / Question Solution / Answer What do the blinking lights See Understanding the control panel lights on envelopes? If Envelope is on . 4 Keep ...
User's Guide
Page 86
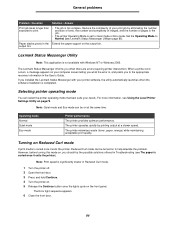
.... • The job is completed. Set the Operating Mode to help alleviate the problem. Lexmark Status Messenger Utility Note: This application is , and points you what the error is not available with Windows NT or Windows 2000. The printer operates quietly by eliminating the number and size of fonts, the number and complexity...
.... • The job is completed. Set the Operating Mode to help alleviate the problem. Lexmark Status Messenger Utility Note: This application is , and points you what the error is not available with Windows NT or Windows 2000. The printer operates quietly by eliminating the number and size of fonts, the number and complexity...
Service Manual
Page 14
Special tools and test equipment are working. Definitions Note: A note provides additional information. CAUTION: When you see this symbol, there is divided into the following chapters: 1. Diagnostic information contains an error indicator table, symptom tables, and service checks used to locate or repeat symptoms of printer problems... danger from hazardous voltage in the area of the printer and the maintenance approach used to isolate failing field replaceable units (FRUs). 3. xiv Lexmark™ E250d and E250dn General information contains a general description of the product ...
Special tools and test equipment are working. Definitions Note: A note provides additional information. CAUTION: When you see this symbol, there is divided into the following chapters: 1. Diagnostic information contains an error indicator table, symptom tables, and service checks used to locate or repeat symptoms of printer problems... danger from hazardous voltage in the area of the printer and the maintenance approach used to isolate failing field replaceable units (FRUs). 3. xiv Lexmark™ E250d and E250dn General information contains a general description of the product ...

Service Manual
Page 53
This topic provides a list of the printer and indicates possible printer problems that must be visible only in the print history in the source tray. perhaps due to media pre-staged in the diagnostic mode for E250d and E250dn. The input sensor is covered when the media is not ... light patterns describing the current state of all printer messages and explains what they mean. The main input sensor never became uncovered from the sheet ahead. UNRECOVERABLE NO GAP JAM. Possible causes include multi-sheet feed, tray size sensing problem, and media slippage. Potential causes are a ...
This topic provides a list of the printer and indicates possible printer problems that must be visible only in the print history in the source tray. perhaps due to media pre-staged in the diagnostic mode for E250d and E250dn. The input sensor is covered when the media is not ... light patterns describing the current state of all printer messages and explains what they mean. The main input sensor never became uncovered from the sheet ahead. UNRECOVERABLE NO GAP JAM. Possible causes include multi-sheet feed, tray size sensing problem, and media slippage. Potential causes are a ...
Service Manual
Page 82
... photoconductor kit has been replaced. 3-4 Lexmark™ E250d and E250dn Turn on the printer while pressing and holding until the lights flash. Help isolate printing problems when unexpected characters print or characters are unaffected. Return the photoconductor counter to factory default values. Utilities Use the Utilities menu to troubleshoot printer problems. Setting Reset Factory Defaults Hex...
... photoconductor kit has been replaced. 3-4 Lexmark™ E250d and E250dn Turn on the printer while pressing and holding until the lights flash. Help isolate printing problems when unexpected characters print or characters are unaffected. Return the photoconductor counter to factory default values. Utilities Use the Utilities menu to troubleshoot printer problems. Setting Reset Factory Defaults Hex...


