Quick Reference
Page 3
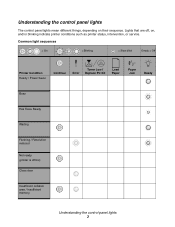
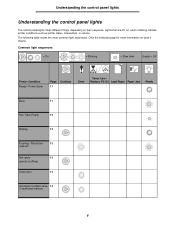
... Kit Load Paper Paper Jam Ready Busy Hex Trace Ready Waiting Flushing / Resolution reduced Not ready (printer is offline) Close door Insufficient collation area / Insufficient memory Understanding the control panel lights 3
... Kit Load Paper Paper Jam Ready Busy Hex Trace Ready Waiting Flushing / Resolution reduced Not ready (printer is offline) Close door Insufficient collation area / Insufficient memory Understanding the control panel lights 3

Quick Reference
Page 6
Verify that the paper trays are configured for the sizes and types of memory installed is not listed under "Installed Features." Printing a test page from the wall outlet, and reinstall the option. - Restoring factory defaults Sometimes restoring the printer ...
Verify that the paper trays are configured for the sizes and types of memory installed is not listed under "Installed Features." Printing a test page from the wall outlet, and reinstall the option. - Restoring factory defaults Sometimes restoring the printer ...
Quick Reference
Page 18
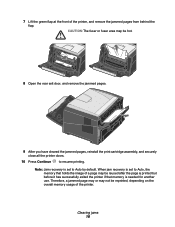
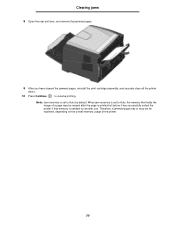
... holds the image of a page may be reused after the page is printed but before it has successfully exited the printer if that memory is set to Auto by default. 7 Lift the green flap at the front of the printer. When jam recovery is needed for another use. Clearing ...jams 18 Therefore, a jammed page may or may be reprinted, depending on the overall memory usage of the printer, and remove the jammed pages from behind the flap. CAUTION:The fuser or fuser area may not be hot. 8 Open the...
... holds the image of a page may be reused after the page is printed but before it has successfully exited the printer if that memory is set to Auto by default. 7 Lift the green flap at the front of the printer. When jam recovery is needed for another use. Clearing ...jams 18 Therefore, a jammed page may or may be reprinted, depending on the overall memory usage of the printer, and remove the jammed pages from behind the flap. CAUTION:The fuser or fuser area may not be hot. 8 Open the...
User's Guide
Page 4
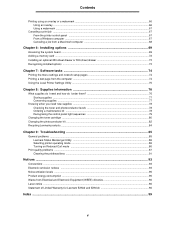
... ...67 From a Windows computer ...67 Canceling a job from a Macintosh computer 68 Chapter 6: Installing options 69 Accessing the system board ...69 Adding a memory card ...72 Installing an optional 250-sheet drawer or 550-sheet drawer 73 Recognizing installed options ...73 Chapter 7: Software tasks 74 Printing the menu settings... ...93 Electronic emission notices ...93 Noise emission levels ...95 Product energy consumption ...95 Waste from Electrical and Electronic Equipment (WEEE) directive 96 Laser notice ...96 Statement of Limited Warranty for Lexmark E250d and E250dn 96 Index ...99 4
... ...67 From a Windows computer ...67 Canceling a job from a Macintosh computer 68 Chapter 6: Installing options 69 Accessing the system board ...69 Adding a memory card ...72 Installing an optional 250-sheet drawer or 550-sheet drawer 73 Recognizing installed options ...73 Chapter 7: Software tasks 74 Printing the menu settings... ...93 Electronic emission notices ...93 Noise emission levels ...95 Product energy consumption ...95 Waste from Electrical and Electronic Equipment (WEEE) directive 96 Laser notice ...96 Statement of Limited Warranty for Lexmark E250d and E250dn 96 Index ...99 4
User's Guide
Page 8
... 11 Hex Trace Ready 12 Waiting 12 Flushing / Resolution 13 reduced Not ready 13 (printer is offline) Close door 14 Insufficient collation area 14 / Insufficient memory 8 Lights that are off, on, and/or blinking indicate printer conditions such as printer status, intervention, or service.
... 11 Hex Trace Ready 12 Waiting 12 Flushing / Resolution 13 reduced Not ready 13 (printer is offline) Close door 14 Insufficient collation area 14 / Insufficient memory 8 Lights that are off, on, and/or blinking indicate printer conditions such as printer status, intervention, or service.
User's Guide
Page 13
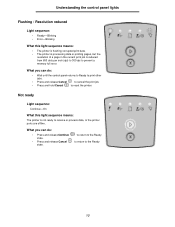
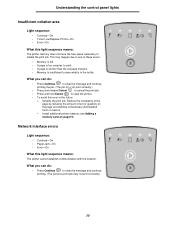
...; Ready-Blinking • Error-Blinking What this light sequence means: The printer is reduced from 600 dots per inch (dpi) to 300 dpi to prevent a memory full error.
...; Ready-Blinking • Error-Blinking What this light sequence means: The printer is reduced from 600 dots per inch (dpi) to 300 dpi to prevent a memory full error.
User's Guide
Page 14
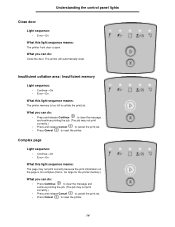
...panel lights Close door Light sequence: • Error-On What this light sequence means: The printer front door is , too large for the printer memory). What you can do: • Press and release Continue to clear the message and continue printing the job. (The job may not print ...job. (The job may not print correctly because the print information on the page is too complex (that is open. Insufficient collation area / Insufficient memory Light sequence: • Continue-On • Error-On What this light sequence means: The page may not print correctly.) • Press and ...
...panel lights Close door Light sequence: • Error-On What this light sequence means: The printer front door is , too large for the printer memory). What you can do: • Press and release Continue to clear the message and continue printing the job. (The job may not print ...job. (The job may not print correctly because the print information on the page is too complex (that is open. Insufficient collation area / Insufficient memory Light sequence: • Continue-On • Error-On What this light sequence means: The page may not print correctly.) • Press and ...

User's Guide
Page 20
... printer error Light sequence: • Continue-On • Paper Jam-On What this light sequence means: The printer has one of the following errors: • Memory is full, insufficient to save what is in the buffer. • A page is too complex to print or is shorter than the set page margins...
... printer error Light sequence: • Continue-On • Paper Jam-On What this light sequence means: The printer has one of the following errors: • Memory is full, insufficient to save what is in the buffer. • A page is too complex to print or is shorter than the set page margins...
User's Guide
Page 23
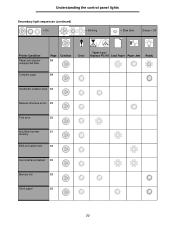
Understanding the control panel lights Secondary light sequences (continued) = On = Blinking = Slow blink Empty = Off Printer Condition Paper jam (duplex unsupported size) Page Continue 28 Error Toner Low / Replace PC Kit Load Paper Paper Jam Ready Complex page 29 Insufficient collation area 32 Network interface errors 32 Font error 32 Insufficient printer 31 memory ENA connection lost 32 Host interface disabled 32 Memory full 33 Short paper 33 23
Understanding the control panel lights Secondary light sequences (continued) = On = Blinking = Slow blink Empty = Off Printer Condition Paper jam (duplex unsupported size) Page Continue 28 Error Toner Low / Replace PC Kit Load Paper Paper Jam Ready Complex page 29 Insufficient collation area 32 Network interface errors 32 Font error 32 Insufficient printer 31 memory ENA connection lost 32 Host interface disabled 32 Memory full 33 Short paper 33 23

User's Guide
Page 29
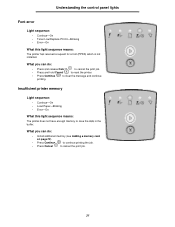
What you can do: • Press Continue to On in the future: - Install additional printer memory (see Adding a memory card on the page is too complex (that is, too large for the printer memory). Set Page Protect to clear the error code and continue processing the print job (some of text or graphics on...
What you can do: • Press Continue to On in the future: - Install additional printer memory (see Adding a memory card on the page is too complex (that is, too large for the printer memory). Set Page Protect to clear the error code and continue processing the print job (some of text or graphics on...
User's Guide
Page 30
...sequence: • Continue-On • Toner Low/Replace PC Kit-On • Error-On What this light sequence means: The printer memory does not have the free space necessary to reset the printer. • To avoid this light sequence means: The printer cannot establish communication... with the network. Install additional printer memory (see Adding a memory card on the page and deleting unnecessary downloaded fonts or macros. - Reduce the complexity of the page by reducing the amount ...
...sequence: • Continue-On • Toner Low/Replace PC Kit-On • Error-On What this light sequence means: The printer memory does not have the free space necessary to reset the printer. • To avoid this light sequence means: The printer cannot establish communication... with the network. Install additional printer memory (see Adding a memory card on the page and deleting unnecessary downloaded fonts or macros. - Reduce the complexity of the page by reducing the amount ...
User's Guide
Page 31
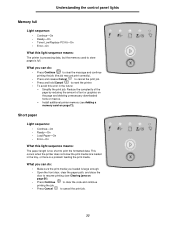
Insufficient printer memory Light sequence: • Continue-On • Load Paper-Blinking • Error-On What this light sequence means: The printer ... the printer. • Press Continue to clear the message and continue printing. What you can do : • Install additional memory (see Adding a memory card on page72). • Press Continue to continue printing the job. • Press Cancel to save the data in the buffer... Low/Replace PC Kit-Blinking • Error-On What this light sequence means: The printer does not have enough memory to cancel the print job. 31
Insufficient printer memory Light sequence: • Continue-On • Load Paper-Blinking • Error-On What this light sequence means: The printer ... the printer. • Press Continue to clear the message and continue printing. What you can do : • Install additional memory (see Adding a memory card on page72). • Press Continue to continue printing the job. • Press Cancel to save the data in the buffer... Low/Replace PC Kit-Blinking • Error-On What this light sequence means: The printer does not have enough memory to cancel the print job. 31
User's Guide
Page 33
... Open the front door, clear the paper path, and close the door to resume printing (see Adding a memory card on the page and deleting unnecessary downloaded fonts or macros. - Understanding the control panel lights Memory full Light sequence: • Continue-On • Ready-On • Toner Low/Replace PC Kit-On ...• Error-On What this light sequence means: The printer is processing data, but the memory used to store pages is too short to print the formatted data. Reduce the complexity of the page by reducing the amount of text or...
... Open the front door, clear the paper path, and close the door to resume printing (see Adding a memory card on the page and deleting unnecessary downloaded fonts or macros. - Understanding the control panel lights Memory full Light sequence: • Continue-On • Ready-On • Toner Low/Replace PC Kit-On ...• Error-On What this light sequence means: The printer is processing data, but the memory used to store pages is too short to print the formatted data. Reduce the complexity of the page by reducing the amount of text or...
User's Guide
Page 40
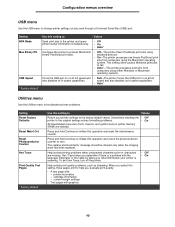
... USB menu Use the USB menu to the original settings solves formatting problems. • On All downloaded resources (fonts, macros, and symbol sets) in printer memory (RAM) are missing. Sometimes resetting the • Off* printer to change printer settings on jobs sent through a Universal Serial Bus (USB) port. Hex Trace helps...
... USB menu Use the USB menu to the original settings solves formatting problems. • On All downloaded resources (fonts, macros, and symbol sets) in printer memory (RAM) are missing. Sometimes resetting the • Off* printer to change printer settings on jobs sent through a Universal Serial Bus (USB) port. Hex Trace helps...
User's Guide
Page 59
... may not be reused after the page is printed but before it has successfully exited the printer if that memory is needed for another use. When jam recovery is set to Auto, the memory that holds the image of the printer. 59 Clearing jams 8 Open the rear exit door, and remove the...
... may not be reused after the page is printed but before it has successfully exited the printer if that memory is needed for another use. When jam recovery is set to Auto, the memory that holds the image of the printer. 59 Clearing jams 8 Open the rear exit door, and remove the...
User's Guide
Page 66
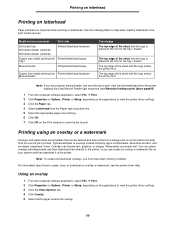
.... Typical examples of the tray / drawer. You can create overlays and watermarks and then download them directly to the printer, or you must have flash memory installed. Printing on letterhead Printing on letterhead Page orientation is important when printing on the application) to print. The top edge of the sheet with...
.... Typical examples of the tray / drawer. You can create overlays and watermarks and then download them directly to the printer, or you must have flash memory installed. Printing on letterhead Printing on letterhead Page orientation is important when printing on the application) to print. The top edge of the sheet with...

User's Guide
Page 69
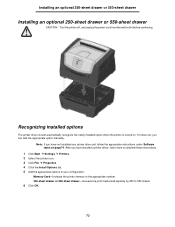
CAUTION: Turn the printer off, and unplug the power cord from the wall outlet before continuing. 1 Remove the 250-sheet tray. 69 6 Installing options Accessing the system board To install memory, you must access the printer system board.
CAUTION: Turn the printer off, and unplug the power cord from the wall outlet before continuing. 1 Remove the 250-sheet tray. 69 6 Installing options Accessing the system board To install memory, you must access the printer system board.

User's Guide
Page 72
... exit. 9 Close the front door. 10 See Recognizing installed options on page73 . 72 CAUTION: If you touch a memory card. Memory options designed for other Lexmark printers may be required to 64MB of additional memory (for an optional memory card. The printer can support up the printer, turn the printer off, and unplug the power cord...
... exit. 9 Close the front door. 10 See Recognizing installed options on page73 . 72 CAUTION: If you touch a memory card. Memory options designed for other Lexmark printers may be required to 64MB of additional memory (for an optional memory card. The printer can support up the printer, turn the printer off, and unplug the power cord...
User's Guide
Page 73
If it does not, you have not installed your configuration: Memory Card-Increase the printer memory to the appropriate number. 250-sheet drawer or 550-sheet drawer-Increase the print media load capacity by 250 to 550 sheets. 6 Click OK. 73 ...
If it does not, you have not installed your configuration: Memory Card-Increase the printer memory to the appropriate number. 250-sheet drawer or 550-sheet drawer-Increase the print media load capacity by 250 to 550 sheets. 6 Click OK. 73 ...

User's Guide
Page 74
... printer. 3 Click File à Properties. 4 Click Print Test Page. 74 Verify the amount of paper you installed are configured for the sizes and types of memory installed is not listed under "Printer Information." - Printing a test page from the Ready state. On the menu settings page: -
... printer. 3 Click File à Properties. 4 Click Print Test Page. 74 Verify the amount of paper you installed are configured for the sizes and types of memory installed is not listed under "Printer Information." - Printing a test page from the Ready state. On the menu settings page: -


