User Guide
Page 3
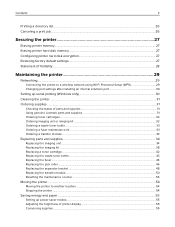
... Ordering supplies...31 Checking the status of parts and supplies ...31 Using genuine Lexmark parts and supplies ...31 Ordering toner cartridges ...32 Ordering imaging unit or imaging kit ...32 Ordering a waste toner bottle...33 Ordering a fuser maintenance kit ...33 Ordering a transfer module ...33... Replacing parts and supplies...34 Replacing the imaging unit ...34 Replacing the imaging kit...38 Replacing a toner cartridge ...42 Replacing the waste toner bottle ...43 Replacing the fuser ...44 Replacing the pick roller...46 Replacing the separator bracket ...48 Replacing the ...
... Ordering supplies...31 Checking the status of parts and supplies ...31 Using genuine Lexmark parts and supplies ...31 Ordering toner cartridges ...32 Ordering imaging unit or imaging kit ...32 Ordering a waste toner bottle...33 Ordering a fuser maintenance kit ...33 Ordering a transfer module ...33... Replacing parts and supplies...34 Replacing the imaging unit ...34 Replacing the imaging kit...38 Replacing a toner cartridge ...42 Replacing the waste toner bottle ...43 Replacing the fuser ...44 Replacing the pick roller...46 Replacing the separator bracket ...48 Replacing the ...
User Guide
Page 32
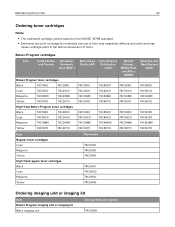
... before exhaustion of Europe, Middle East, and Africa (EMEA) Australia and New Zealand (ANZ) Return Program toner cartridges Black 74C10K0 74C20K0 74C30K0 74C40K0 74C50K0 74C60K0 Cyan 74C10C0 74C20C0 74C30C0 74C40C0 74C50C0 74C60C0 Magenta 74C10M0 74C20M0 74C30M0... 74C40M0 74C50M0 74C60M0 Yellow 74C10Y0 74C20Y0 74C30Y0 74C40Y0 74C50Y0 74C60Y0 High Yield Return Program toner cartridges Black 74C1HK0 74C2HK0 74C3HK0 74C4HK0 74C5HK0 74C6HK0 Cyan 74C1HC0 74C2HC0 74C3HC0 74C4HC0 74C5HC0 74C6HC0 Magenta 74C1HM0 74C2HM0...
... before exhaustion of Europe, Middle East, and Africa (EMEA) Australia and New Zealand (ANZ) Return Program toner cartridges Black 74C10K0 74C20K0 74C30K0 74C40K0 74C50K0 74C60K0 Cyan 74C10C0 74C20C0 74C30C0 74C40C0 74C50C0 74C60C0 Magenta 74C10M0 74C20M0 74C30M0... 74C40M0 74C50M0 74C60M0 Yellow 74C10Y0 74C20Y0 74C30Y0 74C40Y0 74C50Y0 74C60Y0 High Yield Return Program toner cartridges Black 74C1HK0 74C2HK0 74C3HK0 74C4HK0 74C5HK0 74C6HK0 Cyan 74C1HC0 74C2HC0 74C3HC0 74C4HC0 74C5HC0 74C6HC0 Magenta 74C1HM0 74C2HM0...
User Guide
Page 33
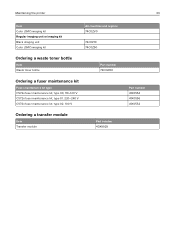
Maintaining the printer 33 Item Color (CMY) imaging kit Regular imaging unit or imaging kit Black imaging unit Color (CMY) imaging kit All countries and regions 74C0ZV0 74C0Z10 74C0Z50 Ordering a waste toner bottle Item Waste toner bottle Part number 74C0W00 Ordering a fuser maintenance kit Fuser maintenance kit type CS72x fuser maintenance kit, type 00, 110-120 V CS72x fuser maintenance kit, type 01, 220-240 V CS72x fuser maintenance kit, type 02, 100 V Ordering a transfer module Item Transfer module Part number 40X9929 Part number 41X0554 41X0556 41X0552
Maintaining the printer 33 Item Color (CMY) imaging kit Regular imaging unit or imaging kit Black imaging unit Color (CMY) imaging kit All countries and regions 74C0ZV0 74C0Z10 74C0Z50 Ordering a waste toner bottle Item Waste toner bottle Part number 74C0W00 Ordering a fuser maintenance kit Fuser maintenance kit type CS72x fuser maintenance kit, type 00, 110-120 V CS72x fuser maintenance kit, type 01, 220-240 V CS72x fuser maintenance kit, type 02, 100 V Ordering a transfer module Item Transfer module Part number 40X9929 Part number 41X0554 41X0556 41X0552
User Guide
Page 34
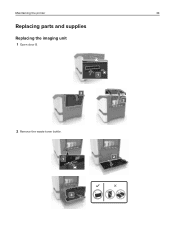
Maintaining the printer 34 Replacing parts and supplies Replacing the imaging unit 1 Open door B. 2 Remove the waste toner bottle.
Maintaining the printer 34 Replacing parts and supplies Replacing the imaging unit 1 Open door B. 2 Remove the waste toner bottle.

User Guide
Page 35
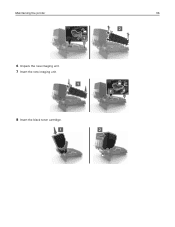
Extended exposure to direct light for more than 10 minutes. Maintaining the printer 35 3 Remove the imaging kit. 4 Remove the black toner cartridge. 5 Remove the imaging unit. Doing so may cause print quality problems. Warning-Potential Damage: Do not touch the shiny photoconductor drum under the imaging kit. Warning-Potential Damage: Do not expose the photoconductor unit to light may affect the quality of future print jobs.
Extended exposure to direct light for more than 10 minutes. Maintaining the printer 35 3 Remove the imaging kit. 4 Remove the black toner cartridge. 5 Remove the imaging unit. Doing so may cause print quality problems. Warning-Potential Damage: Do not touch the shiny photoconductor drum under the imaging kit. Warning-Potential Damage: Do not expose the photoconductor unit to light may affect the quality of future print jobs.
User Guide
Page 36
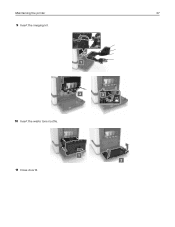
Maintaining the printer 36 6 Unpack the new imaging unit. 7 Insert the new imaging unit. 8 Insert the black toner cartridge.
Maintaining the printer 36 6 Unpack the new imaging unit. 7 Insert the new imaging unit. 8 Insert the black toner cartridge.
User Guide
Page 37
Maintaining the printer 37 9 Insert the imaging kit. 10 Insert the waste toner bottle. 11 Close door B.
Maintaining the printer 37 9 Insert the imaging kit. 10 Insert the waste toner bottle. 11 Close door B.

User Guide
Page 38
Maintaining the printer 38 Replacing the imaging kit 1 Open door B. 2 Remove the waste toner bottle.
Maintaining the printer 38 Replacing the imaging kit 1 Open door B. 2 Remove the waste toner bottle.
User Guide
Page 39
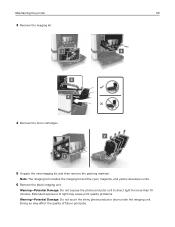
... imaging kit and the cyan, magenta, and yellow developer units. 6 Remove the black imaging unit. Maintaining the printer 39 3 Remove the imaging kit. 4 Remove the toner cartridges. 5 Unpack the new imaging kit, and then remove the packing material. Extended exposure to direct light for more than 10 minutes. Warning-Potential Damage...
... imaging kit and the cyan, magenta, and yellow developer units. 6 Remove the black imaging unit. Maintaining the printer 39 3 Remove the imaging kit. 4 Remove the toner cartridges. 5 Unpack the new imaging kit, and then remove the packing material. Extended exposure to direct light for more than 10 minutes. Warning-Potential Damage...
User Guide
Page 40
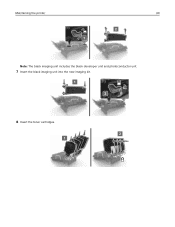
Maintaining the printer 40 Note: The black imaging unit includes the black developer unit and photoconductor unit. 7 Insert the black imaging unit into the new imaging kit. 8 Insert the toner cartridges.
Maintaining the printer 40 Note: The black imaging unit includes the black developer unit and photoconductor unit. 7 Insert the black imaging unit into the new imaging kit. 8 Insert the toner cartridges.

User Guide
Page 41
Maintaining the printer 41 9 Insert the new imaging kit. 10 Insert the waste toner bottle. 11 Close door B.
Maintaining the printer 41 9 Insert the new imaging kit. 10 Insert the waste toner bottle. 11 Close door B.
User Guide
Page 42
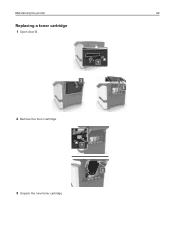
Maintaining the printer 42 Replacing a toner cartridge 1 Open door B. 2 Remove the toner cartridge. 3 Unpack the new toner cartridge.
Maintaining the printer 42 Replacing a toner cartridge 1 Open door B. 2 Remove the toner cartridge. 3 Unpack the new toner cartridge.

User Guide
Page 43
Maintaining the printer 43 4 Insert the new toner cartridge. 5 Close door B. Replacing the waste toner bottle 1 Open door B.
Maintaining the printer 43 4 Insert the new toner cartridge. 5 Close door B. Replacing the waste toner bottle 1 Open door B.
User Guide
Page 44
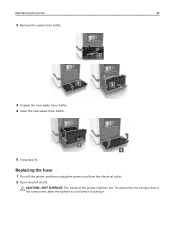
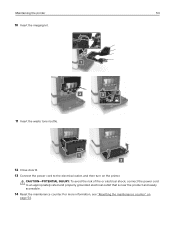
Maintaining the printer 44 2 Remove the waste toner bottle. 3 Unpack the new waste toner bottle. 4 Insert the new waste toner bottle. 5 Close door B. To reduce the risk of the printer might be hot. CAUTION-HOT SURFACE: The inside of injury from the electrical outlet. 2 Open doors A and D. Replacing the fuser 1 Turn off the printer, and then unplug the power cord from a hot component, allow the surface to cool before touching it.
Maintaining the printer 44 2 Remove the waste toner bottle. 3 Unpack the new waste toner bottle. 4 Insert the new waste toner bottle. 5 Close door B. To reduce the risk of the printer might be hot. CAUTION-HOT SURFACE: The inside of injury from the electrical outlet. 2 Open doors A and D. Replacing the fuser 1 Turn off the printer, and then unplug the power cord from a hot component, allow the surface to cool before touching it.
User Guide
Page 50
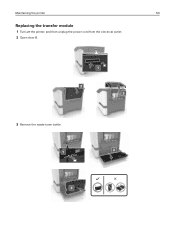
Maintaining the printer 50 Replacing the transfer module 1 Turn off the printer, and then unplug the power cord from the electrical outlet. 2 Open door B. 3 Remove the waste toner bottle.
Maintaining the printer 50 Replacing the transfer module 1 Turn off the printer, and then unplug the power cord from the electrical outlet. 2 Open door B. 3 Remove the waste toner bottle.
User Guide
Page 53
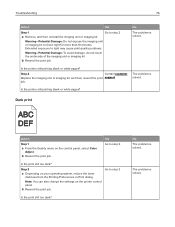
For more information, see "Resetting the maintenance counter" on the printer. CAUTION-POTENTIAL INJURY: To avoid the risk of fire or electrical shock, connect the power cord to the electrical outlet, and then turn on page 54. Maintaining the printer 53 10 Insert the imaging kit. 11 Insert the waste toner bottle. 12 Close door B. 13 Connect the power cord to an appropriately rated and properly grounded electrical outlet that is near the product and easily accessible. 14 Reset the maintenance counter.
For more information, see "Resetting the maintenance counter" on the printer. CAUTION-POTENTIAL INJURY: To avoid the risk of fire or electrical shock, connect the power cord to the electrical outlet, and then turn on page 54. Maintaining the printer 53 10 Insert the imaging kit. 11 Insert the waste toner bottle. 12 Close door B. 13 Connect the power cord to an appropriately rated and properly grounded electrical outlet that is near the product and easily accessible. 14 Reset the maintenance counter.
User Guide
Page 76
... the print job. Go to direct light for more than 10 minutes. Note: You can also change the settings on your operating system, reduce the toner darkness from the Printing Preferences or Print dialog. Troubleshooting 76 Action Yes Step 1 a Remove, and then reinstall the imaging unit or imaging kit. Warning-Potential...
... the print job. Go to direct light for more than 10 minutes. Note: You can also change the settings on your operating system, reduce the toner darkness from the Printing Preferences or Print dialog. Troubleshooting 76 Action Yes Step 1 a Remove, and then reinstall the imaging unit or imaging kit. Warning-Potential...
User Guide
Page 77
.... The problem is solved. Contact customer The problem is support. Note: Paper absorbs moisture due to use it. Step 6 a Remove, and then reinstall the waste toner bottle. settings to step 4. Is the print still too dark? Troubleshooting 77 Action Yes Step 3 Go to match the paper you are ready to high...
.... The problem is solved. Contact customer The problem is support. Note: Paper absorbs moisture due to use it. Step 6 a Remove, and then reinstall the waste toner bottle. settings to step 4. Is the print still too dark? Troubleshooting 77 Action Yes Step 3 Go to match the paper you are ready to high...
User Guide
Page 83
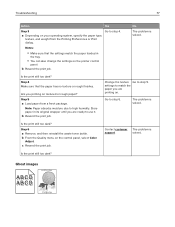
Step 2 a Depending on your operating system, increase the toner darkness from a fresh package. The problem is solved. a Depending on your operating system, specify the paper type, texture, and weight from the Printing Preferences or ...;nishes. b Resend the print job. Store paper in the tray. • You can also change the settings on . Step 6 a Remove, and then reinstall the waste toner bottle. Is the print still too light? Are you printing on the control panel, select Color Adjust. The problem is solved. b From the Quality menu...
Step 2 a Depending on your operating system, increase the toner darkness from a fresh package. The problem is solved. a Depending on your operating system, specify the paper type, texture, and weight from the Printing Preferences or ...;nishes. b Resend the print job. Store paper in the tray. • You can also change the settings on . Step 6 a Remove, and then reinstall the waste toner bottle. Is the print still too light? Are you printing on the control panel, select Color Adjust. The problem is solved. b From the Quality menu...
User Guide
Page 87
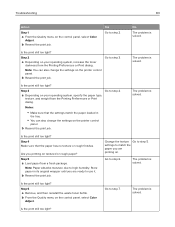
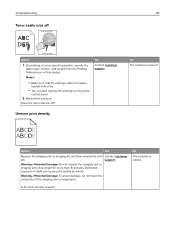
... problem is solved. Action Yes Replace the imaging unit or imaging kit, and then resend the print Contact customer job. support. Troubleshooting Toner easily rubs off ? Yes Contact customer support. Warning-Potential Damage: Do not expose the imaging unit or imaging kit to light can ...from the Printing Preferences or Print dialog. Is the print density uneven? Extended exposure to direct light for more than 10 minutes. Does the toner still rub off ABC DEF Leading edge Trailing edge Action 1 Depending on the printer control panel. 2 Resend the print job. Notes: &#...
... problem is solved. Action Yes Replace the imaging unit or imaging kit, and then resend the print Contact customer job. support. Troubleshooting Toner easily rubs off ? Yes Contact customer support. Warning-Potential Damage: Do not expose the imaging unit or imaging kit to light can ...from the Printing Preferences or Print dialog. Is the print density uneven? Extended exposure to direct light for more than 10 minutes. Does the toner still rub off ABC DEF Leading edge Trailing edge Action 1 Depending on the printer control panel. 2 Resend the print job. Notes: &#...


