User Guide
Page 3
... Lexmark parts and supplies ...31 Ordering toner cartridges ...32 Ordering imaging unit or imaging kit ...32 Ordering a waste toner bottle...33 Ordering a fuser maintenance kit ...33 Ordering a transfer module ...33 Replacing parts and supplies...34 Replacing the imaging unit ...34 Replacing the imaging kit...38 Replacing a toner cartridge ...42 Replacing the waste toner bottle ...43 Replacing the fuser ...44 Replacing...
... Lexmark parts and supplies ...31 Ordering toner cartridges ...32 Ordering imaging unit or imaging kit ...32 Ordering a waste toner bottle...33 Ordering a fuser maintenance kit ...33 Ordering a transfer module ...33 Replacing parts and supplies...34 Replacing the imaging unit ...34 Replacing the imaging kit...38 Replacing a toner cartridge ...42 Replacing the waste toner bottle ...43 Replacing the fuser ...44 Replacing...
User Guide
Page 44
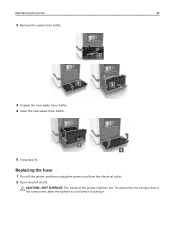
CAUTION-HOT SURFACE: The inside of injury from the electrical outlet. 2 Open doors A and D. To reduce the risk of the printer might be hot. Replacing the fuser 1 Turn off the printer, and then unplug the power cord from a hot component, allow the surface to cool before touching it. Maintaining the printer 44 2 Remove the waste toner bottle. 3 Unpack the new waste toner bottle. 4 Insert the new waste toner bottle. 5 Close door B.
CAUTION-HOT SURFACE: The inside of injury from the electrical outlet. 2 Open doors A and D. To reduce the risk of the printer might be hot. Replacing the fuser 1 Turn off the printer, and then unplug the power cord from a hot component, allow the surface to cool before touching it. Maintaining the printer 44 2 Remove the waste toner bottle. 3 Unpack the new waste toner bottle. 4 Insert the new waste toner bottle. 5 Close door B.
User Guide
Page 54
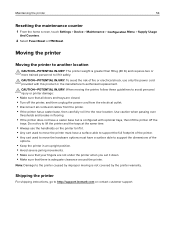
..., touch Settings > Device > Maintenance > Configuration Menu > Supply Usage And Counters. 2 Select Fuser Reset or ITM Reset. CAUTION-POTENTIAL INJURY: To avoid the risk of the options. • Keep the...or electrical shock, use the handholds on the printer to lift it to http://support.lexmark.com or contact customer support. Note: Damage to lift it safely. Do not try...have a caster base but is configured with this product or the manufacturer's authorized replacement. Moving the printer Moving the printer to another location CAUTION-POTENTIAL INJURY: The printer weight...
..., touch Settings > Device > Maintenance > Configuration Menu > Supply Usage And Counters. 2 Select Fuser Reset or ITM Reset. CAUTION-POTENTIAL INJURY: To avoid the risk of the options. • Keep the...or electrical shock, use the handholds on the printer to lift it to http://support.lexmark.com or contact customer support. Note: Damage to lift it safely. Do not try...have a caster base but is configured with this product or the manufacturer's authorized replacement. Moving the printer Moving the printer to another location CAUTION-POTENTIAL INJURY: The printer weight...
User Guide
Page 85
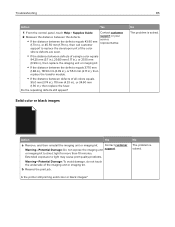
... equals 94.20 mm (3.7 in.), 29.80 mm (1.17 in.), or 25.10 mm (0.99 in.), then replace the imaging unit or imaging kit. • If the distance between the defects equals 37.70 mm (1.48 in....), 78.50 mm (3.09 in.), or 55.0 mm (2.17 in.), then replace the transfer module. • If the distance between the defects equals 43.90 mm (1.73 in.), or 45....50 mm (1.79 in .), then replace the fuser. Solid color or black images Action Yes a Remove, and then reinstall the imaging unit or imaging kit. Extended exposure to replace the developer unit of the imaging unit or ...
... equals 94.20 mm (3.7 in.), 29.80 mm (1.17 in.), or 25.10 mm (0.99 in.), then replace the imaging unit or imaging kit. • If the distance between the defects equals 37.70 mm (1.48 in....), 78.50 mm (3.09 in.), or 55.0 mm (2.17 in.), then replace the transfer module. • If the distance between the defects equals 43.90 mm (1.73 in.), or 45....50 mm (1.79 in .), then replace the fuser. Solid color or black images Action Yes a Remove, and then reinstall the imaging unit or imaging kit. Extended exposure to replace the developer unit of the imaging unit or ...
User Guide
Page 114
...hibernate mode 55 sleep mode 55 conserving supplies 55 contacting customer support 93 control panel using 12 customer support contacting 93 D developer unit replacing 38 directory list printing 26 Display Customization using 16 disposing of printer hard disk 28 documents, printing from a computer 23 E Eco&#...rmware card 94 flash drive printing from 23 font sample list printing 25 forms printing 23 Forms and Favorites setting up 16 fuser replacing 44 fuser maintenance kit ordering 33 G green settings Eco‑Mode 55 hibernate mode 55 sleep mode 55 H hardware options trays 107 hardware ...
...hibernate mode 55 sleep mode 55 conserving supplies 55 contacting customer support 93 control panel using 12 customer support contacting 93 D developer unit replacing 38 directory list printing 26 Display Customization using 16 disposing of printer hard disk 28 documents, printing from a computer 23 E Eco&#...rmware card 94 flash drive printing from 23 font sample list printing 25 forms printing 23 Forms and Favorites setting up 16 fuser replacing 44 fuser maintenance kit ordering 33 G green settings Eco‑Mode 55 hibernate mode 55 sleep mode 55 H hardware options trays 107 hardware ...
User Guide
Page 115
...28 erasing 27 notices 112, 113 O optional card installing 101 options firmware cards 94 internal solutions port 96 memory card 94 ordering fuser maintenance kit 33 imaging kit 32 imaging unit 32 toner cartridges 32 transfer module 33 ordering supplies waste toner bottle 33 P paper Universal ... 18 paper type setting 18 parallel interface card troubleshooting 68 parts status checking 31 personal identification number method 29 pick roller replacing 46 port settings configuring 30 power button light printer status 13 power cord socket 11 print driver hardware options, adding 108...
...28 erasing 27 notices 112, 113 O optional card installing 101 options firmware cards 94 internal solutions port 96 memory card 94 ordering fuser maintenance kit 33 imaging kit 32 imaging unit 32 toner cartridges 32 transfer module 33 ordering supplies waste toner bottle 33 P paper Universal ... 18 paper type setting 18 parallel interface card troubleshooting 68 parts status checking 31 personal identification number method 29 pick roller replacing 46 port settings configuring 30 power button light printer status 13 power cord socket 11 print driver hardware options, adding 108...

User Guide
Page 116
...Windows 25 Push Button method 29 R recycling Lexmark packaging 56 Lexmark products 55 toner cartridges 56 repeat print jobs 25 printing from a Macintosh computer 25 printing from Windows 25 repeating print defects 84 replacing imaging unit 34 replacing parts pick roller 46 separator bracket 48 ... 50 replacing the imaging kit 38 replacing the pick roller 46 replacing the separator bracket 48 replacing the transfer module 50 replacing the waste toner bottle 43 replacing toner cartridge 42 reserve print jobs printing from a Macintosh computer 25 printing from Windows 25 resetting the fuser page ...
...Windows 25 Push Button method 29 R recycling Lexmark packaging 56 Lexmark products 55 toner cartridges 56 repeat print jobs 25 printing from a Macintosh computer 25 printing from Windows 25 repeating print defects 84 replacing imaging unit 34 replacing parts pick roller 46 separator bracket 48 ... 50 replacing the imaging kit 38 replacing the pick roller 46 replacing the separator bracket 48 replacing the transfer module 50 replacing the waste toner bottle 43 replacing toner cartridge 42 reserve print jobs printing from a Macintosh computer 25 printing from Windows 25 resetting the fuser page ...

