
User Manual
Page 120
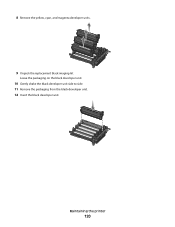
Leave the packaging on the black developer unit. 10 Gently shake the black developer unit side to side. 11 Remove the packaging from the black developer unit. 12 Insert the black developer unit. 8 Remove the yellow, cyan, and magenta developer units. 9 Unpack the replacement black imaging kit. Maintaining the printer 120
Leave the packaging on the black developer unit. 10 Gently shake the black developer unit side to side. 11 Remove the packaging from the black developer unit. 12 Insert the black developer unit. 8 Remove the yellow, cyan, and magenta developer units. 9 Unpack the replacement black imaging kit. Maintaining the printer 120
User Manual
Page 121
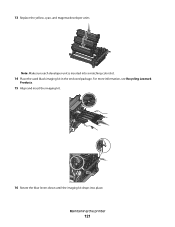
Note: Make sure each developer unit is inserted into place. 13 Replace the yellow, cyan, and magenta developer units. For more information, see Recycling Lexmark Products. 15 Align and insert the imaging kit. 16 Rotate the blue levers down until the imaging kit drops into a matching color slot. 14 Place the used black imaging kit in the enclosed package. Maintaining the printer 121
Note: Make sure each developer unit is inserted into place. 13 Replace the yellow, cyan, and magenta developer units. For more information, see Recycling Lexmark Products. 15 Align and insert the imaging kit. 16 Rotate the blue levers down until the imaging kit drops into a matching color slot. 14 Place the used black imaging kit in the enclosed package. Maintaining the printer 121

User Manual
Page 125
Warning-Potential Damage: Do not touch the underside of the waste toner bottle, and remove it. 6 Lift the blue levers on the imaging kit, and then pull it toward you. 7 Press down on the blue levers, grasp the green handles on the developer units. 9 Gently shake the yellow, cyan, magenta, and black developer units side to side. Maintaining the printer 125 This could damage the imaging kit. 8 Unpack the replacement black and color imaging kit. Leave the packaging on the sides, and then pull the imaging kit out. 5 Press the green levers on each side of the imaging kit.
Warning-Potential Damage: Do not touch the underside of the waste toner bottle, and remove it. 6 Lift the blue levers on the imaging kit, and then pull it toward you. 7 Press down on the blue levers, grasp the green handles on the developer units. 9 Gently shake the yellow, cyan, magenta, and black developer units side to side. Maintaining the printer 125 This could damage the imaging kit. 8 Unpack the replacement black and color imaging kit. Leave the packaging on the sides, and then pull the imaging kit out. 5 Press the green levers on each side of the imaging kit.
User Manual
Page 126
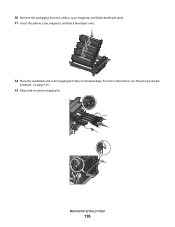
Maintaining the printer 126 10 Remove the packaging from the yellow, cyan, magenta, and black developer units. 11 Insert the yellow, cyan, magenta, and black developer units. 12 Place the used black and color imaging kit in the enclosed package. For more information, see "Recycling Lexmark products" on page 136. 13 Align and insert the imaging kit.
Maintaining the printer 126 10 Remove the packaging from the yellow, cyan, magenta, and black developer units. 11 Insert the yellow, cyan, magenta, and black developer units. 12 Place the used black and color imaging kit in the enclosed package. For more information, see "Recycling Lexmark products" on page 136. 13 Align and insert the imaging kit.
User Manual
Page 152
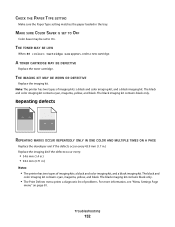
... contains black only. Troubleshooting 152 THE IMAGING KIT MAY BE WORN OR DEFECTIVE Replace the imaging kit. The black and color imaging kit contains cyan, magenta, yellow, and black. MAKE SURE COLOR SAVER IS SET TO OFF Color Saver may be set to On. Note: The printer has two types of..., see "Menu Settings Page menu" on page 81. Repeating defects REPEATING MARKS OCCUR REPEATEDLY ONLY IN ONE COLOR AND MULTIPLE TIMES ON A PAGE Replace the developer unit if the defects occur every 43.9 mm (1.7 in.) Replace the imaging kit if the defects occur every: • 34.6 mm (1.4 in.) • 94.2 mm...
... contains black only. Troubleshooting 152 THE IMAGING KIT MAY BE WORN OR DEFECTIVE Replace the imaging kit. The black and color imaging kit contains cyan, magenta, yellow, and black. MAKE SURE COLOR SAVER IS SET TO OFF Color Saver may be set to On. Note: The printer has two types of..., see "Menu Settings Page menu" on page 81. Repeating defects REPEATING MARKS OCCUR REPEATEDLY ONLY IN ONE COLOR AND MULTIPLE TIMES ON A PAGE Replace the developer unit if the defects occur every 43.9 mm (1.7 in.) Replace the imaging kit if the defects occur every: • 34.6 mm (1.4 in.) • 94.2 mm...
Service Manual
Page 77
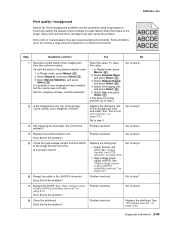
... 4. If this value: Go to the image transfer unit (ITU). Go to step 5. Problem resolved. Go to step 4. 3 Did replacing the developer unit correct the problem? Problem resolved. Go to step 8. 8 Clean the printhead. supply (HVPS) assembly removal" on page 4-49. Go to step...step 2. Select Supplies Menu, and press Select ( ). 3. yellow, cyan, magenta, or black? See "High-voltage power supply (HVPS) assembly removal" on page 4-21. Problem resolved. Using non-Lexmark toner cartridges may also cause background problems. Some problems occur by using rough ...
... 4. If this value: Go to the image transfer unit (ITU). Go to step 5. Problem resolved. Go to step 4. 3 Did replacing the developer unit correct the problem? Problem resolved. Go to step 8. 8 Clean the printhead. supply (HVPS) assembly removal" on page 4-49. Go to step...step 2. Select Supplies Menu, and press Select ( ). 3. yellow, cyan, magenta, or black? See "High-voltage power supply (HVPS) assembly removal" on page 4-21. Problem resolved. Using non-Lexmark toner cartridges may also cause background problems. Some problems occur by using rough ...
Service Manual
Page 80
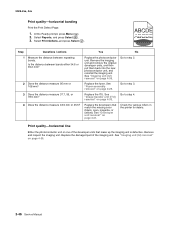
... make up the imaging unit is defective. Remove and inspect the imaging unit. Replace the damaged part of the developer units that match the missing color (black, cyan, magenta, or yellow). Select Print Defects, and press Select ( ). Step Questions / actions Yes No 1 Measure the distance between ...Print quality-horizontal banding Print the Print Defect Page: 1. Is the distance between repeating bands. Remove the imaging unit and remove the original developer units, and then put them back into the new photoconductor unit, and reinstall the imaging unit. Go to step 2. 2 Does the ...
... make up the imaging unit is defective. Remove and inspect the imaging unit. Replace the damaged part of the developer units that match the missing color (black, cyan, magenta, or yellow). Select Print Defects, and press Select ( ). Step Questions / actions Yes No 1 Measure the distance between ...Print quality-horizontal banding Print the Print Defect Page: 1. Is the distance between repeating bands. Remove the imaging unit and remove the original developer units, and then put them back into the new photoconductor unit, and reinstall the imaging unit. Go to step 2. 2 Does the ...
Service Manual
Page 123
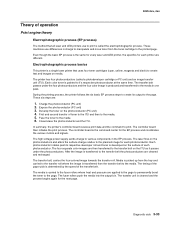
...roll. 5025-2xx, 4xx Theory of toner to the ITU and then to the media. 5. Even though the basic EP process is developed on the surface of the transfer belt. The printer has four photoconductors (called the electrophotographic process. First and second transfer of operation Print... engine theory Electrophotographic process (EP process) The method that uses four toner cartridges (cyan, yellow, magenta and black) to create text and images on the photoconductor (PC unit) 4. The laser fires on the ITU as it 's respective photoconductor...
...roll. 5025-2xx, 4xx Theory of toner to the ITU and then to the media. 5. Even though the basic EP process is developed on the surface of the transfer belt. The printer has four photoconductors (called the electrophotographic process. First and second transfer of operation Print... engine theory Electrophotographic process (EP process) The method that uses four toner cartridges (cyan, yellow, magenta and black) to create text and images on the photoconductor (PC unit) 4. The laser fires on the ITU as it 's respective photoconductor...


