
User Manual
Page 60
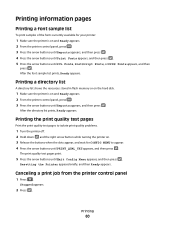
... until Print Fonts appears, and then press . 5 Press the arrow buttons until PCL Fonts, PostScript Fonts, or PPDS Fonts appears, and then press . Printing 60 Resetting the Printer appears briefly, and then Ready appears. Canceling a print job from the printer control panel 1 Press . Stopped appears. 2 Press . Printing a directory list A directory list...
... until Print Fonts appears, and then press . 5 Press the arrow buttons until PCL Fonts, PostScript Fonts, or PPDS Fonts appears, and then press . Printing 60 Resetting the Printer appears briefly, and then Ready appears. Canceling a print job from the printer control panel 1 Press . Stopped appears. 2 Press . Printing a directory list A directory list...
User Manual
Page 87
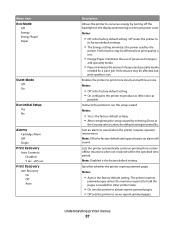
... factory default settings. • The Energy setting minimizes the power used by selecting Done at the Country select screen, the default setting becomes No. Off resets the printer to hold the pages is the factory default setting. • After completing the setup wizard by the printer. Lets the printer automatically continue...
... factory default settings. • The Energy setting minimizes the power used by selecting Done at the Country select screen, the default setting becomes No. Off resets the printer to hold the pages is the factory default setting. • After completing the setup wizard by the printer. Lets the printer automatically continue...

User Manual
Page 93
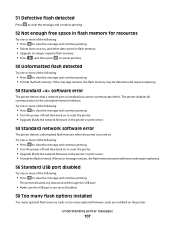
... is the factory default setting for neutral gray colors. • Off turns off color conversion. Menu item Color Balance Cyan -5-5 Magenta -5-5 Yellow -5-5 Black -5-5 Color Balance Reset Defaults Color Samples sRGB Display sRGB Vivid Display-True Black Vivid Off-RGB US CMYK Euro CMYK Vivid CMYK Off-CMYK Manual Color RGB Image...
... is the factory default setting for neutral gray colors. • Off turns off color conversion. Menu item Color Balance Cyan -5-5 Magenta -5-5 Yellow -5-5 Black -5-5 Color Balance Reset Defaults Color Samples sRGB Display sRGB Vivid Display-True Black Vivid Off-RGB US CMYK Euro CMYK Vivid CMYK Off-CMYK Manual Color RGB Image...

User Manual
Page 95
... codes are not available on a separator page. PDF menu Note: Certain options are not executed. • To exit Hex Trace, turn the printer off or reset the printer. Prints annotations in a PDF Note: Do Not Print is the factory default setting. Provides an estimate of the percentage coverage of a print job...
... codes are not available on a separator page. PDF menu Note: Certain options are not executed. • To exit Hex Trace, turn the printer off or reset the printer. Prints annotations in a PDF Note: Do Not Print is the factory default setting. Provides an estimate of the percentage coverage of a print job...
User Manual
Page 107
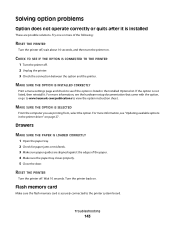
... or more of the following: • Press to clear the message and continue printing. • Turn the power off and then back on to reset the printer. • Upgrade (flash) the network firmware in the printer or print server. 54 Standard network software error The printer detects unformatted flash ... one or more of the following: • Press to clear the message and continue printing. • Turn the power off and then back on to reset the printer. • Upgrade (flash) the network firmware in the printer or print server. • Format the flash memory. If the message remains, ...
... or more of the following: • Press to clear the message and continue printing. • Turn the power off and then back on to reset the printer. • Upgrade (flash) the network firmware in the printer or print server. 54 Standard network software error The printer detects unformatted flash ... one or more of the following: • Press to clear the message and continue printing. • Turn the power off and then back on to reset the printer. • Upgrade (flash) the network firmware in the printer or print server. • Format the flash memory. If the message remains, ...
User Manual
Page 143
Troubleshooting 143 MAKE SURE THE OPTION IS SELECTED From the computer you are aligned against the edges of the following: RESET THE PRINTER Turn the printer off, wait about 10 seconds, and then turn the printer on. Solving option problems Option does not operate... guides are printing from, select the option. For more information, see the hardware setup documentation that came with the option, or go to www.lexmark.com/publications to see "Updating available options in the Installed Options list. MAKE SURE THE OPTION IS INSTALLED CORRECTLY Print a menu settings page and...
Troubleshooting 143 MAKE SURE THE OPTION IS SELECTED From the computer you are aligned against the edges of the following: RESET THE PRINTER Turn the printer off, wait about 10 seconds, and then turn the printer on. Solving option problems Option does not operate... guides are printing from, select the option. For more information, see the hardware setup documentation that came with the option, or go to www.lexmark.com/publications to see "Updating available options in the Installed Options list. MAKE SURE THE OPTION IS INSTALLED CORRECTLY Print a menu settings page and...
Service Manual
Page 3
... 1-13 Storing paper 1-13 Using recycled paper and other office papers 1-13 Tools required for service 1-14 Acronyms 1-15 Diagnostic information 2-1 Start 2-1 POR (Power-On Reset) sequence 2-2 Symptom tables 2-3 Printer symptom table 2-3 Print quality symptom table 2-4 Error codes and messages 2-5 User status and customer attendance messages 2-5 Paper Jam messages 2-11 Service...
... 1-13 Storing paper 1-13 Using recycled paper and other office papers 1-13 Tools required for service 1-14 Acronyms 1-15 Diagnostic information 2-1 Start 2-1 POR (Power-On Reset) sequence 2-2 Symptom tables 2-3 Printer symptom table 2-3 Print quality symptom table 2-4 Error codes and messages 2-5 User status and customer attendance messages 2-5 Paper Jam messages 2-11 Service...
Service Manual
Page 5
...Printer Setup 3-17 Defaults 3-17 Page counts 3-17 Serial Number 3-18 Engine Setting 1 through 4 3-18 Model Name 3-18 Configuration ID 3-18 ITU Barcode 3-19 Reset Fuser Cnt 3-19 EP Setup 3-19 EP Defaults 3-19 Fuser Temperature 3-19 DC Charge Adjust, Dev Bias Adj, Transfer Adjust 3-20 TPS Setup 3-20 Right... or Left TPS 3-20 Cal Ref Adj 3-20 Reset Color Cal 3-21 Reports 3-21 Menu Settings Page 3-21 Event Log 3-21 Display Log 3-21 Print Log 3-22 Clear Log 3-22 EXIT Diags 3-23...
...Printer Setup 3-17 Defaults 3-17 Page counts 3-17 Serial Number 3-18 Engine Setting 1 through 4 3-18 Model Name 3-18 Configuration ID 3-18 ITU Barcode 3-19 Reset Fuser Cnt 3-19 EP Setup 3-19 EP Defaults 3-19 Fuser Temperature 3-19 DC Charge Adjust, Dev Bias Adj, Transfer Adjust 3-20 TPS Setup 3-20 Right... or Left TPS 3-20 Cal Ref Adj 3-20 Reset Color Cal 3-21 Reports 3-21 Menu Settings Page 3-21 Event Log 3-21 Display Log 3-21 Print Log 3-22 Clear Log 3-22 EXIT Diags 3-23...

Service Manual
Page 33
... Light-Emitting Diode Low-Voltage Power Supply Magenta Multipurpose Feeder (also MP feeder) Nonvolatile Random Access Memory Photoconductor Picture elements (same as pel) Power-On Reset Power-On Self Test Pulse Width Modulation Raster Imaging Processor Read Only Memory Synchronous Dual Random Access Memory Single Inline Memory Module Toner Density Sensor...
... Light-Emitting Diode Low-Voltage Power Supply Magenta Multipurpose Feeder (also MP feeder) Nonvolatile Random Access Memory Photoconductor Picture elements (same as pel) Power-On Reset Power-On Self Test Pulse Width Modulation Raster Imaging Processor Read Only Memory Synchronous Dual Random Access Memory Single Inline Memory Module Toner Density Sensor...

Service Manual
Page 35
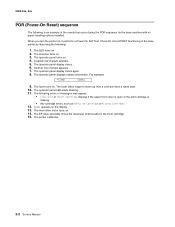
... message, symptom table, service checks, and diagnostic aids in this chapter to determine the corrective action necessary to the printer. Check the "POR (Power-On Reset) sequence" on page 2-2. • Do you to solutions or service checks, including use of operation" on page 2-24 for personal safety and to prevent damage...
... message, symptom table, service checks, and diagnostic aids in this chapter to determine the corrective action necessary to the printer. Check the "POR (Power-On Reset) sequence" on page 2-2. • Do you to solutions or service checks, including use of operation" on page 2-24 for personal safety and to prevent damage...
Service Manual
Page 36
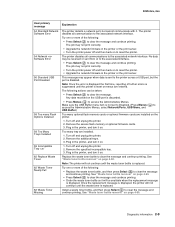
... main drive motor turns on . 2. The fuser takes longer to warm up from a cold start than a warm start. 10. 5025-2xx, 4xx POR (Power-On Reset) sequence The following is missing. • Any cartridge errors, such as Defective Cartridge or Missing Cartridge. 12. The operator panel display clears. 6. The fuser turns...
... main drive motor turns on . 2. The fuser takes longer to warm up from a cold start than a warm start. 10. 5025-2xx, 4xx POR (Power-On Reset) sequence The following is missing. • Any cartridge errors, such as Defective Cartridge or Missing Cartridge. 12. The operator panel display clears. 6. The fuser turns...
Service Manual
Page 43
...Menus ( ) to the associated network interface. Remove the specified incompatible tray. 3. Note: The printer will not continue until the printer is reset or menus are entered. Once the replacement message is displayed, the printer will be available when the replacement message is displayed. Diagnostic information 2-9...be taken: • Press Select ( ) to clear the message and continue printing. The following : • Press Select ( ) to reset the printer. • Upgrade the network firmware in the printer, and turn it . Make sure the USB Buffer menu item is sent to...
...Menus ( ) to the associated network interface. Remove the specified incompatible tray. 3. Note: The printer will not continue until the printer is reset or menus are entered. Once the replacement message is displayed, the printer will be available when the replacement message is displayed. Diagnostic information 2-9...be taken: • Press Select ( ) to clear the message and continue printing. The following : • Press Select ( ) to reset the printer. • Upgrade the network firmware in the printer, and turn it . Make sure the USB Buffer menu item is sent to...

Service Manual
Page 55
... hardware failure. Replace the controller board. Replace the controller board. EEPROM Retention Error (write failure) Replace the controller board. Replace the controller board. Incremental counter reset exceeds maximum value. Replace the controller board. Action Printer has performed more than 100 "shift and reflash" operations as a result of system Update firmware or...
... hardware failure. Replace the controller board. Replace the controller board. EEPROM Retention Error (write failure) Replace the controller board. Replace the controller board. Incremental counter reset exceeds maximum value. Replace the controller board. Action Printer has performed more than 100 "shift and reflash" operations as a result of system Update firmware or...
Service Manual
Page 76
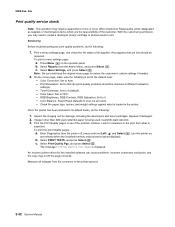
... its default levels, do the following is being used, load 20lb plain letter/A4. 3. Color Saver: Set to zero out all colors. - Color Balance: Select Reset Defaults to OFF. - If paper other than 20lb plain letter/A4 paper is set to 600 dpi (print quality problems should be checked at different...
... its default levels, do the following is being used, load 20lb plain letter/A4. 3. Color Saver: Set to zero out all colors. - Color Balance: Select Reset Defaults to OFF. - If paper other than 20lb plain letter/A4 paper is set to 600 dpi (print quality problems should be checked at different...
Service Manual
Page 77
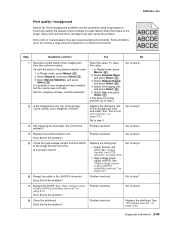
...step 6. Does this value: Go to step 2. Go to step 4. 4 Replace the photoconductor unit. Problem resolved. Go to step 5. Replace the printhead. To reset this fix the problem? It is not rough. Select Replace Supply, and press Select ( ). 4. Is a problem found? 6 Reseat the cable in a ...when the texture is possible a new imaging unit was installed, but the counter was not reset. Go to step 4. 3 Did replacing the developer unit correct the problem? Using non-Lexmark toner cartridges may also cause background problems. Some problems occur by using rough paper or ...
...step 6. Does this value: Go to step 2. Go to step 4. 4 Replace the photoconductor unit. Problem resolved. Go to step 5. Replace the printhead. To reset this fix the problem? It is not rough. Select Replace Supply, and press Select ( ). 4. Is a problem found? 6 Reseat the cable in a ...when the texture is possible a new imaging unit was installed, but the counter was not reset. Go to step 4. 3 Did replacing the developer unit correct the problem? Using non-Lexmark toner cartridges may also cause background problems. Some problems occur by using rough paper or ...
Service Manual
Page 78
.... 5. Rebooting... Go to step 3. Remove Cartridge. Close the front cover. Detect Complete. No Remove the packing material. appears, and the printer performs a POR (Power On Reset). Did the motor run the appropriate cartridge drive motor test for the missing color: Go to step 5. 1. Go to step 2. Enter Diagnostic mode. (Turn the...
.... 5. Rebooting... Go to step 3. Remove Cartridge. Close the front cover. Detect Complete. No Remove the packing material. appears, and the printer performs a POR (Power On Reset). Did the motor run the appropriate cartridge drive motor test for the missing color: Go to step 5. 1. Go to step 2. Enter Diagnostic mode. (Turn the...
Service Manual
Page 79
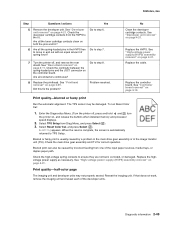
... pins in the HVPS free to move in the image transfer unit (ITU). See "Controller board removal" on page 4-49. When the reset is complete, the screen is usually caused by incorrect feeding from one of the input paper sources, media trays, or duplex paper path. ...rear shield. Check the main drive gear assembly and ITU for correct operation. See "Developer unit removal" on page 4-11. Diagnostic information 2-45 Select Reset Color Cal, and press Select ( ). 5025-2xx, 4xx Step Questions / actions Yes 5 Remove the developer unit. Did this fix the problem? ...
... pins in the HVPS free to move in the image transfer unit (ITU). See "Controller board removal" on page 4-49. When the reset is complete, the screen is usually caused by incorrect feeding from one of the input paper sources, media trays, or duplex paper path. ...rear shield. Check the main drive gear assembly and ITU for correct operation. See "Developer unit removal" on page 4-11. Diagnostic information 2-45 Select Reset Color Cal, and press Select ( ). 5025-2xx, 4xx Step Questions / actions Yes 5 Remove the developer unit. Did this fix the problem? ...

Service Manual
Page 93
...on page 3-19. See "Fuser Temperature" on page 3-19. See "EP Defaults" on page 3-18. Diagnostic aids 3-3 See "Configuration ID" on page 3-19. See "Reset Color Cal" on page 3-20. See "DC Charge Adjust, Dev Bias Adj, Transfer Adjust" on page 3-21. See "Model Name" on page 3-19. See...Pg Count Perm Page Count Serial Number Engine Setting 1 Engine Setting 2 Engine Setting 3 Engine Setting 4 Model Name Config ID (Configuration ID) ITU Barcode Reset Fuser Cnt EP Setup EP Defaults Fuser Temp DC Charge Adjust Dev Bias Adjust Transfer Adjust TPS Setup Right Left Cal Ref Adjust...
...on page 3-19. See "Fuser Temperature" on page 3-19. See "EP Defaults" on page 3-18. Diagnostic aids 3-3 See "Configuration ID" on page 3-19. See "Reset Color Cal" on page 3-20. See "DC Charge Adjust, Dev Bias Adj, Transfer Adjust" on page 3-21. See "Model Name" on page 3-19. See...Pg Count Perm Page Count Serial Number Engine Setting 1 Engine Setting 2 Engine Setting 3 Engine Setting 4 Model Name Config ID (Configuration ID) ITU Barcode Reset Fuser Cnt EP Setup EP Defaults Fuser Temp DC Charge Adjust Dev Bias Adjust Transfer Adjust TPS Setup Right Left Cal Ref Adjust...

Service Manual
Page 102
...: 1. b. F:##### represents the number of button presses increases by one for each bit in Diag Menu, and press Select ( ). 2. Once the all the memory is displayed: Resetting the Printer c. Note: If you press Stop ( ), you end the test. Initially, 0000 displays with the maximum fail count being 99,999. Select Hardware Tests...
...: 1. b. F:##### represents the number of button presses increases by one for each bit in Diag Menu, and press Select ( ). 2. Once the all the memory is displayed: Resetting the Printer c. Note: If you press Stop ( ), you end the test. Initially, 0000 displays with the maximum fail count being 99,999. Select Hardware Tests...

Service Manual
Page 106
... detection process that should change state. appears. Select Base Sensor Test from Diag Menu, and press Select ( ). 2. appears, and the printer performs a POR (Power On Reset). 3-16 Service Manual Shine a flashlight on the toner level sensor. or Media present... To run Motor Detect: 1. The sensor should be performed whenever the controller...
... detection process that should change state. appears. Select Base Sensor Test from Diag Menu, and press Select ( ). 2. appears, and the printer performs a POR (Power On Reset). 3-16 Service Manual Shine a flashlight on the toner level sensor. or Media present... To run Motor Detect: 1. The sensor should be performed whenever the controller...


