
User Manual
Page 36
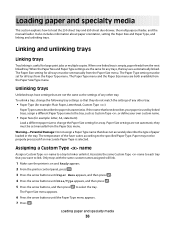
... Paper Size and Paper Type, and linking and unlinking trays. Unlinking trays Unlinked trays have settings that does not accurately describe the type of the fuser varies according to the tray, such as the settings of any other tray. to link. When the Paper Size and Paper Type settings are automatically...
... Paper Size and Paper Type, and linking and unlinking trays. Unlinking trays Unlinked trays have settings that does not accurately describe the type of the fuser varies according to the tray, such as the settings of any other tray. to link. When the Paper Size and Paper Type settings are automatically...
User Manual
Page 47
... hazardous emissions. Use papers printed with rough or heavily textured surfaces. Use inks that has been cut or trimmed by the temperature in the printer fuser • Preprinted papers that fail EN12281:2002 (European) • Paper weighing less than ±2.3 mm (±0.9 in fewer paper feeding problems and better print quality...
... hazardous emissions. Use papers printed with rough or heavily textured surfaces. Use inks that has been cut or trimmed by the temperature in the printer fuser • Preprinted papers that fail EN12281:2002 (European) • Paper weighing less than ±2.3 mm (±0.9 in fewer paper feeding problems and better print quality...
User Manual
Page 64
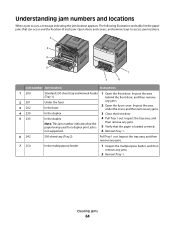
... locations. 3 2 4 5 1 7 6 Jam number Jam location Instructions 1 200 2 201 3 202 4 230 5 235 Standard 250-sheet tray and manual feeder (Tray 1) Under the fuser In the fuser In the duplex In the duplex Note: This jam number indicates that can occur and the location of each jam. Understanding jam numbers and... jams. 3 Close the front door. 4 Pull Tray 1 out. Clearing jams 64 Inspect the tray area, and then remove any jams. 2 Open the fuser cover. Inspect the area behind the front door, and then remove any jams. 5 Verify that the paper is not supported. 1 Open the front door.
... locations. 3 2 4 5 1 7 6 Jam number Jam location Instructions 1 200 2 201 3 202 4 230 5 235 Standard 250-sheet tray and manual feeder (Tray 1) Under the fuser In the fuser In the duplex In the duplex Note: This jam number indicates that can occur and the location of each jam. Understanding jam numbers and... jams. 3 Close the front door. 4 Pull Tray 1 out. Clearing jams 64 Inspect the tray area, and then remove any jams. 2 Open the fuser cover. Inspect the area behind the front door, and then remove any jams. 5 Verify that the paper is not supported. 1 Open the front door.
User Manual
Page 66
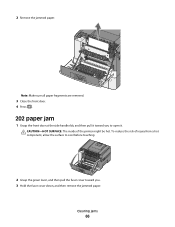
To reduce the risk of the printer might be hot. 2 Remove the jammed paper. Note: Make sure all paper fragments are removed. 3 Close the front door. 4 Press . 202 paper jam 1 Grasp the front door at the side handholds, and then pull it . Clearing jams 66 CAUTION-HOT SURFACE: The inside of injury from a hot component, allow the surface to open it toward you to cool before touching. 2 Grasp the green lever, and then pull the fuser cover toward you . 3 Hold the fuser cover down, and then remove the jammed paper.
To reduce the risk of the printer might be hot. 2 Remove the jammed paper. Note: Make sure all paper fragments are removed. 3 Close the front door. 4 Press . 202 paper jam 1 Grasp the front door at the side handholds, and then pull it . Clearing jams 66 CAUTION-HOT SURFACE: The inside of injury from a hot component, allow the surface to open it toward you to cool before touching. 2 Grasp the green lever, and then pull the fuser cover toward you . 3 Hold the fuser cover down, and then remove the jammed paper.
User Manual
Page 67
The fuser cover closes when released. Clearing jams 67 Note: Make sure all paper fragments are removed. 4 Close the front door. 5 Press .
The fuser cover closes when released. Clearing jams 67 Note: Make sure all paper fragments are removed. 4 Close the front door. 5 Press .
User Manual
Page 109
... than one jam, the message displays the number of pages jammed. 201.yy Paper jam 1 Clear the paper path. 2 Remove the jammed paper below the fuser. 3 Press to clear the message and continue printing. 202.yy Paper jam 1 Clear the paper path. 2 Remove the jammed paper from the... fuser. 3 Press to clear the message and continue printing. 230.yy Paper jam 1 Clear the paper path. 2 Open the front door, and then remove the jammed ...
... than one jam, the message displays the number of pages jammed. 201.yy Paper jam 1 Clear the paper path. 2 Remove the jammed paper below the fuser. 3 Press to clear the message and continue printing. 202.yy Paper jam 1 Clear the paper path. 2 Remove the jammed paper from the... fuser. 3 Press to clear the message and continue printing. 230.yy Paper jam 1 Clear the paper path. 2 Open the front door, and then remove the jammed ...
User Manual
Page 110
... Paper jam 1 Clear the paper path. 2 Open the front door, and then remove the jammed paper. 3 Hold the fuser cover down, and then remove the jammed paper from inside the fuser. 4 Close the fuser cover, and then close the front door. 5 Press to clear the message and continue printing. 940.01 Press down...
... Paper jam 1 Clear the paper path. 2 Open the front door, and then remove the jammed paper. 3 Hold the fuser cover down, and then remove the jammed paper from inside the fuser. 4 Close the fuser cover, and then close the front door. 5 Press to clear the message and continue printing. 940.01 Press down...
Service Manual
Page 3
... symptom table 2-4 Error codes and messages 2-5 User status and customer attendance messages 2-5 Paper Jam messages 2-11 Service error messages 2-12 Service checks 2-24 122.xx-Fuser temperature incorrect 2-24 90x.xx error 2-24 925.01-Fan error service check 2-25 930.xx-935.xx-Printhead errors service check 2-25 Table of...
... symptom table 2-4 Error codes and messages 2-5 User status and customer attendance messages 2-5 Paper Jam messages 2-11 Service error messages 2-12 Service checks 2-24 122.xx-Fuser temperature incorrect 2-24 90x.xx error 2-24 925.01-Fan error service check 2-25 930.xx-935.xx-Printhead errors service check 2-25 Table of...
Service Manual
Page 4
... check 2-27 Dead printer service check 2-28 Duplex/manual feed sensor (S1) service check 2-29 Front door sensor or switches service check 2-30 Fuser exit sensor service check 2-31 Fuser service check 2-32 Input sensor (S2) service check 2-34 Main drive gear assembly (EP drive) service check 2-35 Operator panel service check...
... check 2-27 Dead printer service check 2-28 Duplex/manual feed sensor (S1) service check 2-29 Front door sensor or switches service check 2-30 Fuser exit sensor service check 2-31 Fuser service check 2-32 Input sensor (S2) service check 2-34 Main drive gear assembly (EP drive) service check 2-35 Operator panel service check...
Service Manual
Page 5
... 3-17 Page counts 3-17 Serial Number 3-18 Engine Setting 1 through 4 3-18 Model Name 3-18 Configuration ID 3-18 ITU Barcode 3-19 Reset Fuser Cnt 3-19 EP Setup 3-19 EP Defaults 3-19 Fuser Temperature 3-19 DC Charge Adjust, Dev Bias Adj, Transfer Adjust 3-20 TPS Setup 3-20 Right or Left TPS 3-20 Cal Ref...
... 3-17 Page counts 3-17 Serial Number 3-18 Engine Setting 1 through 4 3-18 Model Name 3-18 Configuration ID 3-18 ITU Barcode 3-19 Reset Fuser Cnt 3-19 EP Setup 3-19 EP Defaults 3-19 Fuser Temperature 3-19 DC Charge Adjust, Dev Bias Adj, Transfer Adjust 3-20 TPS Setup 3-20 Right or Left TPS 3-20 Cal Ref...
Service Manual
Page 6
... Controller board removal 4-19 Developer unit removal 4-21 Duplex sensor removal 4-21 Exit deflector and bin full sensor flag removal 4-24 Fuser assembly removal 4-26 Fuser drive motor assembly removal 4-29 Fuser exit sensor removal 4-30 High-voltage power supply (HVPS) assembly removal 4-31 Image transfer unit (ITU) removal 4-33 Imaging unit (IU...
... Controller board removal 4-19 Developer unit removal 4-21 Duplex sensor removal 4-21 Exit deflector and bin full sensor flag removal 4-24 Fuser assembly removal 4-26 Fuser drive motor assembly removal 4-29 Fuser exit sensor removal 4-30 High-voltage power supply (HVPS) assembly removal 4-31 Image transfer unit (ITU) removal 4-33 Imaging unit (IU...
Service Manual
Page 20
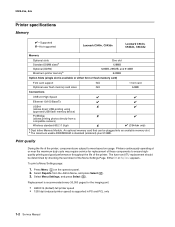
...11 b/g/n ✘ ✔ (C544dw only) a Dual Inline Memory Module. Print quality During the life of the printer. The fuser and ITU replacement should be plugged into an available memory slot. An optional memory card that can be determined by checking the last sheet...standard (soldered) plus 512MB. Either OK or Replace appears. 5025-2xx, 4xx Printer specifications Memory ✔-Supported ✘-Not supported Lexmark C540n, C543dn Lexmark C544n, C544dn, C544dw Memory Optional slots Standard DIMM sizesa Optional (DDR2) Maximum printer memoryb One slot 128MB 128MB, 256MB, and ...
...11 b/g/n ✘ ✔ (C544dw only) a Dual Inline Memory Module. Print quality During the life of the printer. The fuser and ITU replacement should be plugged into an available memory slot. An optional memory card that can be determined by checking the last sheet...standard (soldered) plus 512MB. Either OK or Replace appears. 5025-2xx, 4xx Printer specifications Memory ✔-Supported ✘-Not supported Lexmark C540n, C543dn Lexmark C544n, C544dn, C544dw Memory Optional slots Standard DIMM sizesa Optional (DDR2) Maximum printer memoryb One slot 128MB 128MB, 256MB, and ...
Service Manual
Page 21
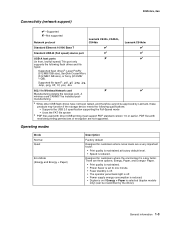
..., Paper, and Energy+ Paper. • Print quality is maintained. • Power Saver is set to one minute. • Fuser standby is off. • The operator panel back light is off. • Power supply energy consumption is reduced. • Duplex...tested, and therefore cannot be installed postmanufacturing. 5025-2xx, 4xx Connectivity (network support) ✔-Supported ✘-Not supported Network protocol Lexmark C540n, C543dn, C544dn Lexmark C544dw Standard Ethernet 10/100 Base T ✔ ✔ Standard USB-B (Full speed) device port ✔ ✔ USB-A...
..., Paper, and Energy+ Paper. • Print quality is maintained. • Power Saver is set to one minute. • Fuser standby is off. • The operator panel back light is off. • Power supply energy consumption is reduced. • Duplex...tested, and therefore cannot be installed postmanufacturing. 5025-2xx, 4xx Connectivity (network support) ✔-Supported ✘-Not supported Network protocol Lexmark C540n, C543dn, C544dn Lexmark C544dw Standard Ethernet 10/100 Base T ✔ ✔ Standard USB-B (Full speed) device port ✔ ✔ USB-A...
Service Manual
Page 30
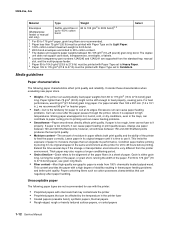
... wrapper until it is either grain long, running the length of the paper, or grain short, running the width of stability resulting in the printer fuser • Coated papers (erasable bond), synthetic papers, thermal papers • Rough-edged, rough or heavily textured surface papers, or curled papers 1-12 Service Manual The...
... wrapper until it is either grain long, running the length of the paper, or grain short, running the width of stability resulting in the printer fuser • Coated papers (erasable bond), synthetic papers, thermal papers • Rough-edged, rough or heavily textured surface papers, or curled papers 1-12 Service Manual The...
Service Manual
Page 36
... on . 4. The operator panel turns on . The operator panel displays system information. The fuser takes longer to warm up from a cold start than a warm start. 10. The printer calibrates. 2-2 Service Manual The LED turns on the display. 13. A partial ...
... on . 4. The operator panel turns on . The operator panel displays system information. The fuser takes longer to warm up from a cold start than a warm start. 10. The printer calibrates. 2-2 Service Manual The LED turns on the display. 13. A partial ...
Service Manual
Page 49
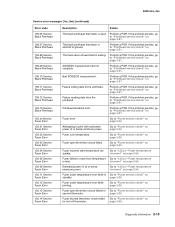
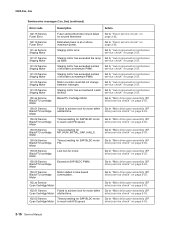
...51. Failure writing data tot he printhead. Perform a POR. Fuser failed to reach final temperature Go to "Fuser service check" on for Go to "Fuser service check" on page 2-51. Fuser shorted thermistor check failed Go to "122.xx-Fuser temperature in testing. Go to "Printhead service check" on ... Service Fuser Error 122.01 Service Fuser Error 122.02 Service Fuser Error 122.03 Service Fuser Error 122.04 Service Fuser Error 122.05 Service Fuser Error 122.06 Service Fuser Error 122.11 Service Fuser Error 122.12 Service Fuser Error 122.13 Service Fuser Error 122.14 Service Fuser Error ...
...51. Failure writing data tot he printhead. Perform a POR. Fuser failed to reach final temperature Go to "Fuser service check" on for Go to "Fuser service check" on page 2-51. Fuser shorted thermistor check failed Go to "122.xx-Fuser temperature in testing. Go to "Printhead service check" on ... Service Fuser Error 122.01 Service Fuser Error 122.02 Service Fuser Error 122.03 Service Fuser Error 122.04 Service Fuser Error 122.05 Service Fuser Error 122.06 Service Fuser Error 122.11 Service Fuser Error 122.12 Service Fuser Error 122.13 Service Fuser Error 122.14 Service Fuser Error ...
Service Manual
Page 50
... Motor Failed to achieve lock for motor within Go to "Main drive gear assembly (EP Cyan Cartridge Motor allotted time. Go to "Fuser service check" on page 2-35. 150.02 Service Black/ITU cartridge Motor Timeout waiting for SAP BLDC motor Go to "Main drive gear... Service error messages (1xx, 9xx) (continued) Error code Description Action 122.15 Service Fuser Error Fuser storted thermistor check failed for second thermistor Go to "Fuser service check" on page 2-32. 122.16 Service Fuser Error Estimated power is at maximum PWM. drive) service check" on page 2-35. 150...
... Motor Failed to achieve lock for motor within Go to "Main drive gear assembly (EP Cyan Cartridge Motor allotted time. Go to "Fuser service check" on page 2-35. 150.02 Service Black/ITU cartridge Motor Timeout waiting for SAP BLDC motor Go to "Main drive gear... Service error messages (1xx, 9xx) (continued) Error code Description Action 122.15 Service Fuser Error Fuser storted thermistor check failed for second thermistor Go to "Fuser service check" on page 2-32. 122.16 Service Fuser Error Estimated power is at maximum PWM. drive) service check" on page 2-35. 150...
Service Manual
Page 53
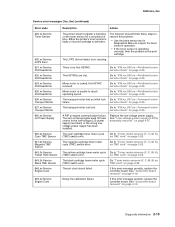
... Card Description Action The printer doesn't register a transition on page 2-26. The LVPS did not detect zero crossing. service check" on the toner sensor for fuser control in Diagnostics Menu to "936.xx, 937.xx-Transport motor service check" on page 2-25. The zero crossing signal used for a set period of...
... Card Description Action The printer doesn't register a transition on page 2-26. The LVPS did not detect zero crossing. service check" on the toner sensor for fuser control in Diagnostics Menu to "936.xx, 937.xx-Transport motor service check" on page 2-25. The zero crossing signal used for a set period of...
Service Manual
Page 58
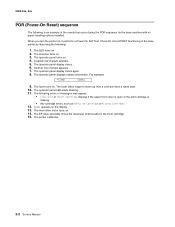
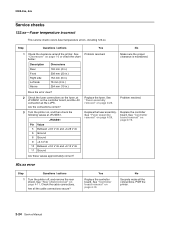
...controller board. POR the printer. 2-24 Service Manual Replace the fuser. See "Fuser assembly removal" on page 4-26. Replace the fuser assembly. 5025-2xx, 4xx Service checks 122.xx-Fuser temperature incorrect This service check covers fuser temperature errors, including 122.xx. Step Questions / actions Yes ...No 1 Check the clearance around the printer. Does the error clear? 2 Check the fuser connections on the fuser, at the LVPS. Problem resolved. Check the cable connections. No Securely make all the cable connections secure? See "Rear ...
...controller board. POR the printer. 2-24 Service Manual Replace the fuser. See "Fuser assembly removal" on page 4-26. Replace the fuser assembly. 5025-2xx, 4xx Service checks 122.xx-Fuser temperature incorrect This service check covers fuser temperature errors, including 122.xx. Step Questions / actions Yes ...No 1 Check the clearance around the printer. Does the error clear? 2 Check the fuser connections on the fuser, at the LVPS. Problem resolved. Check the cable connections. No Securely make all the cable connections secure? See "Rear ...
Service Manual
Page 65
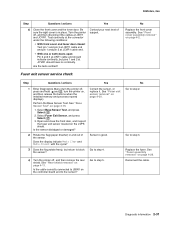
... 4 Turn the printer off , press and hold and , turn the printer on page 4-30. 2 Rotate the flag (paper diverter) in place. See "Fuser assembly removal" on page 4-11. Diagnostic information 2-31 5025-2xx, 4xx Step Questions / actions Yes 6 Close the front cover and the toner door. Go... printer support. Select Base Sensor Test, and press Select ( ). 2. No Go to step 5. Correct the sensor, or replace it. See "Fuser exit sensor removal" on , and then release the buttons when the installed memory and processor speed displays). Go to step 2. Reconnect the cable. ...
... 4 Turn the printer off , press and hold and , turn the printer on page 4-30. 2 Rotate the flag (paper diverter) in place. See "Fuser assembly removal" on page 4-11. Diagnostic information 2-31 5025-2xx, 4xx Step Questions / actions Yes 6 Close the front cover and the toner door. Go... printer support. Select Base Sensor Test, and press Select ( ). 2. No Go to step 5. Correct the sensor, or replace it. See "Fuser exit sensor removal" on , and then release the buttons when the installed memory and processor speed displays). Go to step 2. Reconnect the cable. ...


