
User Manual
Page 6
...supplies from the printer control panel 111 Checking the status of supplies from a network computer 111 Ordering supplies...112 Ordering toner cartridges...112 Ordering imaging kits ...113 Ordering a waste toner bottle...113 Replacing supplies...114 Replacing the waste toner bottle ...114 Replacing ... imaging kit ...117 Replacing a black and color imaging kit ...123 Replacing a toner cartridge...128 Replacing a developer unit ...130 Cleaning the exterior of the printer...135 Recycling Lexmark products...136 Moving the printer...136 Before moving the printer...136 Moving the printer to another...
...supplies from the printer control panel 111 Checking the status of supplies from a network computer 111 Ordering supplies...112 Ordering toner cartridges...112 Ordering imaging kits ...113 Ordering a waste toner bottle...113 Replacing supplies...114 Replacing the waste toner bottle ...114 Replacing ... imaging kit ...117 Replacing a black and color imaging kit ...123 Replacing a toner cartridge...128 Replacing a developer unit ...130 Cleaning the exterior of the printer...135 Recycling Lexmark products...136 Moving the printer...136 Before moving the printer...136 Moving the printer to another...
User Manual
Page 57
... high printing temperature may cause labels to fit the width of the label. Partial sheets also contaminate the printer and the cartridge with adhesive, and could void the printer and cartridge warranties. • Do not use envelopes made from the manual feeder or optional multipurpose feeder. • Set the Paper Type to...
... high printing temperature may cause labels to fit the width of the label. Partial sheets also contaminate the printer and the cartridge with adhesive, and could void the printer and cartridge warranties. • Do not use envelopes made from the manual feeder or optional multipurpose feeder. • Set the Paper Type to...
User Manual
Page 70
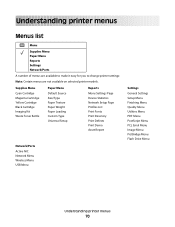
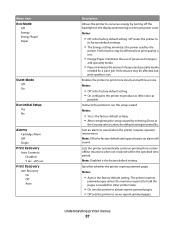
... to make it easy for you to change printer settings: Note: Certain menus are not available on selected printer models. Supplies Menu Cyan Cartridge Magenta Cartridge Yellow Cartridge Black Cartridge Imaging Kit Waste Toner Bottle Paper Menu Default Source Size/Type Paper Texture Paper Weight Paper Loading Custom Type Universal Setup Reports Menu Settings...
... to make it easy for you to change printer settings: Note: Certain menus are not available on selected printer models. Supplies Menu Cyan Cartridge Magenta Cartridge Yellow Cartridge Black Cartridge Imaging Kit Waste Toner Bottle Paper Menu Default Source Size/Type Paper Texture Paper Weight Paper Loading Custom Type Universal Setup Reports Menu Settings...
User Manual
Page 71
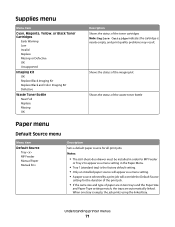
... installed in order for the duration of the print job. • If the same size and type of the toner cartridges Note: Replace Cartridge indicates the cartridge is nearly empty, and print quality problems may result. Understanding printer menus 71 When one tray is the factory default setting...(standard tray) is empty, the job prints using the linked tray. Supplies menu Menu item Cyan, Magenta, Yellow, or Black Toner Cartridges Early Warning Low Invalid Replace Missing or Defective OK Unsupported Imaging Kit OK Replace Black Imaging Kit Replace Black and Color Imaging Kit Defective Waste...
... installed in order for the duration of the print job. • If the same size and type of the toner cartridges Note: Replace Cartridge indicates the cartridge is nearly empty, and print quality problems may result. Understanding printer menus 71 When one tray is the factory default setting...(standard tray) is empty, the job prints using the linked tray. Supplies menu Menu item Cyan, Magenta, Yellow, or Black Toner Cartridges Early Warning Low Invalid Replace Missing or Defective OK Unsupported Imaging Kit OK Replace Black Imaging Kit Replace Black and Color Imaging Kit Defective Waste...
User Manual
Page 87
...; Off is the factory default setting. Menu item Eco-Mode Off Energy Energy/Paper Paper Quiet Mode Off On Run Initial Setup Yes No Alarms Cartridge Alarm Off Single Print Recovery Auto Continue Disabled 5 sec -255 sec Print Recovery Jam Recovery On Off Auto Description Allows the printer to run the...
...; Off is the factory default setting. Menu item Eco-Mode Off Energy Energy/Paper Paper Quiet Mode Off On Run Initial Setup Yes No Alarms Cartridge Alarm Off Single Print Recovery Auto Continue Disabled 5 sec -255 sec Print Recovery Jam Recovery On Off Auto Description Allows the printer to run the...
User Manual
Page 101
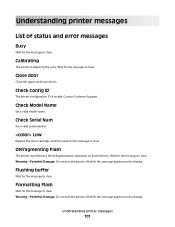
... 101 Defragmenting Flash The printer is performing the defragmentation operation on the display. Close door Close the upper and lower doors. Low Replace the toner cartridge, and then wait for the message to clear. Check Serial Num Set a valid serial number. Contact Customer Support. Understanding printer messages List of status and...
... 101 Defragmenting Flash The printer is performing the defragmentation operation on the display. Close door Close the upper and lower doors. Low Replace the toner cartridge, and then wait for the message to clear. Check Serial Num Set a valid serial number. Contact Customer Support. Understanding printer messages List of status and...

User Manual
Page 104
...into the printer. Understanding printer messages 104 Remote Management Active The printer is ready to clear the message and continue printing. Replace cartridge Replace the toner cartridge, and then press to clear. Tray Low Load the paper tray or other source with the correct paper type and size. ...Remove paper from the toner cartridges. Ready The printer is offline while it configures settings. Programming Flash Fonts and macros are being written to clear. Wait for and remove...
...into the printer. Understanding printer messages 104 Remote Management Active The printer is ready to clear the message and continue printing. Replace cartridge Replace the toner cartridge, and then press to clear. Tray Low Load the paper tray or other source with the correct paper type and size. ...Remove paper from the toner cartridges. Ready The printer is offline while it configures settings. Programming Flash Fonts and macros are being written to clear. Wait for and remove...

User Manual
Page 105
... a new one. 31.yy Defective Imaging Kit Replace the defective imaging kit with a new one. 32.yy Replace Unsupported Cartridge Replace the unsupported toner cartridge with a supported one. 34 Short paper Try one or more of the following : • Press to print, but is nearly full. Unsupported USB hub, please ...
... a new one. 31.yy Defective Imaging Kit Replace the defective imaging kit with a new one. 32.yy Replace Unsupported Cartridge Replace the unsupported toner cartridge with a supported one. 34 Short paper Try one or more of the following : • Press to print, but is nearly full. Unsupported USB hub, please ...

User Manual
Page 106
...; The printer cannot find a similar font and reformat the affected text. • Press , and then press to cancel printing. 40 Invalid refill, change cartridge Replace the toner cartridge with a new one or more of the following: • Press , and then press to cancel printing. • Simplify the print job by reducing the...
...; The printer cannot find a similar font and reformat the affected text. • Press , and then press to cancel printing. 40 Invalid refill, change cartridge Replace the toner cartridge with a new one or more of the following: • Press , and then press to cancel printing. • Simplify the print job by reducing the...
User Manual
Page 108
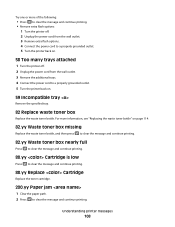
.... 82.yy Waste toner box nearly full Press to clear the message and continue printing. 88.yy Cartridge is low Press to clear the message and continue printing. 88.yy Replace Cartridge Replace the toner cartridge. 200.yy Paper jam 1 Clear the paper path. 2 Press to clear the message and continue printing. Try...
.... 82.yy Waste toner box nearly full Press to clear the message and continue printing. 88.yy Cartridge is low Press to clear the message and continue printing. 88.yy Replace Cartridge Replace the toner cartridge. 200.yy Paper jam 1 Clear the paper path. 2 Press to clear the message and continue printing. Try...
User Manual
Page 110
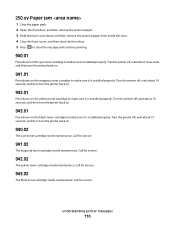
... messages 110 Turn the printer off , wait about 10 seconds, and then turn the printer back on 943.01 Press down on the yellow toner cartridge to make sure it is installed properly. Turn the printer off , wait about 10 seconds, and then turn the printer back on 941.01 Press... down on the cyan toner cartridge to make sure it is installed properly. 250.yy Paper jam 1 Clear the paper path. 2 Open the front door, and then remove the jammed paper...
... messages 110 Turn the printer off , wait about 10 seconds, and then turn the printer back on 943.01 Press down on the yellow toner cartridge to make sure it is installed properly. Turn the printer off , wait about 10 seconds, and then turn the printer back on 941.01 Press... down on the cyan toner cartridge to make sure it is installed properly. 250.yy Paper jam 1 Clear the paper path. 2 Open the front door, and then remove the jammed paper...

User Manual
Page 112
... Device Status page appears, displaying a summary of supply levels. When 88 Replace Cyan Cartridge, 88 Replace Magenta Cartridge, 88 Replace Yellow Cartridge, or 88 Replace Black Cartridge appears, you purchased the printer. Ordering supplies To order supplies in the U.S., contact Lexmark at www.lexmark.com or contact the place where you must replace the specified toner...
... Device Status page appears, displaying a summary of supply levels. When 88 Replace Cyan Cartridge, 88 Replace Magenta Cartridge, 88 Replace Yellow Cartridge, or 88 Replace Black Cartridge appears, you purchased the printer. Ordering supplies To order supplies in the U.S., contact Lexmark at www.lexmark.com or contact the place where you must replace the specified toner...
User Manual
Page 113
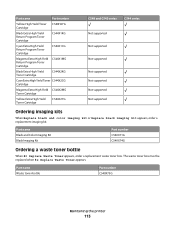
... High Yield Return Program Toner Cartridge C544X1KG Cyan Extra High Yield Return Program Toner Cartridge C544X1CG Magenta Extra High Yield C544X1MG Return Program Toner Cartridge Black Extra High Yield Toner Cartridge C544X2KG Cyan Extra High Yield Toner C544X2CG Cartridge Magenta Extra High Yield C544X2MG Toner Cartridge Yellow Extra High Yield Toner Cartridge C544X2YG C540 and C543 series...
... High Yield Return Program Toner Cartridge C544X1KG Cyan Extra High Yield Return Program Toner Cartridge C544X1CG Magenta Extra High Yield C544X1MG Return Program Toner Cartridge Black Extra High Yield Toner Cartridge C544X2KG Cyan Extra High Yield Toner C544X2CG Cartridge Magenta Extra High Yield C544X2MG Toner Cartridge Yellow Extra High Yield Toner Cartridge C544X2YG C540 and C543 series...

User Manual
Page 118
Maintaining the printer 118 2 Open the top door. 3 Remove the toner cartridges by lifting the handles, and then gently pulling away from the imaging kit. 4 Remove the right side cover.
Maintaining the printer 118 2 Open the top door. 3 Remove the toner cartridges by lifting the handles, and then gently pulling away from the imaging kit. 4 Remove the right side cover.

User Manual
Page 122
Maintaining the printer 122 17 Replace the waste toner bottle. 18 Replace the right side cover. 19 Replace the toner cartridges.
Maintaining the printer 122 17 Replace the waste toner bottle. 18 Replace the right side cover. 19 Replace the toner cartridges.

User Manual
Page 124
Maintaining the printer 124 2 Open the top door. 3 Remove the toner cartridges by lifting the handles, and then gently pulling away from the imaging kit. 4 Remove the right side cover.
Maintaining the printer 124 2 Open the top door. 3 Remove the toner cartridges by lifting the handles, and then gently pulling away from the imaging kit. 4 Remove the right side cover.

User Manual
Page 127
Maintaining the printer 127 14 Replace the waste toner bottle. 15 Replace the right side cover. 16 Replace the toner cartridges.
Maintaining the printer 127 14 Replace the waste toner bottle. 15 Replace the right side cover. 16 Replace the toner cartridges.
User Manual
Page 128
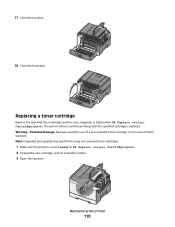
... door. The printer will not continue printing until the specified cartridge is not covered under warranty. Note: Degraded print quality may result from using non-Lexmark toner cartridges. 1 Make sure the printer is on and Ready or 88 Replace Cartridge appears. 2 Unpack the new cartridge, and set it near the printer. 3 Open the top door...
... door. The printer will not continue printing until the specified cartridge is not covered under warranty. Note: Degraded print quality may result from using non-Lexmark toner cartridges. 1 Make sure the printer is on and Ready or 88 Replace Cartridge appears. 2 Unpack the new cartridge, and set it near the printer. 3 Open the top door...

User Manual
Page 129
Y K M C Maintaining the printer 129 Y C M K Y C M K 4 Remove the toner cartridge by lifting the handle, and then gently pulling away from the imaging kit. Y K M C 5 Align the new toner cartridge, and then press down until it is all the way into the slot.
Y K M C Maintaining the printer 129 Y C M K Y C M K 4 Remove the toner cartridge by lifting the handle, and then gently pulling away from the imaging kit. Y K M C 5 Align the new toner cartridge, and then press down until it is all the way into the slot.
User Manual
Page 131
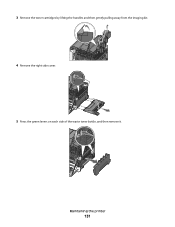
Maintaining the printer 131 3 Remove the toner cartridges by lifting the handles and then gently pulling away from the imaging kit. 4 Remove the right side cover. 5 Press the green levers on each side of the waste toner bottle, and then remove it.
Maintaining the printer 131 3 Remove the toner cartridges by lifting the handles and then gently pulling away from the imaging kit. 4 Remove the right side cover. 5 Press the green levers on each side of the waste toner bottle, and then remove it.


