Clearing Jams Guide
Page 1
... Do not load too much media. Wait for Load tray or Ready to appear. • Push all trays in firmly after loading media. • Make sure the guides in the trays are properly positioned and are not pressing too tightly against the paper. • Make sure all media must be cleared ... jam areas Open doors and covers, and remove trays to locate instructions for Load manual feeder with to appear before loading it. • Do not use media that paper takes through the printer varies depending on the Lexmark Web site at www.lexmark.com/publications. • For detailed information about ...
... Do not load too much media. Wait for Load tray or Ready to appear. • Push all trays in firmly after loading media. • Make sure the guides in the trays are properly positioned and are not pressing too tightly against the paper. • Make sure all media must be cleared ... jam areas Open doors and covers, and remove trays to locate instructions for Load manual feeder with to appear before loading it. • Do not use media that paper takes through the printer varies depending on the Lexmark Web site at www.lexmark.com/publications. • For detailed information about ...
Clearing Jams Guide
Page 2
... in the duplex Paper Jam area" on page 5 241.xx Jam in Tray 1 Paper Jam "Clearing jams just beyond Tray 1" on page 2 242.xx Jam in Tray 2 Paper Jam "Clearing Tray 2 jams" on page 6 Clearing jams just beyond Tray 1 If the paper did not feed from Tray 1 and jammed just beyond the tray, 200.xx Paper Jam appears. 1 Open Tray 1. 2 Remove the jam...
... in the duplex Paper Jam area" on page 5 241.xx Jam in Tray 1 Paper Jam "Clearing jams just beyond Tray 1" on page 2 242.xx Jam in Tray 2 Paper Jam "Clearing Tray 2 jams" on page 6 Clearing jams just beyond Tray 1 If the paper did not feed from Tray 1 and jammed just beyond the tray, 200.xx Paper Jam appears. 1 Open Tray 1. 2 Remove the jam...
Clearing Jams Guide
Page 3
If the paper fed from Tray 2, but is caught between Tray 1 and Tray 2, 200.xx Paper Jam may appear. 1 Open Tray 2. 2 Grasp the paper on both sides. If the paper fed from Tray 2 correctly, the jam is in the tray. 242.xx Paper Jam appears. 1 Open Tray 2. 2 Remove the jam. Pull it out gently to avoid tearing it. Clearing Tray 2 jams If the paper did not feed from Tray 2, but is caught between Tray 1 and Tray 2, 242.xx Paper Jam may appear. 1 Open Tray 1. 2 Pull the paper up and then out of the tray. 3 Reinsert the tray. 3 Reinsert the tray. 3 Reinsert the tray. 3
If the paper fed from Tray 2, but is caught between Tray 1 and Tray 2, 200.xx Paper Jam may appear. 1 Open Tray 2. 2 Grasp the paper on both sides. If the paper fed from Tray 2 correctly, the jam is in the tray. 242.xx Paper Jam appears. 1 Open Tray 2. 2 Remove the jam. Pull it out gently to avoid tearing it. Clearing Tray 2 jams If the paper did not feed from Tray 2, but is caught between Tray 1 and Tray 2, 242.xx Paper Jam may appear. 1 Open Tray 1. 2 Pull the paper up and then out of the tray. 3 Reinsert the tray. 3 Reinsert the tray. 3 Reinsert the tray. 3
Clearing Jams Guide
Page 6
...the manual feeder, the display prompts you to feed properly, 200.xx Paper Jam appears. If the paper is visible, remove the tray completely. When paper jams entering Tray 1, 230.xx Paper Jam appears. 1 Remove Tray 1. 2 Pull the jammed paper down and out. 3 Remove the jam and close the door(s). Clearing... jams in the multipurpose feeder When paper jams in the following illustration, 200.xx Paper Jam or 230.xx Paper Jam appears. 1 Open Tray 1. 2 Pull the jammed paper straight up. Note: If no jam is pushed far enough into the manual feeder...
...the manual feeder, the display prompts you to feed properly, 200.xx Paper Jam appears. If the paper is visible, remove the tray completely. When paper jams entering Tray 1, 230.xx Paper Jam appears. 1 Remove Tray 1. 2 Pull the jammed paper down and out. 3 Remove the jam and close the door(s). Clearing... jams in the multipurpose feeder When paper jams in the following illustration, 200.xx Paper Jam or 230.xx Paper Jam appears. 1 Open Tray 1. 2 Pull the jammed paper straight up. Note: If no jam is pushed far enough into the manual feeder...
Troubleshooting Guide
Page 1
...responding, make sure you want to the printer and the host computer, print server, option, or other held jobs and deleting some of paper from the bin is not ready to receive data. Copies of these possibilities, turn the printer back on . Solving printing problems Multiple-...Solution Printer is full. For information regarding tested and approved USB flash memory devices, see the Lexmark Web site at www.lexmark.com. Specified output (exit) Remove the stack of them. Specified tray is secure. For more information about 10 seconds, and then turn the printer off by scrolling...
...responding, make sure you want to the printer and the host computer, print server, option, or other held jobs and deleting some of paper from the bin is not ready to receive data. Copies of these possibilities, turn the printer back on . Solving printing problems Multiple-...Solution Printer is full. For information regarding tested and approved USB flash memory devices, see the Lexmark Web site at www.lexmark.com. Specified output (exit) Remove the stack of them. Specified tray is secure. For more information about 10 seconds, and then turn the printer off by scrolling...

Troubleshooting Guide
Page 2
...Note: Setting Collate to print Cause Solution Job is completed. 2 Lexmark Status Messenger Utility This program is not available with the printer software...Documentation CD. Solution • Make sure the media size and type are the same in both trays. • Make sure the paper guides in the job. From the Finishing menu or the printer software, set correctly in the ...until Print Timeout appears, and then press . 6 Press until Off appears, and then press . The Lexmark Status Messenger informs you installed the Lexmark Status Messenger with Windows NT or Windows 2000.
...Note: Setting Collate to print Cause Solution Job is completed. 2 Lexmark Status Messenger Utility This program is not available with the printer software...Documentation CD. Solution • Make sure the media size and type are the same in both trays. • Make sure the paper guides in the job. From the Finishing menu or the printer software, set correctly in the ...until Print Timeout appears, and then press . 6 Press until Off appears, and then press . The Lexmark Status Messenger informs you installed the Lexmark Status Messenger with Windows NT or Windows 2000.
Troubleshooting Guide
Page 3
... cable, that it is securely connected. For more information, see the User's Guide. • Make sure you are on . Solving paper feed problems Paper frequently jams Cause Solution Media loaded does not meet the printer specifications. Too much media was not Clear media from a fresh package. •...securely connected to the printer system board. • Make sure you load it. Guides in the tray to see the Card Stock & Label Guide available on the Lexmark Web site at www.lexmark.com. Make sure the stack of an imaginary line drawn between the two infrared ports. •...
... cable, that it is securely connected. For more information, see the User's Guide. • Make sure you are on . Solving paper feed problems Paper frequently jams Cause Solution Media loaded does not meet the printer specifications. Too much media was not Clear media from a fresh package. •...securely connected to the printer system board. • Make sure you load it. Guides in the tray to see the Card Stock & Label Guide available on the Lexmark Web site at www.lexmark.com. Make sure the stack of an imaginary line drawn between the two infrared ports. •...
Troubleshooting Guide
Page 5
... Saver is low. Turn Color Saver off. Photoconductors may be defective. Replace the transfer belt. Toner is On. or worn. another tray. Toner cartridge is Replace the toner defective, empty, cartridge. Streaked horizontal lines Example Cause Solution A toner cartridge is defective or worn.... transfer belt. Streaked vertical lines Example Cause Solution Toner is smeared If media is not damp. • Make sure the Paper Type and Paper Weight settings match the type of the page: 1 Replace the toner cartridge(s) causing the line. 2 If the problem still...
... Saver is low. Turn Color Saver off. Photoconductors may be defective. Replace the transfer belt. Toner is On. or worn. another tray. Toner cartridge is Replace the toner defective, empty, cartridge. Streaked horizontal lines Example Cause Solution A toner cartridge is defective or worn.... transfer belt. Streaked vertical lines Example Cause Solution Toner is smeared If media is not damp. • Make sure the Paper Type and Paper Weight settings match the type of the page: 1 Replace the toner cartridge(s) causing the line. 2 If the problem still...
Troubleshooting Guide
Page 6
...or defective. Replace the fuser. Paper Type setting for the tray Make sure the Paper Type setting you are using is set to something is set to Transparency. Solution Reinstall or replace the cartridge. Select a different toner darkness setting in the paper path. Photoconductor is Replace the... toner low or may be almost cartridge. Toner is not supported. Replace the toner cartridge. 6 the paper tray. Avoid textured media with rough finishes. Use only transparencies recommended by the printer, the host computer, and the software application...
...or defective. Replace the fuser. Paper Type setting for the tray Make sure the Paper Type setting you are using is set to something is set to Transparency. Solution Reinstall or replace the cartridge. Select a different toner darkness setting in the paper path. Photoconductor is Replace the... toner low or may be almost cartridge. Toner is not supported. Replace the toner cartridge. 6 the paper tray. Avoid textured media with rough finishes. Use only transparencies recommended by the printer, the host computer, and the software application...

User's Guide
Page 50
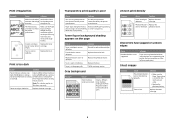
... print. 5 Press until Prt Quality Pgs appears, and then press . Printing a duplex job manually from the output bin and load them into the paper tray facedown with black toner only for CONFIG MENU to Color Lock Out mode, and remove and store the color printing supplies. ABC 7 Click File Œ...; Print. 8 From the drop-down list, choose Paper Handling. 9 Make sure Page order is set to Reverse order. 4 From the Print options area, select Even numbered pages. 5 Click Print. 6 Remove the ...
... print. 5 Press until Prt Quality Pgs appears, and then press . Printing a duplex job manually from the output bin and load them into the paper tray facedown with black toner only for CONFIG MENU to Color Lock Out mode, and remove and store the color printing supplies. ABC 7 Click File Œ...; Print. 8 From the drop-down list, choose Paper Handling. 9 Make sure Page order is set to Reverse order. 4 From the Print options area, select Even numbered pages. 5 Click Print. 6 Remove the ...

User's Guide
Page 91
...Troubleshooting 91 Call for the tray you are using. Replace the toner cartridge. Transparency print quality is poor Cause Solution You are using transparencies that do not meet Make sure the Paper Type and the printer specifications. into the paper tray. The media being used does... not meet the printer Use only transparencies recommended by the printer specifications. Paper Weight settings match the type of media you are...
...Troubleshooting 91 Call for the tray you are using. Replace the toner cartridge. Transparency print quality is poor Cause Solution You are using transparencies that do not meet Make sure the Paper Type and the printer specifications. into the paper tray. The media being used does... not meet the printer Use only transparencies recommended by the printer specifications. Paper Weight settings match the type of media you are...

Menus and Messages Guide
Page 8
... trays Legal and the paper size and paper type are correctly set, Executive the trays are automatically linked. Universal 8 Default Source menu Menu item Default Source Description Settings Identifies the default paper tray or other media source Tray Notes: MP Feeder • Tray 1 is set , the trays... are in this menu. JIS B5 Letter • If the same size and type of paper are automatically linked. For more information...
... trays Legal and the paper size and paper type are correctly set, Executive the trays are automatically linked. Universal 8 Default Source menu Menu item Default Source Description Settings Identifies the default paper tray or other media source Tray Notes: MP Feeder • Tray 1 is set , the trays... are in this menu. JIS B5 Letter • If the same size and type of paper are automatically linked. For more information...

Menus and Messages Guide
Page 12
...inches is the default setting. • Duplex sets the printer default to print the job correctly. Millimeters can be supported by the paper tray, Transparency drawer, or multipurpose feeder. Menu item Custom Type Recycled Description Settings Creates a menu listing for duplex and n-up printing, ...see "Finishing menu" on duplex and n-up printing. Paper Loading menu Menu item Recycled Loading Glossy Loading Letterhead Loading Preprinted Loading Colored Loading Custom Loading Custom Type menu Description Settings ...
...inches is the default setting. • Duplex sets the printer default to print the job correctly. Millimeters can be supported by the paper tray, Transparency drawer, or multipurpose feeder. Menu item Custom Type Recycled Description Settings Creates a menu listing for duplex and n-up printing, ...see "Finishing menu" on duplex and n-up printing. Paper Loading menu Menu item Recycled Loading Glossy Loading Letterhead Loading Preprinted Loading Colored Loading Custom Loading Custom Type menu Description Settings ...
Menus and Messages Guide
Page 21
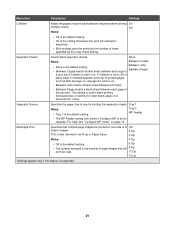
... page is inserted between each copy of Between Pages a print job if Collation is set to use for notes. Separator Source Specifies the paper tray to cassette. Multipage Print Specifies that multiple-page images be printed on . • Between Jobs inserts a blank sheet between print jobs....The number selected is the number of page images that keeps the print job stacked in a document for printing the separator sheets Tray 1 Notes: • Tray 1 is the default setting. Menu item Description Settings Collation Keeps the pages of a print job stacked in sequence when printing...
... page is inserted between each copy of Between Pages a print job if Collation is set to use for notes. Separator Source Specifies the paper tray to cassette. Multipage Print Specifies that multiple-page images be printed on . • Between Jobs inserts a blank sheet between print jobs....The number selected is the number of page images that keeps the print job stacked in a document for printing the separator sheets Tray 1 Notes: • Tray 1 is the default setting. Menu item Description Settings Collation Keeps the pages of a print job stacked in sequence when printing...

Menus and Messages Guide
Page 30
... Œ Assign MP Configures the printer to work with printer software or Feeder programs that use different source assignments for trays, Tray Renumber Œ Assign Tray drawers, and feeders Notes: Tray Renumber Œ Assign Manual Paper Tray Renumber Œ Assign Man Env • Off is the default setting. Menu item Description PCL Emulation Settings Œ A4...
... Œ Assign MP Configures the printer to work with printer software or Feeder programs that use different source assignments for trays, Tray Renumber Œ Assign Tray drawers, and feeders Notes: Tray Renumber Œ Assign Manual Paper Tray Renumber Œ Assign Man Env • Off is the default setting. Menu item Description PCL Emulation Settings Œ A4...
Menus and Messages Guide
Page 45
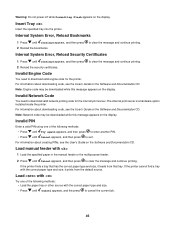
...exit. Invalid Engine Code You need to clear the message and continue printing. 2 Reload the bookmarks. If the printer cannot find a tray with 1 Load the specified paper in the manual feeder or the multipurpose feeder. 2 Press until Continue appears, and then press to download valid engine code for the ... and size, it feeds from the default source. Invalid PIN Enter a valid PIN using one of the following methods: • Load the paper tray or other source with Try one of the following methods: • Press until Try again appears, and then press to enter another PIN. &#...
...exit. Invalid Engine Code You need to clear the message and continue printing. 2 Reload the bookmarks. If the printer cannot find a tray with 1 Load the specified paper in the manual feeder or the multipurpose feeder. 2 Press until Continue appears, and then press to download valid engine code for the ... and size, it feeds from the default source. Invalid PIN Enter a valid PIN using one of the following methods: • Load the paper tray or other source with Try one of the following methods: • Press until Try again appears, and then press to enter another PIN. &#...

Menus and Messages Guide
Page 48
...on the firmware card. Waiting The printer has received data to print, but is using a different paper tray. • Check tray length and width guides and make sure the paper is properly loaded in the tray. • Check the Print Properties settings to print the contents of -Job command, a Form ... Tray Missing Insert the specified tray into the printer. USB/USB The printer is waiting for the message to clear the message. The USB port is requesting the correct paper size and type. 48 To fix this, download the correct download emulator version from the Lexmark Web site at www.lexmark...
...on the firmware card. Waiting The printer has received data to print, but is using a different paper tray. • Check tray length and width guides and make sure the paper is properly loaded in the tray. • Check the Print Properties settings to print the contents of -Job command, a Form ... Tray Missing Insert the specified tray into the printer. USB/USB The printer is waiting for the message to clear the message. The USB port is requesting the correct paper size and type. 48 To fix this, download the correct download emulator version from the Lexmark Web site at www.lexmark...
Menus and Messages Guide
Page 54
... 13 Clearing job accounting statistics 43 Close lower door 43 Close upper door 43 configuring multipurpose feeder 10 control panel 5 Copies 43 custom paper type 12 D default paper tray setting 8 Defragmenting Flash 43 Deleting 43 Disabling DLEs 44 Disabling Menus 44 Disk Corrupted 44 Disk recovery x/5 yyy% 44 display, control ...No held jobs 46 No jobs found 47 No jobs to cancel 46 notices 2 P paper creating a custom type 12 default tray 8 loading 8, 12 selecting weight 11 setting size/type 8 Universal Paper Size 12 Paper Texture menu 11 PC Unit Exposure Warning 53 PCL Emul menu 28 PDF menu 27 ...
... 13 Clearing job accounting statistics 43 Close lower door 43 Close upper door 43 configuring multipurpose feeder 10 control panel 5 Copies 43 custom paper type 12 D default paper tray setting 8 Defragmenting Flash 43 Deleting 43 Disabling DLEs 44 Disabling Menus 44 Disk Corrupted 44 Disk recovery x/5 yyy% 44 display, control ...No held jobs 46 No jobs found 47 No jobs to cancel 46 notices 2 P paper creating a custom type 12 default tray 8 loading 8, 12 selecting weight 11 setting size/type 8 Universal Paper Size 12 Paper Texture menu 11 PC Unit Exposure Warning 53 PCL Emul menu 28 PDF menu 27 ...
Menus and Messages Guide
Page 55
... 46 Remove all color supplies 47 Remove paper from standard output bin 47 replacing supplies 7 Resetting Fuser Count 47 Resetting the printer 47 Restore Held Jobs? 47 Restoring Factory Defaults 47 S Security menu 32 Serial 47 Serial menu 39 setting default paper tray 8 paper size/type 8 TCP/IP address 33... units of measure 12 Universal Paper Size 12 Setup menu 15 Setup Required 47 Some held jobs were lost 47 Standard Network and Network menu...
... 46 Remove all color supplies 47 Remove paper from standard output bin 47 replacing supplies 7 Resetting Fuser Count 47 Resetting the printer 47 Restore Held Jobs? 47 Restoring Factory Defaults 47 S Security menu 32 Serial 47 Serial menu 39 setting default paper tray 8 paper size/type 8 TCP/IP address 33... units of measure 12 Universal Paper Size 12 Setup menu 15 Setup Required 47 Some held jobs were lost 47 Standard Network and Network menu...
Help Menu Pages
Page 10
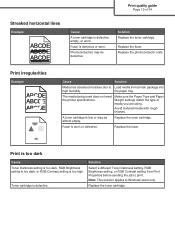
Replace the photoconductor units. The media being used does not meet Make sure the Paper Type and Paper the printer specifications. Replace the toner cartridge. Toner cartridge is too high. Solution Replace the toner cartridge. Print is too dark Cause Toner Darkness setting ... may be almost empty. Fuser is defective or worn. Print quality guide Page 10 of media you are using. Fuser is worn or defective. the paper tray. Replace the fuser. A toner cartridge is defective, empty, or worn.
Replace the photoconductor units. The media being used does not meet Make sure the Paper Type and Paper the printer specifications. Replace the toner cartridge. Toner cartridge is too high. Solution Replace the toner cartridge. Print is too dark Cause Toner Darkness setting ... may be almost empty. Fuser is defective or worn. Print quality guide Page 10 of media you are using. Fuser is worn or defective. the paper tray. Replace the fuser. A toner cartridge is defective, empty, or worn.


