
User Guide
Page 3
... the printer...33 Ordering supplies...33 Checking the status of parts and supplies ...33 Using genuine Lexmark parts and supplies ...33 Ordering toner cartridges ...34 Ordering imaging unit or imaging kit ...34 Ordering a waste toner bottle...34 Ordering a fuser maintenance kit ...34 Ordering a... transfer module ...34 Replacing parts and supplies...35 Replacing the imaging unit ...35 Replacing the imaging kit...39 Replacing a toner cartridge ...43 Replacing the waste toner bottle ...44 Replacing the fuser ...45 Replacing the pick...
... the printer...33 Ordering supplies...33 Checking the status of parts and supplies ...33 Using genuine Lexmark parts and supplies ...33 Ordering toner cartridges ...34 Ordering imaging unit or imaging kit ...34 Ordering a waste toner bottle...34 Ordering a fuser maintenance kit ...34 Ordering a... transfer module ...34 Replacing parts and supplies...35 Replacing the imaging unit ...35 Replacing the imaging kit...39 Replacing a toner cartridge ...43 Replacing the waste toner bottle ...44 Replacing the fuser ...45 Replacing the pick...

User Guide
Page 34
... Return Program imaging unit or imaging kit Black imaging unit Color (CMY) imaging kit Regular imaging unit or imaging kit Black imaging unit Color (CMY) imaging kit All countries and regions 74C0ZK0 74C0ZV0 74C0Z10 74C0Z50 Ordering a waste toner bottle Item Waste toner bottle Part number 74C0W00 Ordering a fuser maintenance kit Fuser maintenance kit type C4150 fuser maintenance kit, type 00, 110-120 V C4150 fuser...
... Return Program imaging unit or imaging kit Black imaging unit Color (CMY) imaging kit Regular imaging unit or imaging kit Black imaging unit Color (CMY) imaging kit All countries and regions 74C0ZK0 74C0ZV0 74C0Z10 74C0Z50 Ordering a waste toner bottle Item Waste toner bottle Part number 74C0W00 Ordering a fuser maintenance kit Fuser maintenance kit type C4150 fuser maintenance kit, type 00, 110-120 V C4150 fuser...

User Guide
Page 35
Maintaining the printer 35 Replacing parts and supplies Replacing the imaging unit 1 Open door B. 2 Remove the waste toner bottle.
Maintaining the printer 35 Replacing parts and supplies Replacing the imaging unit 1 Open door B. 2 Remove the waste toner bottle.
User Guide
Page 36
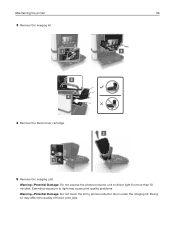
Maintaining the printer 36 3 Remove the imaging kit. 4 Remove the black toner cartridge. 5 Remove the imaging unit. Warning-Potential Damage: Do not expose the photoconductor unit to light may affect the quality of future print jobs. Doing so may cause print quality problems. Warning-Potential Damage: Do not touch the shiny photoconductor drum under the imaging kit. Extended exposure to direct light for more than 10 minutes.
Maintaining the printer 36 3 Remove the imaging kit. 4 Remove the black toner cartridge. 5 Remove the imaging unit. Warning-Potential Damage: Do not expose the photoconductor unit to light may affect the quality of future print jobs. Doing so may cause print quality problems. Warning-Potential Damage: Do not touch the shiny photoconductor drum under the imaging kit. Extended exposure to direct light for more than 10 minutes.
User Guide
Page 37
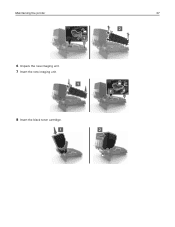
Maintaining the printer 37 6 Unpack the new imaging unit. 7 Insert the new imaging unit. 8 Insert the black toner cartridge.
Maintaining the printer 37 6 Unpack the new imaging unit. 7 Insert the new imaging unit. 8 Insert the black toner cartridge.

User Guide
Page 40
...: Do not touch the shiny photoconductor drum under the imaging unit. Warning-Potential Damage: Do not expose the photoconductor unit to light may affect the quality of future print jobs. Maintaining the printer 40 3 Remove the imaging kit. 4 Remove the toner cartridges. 5 Unpack the new imaging kit, and then remove the packing material. Extended exposure...
...: Do not touch the shiny photoconductor drum under the imaging unit. Warning-Potential Damage: Do not expose the photoconductor unit to light may affect the quality of future print jobs. Maintaining the printer 40 3 Remove the imaging kit. 4 Remove the toner cartridges. 5 Unpack the new imaging kit, and then remove the packing material. Extended exposure...

User Guide
Page 41
Maintaining the printer 41 Note: The black imaging unit includes the black developer unit and photoconductor unit. 7 Insert the black imaging unit into the new imaging kit. 8 Insert the toner cartridges.
Maintaining the printer 41 Note: The black imaging unit includes the black developer unit and photoconductor unit. 7 Insert the black imaging unit into the new imaging kit. 8 Insert the toner cartridges.

User Guide
Page 77
...Print dialog. Yes Go to light may cause print quality problems. Warning-Potential Damage: To avoid damage, do not touch the underside of the imaging unit or imaging kit. job. Go to direct light for more than 10 minutes. No The problem is solved. b Resend the print job. Step 2... a Depending on the control panel, select Color Adjust. Is the print still too dark? Warning-Potential Damage: Do not expose the imaging unit or imaging kit to step 3. The problem is solved. Is the print still too dark? Is the printer still printing blank or white pages? Note...
...Print dialog. Yes Go to light may cause print quality problems. Warning-Potential Damage: To avoid damage, do not touch the underside of the imaging unit or imaging kit. job. Go to direct light for more than 10 minutes. No The problem is solved. b Resend the print job. Step 2... a Depending on the control panel, select Color Adjust. Is the print still too dark? Warning-Potential Damage: Do not expose the imaging unit or imaging kit to step 3. The problem is solved. Is the print still too dark? Is the printer still printing blank or white pages? Note...

User Guide
Page 80
...2 Go to light may cause print quality problems. Warning-Potential Damage: To avoid damage, do not touch the underside of the imaging unit or imaging kit. No The problem is solved. a Depending on your operating system, specify the tray or feeder from Print dialog. Do ...Repeating defects" topic. The problem is solved. b Resend the print job. Troubleshooting 80 Action Yes Step 2 a Remove, and then reinstall the imaging unit or imaging kit. a Depending on prints? Notes: • Make sure that the settings match the paper loaded in the tray. • You can ...
...2 Go to light may cause print quality problems. Warning-Potential Damage: To avoid damage, do not touch the underside of the imaging unit or imaging kit. No The problem is solved. a Depending on your operating system, specify the tray or feeder from Print dialog. Do ...Repeating defects" topic. The problem is solved. b Resend the print job. Troubleshooting 80 Action Yes Step 2 a Remove, and then reinstall the imaging unit or imaging kit. a Depending on prints? Notes: • Make sure that the settings match the paper loaded in the tray. • You can ...

User Guide
Page 81
... to light may cause print quality problems. Warning-Potential Damage: To avoid damage, do not touch the underside of the imaging unit or imaging kit. a Depending on your operating system, specify the paper type and weight from a fresh package. Store paper in the tray. • You... can also change the settings on prints? Step 4 a Remove, and then reinstall the imaging unit or imaging kit. Extended exposure to direct light for more than 10 minutes. b Resend the print job. b Resend the print job. No The problem is solved....
... to light may cause print quality problems. Warning-Potential Damage: To avoid damage, do not touch the underside of the imaging unit or imaging kit. a Depending on your operating system, specify the paper type and weight from a fresh package. Store paper in the tray. • You... can also change the settings on prints? Step 4 a Remove, and then reinstall the imaging unit or imaging kit. Extended exposure to direct light for more than 10 minutes. b Resend the print job. b Resend the print job. No The problem is solved....

User Guide
Page 82
... solved. Are the margins correct? a Load the specified tray or feeder with the recommended paper type. Warning-Potential Damage: Do not expose the imaging unit or imaging kit to step 3. the size of the imaging unit or imaging kit. Do horizontal white lines still appear on prints? Step 3 a Remove, and then reinstall the...
... solved. Are the margins correct? a Load the specified tray or feeder with the recommended paper type. Warning-Potential Damage: Do not expose the imaging unit or imaging kit to step 3. the size of the imaging unit or imaging kit. Do horizontal white lines still appear on prints? Step 3 a Remove, and then reinstall the...
User Guide
Page 86
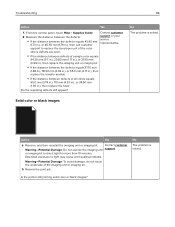
...: To avoid damage, do not touch the underside of the imaging unit or imaging kit. No The problem is solved. Extended exposure to direct light for more than 10 minutes. Solid color or black images Action Yes a Remove, and then reinstall the imaging unit or imaging kit. b Resend the print job. Do the repeating defects ... between defects of a single color equals 94.20 mm (3.7 in.), 29.80 mm (1.17 in.), or 25.10 mm (0.99 in.), then replace the imaging unit or imaging kit. • If the distance between the defects equals 37.70 mm (1.48 in.), 78.50 mm (3.09 in.), or 55.0 mm (2.17 in...
...: To avoid damage, do not touch the underside of the imaging unit or imaging kit. No The problem is solved. Extended exposure to direct light for more than 10 minutes. Solid color or black images Action Yes a Remove, and then reinstall the imaging unit or imaging kit. b Resend the print job. Do the repeating defects ... between defects of a single color equals 94.20 mm (3.7 in.), 29.80 mm (1.17 in.), or 25.10 mm (0.99 in.), then replace the imaging unit or imaging kit. • If the distance between the defects equals 37.70 mm (1.48 in.), 78.50 mm (3.09 in.), or 55.0 mm (2.17 in...

User Guide
Page 87
.... Extended exposure to step 3. Is the page or image still clipped? Step 3 a Remove, and then reinstall the imaging unit or imaging kit. b Resend the print job. Warning-Potential Damage: Do not expose the imaging unit or imaging kit to direct light for the paper loaded. Is the page or image still clipped? Contact customer support. Step 2 Go to...
.... Extended exposure to step 3. Is the page or image still clipped? Step 3 a Remove, and then reinstall the imaging unit or imaging kit. b Resend the print job. Warning-Potential Damage: Do not expose the imaging unit or imaging kit to direct light for the paper loaded. Is the page or image still clipped? Contact customer support. Step 2 Go to...

User Guide
Page 88
... Damage: To avoid damage, do not touch the underside of the imaging unit or imaging kit. Yes Contact customer support. Action Yes Replace the imaging unit or imaging kit, and then resend the print Contact customer job. Warning-Potential Damage: Do not expose the imaging unit or imaging kit to light can also change the settings on your operating...
... Damage: To avoid damage, do not touch the underside of the imaging unit or imaging kit. Yes Contact customer support. Action Yes Replace the imaging unit or imaging kit, and then resend the print Contact customer job. Warning-Potential Damage: Do not expose the imaging unit or imaging kit to light can also change the settings on your operating...

User Guide
Page 89
...damage, do not touch the underside of the imaging unit or imaging kit. Contact customer Warning-Potential Damage: Do not expose the imaging unit support. Vertical white lines Leading edge Trailing edge Action Yes a Remove, and then reinstall the imaging unit or imaging kit. b Resend the print job. Contact ... 89 Vertical dark lines or streaks Leading edge ABCDE ABCDE ABCDE Trailing edge Action Yes a Remove, and then reinstall the imaging unit or imaging kit. Do vertical dark lines or streaks still appear on prints? Extended exposure to light can cause print quality problems....
...damage, do not touch the underside of the imaging unit or imaging kit. Contact customer Warning-Potential Damage: Do not expose the imaging unit support. Vertical white lines Leading edge Trailing edge Action Yes a Remove, and then reinstall the imaging unit or imaging kit. b Resend the print job. Contact ... 89 Vertical dark lines or streaks Leading edge ABCDE ABCDE ABCDE Trailing edge Action Yes a Remove, and then reinstall the imaging unit or imaging kit. Do vertical dark lines or streaks still appear on prints? Extended exposure to light can cause print quality problems....
User Guide
Page 116
Index showing icons 17 home screen buttons using 14 horizontal dark lines 80 I icons on the home screen showing 17 imaging kit ordering 34 replacing 39 imaging unit ordering 34 replacing 35 importing a configuration file using the Embedded Web Server 109 indicator light printer status...O optional card installing 102 options firmware cards 95 internal solutions port 97 memory card 95 ordering fuser maintenance kit 34 imaging kit 34 imaging unit 34 toner cartridges 34 transfer module 34 ordering supplies waste toner bottle 34 P paper Universal size setting 20 paper jam clearing ...
Index showing icons 17 home screen buttons using 14 horizontal dark lines 80 I icons on the home screen showing 17 imaging kit ordering 34 replacing 39 imaging unit ordering 34 replacing 35 importing a configuration file using the Embedded Web Server 109 indicator light printer status...O optional card installing 102 options firmware cards 95 internal solutions port 97 memory card 95 ordering fuser maintenance kit 34 imaging kit 34 imaging unit 34 toner cartridges 34 transfer module 34 ordering supplies waste toner bottle 34 P paper Universal size setting 20 paper jam clearing ...
User Guide
Page 117
... from Windows 27 Push Button method 31 Q QR codes adding 18 R recycling Lexmark packaging 57 Lexmark products 56 toner cartridges 57 repeat print jobs 27 printing from a Macintosh computer 27 printing from Windows 27 repeating print defects 85 replacing imaging unit 35 replacing parts pick roller 47 separator bracket 49 transfer module 51 replacing...
... from Windows 27 Push Button method 31 Q QR codes adding 18 R recycling Lexmark packaging 57 Lexmark products 56 toner cartridges 57 repeat print jobs 27 printing from a Macintosh computer 27 printing from Windows 27 repeating print defects 85 replacing imaging unit 35 replacing parts pick roller 47 separator bracket 49 transfer module 51 replacing...


