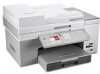
Getting Started
Page 17
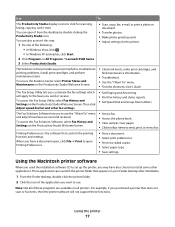
...you customize the fax settings which will not support these programs are available on the Productivity Studio Welcome Screen. • Check ink levels, order print cartridges, and find maintenance information. • Troubleshoot. • Use the "I Want To" menu and adjust how faxes are ...the icon of the following: • In Windows Vista, click . • In Windows XP and earlier, click Start. 2 Click Programs or All Programs ªLexmark 9500 Series. 3 Select Productivity Studio. • Scan, copy, fax, e-mail, or print a photo or document. • Transfer photos. • Make ...
...you customize the fax settings which will not support these programs are available on the Productivity Studio Welcome Screen. • Check ink levels, order print cartridges, and find maintenance information. • Troubleshoot. • Use the "I Want To" menu and adjust how faxes are ...the icon of the following: • In Windows Vista, click . • In Windows XP and earlier, click Start. 2 Click Programs or All Programs ªLexmark 9500 Series. 3 Select Productivity Studio. • Scan, copy, fax, e-mail, or print a photo or document. • Transfer photos. • Make ...
Getting Started
Page 40
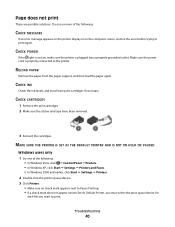
Make sure the power cord is properly connected to print. CHECK CARTRIDGES 1 Remove the print cartridges. 2 Make sure the sticker and tape have been removed. 3 Reinsert the cartridges. RELOAD PAPER Remove the paper from the paper support, and then load the paper again. Troubleshooting 40 MAKE..., resolve the error before trying to print again. CHECK POWER If the light is plugged into a properly grounded outlet. CHECK INK Check the ink levels, and install new print cartridges if necessary. Try one of the following : • In Windows Vista, click ª Control Panel ª Printers....
Make sure the power cord is properly connected to print. CHECK CARTRIDGES 1 Remove the print cartridges. 2 Make sure the sticker and tape have been removed. 3 Reinsert the cartridges. RELOAD PAPER Remove the paper from the paper support, and then load the paper again. Troubleshooting 40 MAKE..., resolve the error before trying to print again. CHECK POWER If the light is plugged into a properly grounded outlet. CHECK INK Check the ink levels, and install new print cartridges if necessary. Try one of the following : • In Windows Vista, click ª Control Panel ª Printers....

Getting Started
Page 57
..., and the used cartridge must be used in Switzerland. The Lexmark filter must be no more than 10 call attempts to the same number within the following license/agreement: The patented print cartridge(s) contained inside , confirms your point of ink will remain in the cartridge when replacement is /are dependent on any single manual call...
..., and the used cartridge must be used in Switzerland. The Lexmark filter must be no more than 10 call attempts to the same number within the following license/agreement: The patented print cartridge(s) contained inside , confirms your point of ink will remain in the cartridge when replacement is /are dependent on any single manual call...
User's Guide
Page 10
...edges of the page...205 Print speed is slow...206 Ink smudges during automatic two-sided printing ...207 Partial document or photo prints ...207 Photo smudges or scratches...208 Checking the print cartridges...208 Ink levels seem incorrect...208 Ink levels seem to go down too quickly ...209 A ...blank or incorrect page prints...209 Characters on printout are missing or unexpected ...209 Colors on printout are faded or differ from colors on the screen 210 Glossy ...
...edges of the page...205 Print speed is slow...206 Ink smudges during automatic two-sided printing ...207 Partial document or photo prints ...207 Photo smudges or scratches...208 Checking the print cartridges...208 Ink levels seem incorrect...208 Ink levels seem to go down too quickly ...209 A ...blank or incorrect page prints...209 Characters on printout are missing or unexpected ...209 Colors on printout are faded or differ from colors on the screen 210 Glossy ...
User's Guide
Page 12
... the printer display...250 Alignment Error...250 Cartridge Error (1102, 1203, 1204, or 120F)...251 Black Ink Low / Color Ink Low / Photo Ink Low ...251 Clear Carrier Jam ...252 Cover Open ...252 Error 1104 ...252 Left Cartridge Error / Right Cartridge Error...252 Left Cartridge Incorrect / Right Cartridge Incorrect ...253 Left Cartridge Missing / Right Cartridge Missing ...253 Memory Failure...253 Could not...
... the printer display...250 Alignment Error...250 Cartridge Error (1102, 1203, 1204, or 120F)...251 Black Ink Low / Color Ink Low / Photo Ink Low ...251 Clear Carrier Jam ...252 Cover Open ...252 Error 1104 ...252 Left Cartridge Error / Right Cartridge Error...252 Left Cartridge Incorrect / Right Cartridge Incorrect ...253 Left Cartridge Missing / Right Cartridge Missing ...253 Memory Failure...253 Could not...
User's Guide
Page 13
... Proof Sheet Error...255 Paper Mismatch...256 Error messages on the computer screen...256 Clearing error messages...256 Left/Right Cartridge Missing...257 Communication not available...257 General Printing Problem ...257 Ink Low ...257 Out of Memory...258 Fixing a printing failure...258 Unsupported file types found on memory card...258 Paper Jam...
... Proof Sheet Error...255 Paper Mismatch...256 Error messages on the computer screen...256 Clearing error messages...256 Left/Right Cartridge Missing...257 Communication not available...257 General Printing Problem ...257 Ink Low ...257 Out of Memory...258 Fixing a printing failure...258 Unsupported file types found on memory card...258 Paper Jam...
User's Guide
Page 49
... User's Guide. To access the Solution Center select Printer Status and Maintenance on the Productivity Studio Welcome Screen. • Check ink levels, order print cartridges, and find maintenance information. • Troubleshoot. • Use the "I Want To" menu and adjust how faxes are sent... the following: • In Windows Vista, click . • In Windows XP and earlier, click Start. 2 Click Programs or All Programs ŒLexmark 9500 Series. 3 Click Solution Center. 4 Click Advanced. 5 Click Printing Status. 6 Select or clear Play voice notification for printing events. 7 Click ...
... User's Guide. To access the Solution Center select Printer Status and Maintenance on the Productivity Studio Welcome Screen. • Check ink levels, order print cartridges, and find maintenance information. • Troubleshoot. • Use the "I Want To" menu and adjust how faxes are sent... the following: • In Windows Vista, click . • In Windows XP and earlier, click Start. 2 Click Programs or All Programs ŒLexmark 9500 Series. 3 Click Solution Center. 4 Click Advanced. 5 Click Printing Status. 6 Select or clear Play voice notification for printing events. 7 Click ...
User's Guide
Page 178
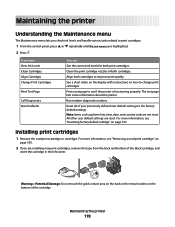
... as phone lists, time, date, and country code are installing new print cartridges, remove the tape from the back and bottom of the cartridge. For more information, see "Removing a used print cartridge or cartridges. From here View Ink Levels Clean Cartridges Align Cartridges Change Print Cartridges Print Test Page Call Diagnostics Reset Defaults You can See the current...
... as phone lists, time, date, and country code are installing new print cartridges, remove the tape from the back and bottom of the cartridge. For more information, see "Removing a used print cartridge or cartridges. From here View Ink Levels Clean Cartridges Align Cartridges Change Print Cartridges Print Test Page Call Diagnostics Reset Defaults You can See the current...
User's Guide
Page 180
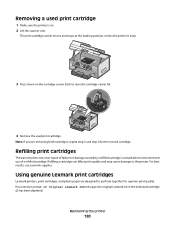
Removing a used print cartridge. Refilling print cartridges The warranty does not cover repair of a refilled cartridge. Note: If you receive an Out of Original Lexmark Ink message, the original Lexmark ink in the indicated cartridge (s) has been depleted. For best results, use of failures or damage caused by a refilled cartridge. Lexmark does not recommend use Lexmark supplies. Refilling a cartridge can affect print quality...
Removing a used print cartridge. Refilling print cartridges The warranty does not cover repair of a refilled cartridge. Note: If you receive an Out of Original Lexmark Ink message, the original Lexmark ink in the indicated cartridge (s) has been depleted. For best results, use of failures or damage caused by a refilled cartridge. Lexmark does not recommend use Lexmark supplies. Refilling a cartridge can affect print quality...
User's Guide
Page 181
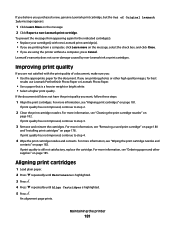
... on the message, select the check box, and click Close. • If you are printing from appearing again for the indicated cartridge(s): • Replace your cartridge(s) with the print quality of Original Lexmark Ink message appears: 1 Click Learn More on page 182. Maintaining the printer 181 If print quality has not improved, continue to...
... on the message, select the check box, and click Close. • If you are printing from appearing again for the indicated cartridge(s): • Replace your cartridge(s) with the print quality of Original Lexmark Ink message appears: 1 Click Learn More on page 182. Maintaining the printer 181 If print quality has not improved, continue to...
User's Guide
Page 182
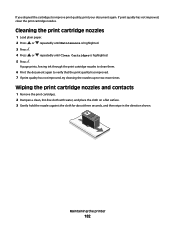
... 1 Load plain paper. 2 Press or repeatedly until Maintenance is highlighted. 3 Press . 4 Press or repeatedly until Clean Cartridges is highlighted. 5 Press . A page prints, forcing ink through the print cartridge nozzles to clean them. 6 Print the document again to verify that the print quality has improved. 7 If print quality has not improved, try cleaning the...
... 1 Load plain paper. 2 Press or repeatedly until Maintenance is highlighted. 3 Press . 4 Press or repeatedly until Clean Cartridges is highlighted. 5 Press . A page prints, forcing ink through the print cartridge nozzles to clean them. 6 Print the document again to verify that the print quality has improved. 7 If print quality has not improved, try cleaning the...

User's Guide
Page 185
... yield color cartridge 43 350 Photo cartridge 40 Not applicable 1 Values obtained by continuous printing. Item Part Number USB cable 1021294 Optional second paper tray (Tray 2) 30B0199 For more information, go to remove any ink residue that has accumulated on the paper exit tray. Notes: • For best results, use Lexmark Photo Paper or Lexmark PerfectFinish...
... yield color cartridge 43 350 Photo cartridge 40 Not applicable 1 Values obtained by continuous printing. Item Part Number USB cable 1021294 Optional second paper tray (Tray 2) 30B0199 For more information, go to remove any ink residue that has accumulated on the paper exit tray. Notes: • For best results, use Lexmark Photo Paper or Lexmark PerfectFinish...
User's Guide
Page 190
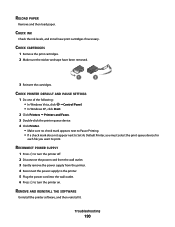
... THE SOFTWARE Uninstall the printer software, and then reinstall it. RELOAD PAPER Remove and then load paper. CHECK CARTRIDGES 1 Remove the print cartridges. 2 Make sure the sticker and tape have been removed. 3 Reinsert the cartridges. 1 2 CHECK PRINTER DEFAULT AND PAUSE SETTINGS 1 Do one of the following: • In Windows Vista, click ŒControl... the power supply from the printer. 4 Reconnect the power supply to the printer. 5 Plug the power cord into the wall outlet. 6 Press to print. CHECK INK Check the ink levels, and install new print cartridges if necessary.
... THE SOFTWARE Uninstall the printer software, and then reinstall it. RELOAD PAPER Remove and then load paper. CHECK CARTRIDGES 1 Remove the print cartridges. 2 Make sure the sticker and tape have been removed. 3 Reinsert the cartridges. 1 2 CHECK PRINTER DEFAULT AND PAUSE SETTINGS 1 Do one of the following: • In Windows Vista, click ŒControl... the power supply from the printer. 4 Reconnect the power supply to the printer. 5 Plug the power cord into the wall outlet. 6 Press to print. CHECK INK Check the ink levels, and install new print cartridges if necessary.
User's Guide
Page 204
... page 185. Poor text and graphic quality • Blank pages • Dark print • Faded print • Incorrect colors • Light and dark bands in print CHECK INK Check the ink levels, and install new print cartridges if necessary. REVIEW STEPS TO IMPROVE PRINT QUALITY See "Improving print quality" on page 181. CHECK PRINT...
... page 185. Poor text and graphic quality • Blank pages • Dark print • Faded print • Incorrect colors • Light and dark bands in print CHECK INK Check the ink levels, and install new print cartridges if necessary. REVIEW STEPS TO IMPROVE PRINT QUALITY See "Improving print quality" on page 181. CHECK PRINT...
User's Guide
Page 207
... With a document open , click File ΠPrint. 2 Click Properties, Preferences, Options, or Setup. USE THE TYPE OF INK RECOMMENDED FOR THE PRINTER Lexmark printers and print cartridges are possible solutions. CHECK PAPER SIZE Make sure the size of a two-sided document did not have been using Best. If you... notice that the ink on one or more of the following: CHECK DOCUMENT PLACEMENT Make sure the ...
... With a document open , click File ΠPrint. 2 Click Properties, Preferences, Options, or Setup. USE THE TYPE OF INK RECOMMENDED FOR THE PRINTER Lexmark printers and print cartridges are possible solutions. CHECK PAPER SIZE Make sure the size of a two-sided document did not have been using Best. If you... notice that the ink on one or more of the following: CHECK DOCUMENT PLACEMENT Make sure the ...
User's Guide
Page 208
... at least 24 hours before stacking, displaying, or storing. ARE THE STICKER AND TAPE REMOVED FROM THE CARTRIDGES? Install a new cartridge. ARE YOU PRINTING A LARGE FILE? ARE THE CARTRIDGES LOW ON INK? 1 Do one or more of the following : • In Windows Vista, click . • In ...Windows XP and earlier, click Start. 2 Click Programs or All Programs ŒLexmark 9500 Series. 3 Click Solution Center. 4 If an exclamation point (!) appears on a cartridge, the ink level is low. The ink levels displayed in the Printing Status window when you are possible solutions. Photo smudges or...
... at least 24 hours before stacking, displaying, or storing. ARE THE STICKER AND TAPE REMOVED FROM THE CARTRIDGES? Install a new cartridge. ARE YOU PRINTING A LARGE FILE? ARE THE CARTRIDGES LOW ON INK? 1 Do one or more of the following : • In Windows Vista, click . • In ...Windows XP and earlier, click Start. 2 Click Programs or All Programs ŒLexmark 9500 Series. 3 Click Solution Center. 4 If an exclamation point (!) appears on a cartridge, the ink level is low. The ink levels displayed in the Printing Status window when you are possible solutions. Photo smudges or...
User's Guide
Page 209
...program. The USB port on printout are missing or unexpected These are using a black or photo cartridge, make sure it is marked by the USB symbol. If you are using a color cartridge, make sure it is properly installed in the program you print photos or graphics. All other ...PRINTING WITH THE BEST SETTING ON THE PRINT SETUP TAB? To reduce ink usage, select Best only when you , check for proper print cartridge installation. Make sure the sticker and tape are possible solutions. MAKE SURE THE CARTRIDGES ARE PROPERLY INSTALLED With the front of the following : MAKE SURE...
...program. The USB port on printout are missing or unexpected These are using a black or photo cartridge, make sure it is marked by the USB symbol. If you are using a color cartridge, make sure it is properly installed in the program you print photos or graphics. All other ...PRINTING WITH THE BEST SETTING ON THE PRINT SETUP TAB? To reduce ink usage, select Best only when you , check for proper print cartridge installation. Make sure the sticker and tape are possible solutions. MAKE SURE THE CARTRIDGES ARE PROPERLY INSTALLED With the front of the following : MAKE SURE...

User's Guide
Page 210
...colors on the screen Check the following : • In Windows Vista, click Œ Control Panel. • In Windows XP or 2000, click Start. 2 Click Programs or All Programs ŒLexmark 9500 Series. 3 Click Solution Center. 4 If an exclamation point (!) appears on page 96. Allow them to dry before stacking. Install a new cartridge...the print cartridges, the ink level is a TrueType font. Not all fonts are designed to be available in the program font selection box. ARE THE COLOR AND PRINT SPEED SETTINGS CORRECT? ARE YOU USING A TRANSPARENCY OR PHOTO PAPER DESIGNED FOR AN INKJET PRINTER? ...
...colors on the screen Check the following : • In Windows Vista, click Œ Control Panel. • In Windows XP or 2000, click Start. 2 Click Programs or All Programs ŒLexmark 9500 Series. 3 Click Solution Center. 4 If an exclamation point (!) appears on page 96. Allow them to dry before stacking. Install a new cartridge...the print cartridges, the ink level is a TrueType font. Not all fonts are designed to be available in the program font selection box. ARE THE COLOR AND PRINT SPEED SETTINGS CORRECT? ARE YOU USING A TRANSPARENCY OR PHOTO PAPER DESIGNED FOR AN INKJET PRINTER? ...
User's Guide
Page 211
... paper, try using the Best setting. Not all fonts are designed to print your job. make sure you want to clean the print cartridge nozzles. See the program documentation for printing. MAKE SURE THE SETTING ON THE PRINT SETUP TAB IS APPROPRIATE FOR THE PAPER TYPE LOADED IN...stretched or resized font. Print is useful to print may need adjusting if the ink smears on plain paper. If you are using plain paper, try using the Automatic or Normal setting. MAKE SURE THE PRINT CARTRIDGE NOZZLES ARE CLEAN You may not be printed; Printed characters are improperly formed or...
... paper, try using the Best setting. Not all fonts are designed to print your job. make sure you want to clean the print cartridge nozzles. See the program documentation for printing. MAKE SURE THE SETTING ON THE PRINT SETUP TAB IS APPROPRIATE FOR THE PAPER TYPE LOADED IN...stretched or resized font. Print is useful to print may need adjusting if the ink smears on plain paper. If you are using plain paper, try using the Automatic or Normal setting. MAKE SURE THE PRINT CARTRIDGE NOZZLES ARE CLEAN You may not be printed; Printed characters are improperly formed or...
User's Guide
Page 215
...cartridges, the ink level is not selected. Install a new cartridge. Settings are not saved These are removed from the print cartridge... THE PRINT CARTRIDGES HAVE INK? 1 Do one or more of the cartridges. 3 Make... sure: • Set as Default Printer is selected. • Pause Printing is not selected. • Use Printer Offline is low. The printer reverts to the selected setting. Check the following. REMOVE THE STICKER AND TAPE FROM THE PRINT CARTRIDGES... 1 Lift the scanner unit. 2 Remove the print cartridges from the...
...cartridges, the ink level is not selected. Install a new cartridge. Settings are not saved These are removed from the print cartridge... THE PRINT CARTRIDGES HAVE INK? 1 Do one or more of the cartridges. 3 Make... sure: • Set as Default Printer is selected. • Pause Printing is not selected. • Use Printer Offline is low. The printer reverts to the selected setting. Check the following. REMOVE THE STICKER AND TAPE FROM THE PRINT CARTRIDGES... 1 Lift the scanner unit. 2 Remove the print cartridges from the...

