Getting Started
Page 3
......18 Making a copy...18 Printing a photo or selected photos...19 Scanning a document ...19 Sending a fax using the control panel ...20 Ordering supplies...21 Ordering print cartridges ...21 Ordering paper and other supplies...21 Getting the printer ready to fax 23 Choosing a fax connection...23 Connecting directly to a telephone wall jack...24...
......18 Making a copy...18 Printing a photo or selected photos...19 Scanning a document ...19 Sending a fax using the control panel ...20 Ordering supplies...21 Ordering print cartridges ...21 Ordering paper and other supplies...21 Getting the printer ready to fax 23 Choosing a fax connection...23 Connecting directly to a telephone wall jack...24...
Getting Started
Page 9
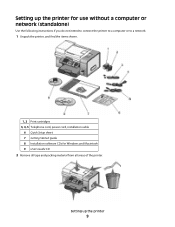
Setting up the printer for use without a computer or network (standalone) Use the following instructions if you do not intend to connect the printer to a computer or to a network. 1 Unpack the printer, and find the items shown. 1, 2 Print cartridges 3, 4, 5 Telephone cord, power cord, installation cable 6 Quick Setup sheet 7 Getting Started guide 8 Installation software CDs for Windows and Macintosh 9 User's Guide CD 2 Remove all tape and packing material from all areas of the printer. Setting up the printer 9
Setting up the printer for use without a computer or network (standalone) Use the following instructions if you do not intend to connect the printer to a computer or to a network. 1 Unpack the printer, and find the items shown. 1, 2 Print cartridges 3, 4, 5 Telephone cord, power cord, installation cable 6 Quick Setup sheet 7 Getting Started guide 8 Installation software CDs for Windows and Macintosh 9 User's Guide CD 2 Remove all tape and packing material from all areas of the printer. Setting up the printer 9
Getting Started
Page 11
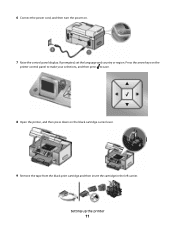
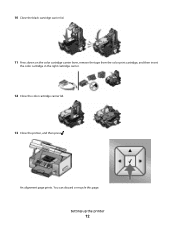
If prompted, set the language and country or region. Press the arrow keys on the printer control panel to make your selections, and then press to save. 8 Open the printer, and then press down on . 7 Raise the control panel display. Setting up the printer 11 6 Connect the power cord, and then turn the power on the black cartridge carrier lever. 9 Remove the tape from the black print cartridge and then insert the cartridge in the left carrier.
If prompted, set the language and country or region. Press the arrow keys on the printer control panel to make your selections, and then press to save. 8 Open the printer, and then press down on . 7 Raise the control panel display. Setting up the printer 11 6 Connect the power cord, and then turn the power on the black cartridge carrier lever. 9 Remove the tape from the black print cartridge and then insert the cartridge in the left carrier.
Getting Started
Page 12
You can discard or recycle this page. Setting up the printer 12 10 Close the black cartridge carrier lid. 11 Press down on the color cartridge carrier lever, remove the tape from the color print cartridge, and then insert the color cartridge in the right cartridge carrier. 12 Close the color cartridge carrier lid. 13 Close the printer, and then press . An alignment page prints.
You can discard or recycle this page. Setting up the printer 12 10 Close the black cartridge carrier lid. 11 Press down on the color cartridge carrier lever, remove the tape from the color print cartridge, and then insert the color cartridge in the right cartridge carrier. 12 Close the color cartridge carrier lid. 13 Close the printer, and then press . An alignment page prints.
Getting Started
Page 16
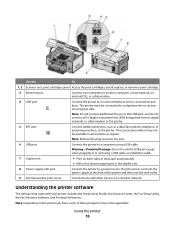
... devices, such as a data/fax modem, telephone, or answering machine, to receive incoming fax calls. Note: Depending on a wireless network. install, replace, or remove a print cartridge. 3 Ethernet port Connect your printer includes the Productivity Studio, the Solution Center, the Fax Setup Utility, the Fax Solutions Software, and Printing Preferences. Note: Remove... DSL, or cable modem. 4 LINE port Connect the printer to an active telephone line to a computer using a USB cable. Use the To 1, 2 Scanner unit, print cartridge carrier Access the print...
... devices, such as a data/fax modem, telephone, or answering machine, to receive incoming fax calls. Note: Depending on a wireless network. install, replace, or remove a print cartridge. 3 Ethernet port Connect your printer includes the Productivity Studio, the Solution Center, the Fax Setup Utility, the Fax Solutions Software, and Printing Preferences. Note: Remove... DSL, or cable modem. 4 LINE port Connect the printer to an active telephone line to a computer using a USB cable. Use the To 1, 2 Scanner unit, print cartridge carrier Access the print...
Getting Started
Page 17
...; Access the phone book. • View sample cover pages. • Click toolbar items to print photos, troubleshoot printing problems, install print cartridges, and perform maintenance tasks. You can open Printing Preferences. • Print a document. • Select print preferences. • Print two-...the following: • In Windows Vista, click . • In Windows XP and earlier, click Start. 2 Click Programs or All Programs ªLexmark 9500 Series. 3 Select Productivity Studio. • Scan, copy, fax, e-mail, or print a photo or document. • Transfer photos. &#...
...; Access the phone book. • View sample cover pages. • Click toolbar items to print photos, troubleshoot printing problems, install print cartridges, and perform maintenance tasks. You can open Printing Preferences. • Print a document. • Select print preferences. • Print two-...the following: • In Windows Vista, click . • In Windows XP and earlier, click Start. 2 Click Programs or All Programs ªLexmark 9500 Series. 3 Select Productivity Studio. • Scan, copy, fax, e-mail, or print a photo or document. • Transfer photos. &#...
Getting Started
Page 18
Printer Utility • Install print cartridges and perform other maintenance tasks. • Contact customer support. Place these items on both sides of copies. Fax Setup Utility • Customize settings for scan ...
Printer Utility • Install print cartridges and perform other maintenance tasks. • Contact customer support. Place these items on both sides of copies. Fax Setup Utility • Customize settings for scan ...
Getting Started
Page 21
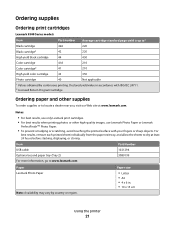
... print cartridges Lexmark 9500 Series models Item Part number Average cartridge standard page yield is up to1 Black cartridge 42A 220 Black cartridge2 42 220 High yield black cartridge 44 450 Color cartridge 41A 210 Color cartridge2 41 210 High yield color cartridge 43 350 Photo cartridge 40 Not..., or storing. Notes: • For best results, use only Lexmark print cartridges. • For best results when printing photos or other high-quality images, use Lexmark Photo Paper or Lexmark PerfectFinishTM Photo Paper. • To prevent smudging or scratching, avoid ...
... print cartridges Lexmark 9500 Series models Item Part number Average cartridge standard page yield is up to1 Black cartridge 42A 220 Black cartridge2 42 220 High yield black cartridge 44 450 Color cartridge 41A 210 Color cartridge2 41 210 High yield color cartridge 43 350 Photo cartridge 40 Not..., or storing. Notes: • For best results, use only Lexmark print cartridges. • For best results when printing photos or other high-quality images, use Lexmark Photo Paper or Lexmark PerfectFinishTM Photo Paper. • To prevent smudging or scratching, avoid ...
Getting Started
Page 40
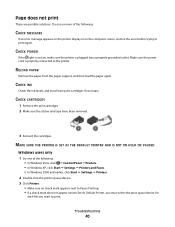
...levels, and install new print cartridges if necessary. Make sure the power cord is plugged into a properly grounded outlet. CHECK POWER If the light is not on the computer screen, resolve the error before trying to print. CHECK CARTRIDGES 1 Remove the print cartridges. 2 Make sure the ...sticker and tape have been removed. 3 Reinsert the cartridges. Try one of the following : • In Windows Vista, click ª Control Panel ª...
...levels, and install new print cartridges if necessary. Make sure the power cord is plugged into a properly grounded outlet. CHECK POWER If the light is not on the computer screen, resolve the error before trying to print. CHECK CARTRIDGES 1 Remove the print cartridges. 2 Make sure the ...sticker and tape have been removed. 3 Reinsert the cartridges. Try one of the following : • In Windows Vista, click ª Control Panel ª...

Getting Started
Page 57
...attempt and the beginning of ink will remain in the cartridge when replacement is available at www.lexmark.com. Uso del prodotto in Svizzera Questo prodotto richiede un filtro toni Billing svizzero, (codice Lexmark 14B5109), da installare su tutte le linee che ricevono impulsi... installé sur toute ligne recevant des impulsions de comptage en Suisse. Die Verwendung des Lexmark Filters ist obligatorisch, da in allen analogen Telefonleitungen in Svizzera. A replacement cartridge sold without these terms is required. End-user license agreement Opening this package, installing the ...
...attempt and the beginning of ink will remain in the cartridge when replacement is available at www.lexmark.com. Uso del prodotto in Svizzera Questo prodotto richiede un filtro toni Billing svizzero, (codice Lexmark 14B5109), da installare su tutte le linee che ricevono impulsi... installé sur toute ligne recevant des impulsions de comptage en Suisse. Die Verwendung des Lexmark Filters ist obligatorisch, da in allen analogen Telefonleitungen in Svizzera. A replacement cartridge sold without these terms is required. End-user license agreement Opening this package, installing the ...
User's Guide
Page 9
... 178 Understanding the Maintenance menu...178 Installing print cartridges...178 Removing a used print cartridge...180 Refilling print cartridges...180 Using genuine Lexmark print cartridges...180 Improving print quality...181 Aligning print cartridges...181 Cleaning the print cartridge nozzles...182 Wiping the print cartridge nozzles and contacts 182 Preserving the print cartridges...183 Removing the printer from the Tray 2 base...
... 178 Understanding the Maintenance menu...178 Installing print cartridges...178 Removing a used print cartridge...180 Refilling print cartridges...180 Using genuine Lexmark print cartridges...180 Improving print quality...181 Aligning print cartridges...181 Cleaning the print cartridge nozzles...182 Wiping the print cartridge nozzles and contacts 182 Preserving the print cartridges...183 Removing the printer from the Tray 2 base...
User's Guide
Page 10
...206 Ink smudges during automatic two-sided printing ...207 Partial document or photo prints ...207 Photo smudges or scratches...208 Checking the print cartridges...208 Ink levels seem incorrect...208 Ink levels seem to go down too quickly ...209 A blank or incorrect page prints...209 Characters on... printout are missing or unexpected ...209 Colors on printout are faded or differ from colors on the screen 210 Glossy photo paper or transparencies stick together ...210 Page prints with different fonts...211 Contents 10
...206 Ink smudges during automatic two-sided printing ...207 Partial document or photo prints ...207 Photo smudges or scratches...208 Checking the print cartridges...208 Ink levels seem incorrect...208 Ink levels seem to go down too quickly ...209 A blank or incorrect page prints...209 Characters on... printout are missing or unexpected ...209 Colors on printout are faded or differ from colors on the screen 210 Glossy photo paper or transparencies stick together ...210 Page prints with different fonts...211 Contents 10
User's Guide
Page 12
... (1102, 1203, 1204, or 120F)...251 Black Ink Low / Color Ink Low / Photo Ink Low ...251 Clear Carrier Jam ...252 Cover Open ...252 Error 1104 ...252 Left Cartridge Error / Right Cartridge Error...252 Left Cartridge Incorrect / Right Cartridge Incorrect ...253 Left Cartridge Missing / Right Cartridge Missing ...253 Memory Failure...253 Could not detect a proof sheet...254 Contents...
... (1102, 1203, 1204, or 120F)...251 Black Ink Low / Color Ink Low / Photo Ink Low ...251 Clear Carrier Jam ...252 Cover Open ...252 Error 1104 ...252 Left Cartridge Error / Right Cartridge Error...252 Left Cartridge Incorrect / Right Cartridge Incorrect ...253 Left Cartridge Missing / Right Cartridge Missing ...253 Memory Failure...253 Could not detect a proof sheet...254 Contents...
User's Guide
Page 13
......255 Printer Carrier Stall ...255 Proof Sheet Error...255 Paper Mismatch...256 Error messages on the computer screen...256 Clearing error messages...256 Left/Right Cartridge Missing...257 Communication not available...257 General Printing Problem ...257 Ink Low ...257 Out of Memory...258 Fixing a printing failure...258 Unsupported file types found...
......255 Printer Carrier Stall ...255 Proof Sheet Error...255 Paper Mismatch...256 Error messages on the computer screen...256 Clearing error messages...256 Left/Right Cartridge Missing...257 Communication not available...257 General Printing Problem ...257 Ink Low ...257 Out of Memory...258 Fixing a printing failure...258 Unsupported file types found...
User's Guide
Page 21
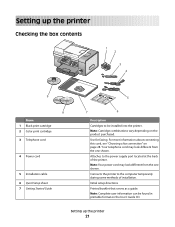
... Printed booklet that serves as a guide. Connects the printer to the power supply port located at the back of installation. Note: Cartridge combinations vary depending on page 28. Use for faxing. Note: Complete user information can be installed into the printer. For more information... power cord may look different from the one shown. Setting up the printer Checking the box contents 1 2 3 4 9 8 Name 1 Black print cartridge 2 Color print cartridge 3 Telephone cord 4 Power cord 5 Installation cable 6 Quick Setup sheet 7 Getting Started Guide 1 2 3 5 7 6 Description...
... Printed booklet that serves as a guide. Connects the printer to the power supply port located at the back of installation. Note: Cartridge combinations vary depending on page 28. Use for faxing. Note: Complete user information can be installed into the printer. For more information... power cord may look different from the one shown. Setting up the printer Checking the box contents 1 2 3 4 9 8 Name 1 Black print cartridge 2 Color print cartridge 3 Telephone cord 4 Power cord 5 Installation cable 6 Quick Setup sheet 7 Getting Started Guide 1 2 3 5 7 6 Description...
User's Guide
Page 25
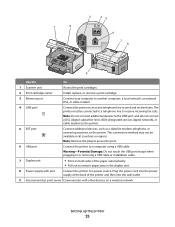
... of the paper automatically. • Pull out to receive incoming fax calls. 1 2 3 45 6 7 8 9 Use the To 1 Scanner unit Access the print cartridges. 2 Print cartridge carrier Install, replace, or remove a print cartridge. 3 Ethernet port Connect your computer to another computer, a local network, an external DSL, or cable modem. 4 LINE port Connect the printer to...
... of the paper automatically. • Pull out to receive incoming fax calls. 1 2 3 45 6 7 8 9 Use the To 1 Scanner unit Access the print cartridges. 2 Print cartridge carrier Install, replace, or remove a print cartridge. 3 Ethernet port Connect your computer to another computer, a local network, an external DSL, or cable modem. 4 LINE port Connect the printer to...
User's Guide
Page 49
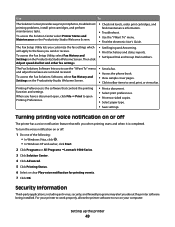
...Information Third-party applications, including anti-virus, security, and firewall programs may alert you to print photos, troubleshoot printing problems, install print cartridges, and perform maintenance tasks. Use To The Solution Center provides ways to use the "I Want To" menu. • Find the ... • In Windows Vista, click . • In Windows XP and earlier, click Start. 2 Click Programs or All Programs ŒLexmark 9500 Series. 3 Click Solution Center. 4 Click Advanced. 5 Click Printing Status. 6 Select or clear Play voice notification for printing events. 7 Click OK....
...Information Third-party applications, including anti-virus, security, and firewall programs may alert you to print photos, troubleshoot printing problems, install print cartridges, and perform maintenance tasks. Use To The Solution Center provides ways to use the "I Want To" menu. • Find the ... • In Windows Vista, click . • In Windows XP and earlier, click Start. 2 Click Programs or All Programs ŒLexmark 9500 Series. 3 Click Solution Center. 4 Click Advanced. 5 Click Printing Status. 6 Select or clear Play voice notification for printing events. 7 Click OK....
User's Guide
Page 53
... outlet. If you want appears on . 11 Set the language and country/region. a Press or repeatedly until the country/region you want appears on the cartridge carrier levers.
... outlet. If you want appears on . 11 Set the language and country/region. a Press or repeatedly until the country/region you want appears on the cartridge carrier levers.

User's Guide
Page 54
... Setup menu The Network Setup menu is available only if an internal wireless print server is installed in the right carrier. 19 Close the color cartridge carrier lid. 20 Close the printer. 21 Flip up and fully extend the paper exit tray stop holds paper as the default settings.... do not indicate a problem. 16 Remove the tape from the black print cartridge, and insert the cartridge in the left carrier. 17 Close the black cartridge carrier lid. 18 Remove the tape from the color print cartridge, and insert the cartridge in the printer. 1 From the control panel, press or repeatedly until Setup...
... Setup menu The Network Setup menu is available only if an internal wireless print server is installed in the right carrier. 19 Close the color cartridge carrier lid. 20 Close the printer. 21 Flip up and fully extend the paper exit tray stop holds paper as the default settings.... do not indicate a problem. 16 Remove the tape from the black print cartridge, and insert the cartridge in the left carrier. 17 Close the black cartridge carrier lid. 18 Remove the tape from the color print cartridge, and insert the cartridge in the printer. 1 From the control panel, press or repeatedly until Setup...
User's Guide
Page 178
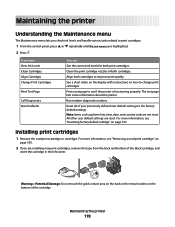
... printer Understanding the Maintenance menu The Maintenance menu lets you are installing new print cartridges, remove the tape from the back and bottom of both cartridges. Align both print cartridges. Run modem diagnostic routines. For more information, see if the printer is highlighted... improve print quality. From here View Ink Levels Clean Cartridges Align Cartridges Change Print Cartridges Print Test Page Call Diagnostics Reset Defaults You can See the current ink levels for both cartridges to print cartridges. 1 From the control panel, press or repeatedly until...
... printer Understanding the Maintenance menu The Maintenance menu lets you are installing new print cartridges, remove the tape from the back and bottom of both cartridges. Align both print cartridges. Run modem diagnostic routines. For more information, see if the printer is highlighted... improve print quality. From here View Ink Levels Clean Cartridges Align Cartridges Change Print Cartridges Print Test Page Call Diagnostics Reset Defaults You can See the current ink levels for both cartridges to print cartridges. 1 From the control panel, press or repeatedly until...

