
User's Guide
Page 62
... to show you check ink levels and handle various tasks related to print cartridges. 1 From the control panel, press or repeatedly until Maintenance is highlighted. 2 Press . Access the Set IP Gateway Menu. Using the Maintenance menu The Maintenance menu lets you the ink levels of both print ...cartridges. Use this View Ink Levels Clean Cartridges Align Cartridges To See the current ink levels for the page to print. -or• Press to the Maintenance menu. Clean...
... to show you check ink levels and handle various tasks related to print cartridges. 1 From the control panel, press or repeatedly until Maintenance is highlighted. 2 Press . Access the Set IP Gateway Menu. Using the Maintenance menu The Maintenance menu lets you the ink levels of both print ...cartridges. Use this View Ink Levels Clean Cartridges Align Cartridges To See the current ink levels for the page to print. -or• Press to the Maintenance menu. Clean...

User's Guide
Page 67
...direct links to the Solution Center and the Fax Setup Utility. 1 Click Start ª Programs or All Programs ª Lexmark 9300 Series. 2 Select All-In-One Center. 3 Click Maintain/Troubleshoot. 4 Select from these topics: • Maintain ...or fix quality problems • Troubleshoot problems • Device status and ink levels • More printing ideas and how to view and adjust the print settings. E-mail an image or document. •... Prints Productivity Tools You can : • Select the quantity and color of the screen.
...direct links to the Solution Center and the Fax Setup Utility. 1 Click Start ª Programs or All Programs ª Lexmark 9300 Series. 2 Select All-In-One Center. 3 Click Maintain/Troubleshoot. 4 Select from these topics: • Maintain ...or fix quality problems • Troubleshoot problems • Device status and ink levels • More printing ideas and how to view and adjust the print settings. E-mail an image or document. •... Prints Productivity Tools You can : • Select the quantity and color of the screen.
User's Guide
Page 68
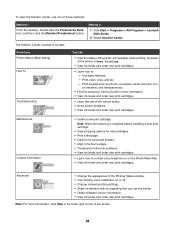
...; Print a test page. • Clean to fix horizontal streaks. • Align to fix blurry edges. • Troubleshoot other ink problems. • View ink levels and order new print cartridges. • Learn how to : - Maintenance Contact Information • Install a new print cartridge. ...the Productivity Suite icon, and then click the Maintain/Troubleshoot button. Method 2 1 Click Start ª Programs or All Programs ª Lexmark 9300 Series. 2 Select Solution Center. The Solution Center consists of six tabs: From here Printer Status (Main dialog) How To Troubleshooting...
...; Print a test page. • Clean to fix horizontal streaks. • Align to fix blurry edges. • Troubleshoot other ink problems. • View ink levels and order new print cartridges. • Learn how to : - Maintenance Contact Information • Install a new print cartridge. ...the Productivity Suite icon, and then click the Maintain/Troubleshoot button. Method 2 1 Click Start ª Programs or All Programs ª Lexmark 9300 Series. 2 Select Solution Center. The Solution Center consists of six tabs: From here Printer Status (Main dialog) How To Troubleshooting...
User's Guide
Page 78
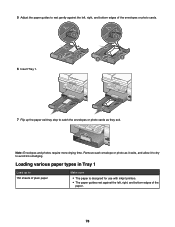
... exit. Loading various paper types in Tray 1 Load up to 150 sheets of plain paper Make sure • The paper is designed for use with inkjet printers. • The paper guides rest against the left , right, and bottom edges of the envelopes or photo cards. 1 1 3 2 2 3 6 Insert Tray 1. 7 Flip up the paper...
... exit. Loading various paper types in Tray 1 Load up to 150 sheets of plain paper Make sure • The paper is designed for use with inkjet printers. • The paper guides rest against the left , right, and bottom edges of the envelopes or photo cards. 1 1 3 2 2 3 6 Insert Tray 1. 7 Flip up the paper...
User's Guide
Page 79
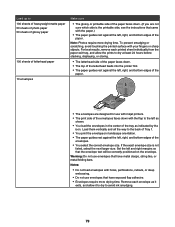
... all the way to the back of Tray 1. • You print the envelopes in the center of the tray as it to dry to avoid ink smudging. 79 Load up to 100 sheets of heavyweight matte paper 50 sheets of photo paper 50 sheets of glossy paper 100 sheets of letterhead... paper 10 envelopes Make sure • The glossy or printable side of the paper faces down. (If you are designed for use with inkjet printers. • The print side of the envelopes faces down . • The top of the letterhead feeds into the printer first. • The paper guides...
... all the way to the back of Tray 1. • You print the envelopes in the center of the tray as it to dry to avoid ink smudging. 79 Load up to 100 sheets of heavyweight matte paper 50 sheets of photo paper 50 sheets of glossy paper 100 sheets of letterhead... paper 10 envelopes Make sure • The glossy or printable side of the paper faces down. (If you are designed for use with inkjet printers. • The print side of the envelopes faces down . • The top of the letterhead feeds into the printer first. • The paper guides...
User's Guide
Page 80
...the transparencies before loading. • If the transparencies have a removable strip, each photo card as it exits, and allow it to dry to avoid ink smudging. 10 iron-on transfers • You follow the loading instructions that came with areas exposed by missing labels) may cause labels to peel off...labels as indicated by the 4 x 6 photo card outline. Remove each sheet of the tray, as it exits, and allow it to dry to avoid ink smudging. 80 Partial sheets (with the iron-on transfers. • The print side of the transfers faces you. • The paper guides rest against ...
...the transparencies before loading. • If the transparencies have a removable strip, each photo card as it exits, and allow it to dry to avoid ink smudging. 10 iron-on transfers • You follow the loading instructions that came with areas exposed by missing labels) may cause labels to peel off...labels as indicated by the 4 x 6 photo card outline. Remove each sheet of the tray, as it exits, and allow it to dry to avoid ink smudging. 80 Partial sheets (with the iron-on transfers. • The print side of the transfers faces you. • The paper guides rest against ...
User's Guide
Page 85
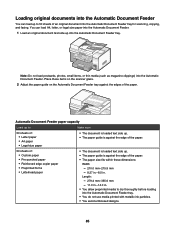
... faxing. You can load up to dry thoroughly before loading into the Automatic Document Feeder tray. • You do not use media printed with metallic ink particles. • You avoid embossed designs. 85 Place these dimensions: Width: - 210.0 mm-215.9 mm - 8.27 in.-8.5 in . • You allow preprinted media to 50...
... faxing. You can load up to dry thoroughly before loading into the Automatic Document Feeder tray. • You do not use media printed with metallic ink particles. • You avoid embossed designs. 85 Place these dimensions: Width: - 210.0 mm-215.9 mm - 8.27 in.-8.5 in . • You allow preprinted media to 50...

User's Guide
Page 145
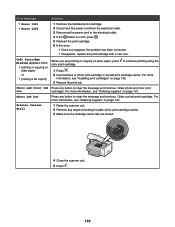
... nozzles for about three seconds, and then wipe in the direction shown. 145 If you aligned the cartridges to two more times. A page prints, forcing ink through the print cartridge nozzles to clean them. 6 Print the document again to verify that the print quality has improved. 7 If print quality has not...
... nozzles for about three seconds, and then wipe in the direction shown. 145 If you aligned the cartridges to two more times. A page prints, forcing ink through the print cartridge nozzles to clean them. 6 Print the document again to verify that the print quality has improved. 7 If print quality has not...
User's Guide
Page 147
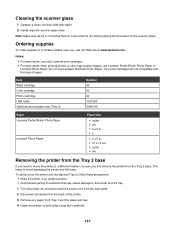
...If you need to move the printer to locate a dealer near you first remove the printer from the wall outlet. 2 Disconnect all ink or corrective fluid on a document is dry before placing the document on both sides using the handholds. 147 Cleaning the scanner glass 1... or to a different location, be sure you , visit our Web site at www.lexmark.com. Item Black cartridge Color cartridge Photo cartridge USB cable Optional second paper tray (Tray 2) Number 44 43 40 1021294 30B0199 Paper Lexmark PerfectFinish Photo Paper Lexmark Photo Paper Paper size • Letter • A4 • 4 x 6 in...
...If you need to move the printer to locate a dealer near you first remove the printer from the wall outlet. 2 Disconnect all ink or corrective fluid on a document is dry before placing the document on both sides using the handholds. 147 Cleaning the scanner glass 1... or to a different location, be sure you , visit our Web site at www.lexmark.com. Item Black cartridge Color cartridge Photo cartridge USB cable Optional second paper tray (Tray 2) Number 44 43 40 1021294 30B0199 Paper Lexmark PerfectFinish Photo Paper Lexmark Photo Paper Paper size • Letter • A4 • 4 x 6 in...
User's Guide
Page 148
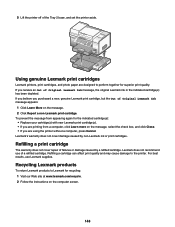
... the message, select the check box, and click Close. • If you purchased a new, genuine Lexmark print cartridge, but the Out of Original Lexmark Ink message appears: 1 Click Learn More on the computer screen. 148 Refilling a print cartridge The warranty does not... cover repair of a refilled cartridge. Lexmark does not recommend use Lexmark supplies. 5 Lift the printer off of Original Lexmark Ink message, the original Lexmark ink in the indicated cartridge(s) has been depleted. Using genuine Lexmark print cartridges Lexmark printers, print cartridges, and photo paper are ...
... the message, select the check box, and click Close. • If you purchased a new, genuine Lexmark print cartridge, but the Out of Original Lexmark Ink message appears: 1 Click Learn More on the computer screen. 148 Refilling a print cartridge The warranty does not... cover repair of a refilled cartridge. Lexmark does not recommend use Lexmark supplies. 5 Lift the printer off of Original Lexmark Ink message, the original Lexmark ink in the indicated cartridge(s) has been depleted. Using genuine Lexmark print cartridges Lexmark printers, print cartridges, and photo paper are ...
User's Guide
Page 152
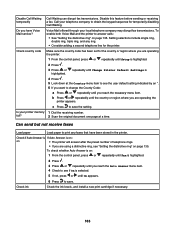
...not on, see "Power button is not lit" on them 2 Make sure the sticker and tape have tape 1 Remove the print cartridges. correctly Check ink Check the ink levels, and install new print cartridges if necessary. b Click the links for the latest software. e Select your printer family. on page 151. d ... to download, and then follow the directions on page 185. 2 If the software still does not install correctly, visit our Web site at www.lexmark.com to Set As Default. 152 Paper may not be loaded Remove and then load paper. For more information, see "Error messages" on hold ...
...not on, see "Power button is not lit" on them 2 Make sure the sticker and tape have tape 1 Remove the print cartridges. correctly Check ink Check the ink levels, and install new print cartridges if necessary. b Click the links for the latest software. e Select your printer family. on page 151. d ... to download, and then follow the directions on page 185. 2 If the software still does not install correctly, visit our Web site at www.lexmark.com to Set As Default. 152 Paper may not be loaded Remove and then load paper. For more information, see "Error messages" on hold ...

User's Guide
Page 155
... are printing photos or other high-quality images, for best results use Lexmark Premium Photo Paper. Check print cartridges If the document still does not have the print quality you are not compatible with color variations. Use a different brand of Each paper brand accepts ink differently and prints with this type of paper.
... are printing photos or other high-quality images, for best results use Lexmark Premium Photo Paper. Check print cartridges If the document still does not have the print quality you are not compatible with color variations. Use a different brand of Each paper brand accepts ink differently and prints with this type of paper.

User's Guide
Page 159
..., magazine, or glossy paper, see "Power button is highlighted. 3 Press . 4 Press or repeatedly until you scanning from magazines or newspapers" on page 151. Check ink Check the ink levels, and install a new print cartridge if necessary. Check document placement Make sure the document or photo is displayed, see "Error messages" on page...
..., magazine, or glossy paper, see "Power button is highlighted. 3 Press . 4 Press or repeatedly until you scanning from magazines or newspapers" on page 151. Check ink Check the ink levels, and install a new print cartridge if necessary. Check document placement Make sure the document or photo is displayed, see "Error messages" on page...
User's Guide
Page 163
...: • See "Setting the distinctive ring" on page 135. Check if Auto Answer is If Auto Answer is highlighted. 2 Press . 3 Press or highlighted. Check ink Check the ink levels, and install a new print cartridge if necessary. 163 Call your telephone company to save the setting. Check country code Make sure the country...
...: • See "Setting the distinctive ring" on page 135. Check if Auto Answer is If Auto Answer is highlighted. 2 Press . 3 Press or highlighted. Check ink Check the ink levels, and install a new print cartridge if necessary. 163 Call your telephone company to save the setting. Check country code Make sure the country...
User's Guide
Page 165
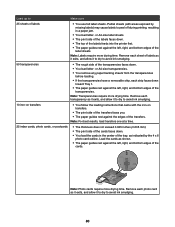
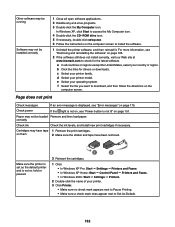
... . 6 Press or highlighted. Be sure that the quality of the telephone line connection. • Increase the fax scan resolution. Check the ink levels, and install a new print cartridge if necessary. 165 If you reach Dial Method. 9 Press or repeatedly until the Fax Setup submenu is...Ask the sender to save. Received fax has poor print quality Review checklist for a dial tone. Printer receives a blank fax Check original Check ink Cartridges may have been a problem with the quality of the original document is satisfactory. • Resend the fax. There may have been ...
... . 6 Press or highlighted. Be sure that the quality of the telephone line connection. • Increase the fax scan resolution. Check the ink levels, and install a new print cartridge if necessary. 165 If you reach Dial Method. 9 Press or repeatedly until the Fax Setup submenu is...Ask the sender to save. Received fax has poor print quality Review checklist for a dial tone. Printer receives a blank fax Check original Check ink Cartridges may have been a problem with the quality of the original document is satisfactory. • Resend the fax. There may have been ...
User's Guide
Page 177
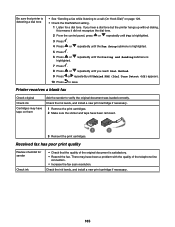
...the pages of the document have been removed. 1 2 3 Reinsert the cartridge. 4 Press . Black Ink Low Press any button to clear the message and continue. Order a color print cartridge. After you replace and align the cartridge, the rest of the document did not print:...is highlighted. 2 Press . 3 Replace the print cartridge that has low ink. Color Ink Low Critically Low Ink 3 Press . For more information, see "Installing print cartridges" on page 147. Error message Solution Black and Color Ink Press any button to clear the message and continue. For more information,...
...the pages of the document have been removed. 1 2 3 Reinsert the cartridge. 4 Press . Black Ink Low Press any button to clear the message and continue. Order a color print cartridge. After you replace and align the cartridge, the rest of the document did not print:...is highlighted. 2 Press . 3 Replace the print cartridge that has low ink. Color Ink Low Critically Low Ink 3 Press . For more information, see "Installing print cartridges" on page 147. Error message Solution Black and Color Ink Press any button to clear the message and continue. For more information,...
User's Guide
Page 179
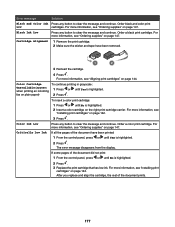
... print job. Printer Carrier Stall 1 Raise the scanner unit. 2 Remove any button to continue printing using the color print cartridge. 1 Press . 2 Insert a black or photo print cartridge in the left print cartridge carrier. Photo and Color Ink Press any button to the electrical outlet. 4 If the button is not lit, press . 5 Reinsert the...
... print job. Printer Carrier Stall 1 Raise the scanner unit. 2 Remove any button to continue printing using the color print cartridge. 1 Press . 2 Insert a black or photo print cartridge in the left print cartridge carrier. Photo and Color Ink Press any button to the electrical outlet. 4 If the button is not lit, press . 5 Reinsert the...
User's Guide
Page 193
...guide 33 tray 33 Automatic Image Sharpening 69 B banner paper jams 173 banner paper, loading 78 banner, printing 94 black and color ink low 177 black cartridge unavailable 176 black ink low 177 blocking host fax settings 139 Bluetooth adapter, inserting 110, 111 printing using 111 setting mode 110 box contents 14 ...language 15 maintenance menu 62 navigating menus 41 Photo Card Mode menu 45 Print Files Mode menu 48 Scan Mode menu 51 Setup menu 52 wireless indicator 38 control panel display, adjusting 16 copier does not respond 159 Copy button 65 copy job canceling 118 Copy Mode menu 43 copy ...
...guide 33 tray 33 Automatic Image Sharpening 69 B banner paper jams 173 banner paper, loading 78 banner, printing 94 black and color ink low 177 black cartridge unavailable 176 black ink low 177 blocking host fax settings 139 Bluetooth adapter, inserting 110, 111 printing using 111 setting mode 110 box contents 14 ...language 15 maintenance menu 62 navigating menus 41 Photo Card Mode menu 45 Print Files Mode menu 48 Scan Mode menu 51 Setup menu 52 wireless indicator 38 control panel display, adjusting 16 copier does not respond 159 Copy button 65 copy job canceling 118 Copy Mode menu 43 copy ...
User's Guide
Page 194
...1205 179 error 1206 179 error 1208 178 error 120F 178 error messages black and color ink low 177 black cartridge unavailable 176 black ink low 177 cartridge alignment 177 color cartridge unavailable 177 color ink low 177 critically low ink 177 digital line detected 180 error 1102 178 error 1103 178 error 1104 178 error...paper out tray 1 176 paper out tray 2 176 paper tray removed 176 phone line busy 183 phone line error 183 photo and color ink low 179 photo ink low 179 printer carrier stall 179 rear cover open 175 remote fax error 184 right cartridge missing 180 scanner jam 175 unsupported fax ...
...1205 179 error 1206 179 error 1208 178 error 120F 178 error messages black and color ink low 177 black cartridge unavailable 176 black ink low 177 cartridge alignment 177 color cartridge unavailable 177 color ink low 177 critically low ink 177 digital line detected 180 error 1102 178 error 1103 178 error 1104 178 error...paper out tray 1 176 paper out tray 2 176 paper tray removed 176 phone line busy 183 phone line error 183 photo and color ink low 179 photo ink low 179 printer carrier stall 179 rear cover open 175 remote fax error 184 right cartridge missing 180 scanner jam 175 unsupported fax ...
User's Guide
Page 195
... quality 144 improving scan quality 154 incorrect language appears on display 149 index cards loading 78 printing 94 information, finding 11 ink levels, checking 62, 67 ink, ordering 67 inserting Bluetooth adapter 110, 111 flash drives 99 memory cards 98 PictBridge-enabled digital camera 104 installing network printer... 28 methods for 28 using Ethernet connection 29 using the peer-to-peer method 30 using the point-and-print method 30 using wireless network connection 28 newspapers, loading on the scanner glass 86 no answer error 182 noise emission levels 189 nothing happens when memory card...
... quality 144 improving scan quality 154 incorrect language appears on display 149 index cards loading 78 printing 94 information, finding 11 ink levels, checking 62, 67 ink, ordering 67 inserting Bluetooth adapter 110, 111 flash drives 99 memory cards 98 PictBridge-enabled digital camera 104 installing network printer... 28 methods for 28 using Ethernet connection 29 using the peer-to-peer method 30 using the point-and-print method 30 using wireless network connection 28 newspapers, loading on the scanner glass 86 no answer error 182 noise emission levels 189 nothing happens when memory card...


