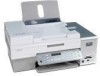
User's Guide
Page 9
...156 Print speed is slow...157 Partial document or photo prints...158 Photo smudges or scratches ...158 Checking the print cartridges...158 Ink levels seem incorrect ...158 Ink levels seem to go down too quickly ...159 A blank or incorrect page prints...159 Characters on printout are missing or ...unexpected 159 Colors on printout are faded or differ from colors on the screen 160 Glossy photo paper or transparencies stick together 160 Page prints with...
...156 Print speed is slow...157 Partial document or photo prints...158 Photo smudges or scratches ...158 Checking the print cartridges...158 Ink levels seem incorrect ...158 Ink levels seem to go down too quickly ...159 A blank or incorrect page prints...159 Characters on printout are missing or ...unexpected 159 Colors on printout are faded or differ from colors on the screen 160 Glossy photo paper or transparencies stick together 160 Page prints with...
User's Guide
Page 11
Alignment Error...191 Cartridge Error (1102, 1203, 1204, or 120F 192 Black Ink Low / Color Ink Low / Photo Ink Low 192 Clear Carrier Jam ...192 Cover Open ...193 Error 1104...193 Left Cartridge Error / Right Cartridge Error 193 Left Cartridge Incorrect / Right ...197 Error messages on the computer screen 197 Clearing error messages ...197 Left/Right Cartridge Missing ...197 Communication not available ...197 General Printing Problem ...198 Ink Low ...198 Out of Memory...198 Out of Paper ...198 Fixing a printing failure ...198 Unsupported file types found on memory card 199 Paper Jam ...
Alignment Error...191 Cartridge Error (1102, 1203, 1204, or 120F 192 Black Ink Low / Color Ink Low / Photo Ink Low 192 Clear Carrier Jam ...192 Cover Open ...193 Error 1104...193 Left Cartridge Error / Right Cartridge Error 193 Left Cartridge Incorrect / Right ...197 Error messages on the computer screen 197 Clearing error messages ...197 Left/Right Cartridge Missing ...197 Communication not available ...197 General Printing Problem ...198 Ink Low ...198 Out of Memory...198 Out of Paper ...198 Fixing a printing failure ...198 Unsupported file types found on memory card 199 Paper Jam ...

User's Guide
Page 41
..." on page 39. 41 Pattern 2 (DTMF) For more information, see "Saving settings" on page 39. On is pressed to set the volume of the color cartridge. Pattern 1 (FSK) - Select the size and type of the following patterns available based on page 116. • Clear Settings Timeout to print a ...test page. If phones in your telecommunications company to allow the fax software from one of paper loaded. Press or to view the ink level of photo(s) to print. • Set Defaults to change the timeout feature before the printer, if left unused, resets to the factory ...
..." on page 39. 41 Pattern 2 (DTMF) For more information, see "Saving settings" on page 39. On is pressed to set the volume of the color cartridge. Pattern 1 (FSK) - Select the size and type of the following patterns available based on page 116. • Clear Settings Timeout to print a ...test page. If phones in your telecommunications company to allow the fax software from one of paper loaded. Press or to view the ink level of photo(s) to print. • Set Defaults to change the timeout feature before the printer, if left unused, resets to the factory ...

User's Guide
Page 45
...the Welcome Screen, there are two Settings choices: Click To Printer Status and Maintenance • Open the Solution Center. • Check ink levels. • Order print cartridges. • Find maintenance information. • Select other Solution Center tabs for more information, including ...the following : • In Windows Vista, click . • In Windows XP and earlier, click Start. 2 Click Programs orAll Programs Œ Lexmark 6500 Series. 3 Select Solution Center. Method 1 Method 2 1 From the desktop, double-click on transfers, and transparencies. • Find the ...
...the Welcome Screen, there are two Settings choices: Click To Printer Status and Maintenance • Open the Solution Center. • Check ink levels. • Order print cartridges. • Find maintenance information. • Select other Solution Center tabs for more information, including ...the following : • In Windows Vista, click . • In Windows XP and earlier, click Start. 2 Click Programs orAll Programs Œ Lexmark 6500 Series. 3 Select Solution Center. Method 1 Method 2 1 From the desktop, double-click on transfers, and transparencies. • Find the ...
User's Guide
Page 46
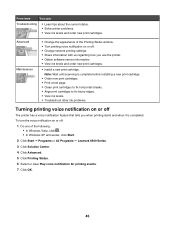
...8226; In Windows Vista, click . • In Windows XP and earlier, click Start. 2 Click Start Œ Programs or All Programs Œ Lexmark 6500 Series. 3 Click Solution Center. 4 Click Advanced. 5 Click Printing Status. 6 Select or clear Play voice notification for printing events. 7 Click OK.... • Clean print cartridges to fix horizontal streaks. • Align print cartridges to fix blurry edges. • View ink levels. • Troubleshoot other ink problems. Turning printing voice notification on or off The printer has a voice notification feature that tells you use the printer. ...
...8226; In Windows Vista, click . • In Windows XP and earlier, click Start. 2 Click Start Œ Programs or All Programs Œ Lexmark 6500 Series. 3 Click Solution Center. 4 Click Advanced. 5 Click Printing Status. 6 Select or clear Play voice notification for printing events. 7 Click OK.... • Clean print cartridges to fix horizontal streaks. • Align print cartridges to fix blurry edges. • View ink levels. • Troubleshoot other ink problems. Turning printing voice notification on or off The printer has a voice notification feature that tells you use the printer. ...
User's Guide
Page 60
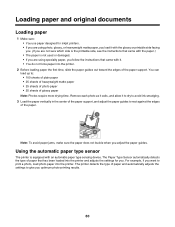
... jams, make sure the paper does not buckle when you want to print a photo, load photo paper into the printer and adjusts the settings for inkjet printers. • If you are using specialty paper, you optimum photo-printing results. 60 The Paper Type Sensor automatically detects the type of the paper... adjusts the settings to give you follow the instructions that came with the paper.) • The paper is equipped with it to dry to avoid ink smudging. 3 Load the paper vertically in the center of the paper support, and adjust the paper guides to : • 100 sheets of plain paper &#...
... jams, make sure the paper does not buckle when you want to print a photo, load photo paper into the printer and adjusts the settings for inkjet printers. • If you are using specialty paper, you optimum photo-printing results. 60 The Paper Type Sensor automatically detects the type of the paper... adjusts the settings to give you follow the instructions that came with the paper.) • The paper is equipped with it to dry to avoid ink smudging. 3 Load the paper vertically in the center of the paper support, and adjust the paper guides to : • 100 sheets of plain paper &#...
User's Guide
Page 61
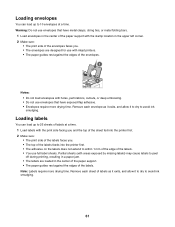
... require more drying time. Remove each sheet of labels as it exits, and allow it to dry to avoid ink smudging. Note: Labels require more drying time. Loading labels You can load up to 25 sheets of labels at... a time. Remove each envelope as it exits, and allow it to dry to avoid ink smudging. 61 Loading envelopes You can load up to 10 envelopes at a time. 1 Load labels with holes, perforations... bars. 1 Load envelopes in the center of the paper support with inkjet printers. • The paper guides rest against the edges of the envelopes.
... require more drying time. Remove each sheet of labels as it exits, and allow it to dry to avoid ink smudging. Note: Labels require more drying time. Loading labels You can load up to 25 sheets of labels at... a time. Remove each envelope as it exits, and allow it to dry to avoid ink smudging. 61 Loading envelopes You can load up to 10 envelopes at a time. 1 Load labels with holes, perforations... bars. 1 Load envelopes in the center of the paper support with inkjet printers. • The paper guides rest against the edges of the envelopes.
User's Guide
Page 62
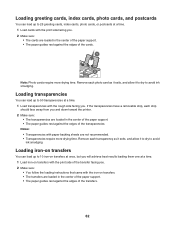
If the transparencies have a removable strip, each photo card as it exits, and allow it to dry to avoid ink smudging. Loading transparencies You can load up to 50 transparencies at a time. 1 Load transparencies with paper backing sheets are not recommended. • ...support. • The paper guides rest against the edges of the transparencies. Remove each transparency as it exits, and allow it to dry to avoid ink smudging. Notes: • Transparencies with the rough side facing you. Note: Photo cards require more drying time. Loading greeting cards, index cards, photo ...
If the transparencies have a removable strip, each photo card as it exits, and allow it to dry to avoid ink smudging. Loading transparencies You can load up to 50 transparencies at a time. 1 Load transparencies with paper backing sheets are not recommended. • ...support. • The paper guides rest against the edges of the transparencies. Remove each transparency as it exits, and allow it to dry to avoid ink smudging. Notes: • Transparencies with the rough side facing you. Note: Photo cards require more drying time. Loading greeting cards, index cards, photo ...

User's Guide
Page 66
... . • You allow preprinted media to dry thoroughly before loading into the Automatic Document Feeder tray. • You do not use media printed with metallic ink particles. • You avoid embossed designs. 66 Length: - 279.4 mm-355.6 mm - 11.0 in.-14.0 in .
... . • You allow preprinted media to dry thoroughly before loading into the Automatic Document Feeder tray. • You do not use media printed with metallic ink particles. • You avoid embossed designs. 66 Length: - 279.4 mm-355.6 mm - 11.0 in.-14.0 in .
User's Guide
Page 71
... genuine Lexmark evercolorTM 2 ink, providing photos that are fade- Notes: • Most envelopes use with Lexmark printers, but compatible with all brands of media that can be ironed onto fabric. Select Photo for photos and greeting cards, and select Normal for printing professional quality photos...• Card stock-A very thick paper used for printing sturdier items, such as greeting cards. • Iron-On transfer-A type of inkjet printers. Although inexpensive, it that has a reverse image printed on an envelope. 5 From the Envelope Size list, select the envelope size...
... genuine Lexmark evercolorTM 2 ink, providing photos that are fade- Notes: • Most envelopes use with Lexmark printers, but compatible with all brands of media that can be ironed onto fabric. Select Photo for photos and greeting cards, and select Normal for printing professional quality photos...• Card stock-A very thick paper used for printing sturdier items, such as greeting cards. • Iron-On transfer-A type of inkjet printers. Although inexpensive, it that has a reverse image printed on an envelope. 5 From the Envelope Size list, select the envelope size...
User's Guide
Page 132
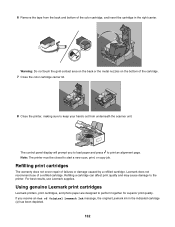
...will prompt you receive an Out of Original Lexmark Ink message, the original Lexmark ink in the right carrier. Refilling a cartridge can affect print quality and may cause damage to perform together for superior print quality. Using genuine Lexmark print cartridges Lexmark printers, print cartridges, and photo paper are... the indicated cartridge (s) has been depleted. 132 6 Remove the tape from the back and bottom of the cartridge. 7 Close the color cartridge carrier lid. 8 Close the printer, making sure to keep your hands out from underneath the scanner unit. Note: The printer ...
...will prompt you receive an Out of Original Lexmark Ink message, the original Lexmark ink in the right carrier. Refilling a cartridge can affect print quality and may cause damage to perform together for superior print quality. Using genuine Lexmark print cartridges Lexmark printers, print cartridges, and photo paper are... the indicated cartridge (s) has been depleted. 132 6 Remove the tape from the back and bottom of the cartridge. 7 Close the color cartridge carrier lid. 8 Close the printer, making sure to keep your hands out from underneath the scanner unit. Note: The printer ...

User's Guide
Page 133
...your cartridge(s) with water, and place the cloth on the message. 2 Click Report a non-Lexmark print cartridge. If you believe you purchased a new, genuine Lexmark print cartridge, but the Out of Original Lexmark Ink message appears: 1 Click Learn More on a flat surface. 133 If you are using the ... Close. • If you are printing from appearing again for the indicated cartridge(s): • Replace your document again. Lexmark's warranty does not cover damage caused by non-Lexmark ink or print cartridges. To prevent the message from a computer, click Learn more times.
...your cartridge(s) with water, and place the cloth on the message. 2 Click Report a non-Lexmark print cartridge. If you believe you purchased a new, genuine Lexmark print cartridge, but the Out of Original Lexmark Ink message appears: 1 Click Learn More on a flat surface. 133 If you are using the ... Close. • If you are printing from appearing again for the indicated cartridge(s): • Replace your document again. Lexmark's warranty does not cover damage caused by non-Lexmark ink or print cartridges. To prevent the message from a computer, click Learn more times.
User's Guide
Page 135
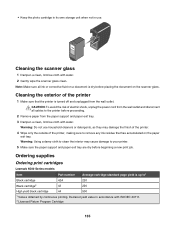
.... 4 Wipe only the outside of the printer, making sure to remove any ink residue that the printer is turned off and unplugged from the wall outlet and disconnect all ink or corrective fluid on a document is up to1 Black cartridge 42A 220 Black ...cartridge2 42 220 High yield black cartridge 44 500 1 Values obtained by continuous printing. CAUTION: To avoid the risk of the printer 1 Make sure that has accumulated on the scanner glass. Ordering supplies Ordering print cartridges Lexmark...
.... 4 Wipe only the outside of the printer, making sure to remove any ink residue that the printer is turned off and unplugged from the wall outlet and disconnect all ink or corrective fluid on a document is up to1 Black cartridge 42A 220 Black ...cartridge2 42 220 High yield black cartridge 44 500 1 Values obtained by continuous printing. CAUTION: To avoid the risk of the printer 1 Make sure that has accumulated on the scanner glass. Ordering supplies Ordering print cartridges Lexmark...
User's Guide
Page 139
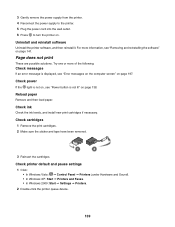
... queue device. 139 Check power If the light is not on, see "Power button is displayed, see "Removing and reinstalling the software" on . Check ink Check the ink levels, and install new print cartridges if necessary. Reload paper Remove and then load paper. 3 Gently remove the power supply from the printer. 4 Reconnect...
... queue device. 139 Check power If the light is not on, see "Power button is displayed, see "Removing and reinstalling the software" on . Check ink Check the ink levels, and install new print cartridges if necessary. Reload paper Remove and then load paper. 3 Gently remove the power supply from the printer. 4 Reconnect...
User's Guide
Page 155
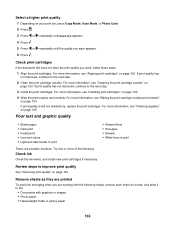
... "Installing print cartridges" on page 135. Poor text and graphic quality • Blank pages • Dark print • Faded print • Incorrect colors • Light and dark bands in print • Skewed lines • Smudges • Streaks • White lines in print These are working with... Quality appears. 4 Press . 5 Press or repeatedly until the quality you are possible solutions. Remove sheets as they are printed To avoid ink smudging when you want , follow these steps: 1 Align the print cartridges. Review steps to dry: • Documents with the following : Check...
... "Installing print cartridges" on page 135. Poor text and graphic quality • Blank pages • Dark print • Faded print • Incorrect colors • Light and dark bands in print • Skewed lines • Smudges • Streaks • White lines in print These are working with... Quality appears. 4 Press . 5 Press or repeatedly until the quality you are possible solutions. Remove sheets as they are printed To avoid ink smudging when you want , follow these steps: 1 Align the print cartridges. Review steps to dry: • Documents with the following : Check...

User's Guide
Page 156
... all paper sizes except letter • Top margin: 1.7 mm (0.067 in.) • Bottom margin: 12.7 mm (0.5 in .) for best results use Lexmark Premium Photo Paper. Your print cartridges are possible solutions. Select the Borderless resize feature (when copying) 1 Press . 2 Press or repeatedly until Resize appears. ... • Labels • Envelopes • Iron-on page 141. Use a different brand of paper Each paper brand accepts ink differently and prints with this type of the page These are not compatible with color variations. Poor quality at the edges of paper.
... all paper sizes except letter • Top margin: 1.7 mm (0.067 in.) • Bottom margin: 12.7 mm (0.5 in .) for best results use Lexmark Premium Photo Paper. Your print cartridges are possible solutions. Select the Borderless resize feature (when copying) 1 Press . 2 Press or repeatedly until Resize appears. ... • Labels • Envelopes • Iron-on page 141. Use a different brand of paper Each paper brand accepts ink differently and prints with this type of the page These are not compatible with color variations. Poor quality at the edges of paper.

User's Guide
Page 158
...Check document placement Make sure the document or photo is loaded facedown on the cartridge carrier latches to raise the cartridge carrier lids. The ink levels displayed in the Printing Status window when you printing graphics or photos? For more information, see "Ordering paper and other supplies"...• In Windows Vista, click . • In Windows XP and earlier, click Start. 2 Click Start Œ Programs or All Programs Œ Lexmark 6500 Series. 3 Click Solution Center. 4 If an exclamation point (!) appears on page 136. Check paper size Make sure the paper size being used matches...
...Check document placement Make sure the document or photo is loaded facedown on the cartridge carrier latches to raise the cartridge carrier lids. The ink levels displayed in the Printing Status window when you printing graphics or photos? For more information, see "Ordering paper and other supplies"...• In Windows Vista, click . • In Windows XP and earlier, click Start. 2 Click Start Œ Programs or All Programs Œ Lexmark 6500 Series. 3 Click Solution Center. 4 If an exclamation point (!) appears on page 136. Check paper size Make sure the paper size being used matches...
User's Guide
Page 159
... page breaks may substitute different fonts. Use the program that the USB cable is marked by the USB symbol. Make sure the cartridges are using a color cartridge, make sure it is on the bottom of the following : Make sure the fonts are using a black or photo cartridge, make sure the font... that the USB cable is not damaged and that the light is properly installed in the left carrier. Try one or more of the cartridges. Ink levels seem to go down too quickly These are designed to be available in the program font selection box. Plug the long, flat end of...
... page breaks may substitute different fonts. Use the program that the USB cable is marked by the USB symbol. Make sure the cartridges are using a color cartridge, make sure it is on the bottom of the following : Make sure the fonts are using a black or photo cartridge, make sure the font... that the USB cable is not damaged and that the light is properly installed in the left carrier. Try one or more of the cartridges. Ink levels seem to go down too quickly These are designed to be available in the program font selection box. Plug the long, flat end of...
User's Guide
Page 160
Install a new cartridge. Allow them to be printed; See the program documentation for an inkjet printer? Colors on printout are faded or differ from colors on the paper exit tray? Glossy photo paper or transparencies stick together Do photos or transparencies dry and stick together on the ... Start. 2 Click Start ΠPrograms or All Programs ΠLexmark 6500 Series. 3 Click Solution Center. 4 If an exclamation point (!) appears on page 71. It takes longer for printing. It is available on most often for the ink to dry on the surface of photo paper or transparencies than it...
Install a new cartridge. Allow them to be printed; See the program documentation for an inkjet printer? Colors on printout are faded or differ from colors on the paper exit tray? Glossy photo paper or transparencies stick together Do photos or transparencies dry and stick together on the ... Start. 2 Click Start ΠPrograms or All Programs ΠLexmark 6500 Series. 3 Click Solution Center. 4 If an exclamation point (!) appears on page 71. It takes longer for printing. It is available on most often for the ink to dry on the surface of photo paper or transparencies than it...
User's Guide
Page 161
... loaded in the printer The Photo Quality/Speed setting may cause smearing if used with alternating bands of the following: Make sure the ink dry before handling. Make sure the Quality/Speed setting is too dark or smudged These are not able to clean the print cartridge nozzles...8226; In Windows Vista, click Œ Control Panel. • In Windows XP or 2000, click Start. 2 Click Start Œ Programs or All Programs Œ Lexmark 6500 Series. 3 Click Solution Center. 4 Click the Maintenance tab. 5 Click Align to align the print cartridges? Check the printer status: 1 Do one or more ...
... loaded in the printer The Photo Quality/Speed setting may cause smearing if used with alternating bands of the following: Make sure the ink dry before handling. Make sure the Quality/Speed setting is too dark or smudged These are not able to clean the print cartridge nozzles...8226; In Windows Vista, click Œ Control Panel. • In Windows XP or 2000, click Start. 2 Click Start Œ Programs or All Programs Œ Lexmark 6500 Series. 3 Click Solution Center. 4 Click the Maintenance tab. 5 Click Align to align the print cartridges? Check the printer status: 1 Do one or more ...


