User's Guide
Page 11
Alignment Error...191 Cartridge Error (1102, 1203, 1204, or 120F 192 Black Ink Low / Color Ink Low / Photo Ink Low 192 Clear Carrier Jam ...192 Cover Open ...193 Error 1104...193 Left Cartridge Error / Right Cartridge Error 193 Left Cartridge Incorrect / Right Cartridge Incorrect 193 Left Cartridge Missing / Right Cartridge Missing 194 ...
Alignment Error...191 Cartridge Error (1102, 1203, 1204, or 120F 192 Black Ink Low / Color Ink Low / Photo Ink Low 192 Clear Carrier Jam ...192 Cover Open ...193 Error 1104...193 Left Cartridge Error / Right Cartridge Error 193 Left Cartridge Incorrect / Right Cartridge Incorrect 193 Left Cartridge Missing / Right Cartridge Missing 194 ...
User's Guide
Page 64
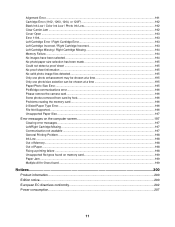
Note: The maximum scan area for the scanner glass is 216 x 297 mm (8.5 x 11.7 in.). 1 Open the top cover. 2 Place the original document or item facedown on the scanned image. 64 Note: Photos should be loaded as shown. 3 Close the top cover to avoid dark edges on the scanner glass in the lower right corner.
Note: The maximum scan area for the scanner glass is 216 x 297 mm (8.5 x 11.7 in.). 1 Open the top cover. 2 Place the original document or item facedown on the scanned image. 64 Note: Photos should be loaded as shown. 3 Close the top cover to avoid dark edges on the scanner glass in the lower right corner.
User's Guide
Page 111
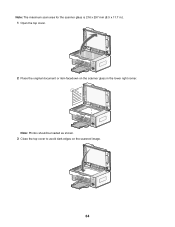
...color depth from the drop-down list. • From the Scan Resolution (Dots per inch): area, select the resolution value from the drop-down list. • Click Auto-crop the scanned item to use the slider to select your cropped value. • Click Select area to be sent. 5 Click Open...Management, click Work with Documents and Photos. 3 Click Add, and select Add File On My Computer. 4 Open the folder where the file is scanned. 5 From the Send Quality and Speed area of files to be ... original document facedown on the scanner glass, and close the top cover. 3 Click E-mail. 4 Click Start.
...color depth from the drop-down list. • From the Scan Resolution (Dots per inch): area, select the resolution value from the drop-down list. • Click Auto-crop the scanned item to use the slider to select your cropped value. • Click Select area to be sent. 5 Click Open...Management, click Work with Documents and Photos. 3 Click Add, and select Add File On My Computer. 4 Open the folder where the file is scanned. 5 From the Send Quality and Speed area of files to be ... original document facedown on the scanner glass, and close the top cover. 3 Click E-mail. 4 Click Start.
User's Guide
Page 126
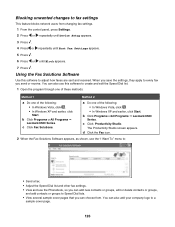
b Click Programs orAll Programs Œ Lexmark 6500 Series. b Click Programs orAll Programs Œ Lexmark 6500 Series. c Click Fax Solutions. The Productivity Studio ...and received. Using the Fax Solutions Software Use this software to create and edit the Speed Dial list. 1 Open the program through one of these methods: Method 1 a Do one of the following : • In...delete contacts or groups, and add contacts or groups to Speed Dial lists. • View several sample cover pages that you send or receive. Blocking unwanted changes to fax settings This feature blocks network users from...
b Click Programs orAll Programs Œ Lexmark 6500 Series. b Click Programs orAll Programs Œ Lexmark 6500 Series. c Click Fax Solutions. The Productivity Studio ...and received. Using the Fax Solutions Software Use this software to create and edit the Speed Dial list. 1 Open the program through one of these methods: Method 1 a Do one of the following : • In...delete contacts or groups, and add contacts or groups to Speed Dial lists. • View several sample cover pages that you send or receive. Blocking unwanted changes to fax settings This feature blocks network users from...
User's Guide
Page 193
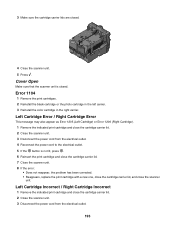
... are closed . Error 1104 1 Remove the print cartridges. 2 Reinstall the black cartridge or the photo cartridge in the left carrier. 3 Reinstall the color cartridge in the right carrier. Cover Open Make sure that the scanner unit is not lit, press . 6 Reinsert the print cartridge and close the cartridge carrier lid. 7 Close the scanner...
... are closed . Error 1104 1 Remove the print cartridges. 2 Reinstall the black cartridge or the photo cartridge in the left carrier. 3 Reinstall the color cartridge in the right carrier. Cover Open Make sure that the scanner unit is not lit, press . 6 Reinsert the print cartridge and close the cartridge carrier lid. 7 Close the scanner...
User's Guide
Page 215
...cleaning exterior of the printer 135 cleaning print cartridge nozzles 133 collating copies 103 color effects applying 90 color effects, applying to photos 96 color ink low 192 colors on paper do not match colors on the screen 160 communication not available error 197 communication problems establishing bidirectional ...101 photos 100 reducing an image 104 repeating an image 103 could not detect a proof sheet 195 cover open 193 creating and viewing slideshow 97 creating fax cover page using the Fax Setup Utility 120 using the Productivity Studio 125 cropping photo 87 customizing settings copy...
...cleaning exterior of the printer 135 cleaning print cartridge nozzles 133 collating copies 103 color effects applying 90 color effects, applying to photos 96 color ink low 192 colors on paper do not match colors on the screen 160 communication not available error 197 communication problems establishing bidirectional ...101 photos 100 reducing an image 104 repeating an image 103 could not detect a proof sheet 195 cover open 193 creating and viewing slideshow 97 creating fax cover page using the Fax Setup Utility 120 using the Productivity Studio 125 cropping photo 87 customizing settings copy...
User's Guide
Page 216
... removed from card by host 196 unsupported file types found on memory card 199 unsupported paper size 197 error messages troubleshooting cover open error 193 Exposure changing setting 90 EXT port 20 exterior of the printer cleaning 135 external devices checking 167 e-mail attaching...F factory default settings resetting internal wireless print server 149 resetting printer software 77 factory default settings, resetting to 172 faded colors 160 failed to connect error message 190 fax activity reports 129 confirmation reports 129 customizing settings 120 forwarding 118 receiving automatically 117...
... removed from card by host 196 unsupported file types found on memory card 199 unsupported paper size 197 error messages troubleshooting cover open error 193 Exposure changing setting 90 EXT port 20 exterior of the printer cleaning 135 external devices checking 167 e-mail attaching...F factory default settings resetting internal wireless print server 149 resetting printer software 77 factory default settings, resetting to 172 faded colors 160 failed to connect error message 190 fax activity reports 129 confirmation reports 129 customizing settings 120 forwarding 118 receiving automatically 117...
User's Guide
Page 221
..., 206 test page printing 165 test page does not print 166 Toolbar printing a Web page 67 printing only the photos from a Web page 68 top cover 19 Transfer Photos button 44 transfer settings changing 87 transferring photos from CD using computer 84 from CD using the computer 85 from flash drive... messages 2-sided paper type error 196 alignment error 191 black ink low 192 cartridge error 192 clear carrier jam 192 color ink low 192 could not detect a proof sheet 195 cover open 193 error 1104 193 error 1205 193 error 1206 193 failed to connect 190 fax error 188 fax mode unsupported 188...
..., 206 test page printing 165 test page does not print 166 Toolbar printing a Web page 67 printing only the photos from a Web page 68 top cover 19 Transfer Photos button 44 transfer settings changing 87 transferring photos from CD using computer 84 from CD using the computer 85 from flash drive... messages 2-sided paper type error 196 alignment error 191 black ink low 192 cartridge error 192 clear carrier jam 192 color ink low 192 could not detect a proof sheet 195 cover open 193 error 1104 193 error 1205 193 error 1206 193 failed to connect 190 fax error 188 fax mode unsupported 188...


