Troubleshooting Guide
Page 4
... telephone port (an R-interface port) on the PBX. From the printer control panel, press Fax to dial. • As an alternative, dial the telephone number manually. CHECK THE POWER Make sure the printer is plugged in , the power is finished before sending or receiving a fax. For more of the following hardware...
... telephone port (an R-interface port) on the PBX. From the printer control panel, press Fax to dial. • As an alternative, dial the telephone number manually. CHECK THE POWER Make sure the printer is plugged in , the power is finished before sending or receiving a fax. For more of the following hardware...
User's Guide
Page 8
...-sheet drawer ...164 Moving the printer to another location...167 Setting the printer up in a new location ...167 Adjusting the color registration...168 Adjusting the color registration automatically...168 Adjusting the color registration manually...168 Administrative support 170 Locking the administrator menus...170 Adjusting Power Saver...170 Setting the Auto Reset...171 Using the...
...-sheet drawer ...164 Moving the printer to another location...167 Setting the printer up in a new location ...167 Adjusting the color registration...168 Adjusting the color registration automatically...168 Adjusting the color registration manually...168 Administrative support 170 Locking the administrator menus...170 Adjusting Power Saver...170 Setting the Auto Reset...171 Using the...
User's Guide
Page 18
... be successfully attached to send and receive faxes. Do not set up this button when entering e-mail addresses and telephone numbers. 23 Redial/Pause 24 Manual Dial 25 Phone Book • Dial the last fax number entered (redial). • Insert a pause in the setup steps. If you do not need to...
... be successfully attached to send and receive faxes. Do not set up this button when entering e-mail addresses and telephone numbers. 23 Redial/Pause 24 Manual Dial 25 Phone Book • Dial the last fax number entered (redial). • Insert a pause in the setup steps. If you do not need to...

User's Guide
Page 64
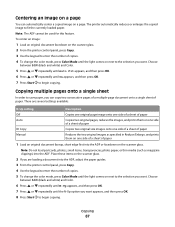
... guides. 3 From the printer control panel, press Copy. 4 Use the keypad to enter the number of copies. 5 To change the color mode, press Color Mode until the light comes on the contents of the printed output based on next to begin copying. Copying 64 Choose between B&W (black and.../Enlarge appears, and then press OK. 7 Press or repeatedly until the document type you want appears, and then press OK. 8 Press Start to manually select the size you want . Note: Do not load postcards, photos, small items, transparencies, photo paper, or thin media (such as magazine clippings...
... guides. 3 From the printer control panel, press Copy. 4 Use the keypad to enter the number of copies. 5 To change the color mode, press Color Mode until the light comes on the contents of the printed output based on next to begin copying. Copying 64 Choose between B&W (black and.../Enlarge appears, and then press OK. 7 Press or repeatedly until the document type you want appears, and then press OK. 8 Press Start to manually select the size you want . Note: Do not load postcards, photos, small items, transparencies, photo paper, or thin media (such as magazine clippings...
User's Guide
Page 67
...the scanner glass. 2 From the printer control panel, press Copy. 3 Use the keypad to enter the number of copies. 4 To change the color mode, press Color Mode until On appears, and then press OK. 7 Press Start to begin copying. Note: Do not load postcards, photos, small items, transparencies...of paper ID Copy Copies two original size images onto one side of a sheet of paper Manual Reduces the two original images as magazine clippings) into the ADF. Choose between B&W (black and white) and Color. 5 Press or repeatedly until Auto Fit appears, and then press OK. 6 Press or ...
...the scanner glass. 2 From the printer control panel, press Copy. 3 Use the keypad to enter the number of copies. 4 To change the color mode, press Color Mode until On appears, and then press OK. 7 Press Start to begin copying. Note: Do not load postcards, photos, small items, transparencies...of paper ID Copy Copies two original size images onto one side of a sheet of paper Manual Reduces the two original images as magazine clippings) into the ADF. Choose between B&W (black and white) and Color. 5 Press or repeatedly until Auto Fit appears, and then press OK. 6 Press or ...
User's Guide
Page 80
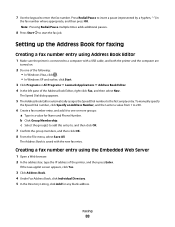
... appears. 5 The Address Book Editor automatically assigns the Address ID to , and then click OK. 8 Click OK. 9 From the File menu, select Save All. To manually specify the Address ID, click Specify an Address Number, and then enter a value from 1 to 100 for the desired address number. 6 Fill in the information...
... appears. 5 The Address Book Editor automatically assigns the Address ID to , and then click OK. 8 Click OK. 9 From the File menu, select Save All. To manually specify the Address ID, click Specify an Address Number, and then enter a value from 1 to 100 for the desired address number. 6 Fill in the information...

User's Guide
Page 87
... the printer control panel, press Fax. 5 Press or repeatedly until Select Sending a broadcast fax You can include Address Book numbers, Group Dial numbers, and one manually dialed number in a fax number Some fax numbers require one or more than one fax number. appears. Press or repeatedly to more pauses during the...
... the printer control panel, press Fax. 5 Press or repeatedly until Select Sending a broadcast fax You can include Address Book numbers, Group Dial numbers, and one manually dialed number in a fax number Some fax numbers require one or more than one fax number. appears. Press or repeatedly to more pauses during the...
User's Guide
Page 88
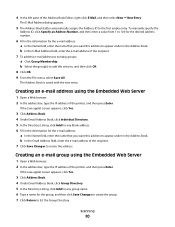
... the printer and the computer are turned on. 2 Do one or more groups: a Type in the fax number where appropriate, and then press OK. To manually specify the Speed Dial number, click Specify an Address Number, and then enter a value from 1 to 200. 6 Create a fax number entry, and add it to... keypad to one of the following: • In Windows Vista, click . • In Windows XP and earlier, click Start. 3 Click Programs or All Programs Œ Lexmark Applications Œ Address Book Editor. 4 In the left pane of the printer, and then press Enter.
... the printer and the computer are turned on. 2 Do one or more groups: a Type in the fax number where appropriate, and then press OK. To manually specify the Speed Dial number, click Specify an Address Number, and then enter a value from 1 to 200. 6 Create a fax number entry, and add it to... keypad to one of the following: • In Windows Vista, click . • In Windows XP and earlier, click Start. 3 Click Programs or All Programs Œ Lexmark Applications Œ Address Book Editor. 4 In the left pane of the printer, and then press Enter.

User's Guide
Page 89
... appears, and then press OK. 4 Press or repeatedly until Address Book appears, and then press OK. 5 Press or repeatedly until Select Function appears. To manually specify the Group ID, click Specify an Address Number, and then enter a value from 1 to 6. 6 Type a group name. 7 Click Group Membership....of the following: • In Windows Vista, click . • In Windows XP and earlier, click Start. 3 Click Programs or All Programs Œ Lexmark Applications Œ Address Book Editor. 4 In the left side of the recipient. 7 Click Save Changes to the ten One Touch Buttons found on the printer...
... appears, and then press OK. 4 Press or repeatedly until Address Book appears, and then press OK. 5 Press or repeatedly until Select Function appears. To manually specify the Group ID, click Specify an Address Number, and then enter a value from 1 to 6. 6 Type a group name. 7 Click Group Membership....of the following: • In Windows Vista, click . • In Windows XP and earlier, click Start. 3 Click Programs or All Programs Œ Lexmark Applications Œ Address Book Editor. 4 In the left side of the recipient. 7 Click Save Changes to the ten One Touch Buttons found on the printer...
User's Guide
Page 124
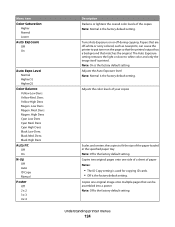
...as newsprint, can cause the printer to fit the size of the paper loaded in the specified paper tray Note: Off is printed. Adjusts the color levels of your copies Scales and centers the copies to put toner on the page so that the printed output has a background that can be...a poster Note: Off is the factory default setting. Dens Black High Dens Auto Fit Off On N-Up Off Auto ID Copy Manual Poster Off 2 x 2 3 x 3 4 x 4 Description Darkens or lightens the overall color levels of paper Notes: • The ID Copy setting is used for copying ID cards. • Off is the factory default...
...as newsprint, can cause the printer to fit the size of the paper loaded in the specified paper tray Note: Off is printed. Adjusts the color levels of your copies Scales and centers the copies to put toner on the page so that the printed output has a background that can be...a poster Note: Off is the factory default setting. Dens Black High Dens Auto Fit Off On N-Up Off Auto ID Copy Manual Poster Off 2 x 2 3 x 3 4 x 4 Description Darkens or lightens the overall color levels of paper Notes: • The ID Copy setting is used for copying ID cards. • Off is the factory default...
User's Guide
Page 145
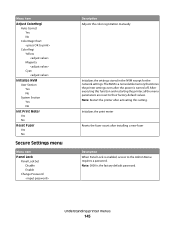
... new fuser Description When Panel Lock is enabled, access to their factory default values. Menu item Adjust ColorRegi Auto Correct Yes No Color Regi Chart Color Regi Yellow Magenta Cyan Initialize NVM User Section Yes No System Section Yes No Init Print Meter Yes No Reset Fuser Yes No ...Secure Settings menu Menu item Panel Lock Panel Lock Set Disable Enable Change Password Description Adjusts the color registration manually Initializes the settings stored in the NVM except for the network settings. Note: Restart the printer after the power is the factory ...
... new fuser Description When Panel Lock is enabled, access to their factory default values. Menu item Adjust ColorRegi Auto Correct Yes No Color Regi Chart Color Regi Yellow Magenta Cyan Initialize NVM User Section Yes No System Section Yes No Init Print Meter Yes No Reset Fuser Yes No ...Secure Settings menu Menu item Panel Lock Panel Lock Set Disable Enable Change Password Description Adjusts the color registration manually Initializes the settings stored in the NVM except for the network settings. Note: Restart the printer after the power is the factory ...

User's Guide
Page 168
... Chart appears, and then press OK. 6 Press OK to print the Color Registration Chart. 7 The chart prints and the printer returns to adjust the color registration. Adjusting the color registration manually You can fine-tune color registration by performing a manual adjustment: 1 From the printer control panel, press System. 2 Press or repeatedly until Admin appears, and then...
... Chart appears, and then press OK. 6 Press OK to print the Color Registration Chart. 7 The chart prints and the printer returns to adjust the color registration. Adjusting the color registration manually You can fine-tune color registration by performing a manual adjustment: 1 From the printer control panel, press System. 2 Press or repeatedly until Admin appears, and then...
User's Guide
Page 182
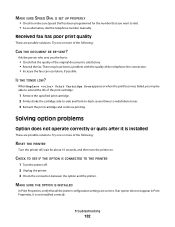
... original document is satisfactory. • Resend the fax. Ask the person who sent you want to dial. • As an alternative, dial the telephone number manually. IS THE TONER LOW? Solving option problems Option does not operate correctly or quits after it is installed These are possible solutions. Try one or...
... original document is satisfactory. • Resend the fax. Ask the person who sent you want to dial. • As an alternative, dial the telephone number manually. IS THE TONER LOW? Solving option problems Option does not operate correctly or quits after it is installed These are possible solutions. Try one or...

User's Guide
Page 199
... may not provide for connection to users of warranty. New Zealand Telecom equipment notice This equipment is not capable, under any circumstances that any single manual call attempt and the beginning of another device connected to another . Le numéro REN du modem est indiqué sur l'étiquette produit...
... may not provide for connection to users of warranty. New Zealand Telecom equipment notice This equipment is not capable, under any circumstances that any single manual call attempt and the beginning of another device connected to another . Le numéro REN du modem est indiqué sur l'étiquette produit...
User's Guide
Page 203
...not warrant uninterrupted or error-free operation of any maintenance items included with Lexmark user's guides, manuals, instructions or guidance -Unsuitable physical or operating environment -Maintenance by anyone other than Lexmark or a Lexmark authorized servicer -Operation of a product beyond repair, or if the ...abuse or use inconsistent with the printer shall end earlier if it prepaid and suitably packaged to the Remarketer or the Lexmark designated location. You are substantially used up, depleted, or consumed. ALL INFORMATION, SPECIFICATIONS, PRICES, AND SERVICES ARE SUBJECT...
...not warrant uninterrupted or error-free operation of any maintenance items included with Lexmark user's guides, manuals, instructions or guidance -Unsuitable physical or operating environment -Maintenance by anyone other than Lexmark or a Lexmark authorized servicer -Operation of a product beyond repair, or if the ...abuse or use inconsistent with the printer shall end earlier if it prepaid and suitably packaged to the Remarketer or the Lexmark designated location. You are substantially used up, depleted, or consumed. ALL INFORMATION, SPECIFICATIONS, PRICES, AND SERVICES ARE SUBJECT...
User's Guide
Page 209
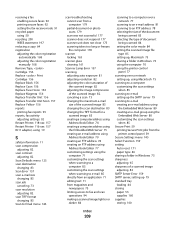
...receive mode 91 recycled paper using 50 recycling 200 WEEE statement 197 reducing a copy 64 registration adjusting the color registration automatically 168 adjusting the color registration manually 168 Remove Tape, Cartridge 156 Replace Print Cartridge 156 Replace Black 156 Replace Cyan 156 Replace Fuser Soon ...178 scanner locking 163 scanner glass cleaning 161 Scanner Lamp Error 157 scanning adjusting auto exposure 81 adjusting resolution 82 adjusting the color saturation of the scanned image 82 adjusting the image compression of the scanned image 82 canceling a scan 73 changing the maximum...
...receive mode 91 recycled paper using 50 recycling 200 WEEE statement 197 reducing a copy 64 registration adjusting the color registration automatically 168 adjusting the color registration manually 168 Remove Tape, Cartridge 156 Replace Print Cartridge 156 Replace Black 156 Replace Cyan 156 Replace Fuser Soon ...178 scanner locking 163 scanner glass cleaning 161 Scanner Lamp Error 157 scanning adjusting auto exposure 81 adjusting resolution 82 adjusting the color saturation of the scanned image 82 adjusting the image compression of the scanned image 82 canceling a scan 73 changing the maximum...

Card Stock & Label Guide
Page 33
... supported. Overview of paper office labels designed for laser printers. Using media higher than 300 Sheffield could result in .) Smoothness: 100-400 Sheffield* * 150-250 Sheffield is supported from the multipurpose feeder and the manual feed slot. The Lexmark C520, C522, and C524 do not support vinyl... or polyester labels. The Lexmark C520, C522, and C524 support stocks up to 176 g/m2 For more information on the...
... supported. Overview of paper office labels designed for laser printers. Using media higher than 300 Sheffield could result in .) Smoothness: 100-400 Sheffield* * 150-250 Sheffield is supported from the multipurpose feeder and the manual feed slot. The Lexmark C520, C522, and C524 do not support vinyl... or polyester labels. The Lexmark C520, C522, and C524 support stocks up to 176 g/m2 For more information on the...
Card Stock & Label Guide
Page 35
...g/m2/163 g/m2 Tray 2 (optional tray) 120 g/m2/163 g/m2 Multipurpose feeder Manual feed slot 120 g/m2/163 g/m2 * Vinyl labels are supported from Tray 1, Tray 2, the manual feed slot, and the multipurpose feeder. The Lexmark C530, C532, and C534 support stocks up to 176 g/m2 For more information on... the supported media sizes, see the printer User's Guide on the publications CD. Overview of card stock or labels and the manual feed slot accepts single sheets only....
...g/m2/163 g/m2 Tray 2 (optional tray) 120 g/m2/163 g/m2 Multipurpose feeder Manual feed slot 120 g/m2/163 g/m2 * Vinyl labels are supported from Tray 1, Tray 2, the manual feed slot, and the multipurpose feeder. The Lexmark C530, C532, and C534 support stocks up to 176 g/m2 For more information on... the supported media sizes, see the printer User's Guide on the publications CD. Overview of card stock or labels and the manual feed slot accepts single sheets only....
Card Stock & Label Guide
Page 37
... g/m2 to 163 g/m2 135 g/m2 to 176 g/m2 131 g/m2 Multipurpose feeder Manual feed slot 120 g/m2 to 163 g/m2 120 g/m2 to 163 g/m2 135 g/m2...m2 * Vinyl labels are supported from Tray 1, Tray 2, the manual feed slot, and the multipurpose feeder. The Lexmark C540, C543, C544, and C546dtn support card stock weights up to...media sizes, see the printer User's Guide on label material and construction. The Lexmark C540, C543, C544, and C546dtn do not support vinyl or polyester labels. ...stock or labels, and the manual feed slot accepts single sheets only. The multipurpose feeder supports approximately 50 sheets...
... g/m2 to 163 g/m2 135 g/m2 to 176 g/m2 131 g/m2 Multipurpose feeder Manual feed slot 120 g/m2 to 163 g/m2 120 g/m2 to 163 g/m2 135 g/m2...m2 * Vinyl labels are supported from Tray 1, Tray 2, the manual feed slot, and the multipurpose feeder. The Lexmark C540, C543, C544, and C546dtn support card stock weights up to...media sizes, see the printer User's Guide on label material and construction. The Lexmark C540, C543, C544, and C546dtn do not support vinyl or polyester labels. ...stock or labels, and the manual feed slot accepts single sheets only. The multipurpose feeder supports approximately 50 sheets...

Card Stock & Label Guide
Page 57
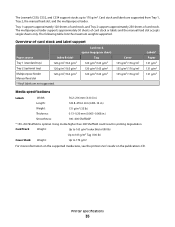
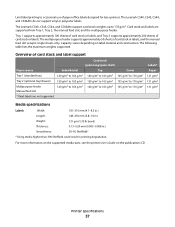
...adhesive at least 1 mm (0.04 in a paper jam. • Do not use of paper office labels designed for laser printers. It may contaminate your printer and could void your warranty. The Lexmark E120 supports stocks up to the edge of card stock or labels. Media specifications Labels Width: Length: Weight: Thickness...Paper Type to Card Stock. • Do not use of grain long card stock. Overview of card stock and label support Paper source Tray 1 Manual feed Card stock Index Bristol 135-163 g/m2 (up to 90 lb) 135-163 g/m2 (up to occasional use card stock that have adhesive to...
...adhesive at least 1 mm (0.04 in a paper jam. • Do not use of paper office labels designed for laser printers. It may contaminate your printer and could void your warranty. The Lexmark E120 supports stocks up to the edge of card stock or labels. Media specifications Labels Width: Length: Weight: Thickness...Paper Type to Card Stock. • Do not use of grain long card stock. Overview of card stock and label support Paper source Tray 1 Manual feed Card stock Index Bristol 135-163 g/m2 (up to 90 lb) 135-163 g/m2 (up to occasional use card stock that have adhesive to...


