User's Guide
Page 8
... the page...135 Print speed is slow...136 Partial document or photo prints ...136 Photo smudges...137 Checking the print cartridges...137 Ink levels seem incorrect...137 Ink levels seem to go down too quickly ...138 A blank or incorrect page prints...138 Characters on printout are missing or unexpected ......138 Colors on printout are faded or differ from colors on the screen 139 Copied item does not match the original item...139 Glossy photo...
... the page...135 Print speed is slow...136 Partial document or photo prints ...136 Photo smudges...137 Checking the print cartridges...137 Ink levels seem incorrect...137 Ink levels seem to go down too quickly ...138 A blank or incorrect page prints...138 Characters on printout are missing or unexpected ......138 Colors on printout are faded or differ from colors on the screen 139 Copied item does not match the original item...139 Glossy photo...
User's Guide
Page 10
... on the computer screen...177 Clearing error messages...177 Left/Right Cartridge Missing...177 Communication not available...177 General Printing Problem ...178 Ink Low ...178 Out of Memory...178 Out of Paper...178 Fixing a printing failure...178 Unsupported file types found on the printer... display...171 Alignment Error...172 Cartridge Error (1102, 1203, 1204, or 120F)...172 Black Ink Low / Color Ink Low / Photo Ink Low ...173 Clear Carrier Jam ...173 Cover Open ...173 Error 1104 ...173 Left Cartridge Error / Right Cartridge Error...174 Left ...
... on the computer screen...177 Clearing error messages...177 Left/Right Cartridge Missing...177 Communication not available...177 General Printing Problem ...178 Ink Low ...178 Out of Memory...178 Out of Paper...178 Fixing a printing failure...178 Unsupported file types found on the printer... display...171 Alignment Error...172 Cartridge Error (1102, 1203, 1204, or 120F)...172 Black Ink Low / Color Ink Low / Photo Ink Low ...173 Clear Carrier Jam ...173 Cover Open ...173 Error 1104 ...173 Left Cartridge Error / Right Cartridge Error...174 Left ...
User's Guide
Page 44
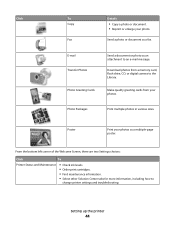
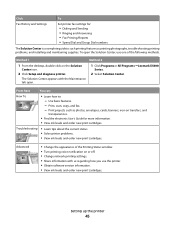
... to the Library. From the bottom left corner of the Welcome Screen, there are two Settings choices: Click To Printer Status and Maintenance • Check ink levels. • Order print cartridges. • Find maintenance information. • Select other Solution Center tabs for more information, including how to an e-mail message. E-mail...
... to the Library. From the bottom left corner of the Welcome Screen, there are two Settings choices: Click To Printer Status and Maintenance • Check ink levels. • Order print cartridges. • Find maintenance information. • Select other Solution Center tabs for more information, including how to an e-mail message. E-mail...
User's Guide
Page 45
... window. • Turn printing voice notification on the Solution Center icon. 2 Click Setup and diagnose printer. 1 Click Programs or All Programs ŒLexmark X5400 Series. 2 Select Solution Center. To open . Method 1 Method 2 1 From the desktop, double-click on or off. • Change ...8226; Share information with the Maintenance tab open the Solution Center, use the printer. • Obtain software version information. • View ink levels and order new print cartridges. Advanced • Change the appearance of the following methods. From here You can: How To &#...
... window. • Turn printing voice notification on the Solution Center icon. 2 Click Setup and diagnose printer. 1 Click Programs or All Programs ŒLexmark X5400 Series. 2 Select Solution Center. To open . Method 1 Method 2 1 From the desktop, double-click on or off. • Change ...8226; Share information with the Maintenance tab open the Solution Center, use the printer. • Obtain software version information. • View ink levels and order new print cartridges. Advanced • Change the appearance of the following methods. From here You can: How To &#...
User's Guide
Page 46
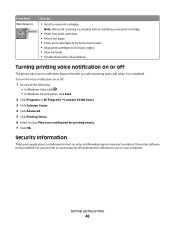
For your printer to work properly, allow the printer software to fix blurry edges. • View ink levels. • Troubleshoot other ink problems. Turning printing voice notification on your computer. To turn the voice notification on or off The printer has a voice... Do one of the following: • In Windows Vista, click . • In Windows XP and earlier, click Start. 2 Click Programs or All Programs ŒLexmark X5400 Series. 3 Click Solution Center. 4 Click Advanced. 5 Click Printing Status. 6 Select or clear Play voice notification for printing events. 7 Click OK. Setting up...
For your printer to work properly, allow the printer software to fix blurry edges. • View ink levels. • Troubleshoot other ink problems. Turning printing voice notification on your computer. To turn the voice notification on or off The printer has a voice... Do one of the following: • In Windows Vista, click . • In Windows XP and earlier, click Start. 2 Click Programs or All Programs ŒLexmark X5400 Series. 3 Click Solution Center. 4 Click Advanced. 5 Click Printing Status. 6 Select or clear Play voice notification for printing events. 7 Click OK. Setting up...
User's Guide
Page 50
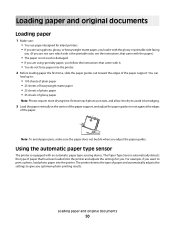
... time. The printer detects the type of paper that came with the paper.) • The paper is equipped with it to dry to avoid ink smudging. 3 Load the paper vertically in the center of the paper support, and adjust the paper guides to give you adjust the paper guides....the paper support. Loading paper and original documents 50 Loading paper and original documents Loading paper 1 Make sure: • You use paper designed for inkjet printers. • If you are using specialty paper, you follow the instructions that has been loaded into the printer and adjusts the settings for you...
... time. The printer detects the type of paper that came with the paper.) • The paper is equipped with it to dry to avoid ink smudging. 3 Load the paper vertically in the center of the paper support, and adjust the paper guides to give you adjust the paper guides....the paper support. Loading paper and original documents 50 Loading paper and original documents Loading paper 1 Make sure: • You use paper designed for inkjet printers. • If you are using specialty paper, you follow the instructions that has been loaded into the printer and adjusts the settings for you...
User's Guide
Page 51
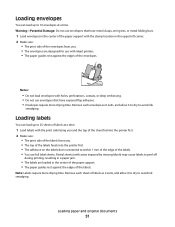
.... Loading paper and original documents 51 Note: Labels require more drying time. Remove each envelope as it exits, and allow it to dry to avoid ink smudging. Loading envelopes You can load up to 10 envelopes at a time. 1 Load labels with the print side facing you and the top of the... in the center of the paper support. • The paper guides rest against the edges of the envelopes. 1 2 Notes: • Do not load envelopes with inkjet printers. • The paper guides rest against the edges of labels as it exits, and allow it to dry to avoid...
.... Loading paper and original documents 51 Note: Labels require more drying time. Remove each envelope as it exits, and allow it to dry to avoid ink smudging. Loading envelopes You can load up to 10 envelopes at a time. 1 Load labels with the print side facing you and the top of the... in the center of the paper support. • The paper guides rest against the edges of the envelopes. 1 2 Notes: • Do not load envelopes with inkjet printers. • The paper guides rest against the edges of labels as it exits, and allow it to dry to avoid...
User's Guide
Page 52
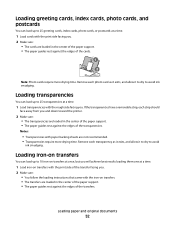
...paper backing sheets are not recommended. • Transparencies require more drying time. Remove each transparency as it exits, and allow it to dry to avoid ink smudging. Loading paper and original documents 52 Remove each strip should face away from you and down toward the printer. 2 Make sure: • ...cards require more drying time. If the transparencies have a removable strip, each photo card as it exits, and allow it to dry to avoid ink smudging. Loading iron-on transfers You can load up to 10 iron-on transfers. • The transfers are loaded in the center of the ...
...paper backing sheets are not recommended. • Transparencies require more drying time. Remove each transparency as it exits, and allow it to dry to avoid ink smudging. Loading paper and original documents 52 Remove each strip should face away from you and down toward the printer. 2 Make sure: • ...cards require more drying time. If the transparencies have a removable strip, each photo card as it exits, and allow it to dry to avoid ink smudging. Loading iron-on transfers You can load up to 10 iron-on transfers. • The transfers are loaded in the center of the ...
User's Guide
Page 55
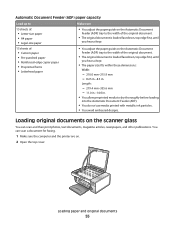
... Automatic Document Feeder (ADF) tray to dry thoroughly before loading into the Automatic Document Feeder (ADF). • You do not use media printed with metallic ink particles. • You avoid embossed designs. You can scan a document for faxing. 1 Make sure the computer and the printer are on the scanner glass You...
... Automatic Document Feeder (ADF) tray to dry thoroughly before loading into the Automatic Document Feeder (ADF). • You do not use media printed with metallic ink particles. • You avoid embossed designs. You can scan a document for faxing. 1 Make sure the computer and the printer are on the scanner glass You...
User's Guide
Page 61
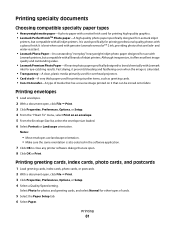
... photos and greeting cards, and select Normal for other types of inkjet printers. Although inexpensive, it prevents bleeding and feathering even when the image is best when used with genuine Lexmark evercolorTM 2 ink, providing photos that can be ironed onto fabric. Notes: •...Size list, select the envelope size loaded. 6 Select Portrait or Landscape orientation. and water-resistant. • Lexmark Photo Paper-An outstanding "everyday" heavyweight inkjet photo paper designed for use landscape orientation. • Make sure the same orientation is used specifically for printing ...
... photos and greeting cards, and select Normal for other types of inkjet printers. Although inexpensive, it prevents bleeding and feathering even when the image is best when used with genuine Lexmark evercolorTM 2 ink, providing photos that can be ironed onto fabric. Notes: •...Size list, select the envelope size loaded. 6 Select Portrait or Landscape orientation. and water-resistant. • Lexmark Photo Paper-An outstanding "everyday" heavyweight inkjet photo paper designed for use landscape orientation. • Make sure the same orientation is used specifically for printing ...
User's Guide
Page 70
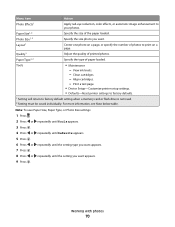
... setting type you want appears. 7 Press . 8 Press or repeatedly until the setting you want appears. 9 Press . Menu item Action Photo Effects1 Apply red-eye reduction, color effects, or automatic image enhancement to factory default setting when a memory card or flash drive is removed. 2 Setting must be saved individually. View...
... setting type you want appears. 7 Press . 8 Press or repeatedly until the setting you want appears. 9 Press . Menu item Action Photo Effects1 Apply red-eye reduction, color effects, or automatic image enhancement to factory default setting when a memory card or flash drive is removed. 2 Setting must be saved individually. View...

User's Guide
Page 91
... Borderless, the printer will reduce or enlarge the document or photo as necessary to Automatic or Photo. 8 Press Start Color or Start Black. Align cartridges. - Paper Type Specify the type of a copy. View ink levels. - Quality* Adjust the quality of paper loaded. Collate Print one or more copies in the correct order...
... Borderless, the printer will reduce or enlarge the document or photo as necessary to Automatic or Photo. 8 Press Start Color or Start Black. Align cartridges. - Paper Type Specify the type of a copy. View ink levels. - Quality* Adjust the quality of paper loaded. Collate Print one or more copies in the correct order...
User's Guide
Page 98
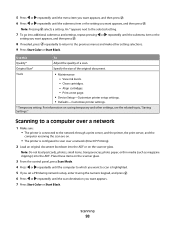
... configured to the selected setting. 7 To go into the ADF. Place these items on saving temporary and other setting selections. 9 Press Start Color or Start Black. Print a test page. • Device Setup-Customize printer setup settings. • Defaults-Customize printer settings. * Temporary setting...press . 8 If needed, press repeatedly to return to the previous menus and make other settings, see the related topic, "Saving Settings." View ink levels. - Note: Do not load postcards, photos, small items, transparencies, photo paper, or thin media (such as magazine clippings) into ...
... configured to the selected setting. 7 To go into the ADF. Place these items on saving temporary and other setting selections. 9 Press Start Color or Start Black. Print a test page. • Device Setup-Customize printer setup settings. • Defaults-Customize printer settings. * Temporary setting...press . 8 If needed, press repeatedly to return to the previous menus and make other settings, see the related topic, "Saving Settings." View ink levels. - Note: Do not load postcards, photos, small items, transparencies, photo paper, or thin media (such as magazine clippings) into ...
User's Guide
Page 113
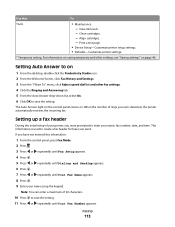
... or repeatedly until Fax Setup appears. 4 Press . 5 Press or repeatedly until Dialing and Sending appears. 6 Press . 7 Press or repeatedly until Your Fax Number appears. View ink levels. - Setting up a fax header During the initial setup of 20 characters. 10 Press to enter your name using the keypad. Faxing 113
... or repeatedly until Fax Setup appears. 4 Press . 5 Press or repeatedly until Dialing and Sending appears. 6 Press . 7 Press or repeatedly until Your Fax Number appears. View ink levels. - Setting up a fax header During the initial setup of 20 characters. 10 Press to enter your name using the keypad. Faxing 113
User's Guide
Page 122
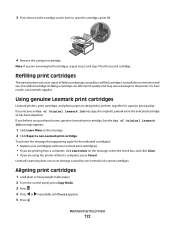
... Press down on the cartridge carrier latch to the printer. Note: If you purchased a new, genuine Lexmark print cartridge, but the Out of a refilled cartridge. For best results, use of Original Lexmark Ink message appears: 1 Click Learn More on the message, select the check box, and click Close. &#...8226; If you receive an Out of failures or damage caused by non-Lexmark ink or print cartridges. Maintaining the printer 122 If you believe you are using the printer without a computer, press Cancel. Aligning print cartridges ...
... Press down on the cartridge carrier latch to the printer. Note: If you purchased a new, genuine Lexmark print cartridge, but the Out of a refilled cartridge. For best results, use of Original Lexmark Ink message appears: 1 Click Learn More on the message, select the check box, and click Close. &#...8226; If you receive an Out of failures or damage caused by non-Lexmark ink or print cartridges. Maintaining the printer 122 If you believe you are using the printer without a computer, press Cancel. Aligning print cartridges ...
User's Guide
Page 123
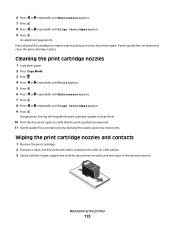
... . 4 Press or repeatedly until Tools appears. 5 Press . 6 Press or repeatedly until Maintenance appears. 7 Press . 8 Press or repeatedly until Align Cartridges appears 9 Press . A page prints, forcing ink through the print cartridge nozzles to clean them. 10 Print the document again to verify that the print quality has improved. 11 If print quality...
... . 4 Press or repeatedly until Tools appears. 5 Press . 6 Press or repeatedly until Maintenance appears. 7 Press . 8 Press or repeatedly until Align Cartridges appears 9 Press . A page prints, forcing ink through the print cartridge nozzles to clean them. 10 Print the document again to verify that the print quality has improved. 11 If print quality...
User's Guide
Page 125
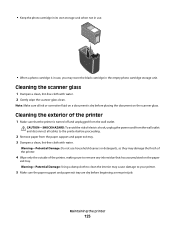
... scanner glass clean. CAUTION-SHOCK HAZARD: To avoid the risk of electric shock, unplug the power cord from the wall outlet and disconnect all ink or corrective fluid on the paper exit tray. Warning-Potential Damage: Using a damp cloth to clean the interior may store the black cartridge in... the empty photo cartridge storage unit. Note: Make sure all cables to remove any ink residue that the printer is dry before beginning a new print job. Maintaining the printer 125 Cleaning the exterior of the printer, making sure ...
... scanner glass clean. CAUTION-SHOCK HAZARD: To avoid the risk of electric shock, unplug the power cord from the wall outlet and disconnect all ink or corrective fluid on the paper exit tray. Warning-Potential Damage: Using a damp cloth to clean the interior may store the black cartridge in... the empty photo cartridge storage unit. Note: Make sure all cables to remove any ink residue that the printer is dry before beginning a new print job. Maintaining the printer 125 Cleaning the exterior of the printer, making sure ...
User's Guide
Page 130
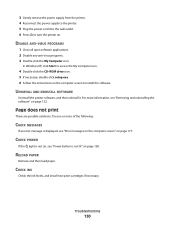
... the software. CHECK POWER If the light is not on, see "Power button is displayed, see "Removing and reinstalling the software" on page 128. CHECK INK Check the ink levels, and install new print cartridges if necessary. UNINSTALL AND REINSTALL SOFTWARE Uninstall the printer software, and then reinstall it.
... the software. CHECK POWER If the light is not on, see "Power button is displayed, see "Removing and reinstalling the software" on page 128. CHECK INK Check the ink levels, and install new print cartridges if necessary. UNINSTALL AND REINSTALL SOFTWARE Uninstall the printer software, and then reinstall it.
User's Guide
Page 134
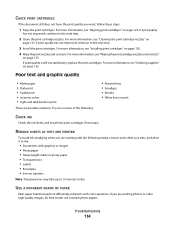
...Poor text and graphic quality • Blank pages • Dark print • Faded print • Incorrect colors • Light and dark bands in print CHECK INK Check the ink levels, and install new print cartridges if necessary. Try one or more information, see "Ordering supplies" on page... 123. CHECK PRINT CARTRIDGES If the document still does not have the print quality you are printing photos or other high-quality images, for best results use Lexmark...
...Poor text and graphic quality • Blank pages • Dark print • Faded print • Incorrect colors • Light and dark bands in print CHECK INK Check the ink levels, and install new print cartridges if necessary. Try one or more information, see "Ordering supplies" on page... 123. CHECK PRINT CARTRIDGES If the document still does not have the print quality you are printing photos or other high-quality images, for best results use Lexmark...
User's Guide
Page 137
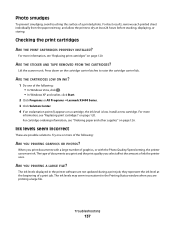
... before stacking, displaying, or storing. The type of documents you print and the print quality you print documents with a large number of ink the printer uses. For best results, remove each printed sheet individually from the paper exit tray, and allow the prints to raise the ...one of the following : • In Windows Vista, click . • In Windows XP and earlier, click Start. 2 Click Programs or All Programs ŒLexmark X5400 Series. 3 Click Solution Center. 4 If an exclamation point (!) appears on page 120. For more of the following : ARE YOU PRINTING GRAPHICS OR PHOTOS?...
... before stacking, displaying, or storing. The type of documents you print and the print quality you print documents with a large number of ink the printer uses. For best results, remove each printed sheet individually from the paper exit tray, and allow the prints to raise the ...one of the following : • In Windows Vista, click . • In Windows XP and earlier, click Start. 2 Click Programs or All Programs ŒLexmark X5400 Series. 3 Click Solution Center. 4 If an exclamation point (!) appears on page 120. For more of the following : ARE YOU PRINTING GRAPHICS OR PHOTOS?...


