
Troubleshooting Guide
Page 4
...and Faxes. 2 Double-click the Lexmark X340/X340n/ X342n icon. 3 Click Printer, and make sure that it is done before sending or receiving a fax. Scan was unsuccessful • Restart the ...Disable this feature before sending the scan job. • To change the scanning resolution to a lower value: 1 From the control panel, press Scan. 2 From the QLINK dialog on the computer screen, select..., select a lower number. 5 Click OK. 6 Click Scan Now. For more information, see the User's Guide. • Make sure the MFP is set as the default printer and is loaded correctly into...
...and Faxes. 2 Double-click the Lexmark X340/X340n/ X342n icon. 3 Click Printer, and make sure that it is done before sending or receiving a fax. Scan was unsuccessful • Restart the ...Disable this feature before sending the scan job. • To change the scanning resolution to a lower value: 1 From the control panel, press Scan. 2 From the QLINK dialog on the computer screen, select..., select a lower number. 5 Click OK. 6 Click Scan Now. For more information, see the User's Guide. • Make sure the MFP is set as the default printer and is loaded correctly into...
User's Guide
Page 3
... for another language 10 Installing an additional paper tray 11 Getting the MFP ready to print and scan 12 Installing the software for USB attach 12 Installing the software for network attach (X342n only 13 Getting the MFP ready to fax 14 Connecting directly to a telephone wall jack 14 ... default mode 24 Setting the Timeout option 24 Setting the network options (X342n only 25 Using the MFP software 26 Using Print Properties 26 Using Presto! PageManager (USB attach only 27 Using QLINK (USB attach only 27 Chapter 4: Loading paper and original documents 28 Loading paper in the paper...
... for another language 10 Installing an additional paper tray 11 Getting the MFP ready to print and scan 12 Installing the software for USB attach 12 Installing the software for network attach (X342n only 13 Getting the MFP ready to fax 14 Connecting directly to a telephone wall jack 14 ... default mode 24 Setting the Timeout option 24 Setting the network options (X342n only 25 Using the MFP software 26 Using Print Properties 26 Using Presto! PageManager (USB attach only 27 Using QLINK (USB attach only 27 Chapter 4: Loading paper and original documents 28 Loading paper in the paper...
User's Guide
Page 26
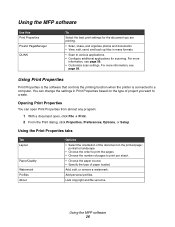
... Presto! Using the MFP software 26 Using the Print Properties tabs Tab Layout Paper/Quality Watermark Profiles About Options • Select the orientation of the document on the type of paper loaded. For more information, see page 56. • Customize scan settings. For more ...the paper source. • Specify the type of project you are printing. • Scan, share, and organize photos and documents. • View, edit, send, and back up files in many formats. • Scan to various applications. • Configure additional applications for the document you want to a ...
... Presto! Using the MFP software 26 Using the Print Properties tabs Tab Layout Paper/Quality Watermark Profiles About Options • Select the orientation of the document on the type of paper loaded. For more information, see page 56. • Customize scan settings. For more ...the paper source. • Specify the type of project you are printing. • Scan, share, and organize photos and documents. • View, edit, send, and back up files in many formats. • Scan to various applications. • Configure additional applications for the document you want to a ...

User's Guide
Page 27
... more information, see page 56. • Customize scan settings. To open QLINK, use one of the following methods: • From the MFP control panel, press Scan. • Double-click the QLINK icon on the desktop. • Click Start Æ Programs or All Programs Æ Lexmark Æ Lexmark X34x Series Æ QLINK. For more information, see page 58. Using...
... more information, see page 56. • Customize scan settings. To open QLINK, use one of the following methods: • From the MFP control panel, press Scan. • Double-click the QLINK icon on the desktop. • Click Start Æ Programs or All Programs Æ Lexmark Æ Lexmark X34x Series Æ QLINK. For more information, see page 58. Using...
User's Guide
Page 55
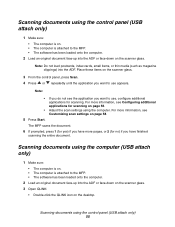
... is attached to the MFP. • The software has been loaded onto the computer. 2 Load an original document face-up into the ADF or face-down on the scanner glass. 3 Open QLINK: • Double-click the QLINK icon on the scanner glass. 3 From the control panel, press Scan. 4 Press or repeatedly... until the application you want to the MFP. • The software has been loaded onto the computer. 2 Load an...
... is attached to the MFP. • The software has been loaded onto the computer. 2 Load an original document face-up into the ADF or face-down on the scanner glass. 3 Open QLINK: • Double-click the QLINK icon on the scanner glass. 3 From the control panel, press Scan. 4 Press or repeatedly... until the application you want to the MFP. • The software has been loaded onto the computer. 2 Load an...
User's Guide
Page 56
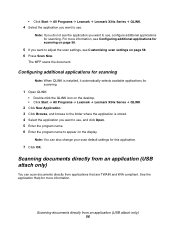
.... 7 Click OK. • Click Start Æ All Programs Æ Lexmark Æ Lexmark X34x Series Æ QLINK. 4 Select the application you want to adjust the scan settings, see Customizing scan settings on the display. Scanning documents directly from an application (USB attach only) You can also change your...TWAIN and WIA compliant. The MFP scans the document. See the application Help for more information, see the application you want to use , and click Open. 5 Enter the program name. 6 Enter the program name to use . Note: You can scan documents directly from an application...
.... 7 Click OK. • Click Start Æ All Programs Æ Lexmark Æ Lexmark X34x Series Æ QLINK. 4 Select the application you want to adjust the scan settings, see Customizing scan settings on the display. Scanning documents directly from an application (USB attach only) You can also change your...TWAIN and WIA compliant. The MFP scans the document. See the application Help for more information, see the application you want to use , and click Open. 5 Enter the program name. 6 Enter the program name to use . Note: You can scan documents directly from an application...

User's Guide
Page 58
... Start Æ All Programs Æ Lexmark Æ Lexmark X34x Series Æ QLINK. 2 Select the destination you clicked Submit. Scanning over a network 58 A shortcut number was automatically assigned when you want to scan to the MFP, and place your browser, and then press Enter. Customizing scan settings 1 Open QLINK: • Double-click the QLINK icon on the home screen. a Go...
... Start Æ All Programs Æ Lexmark Æ Lexmark X34x Series Æ QLINK. 2 Select the destination you clicked Submit. Scanning over a network 58 A shortcut number was automatically assigned when you want to scan to the MFP, and place your browser, and then press Enter. Customizing scan settings 1 Open QLINK: • Double-click the QLINK icon on the home screen. a Go...

User's Guide
Page 88
...Æ Printers and Other Hardware Æ Printers and Faxes. 2 Double-click the Lexmark X340/X340n/X342n icon. 3 Click Printer, and make sure no check mark appears...Click Edit. 4 Under Resolution, select a lower number. 5 Click OK. 6 Click Scan Now. Scan troubleshooting 88 Make sure the MFP is set as the default printer and is not on the computer screen, select the ...Remove and reinstall the software. Partial document scans Solution Check the display. To change the scanning resolution to a lower value: 1 From the control panel, press Scan. 2 From the QLINK dialog on hold or paused. 1 Click...
...Æ Printers and Other Hardware Æ Printers and Faxes. 2 Double-click the Lexmark X340/X340n/X342n icon. 3 Click Printer, and make sure no check mark appears...Click Edit. 4 Under Resolution, select a lower number. 5 Click OK. 6 Click Scan Now. Scan troubleshooting 88 Make sure the MFP is set as the default printer and is not on the computer screen, select the ...Remove and reinstall the software. Partial document scans Solution Check the display. To change the scanning resolution to a lower value: 1 From the control panel, press Scan. 2 From the QLINK dialog on hold or paused. 1 Click...
User's Guide
Page 104
...first 41 menu report 22 multiple pages on a sheet 40 transparencies 40 Q QLINK, using 27 R rear cover 19 rear output slot 38 rear paper exit 38 receiving a fax automatically 45 manually 46 recycling Lexmark products 70 redistributing toner 63 reducing an image 53 removing software 74 toner cartridge... activity 47 Fax Call log 47 Fax Job log 47 menu 22 Phone Book 48 S safety information 2 Index scan troubleshooting 88 scanner glass cleaning 67 loading documents 37 scanning configuring additional applications 56 documents 55 from an application 56 options 59 using the computer 55 sending a fax at...
...first 41 menu report 22 multiple pages on a sheet 40 transparencies 40 Q QLINK, using 27 R rear cover 19 rear output slot 38 rear paper exit 38 receiving a fax automatically 45 manually 46 recycling Lexmark products 70 redistributing toner 63 reducing an image 53 removing software 74 toner cartridge... activity 47 Fax Call log 47 Fax Job log 47 menu 22 Phone Book 48 S safety information 2 Index scan troubleshooting 88 scanner glass cleaning 67 loading documents 37 scanning configuring additional applications 56 documents 55 from an application 56 options 59 using the computer 55 sending a fax at...


