Setup Sheet
Page 1
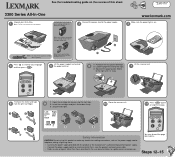
... open cartridges not in the user documentation, to purchase a USB cable separately. Left: photo or black Right: color only 1 2 3 Close the scanner unit. 10 2 1 3 11 Press to the right. 3 Squeeze the paper guide. Lift the paper support and extend 5 the paper exit tray. 2 1 6 1 Pull back the transparent deflector. 2 Load the paper flat and to print an alignment page. Safety information CAUTION: Do not set up this product or the manufacturer's authorized replacement power supply. • Connect...
... open cartridges not in the user documentation, to purchase a USB cable separately. Left: photo or black Right: color only 1 2 3 Close the scanner unit. 10 2 1 3 11 Press to the right. 3 Squeeze the paper guide. Lift the paper support and extend 5 the paper exit tray. 2 1 6 1 Pull back the transparent deflector. 2 Load the paper flat and to print an alignment page. Safety information CAUTION: Do not set up this product or the manufacturer's authorized replacement power supply. • Connect...
Setup Sheet
Page 2
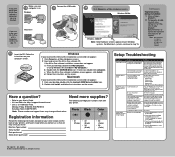
...-virus software. Remove the print cartridges, check for support. Is the paper loaded correctly? Macintosh If you select a language? 1 Press the Power button to your User's Guide. • Visit our Web site: http://support.lexmark.com/. • Call us so that other devices and connect it all New Hardware screens. Monday-Friday (9:00 AM-9:00 PM EST) Saturday (Noon-6:00 PM EST) Note: Phone number and support times may serve you faster: Machine Type number Serial number Date purchased...
...-virus software. Remove the print cartridges, check for support. Is the paper loaded correctly? Macintosh If you select a language? 1 Press the Power button to your User's Guide. • Visit our Web site: http://support.lexmark.com/. • Call us so that other devices and connect it all New Hardware screens. Monday-Friday (9:00 AM-9:00 PM EST) Saturday (Noon-6:00 PM EST) Note: Phone number and support times may serve you faster: Machine Type number Serial number Date purchased...

Service Manual
Page 4
... 2-1 Error codes 2-1 POST errors 2-1 Catastrophic errors 2-2 User intervention errors 2-8 POST symptom table 2-9 Symptom tables 2-10 Service checks 2-13 Carrier transport service check 2-13 CIS module assembly service check 2-14 PictBridge service check 2-15 Maintenance station service check 2-15 Paper feed service check 2-16 Power service check 2-17 Print quality service check 2-18 Scan and copy quality service check 2-20 Diagnostic aids 3-1 Single test page 3-1 Self Test menu 3-2 Repair information 4-1 Handling ESD-sensitive parts 4-1 Adjustments 4-2 Removal procedures...
... 2-1 Error codes 2-1 POST errors 2-1 Catastrophic errors 2-2 User intervention errors 2-8 POST symptom table 2-9 Symptom tables 2-10 Service checks 2-13 Carrier transport service check 2-13 CIS module assembly service check 2-14 PictBridge service check 2-15 Maintenance station service check 2-15 Paper feed service check 2-16 Power service check 2-17 Print quality service check 2-18 Scan and copy quality service check 2-20 Diagnostic aids 3-1 Single test page 3-1 Self Test menu 3-2 Repair information 4-1 Handling ESD-sensitive parts 4-1 Adjustments 4-2 Removal procedures...
Service Manual
Page 11
... listed, as well as general environmental and safety instructions. 2. Preface xi Parts catalog contains illustrations and part numbers for making All-In-One adjustments and removing and installing FRUs. 5. Definitions Note: A note provides additional information. Locations and connections uses illustrations to prevent problems. 7. It is divided into the following chapters: 1. Diagnostic aids contains tests and checks used to repair it. Preface 4479-XXX This manual contains maintenance procedures for service...
... listed, as well as general environmental and safety instructions. 2. Preface xi Parts catalog contains illustrations and part numbers for making All-In-One adjustments and removing and installing FRUs. 5. Definitions Note: A note provides additional information. Locations and connections uses illustrations to prevent problems. 7. It is divided into the following chapters: 1. Diagnostic aids contains tests and checks used to repair it. Preface 4479-XXX This manual contains maintenance procedures for service...
Service Manual
Page 13
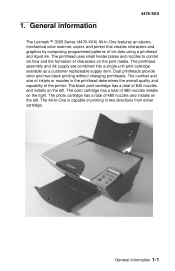
... the left . Dual printheads provide color and true black printing without changing printheads. The number and size of inkjets or nozzles in two directions from either cartridge. The photo cartridge has a total of 640 nozzles and installs on the right. General information 4479-XXX The Lexmark™ 3300 Series (4479-XXX) All-In-One features an electromechanical color scanner, copier, and printer that creates characters and graphics...
... the left . Dual printheads provide color and true black printing without changing printheads. The number and size of inkjets or nozzles in two directions from either cartridge. The photo cartridge has a total of 640 nozzles and installs on the right. General information 4479-XXX The Lexmark™ 3300 Series (4479-XXX) All-In-One features an electromechanical color scanner, copier, and printer that creates characters and graphics...
Service Manual
Page 15
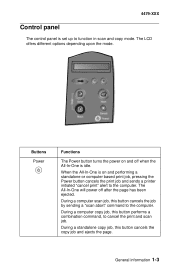
... control panel is set up to cancel the print and scan job. Buttons Power Functions The Power button turns the power on and performing a standalone or computer based print job, pressing the Power button cancels the print job and sends a printer initiated "cancel print" alert to the computer. During a computer copy job, this button performs a combination command, to function in scan and copy mode. During a computer scan job, this button cancels the copy job and ejects the page. General information 1-3 During a standalone copy job, this button cancels the job by sending a "scan...
... control panel is set up to cancel the print and scan job. Buttons Power Functions The Power button turns the power on and performing a standalone or computer based print job, pressing the Power button cancels the print job and sends a printer initiated "cancel print" alert to the computer. During a computer copy job, this button performs a combination command, to function in scan and copy mode. During a computer scan job, this button cancels the copy job and ejects the page. General information 1-3 During a standalone copy job, this button cancels the job by sending a "scan...

Service Manual
Page 16
... the page. Pressing the Scan button sends a message to the host computer causing the All-In-One Center to the next menu item. When the LCD is idle. Each time the Arrow button is pressed, the next menu item on the LCD is idle. If a setting in other menus, the +/- The Scan button has no function defined for non-host attached operation. 1-4 Service Manual 4479-XXX Buttons Cancel +/Arrow Color Copy Black Copy Scan Functions...
... the page. Pressing the Scan button sends a message to the host computer causing the All-In-One Center to the next menu item. When the LCD is idle. Each time the Arrow button is pressed, the next menu item on the LCD is idle. If a setting in other menus, the +/- The Scan button has no function defined for non-host attached operation. 1-4 Service Manual 4479-XXX Buttons Cancel +/Arrow Color Copy Black Copy Scan Functions...
Service Manual
Page 19
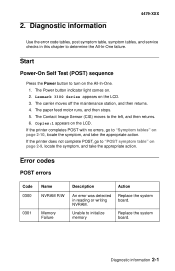
... page 2-10, locate the symptom, and take the appropriate action. Diagnostic information 2-1 The paper feed motor runs, and then stops. 5. Replace the system board. Error codes POST errors Code 0300 0301 Name NVRAM R/W Memory Failure Description An error was detected in this chapter to turn on the LCD. Lexmark 3300 Series appears on . 2. Copies:1 appears on the All-In-One. 1. Start Power-On Self Test (POST) sequence Press the Power button...
... page 2-10, locate the symptom, and take the appropriate action. Diagnostic information 2-1 The paper feed motor runs, and then stops. 5. Replace the system board. Error codes POST errors Code 0300 0301 Name NVRAM R/W Memory Failure Description An error was detected in this chapter to turn on the LCD. Lexmark 3300 Series appears on . 2. Copies:1 appears on the All-In-One. 1. Start Power-On Self Test (POST) sequence Press the Power button...
Service Manual
Page 21
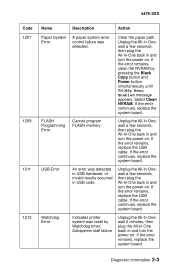
Indicates printer system was reset by pressing the Black Copy button and Power button simultaneously until the Mfg Menu Enabled message appears. Subsystem stall failure Unplug the All-In-One; wait 5 minutes, then plug the All-In-One back in and turn the power on . If the error remains, replace the system board. 4479-XXX Code 1207 1209 1211 1212 Name Description Action Paper System Error A paper system error control failure...
Indicates printer system was reset by pressing the Black Copy button and Power button simultaneously until the Mfg Menu Enabled message appears. Subsystem stall failure Unplug the All-In-One; wait 5 minutes, then plug the All-In-One back in and turn the power on . If the error remains, replace the system board. 4479-XXX Code 1207 1209 1211 1212 Name Description Action Paper System Error A paper system error control failure...
Service Manual
Page 26
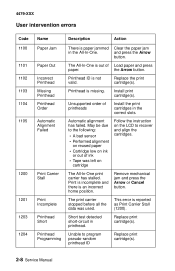
... align the cartridges. The All-In-One print carrier has stalled. Printhead ID is paper jammed Clear the paper jam in the All-In-One. Short test detected short-circuit in the correct slots. the Arrow button. May be due to program pseudo-random printhead ID Replace print cartridge(s). 2-8 Service Manual Remove mechanical jam and press the Arrow or Cancel button. Unsupported order of ink • Tape was used. 4479-XXX User intervention errors Code...
... align the cartridges. The All-In-One print carrier has stalled. Printhead ID is paper jammed Clear the paper jam in the All-In-One. Short test detected short-circuit in the correct slots. the Arrow button. May be due to program pseudo-random printhead ID Replace print cartridge(s). 2-8 Service Manual Remove mechanical jam and press the Arrow or Cancel button. Unsupported order of ink • Tape was used. 4479-XXX User intervention errors Code...

Service Manual
Page 29
...; Scanned images are faded, or colors are okay, replace system board. If connections are slanted or crooked and the straight lines in the image appear to be jagged or uneven. • Blank copies Action Go to the "PictBridge service check" on page 2-15. PictBridge problems Symptom The camera does not communicate with the printer. If connections are dull, blurry, or fuzzy. Go to print Test Page Scanner problems Action Check the USB cable...
...; Scanned images are faded, or colors are okay, replace system board. If connections are slanted or crooked and the straight lines in the image appear to be jagged or uneven. • Blank copies Action Go to the "PictBridge service check" on page 2-15. PictBridge problems Symptom The camera does not communicate with the printer. If connections are dull, blurry, or fuzzy. Go to print Test Page Scanner problems Action Check the USB cable...
Service Manual
Page 31
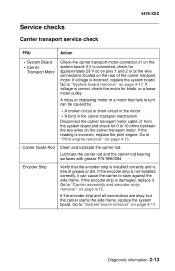
... Disconnect the carrier transport motor cable J1 from the system board and check for 0 to "Carrier assembly and encoder strip removal" on page 4-15. If the encoder strip and all connections are okay, but the carrier slams the side frame, replace the system board. If voltage is incorrect, replace the print engine. Carrier Guide Rod Clean and lubricate the carrier rod...
... Disconnect the carrier transport motor cable J1 from the system board and check for 0 to "Carrier assembly and encoder strip removal" on page 4-15. If the encoder strip and all connections are okay, but the carrier slams the side frame, replace the system board. If voltage is incorrect, replace the print engine. Carrier Guide Rod Clean and lubricate the carrier rod...
Service Manual
Page 34
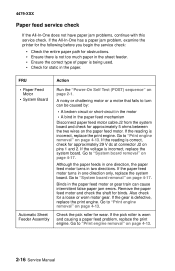
... the sheet feeder. • Ensure the correct type of paper is correct, check for approximately 5 ohms between the two wires on page 4-17. Go to "System board removal" on page 4-13. 2-16 Service Manual If the pick roller is incorrect, replace the print engine. If the reading is worn and causing a paper feed problem, replace the print engine. If the All-In-One has a paper jam problem, examine the printer for...
... the sheet feeder. • Ensure the correct type of paper is correct, check for approximately 5 ohms between the two wires on page 4-17. Go to "System board removal" on page 4-13. 2-16 Service Manual If the pick roller is incorrect, replace the print engine. If the reading is worn and causing a paper feed problem, replace the print engine. If the All-In-One has a paper jam problem, examine the printer for...
Service Manual
Page 36
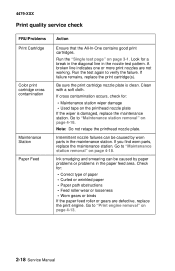
... If the paper feed roller or gears are not working. Go to "Maintenance station removal" on page 4-18. Run the test again to "Print engine removal" on page 4-13. 2-18 Service Manual If failure remains, replace the print cartridge(s). Be sure the print cartridge nozzle plate is damaged, replace the maintenance station. Note: Do not retape the printhead nozzle plate. 4479-XXX Print quality service check FRU/Problems Print Cartridge Color print cartridge cross contamination Maintenance Station Paper Feed Action Ensure...
... If the paper feed roller or gears are not working. Go to "Maintenance station removal" on page 4-18. Run the test again to "Print engine removal" on page 4-13. 2-18 Service Manual If failure remains, replace the print cartridge(s). Be sure the print cartridge nozzle plate is damaged, replace the maintenance station. Note: Do not retape the printhead nozzle plate. 4479-XXX Print quality service check FRU/Problems Print Cartridge Color print cartridge cross contamination Maintenance Station Paper Feed Action Ensure...
Service Manual
Page 37
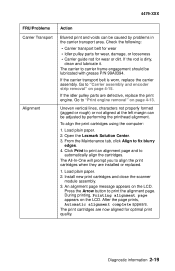
... encoder strip removal" on page 4-13. To align the print cartridges using the computer: 1. If the idler pulley parts are installed or replaced. 1. Load plain paper. 2. From the Maintenance tab, click Align to print the alignment page. During printing, Printing alignment page appears on the LCD. An alignment page message appears on the LCD. After the page prints, Automatic alignment complete appears. 4479-XXX FRU/Problems Carrier Transport Alignment Action Blurred print and voids can be adjusted by problems in the...
... encoder strip removal" on page 4-13. To align the print cartridges using the computer: 1. If the idler pulley parts are installed or replaced. 1. Load plain paper. 2. From the Maintenance tab, click Align to print the alignment page. During printing, Printing alignment page appears on the LCD. An alignment page message appears on the LCD. After the page prints, Automatic alignment complete appears. 4479-XXX FRU/Problems Carrier Transport Alignment Action Blurred print and voids can be adjusted by problems in the...
Service Manual
Page 38
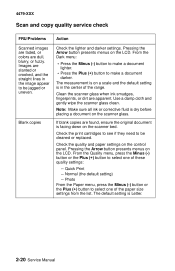
... default setting is dry before placing a document on the control panel. Note: Make sure all ink or corrective fluid is in the image appear to select one of the range. From the Quality menu, press the Minus (-) button or the Plus (+) button to be cleaned or replaced. The measurement is Letter. 2-20 Service Manual Check the lighter and darker settings. Use a damp cloth and gently wipe the scanner glass clean. Blank copies...
... default setting is dry before placing a document on the control panel. Note: Make sure all ink or corrective fluid is in the image appear to select one of the range. From the Quality menu, press the Minus (-) button or the Plus (+) button to be cleaned or replaced. The measurement is Letter. 2-20 Service Manual Check the lighter and darker settings. Use a damp cloth and gently wipe the scanner glass clean. Blank copies...

Service Manual
Page 39
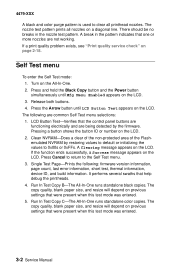
... button. Press the Plus (+) button until Single Test Page appears. 11. 3. Diagnostic aids 4479-XXX Single test page This test prints a test page. To run a complete test page of the following information: • Build Date • Code Level - Lift the scanner unit. 3. Install a good black print cartridge in the left side of the carrier and a good color cartridge in the paper support. 6. Page Count • Last Error • Maint • USB Serial Number • MFG • CMD • Model • Class • USB...
... button. Press the Plus (+) button until Single Test Page appears. 11. 3. Diagnostic aids 4479-XXX Single test page This test prints a test page. To run a complete test page of the following information: • Build Date • Code Level - Lift the scanner unit. 3. Install a good black print cartridge in the left side of the carrier and a good color cartridge in the paper support. 6. Page Count • Last Error • Maint • USB Serial Number • MFG • CMD • Model • Class • USB...
Service Manual
Page 40
... color copies. The copy quality, blank paper size, and resize will depend on previous settings that were present when this test mode was entered. 3-2 Service Manual Press and hold the Black Copy button and the Power button simultaneously until LCD Button Test appears on the LCD. If the function ends successfully, a Success message appears on previous settings that were present when this test mode was entered. 5. Press Cancel to return to the Self Test menu. 3. Press the Arrow button...
... color copies. The copy quality, blank paper size, and resize will depend on previous settings that were present when this test mode was entered. 3-2 Service Manual Press and hold the Black Copy button and the Power button simultaneously until LCD Button Test appears on the LCD. If the function ends successfully, a Success message appears on previous settings that were present when this test mode was entered. 5. Press Cancel to return to the Self Test menu. 3. Press the Arrow button...
Service Manual
Page 41
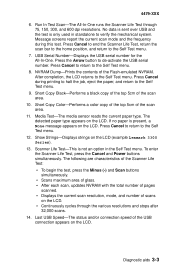
... a black copy of the top 5cm of the scan area. 11. Media Test-The media sensor reads the current paper type. To enter the Scanner Life Test, press the Cancel and Power buttons simultaneously. 4479-XXX 6. No data is sent over USB and the test is not an option in standalone to verify the mechanical system. Scanner Life Test-This is only used in the Self Test menu. Diagnostic aids 3-3 USB Serial Number-Displays the USB serial number...
... a black copy of the top 5cm of the scan area. 11. Media Test-The media sensor reads the current paper type. To enter the Scanner Life Test, press the Cancel and Power buttons simultaneously. 4479-XXX 6. No data is sent over USB and the test is not an option in standalone to verify the mechanical system. Scanner Life Test-This is only used in the Self Test menu. Diagnostic aids 3-3 USB Serial Number-Displays the USB serial number...
Service Manual
Page 73
...paper jam 2-12 part number index 1-3 parts catalog 7-1 covers, scanner, and base 7-2 how to use 7-1 print engine, carrier, and electronics 7-5 PictBridge problems 2-11 plastic latches 4-2 POST (Power-On Self Test) sequence 2-1 POST symptom table 2-9 power problems 2-12 preventive maintenance 6-1 print cartridge 1-1 print quality 2-18 print quality problems 2-12 printer communication problems 2-11 R removals ASF guide with spring 4-4 base assembly 4-19 bezel 4-5 carrier assembly and encoder strip 4-15 control panel 4-6 exit tray with extender 4-7 maintenance station 4-18 paper support 4-8 print...
...paper jam 2-12 part number index 1-3 parts catalog 7-1 covers, scanner, and base 7-2 how to use 7-1 print engine, carrier, and electronics 7-5 PictBridge problems 2-11 plastic latches 4-2 POST (Power-On Self Test) sequence 2-1 POST symptom table 2-9 power problems 2-12 preventive maintenance 6-1 print cartridge 1-1 print quality 2-18 print quality problems 2-12 printer communication problems 2-11 R removals ASF guide with spring 4-4 base assembly 4-19 bezel 4-5 carrier assembly and encoder strip 4-15 control panel 4-6 exit tray with extender 4-7 maintenance station 4-18 paper support 4-8 print...


