User's Guide
Page 5
......55 Cleaning the scanner glass...55 Ordering print cartridges...55 Ordering paper and other supplies...56 Using genuine Lexmark print cartridges...56 Refilling a print cartridge...57 Recycling Lexmark products...57 Troubleshooting 58 Setup troubleshooting...58 Power button is not lit ...58 Software does not install...58 Page does not print...59 Print troubleshooting...60...
......55 Cleaning the scanner glass...55 Ordering print cartridges...55 Ordering paper and other supplies...56 Using genuine Lexmark print cartridges...56 Refilling a print cartridge...57 Recycling Lexmark products...57 Troubleshooting 58 Setup troubleshooting...58 Power button is not lit ...58 Software does not install...58 Page does not print...59 Print troubleshooting...60...

User's Guide
Page 58
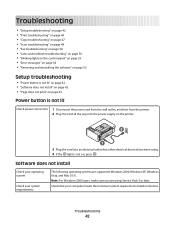
...Windows 2000 users, make sure you are using . 4 If the light is not lit Check power connection 1 Disconnect the power cord from the wall outlet, and then from the printer. 2 Plug the cord all the way into the power supply on the printer. 2 1 3 Plug the cord into an electrical outlet that your ... "Jams and misfeeds troubleshooting" on page 68 • "Error messages" on page 71 • "Removing and reinstalling the software" on page 72 Setup troubleshooting • "Power button is not lit" on page 58 • "Software does not install" on page 58 • "Page does not print" on page 59...
...Windows 2000 users, make sure you are using . 4 If the light is not lit Check power connection 1 Disconnect the power cord from the wall outlet, and then from the printer. 2 Plug the cord all the way into the power supply on the printer. 2 1 3 Plug the cord into an electrical outlet that your ... "Jams and misfeeds troubleshooting" on page 68 • "Error messages" on page 71 • "Removing and reinstalling the software" on page 72 Setup troubleshooting • "Power button is not lit" on page 58 • "Software does not install" on page 58 • "Page does not print" on page 59...
User's Guide
Page 59
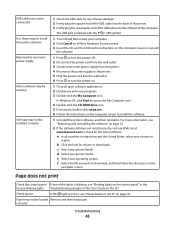
...does not install correctly, visit our Web site at www.lexmark.com to turn the printer off. 2 Disconnect the power cord from the wall outlet. 3 Gently remove the power supply from the printer. 4 Reconnect the power supply to the printer. 5 Plug the power cord into the USB port of the computer. For ... plug the square end of the USB cable into the back of the printer. 3 Firmly plug the rectangular end of the lights is blinking, see "Power button is not on, see "Blinking lights on the control panel" on . 1 Close all countries or regions except the United States, select your printer family...
...does not install correctly, visit our Web site at www.lexmark.com to turn the printer off. 2 Disconnect the power cord from the wall outlet. 3 Gently remove the power supply from the printer. 4 Reconnect the power supply to the printer. 5 Plug the power cord into the USB port of the computer. For ... plug the square end of the USB cable into the back of the printer. 3 Firmly plug the rectangular end of the lights is blinking, see "Power button is not on, see "Blinking lights on the control panel" on . 1 Close all countries or regions except the United States, select your printer family...
User's Guide
Page 63
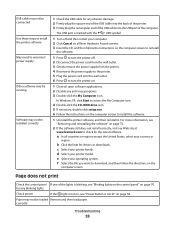
... on page 58. If the light is not on, see "Software may not be installed correctly" on page 59. For more information, see "Power button is not lit" on the scanner glass in the lower right corner. Scanner unit does not close " on page 63 • "Poor copy ... or photo copies" on page 64 Copier does not respond Check the control panel for obstructions 1 Lift the scanner unit. 2 Remove any blinking lights Check power Software may not be installed correctly 1 From the software application, click File Œ Print. 2 Click Properties, Preferences, Options, or Setup. 3 Click Quality/...
... on page 58. If the light is not on, see "Software may not be installed correctly" on page 59. For more information, see "Power button is not lit" on the scanner glass in the lower right corner. Scanner unit does not close " on page 63 • "Poor copy ... or photo copies" on page 64 Copier does not respond Check the control panel for obstructions 1 Lift the scanner unit. 2 Remove any blinking lights Check power Software may not be installed correctly 1 From the software application, click File Œ Print. 2 Click Properties, Preferences, Options, or Setup. 3 Click Quality/...
User's Guide
Page 65
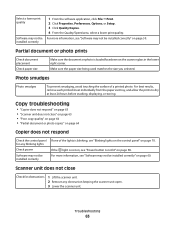
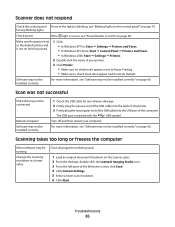
...next to a lower value Close all programs not being used. 1 Load an original document facedown on the scanner glass. 2 From the desktop, double-click the Lexmark Imaging Studio icon. 3 From the left pane of the Welcome screen, click Scan. 4 Click Custom Settings. 5 Select a lower scan resolution. 6 Click Start...the USB symbol. for any blinking lights Check power If the light is not on, see "Blinking lights on the control panel" on page 70. Scanner does not respond Check the control panel If one of the lights is blinking, see "Power button is not lit" on page 58. Troubleshooting ...
...next to a lower value Close all programs not being used. 1 Load an original document facedown on the scanner glass. 2 From the desktop, double-click the Lexmark Imaging Studio icon. 3 From the left pane of the Welcome screen, click Scan. 4 Click Custom Settings. 5 Select a lower scan resolution. 6 Click Start...the USB symbol. for any blinking lights Check power If the light is not on, see "Blinking lights on the control panel" on page 70. Scanner does not respond Check the control panel If one of the lights is blinking, see "Power button is not lit" on page 58. Troubleshooting ...
User's Guide
Page 66
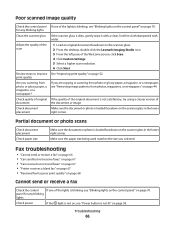
.... panel for any blinking lights Check power If the light is not on, see "Power button is blinking, see "Removing image patterns from photo or glossy paper, a magazine, or a newspaper? Review steps to improve See "Improving print quality" on the scanner glass. 2 From the desktop, double-click the Lexmark Imaging Studio icon. 3 From the...
.... panel for any blinking lights Check power If the light is not on, see "Power button is blinking, see "Removing image patterns from photo or glossy paper, a magazine, or a newspaper? Review steps to improve See "Improving print quality" on the scanner glass. 2 From the desktop, double-click the Lexmark Imaging Studio icon. 3 From the...
User's Guide
Page 81
...70 both sides of the paper, printing on 29 box contents 11 buttons, control panel 4x6 color copy 37 4x6 Copy 14 Black Copy 14 Cancel 14 Color Copy 14 Paper Feed 14 Power 14 Scan 14 buttons, Lexmark Imaging Studio Copy 15 E-mail 15 Fax 15 Photo Greeting Cards ... emission notices 74, 75 envelopes loading 22 printing 29 error messages troubleshooting Black and Color cartridge replacement required 71 Black cartridge replacement required 71 Cartridge Alert 71 Color cartridge replacement required 71 E-mail button 15 e-mailing an image 43 F fax activity reports 47 confirmation reports 47 customizing ...
...70 both sides of the paper, printing on 29 box contents 11 buttons, control panel 4x6 color copy 37 4x6 Copy 14 Black Copy 14 Cancel 14 Color Copy 14 Paper Feed 14 Power 14 Scan 14 buttons, Lexmark Imaging Studio Copy 15 E-mail 15 Fax 15 Photo Greeting Cards ... emission notices 74, 75 envelopes loading 22 printing 29 error messages troubleshooting Black and Color cartridge replacement required 71 Black cartridge replacement required 71 Cartridge Alert 71 Color cartridge replacement required 71 E-mail button 15 e-mailing an image 43 F fax activity reports 47 confirmation reports 47 customizing ...
User's Guide
Page 83
... 66 poor text and graphic quality 61 portrait orientation, selecting 19 postcards loading 23 printing 30 Poster 35 Poster button 15 power button is not lit 58 power supply port 13 print cartridge cleaning 53 print cartridge carrier 13 print cartridge nozzles, cleaning 53 print cartridges aligning...27 publications, finding 7 Q Quality/Copies tab 19 R received fax has poor print quality 68 receiving a fax using the software 47 recycling Lexmark products 57 WEEE statement 76 removing print cartridges 50 reports fax activity 47 fax confirmation 47 reverse page order 28 S safety information 2 saving...
... 66 poor text and graphic quality 61 portrait orientation, selecting 19 postcards loading 23 printing 30 Poster 35 Poster button 15 power button is not lit 58 power supply port 13 print cartridge cleaning 53 print cartridge carrier 13 print cartridge nozzles, cleaning 53 print cartridges aligning...27 publications, finding 7 Q Quality/Copies tab 19 R received fax has poor print quality 68 receiving a fax using the software 47 recycling Lexmark products 57 WEEE statement 76 removing print cartridges 50 reports fax activity 47 fax confirmation 47 reverse page order 28 S safety information 2 saving...
User's Guide
Page 84
... takes too long or freezes the computer 65 setup troubleshooting page does not print 59 power button is not lit 58 software does not install 58 slideshow creating and viewing 35 software Lexmark Imaging Studio 15 Print Properties 18 removing and reinstalling 72 Solution Center 17 Toolbar 19...copies 64 poor copy quality 64 scanner unit does not close 63 troubleshooting, error messages Black and Color cartridge replacement required 71 Black cartridge replacement required 71 Cartridge Alert 71 Color cartridge replacement required 71 troubleshooting, fax can receive but not send fax 67 can send but ...
... takes too long or freezes the computer 65 setup troubleshooting page does not print 59 power button is not lit 58 software does not install 58 slideshow creating and viewing 35 software Lexmark Imaging Studio 15 Print Properties 18 removing and reinstalling 72 Solution Center 17 Toolbar 19...copies 64 poor copy quality 64 scanner unit does not close 63 troubleshooting, error messages Black and Color cartridge replacement required 71 Black cartridge replacement required 71 Cartridge Alert 71 Color cartridge replacement required 71 troubleshooting, fax can receive but not send fax 67 can send but ...
Getting Started
Page 42
... on the control panel" on page 53 • "Error messages" on page 54 • "Removing and reinstalling the software" on page 55 Setup troubleshooting • "Power button is not lit" on page 42 • "Software does not install" on page 42 • "Page does not print" on page 43... Power button is not on the box. Note: For Windows 2000 users, make sure you are supported: Windows 2000, Windows XP, Windows Vista, and Mac OS X. Check ...
... on the control panel" on page 53 • "Error messages" on page 54 • "Removing and reinstalling the software" on page 55 Setup troubleshooting • "Power button is not lit" on page 42 • "Software does not install" on page 42 • "Page does not print" on page 43... Power button is not on the box. Note: For Windows 2000 users, make sure you are supported: Windows 2000, Windows XP, Windows Vista, and Mac OS X. Check ...
Getting Started
Page 43
... on page 55. 2 If the software still does not install correctly, visit our Web site at www.lexmark.com to check for drivers or downloads. For more information, see "Power button is blinking, see "Blinking lights on the control panel" in the for any anti-virus programs. 3 ...Double-click the My Computer icon. correctly Troubleshooting 43 c Select your operating system. Check power If the light is marked with the USB symbol...
... on page 55. 2 If the software still does not install correctly, visit our Web site at www.lexmark.com to check for drivers or downloads. For more information, see "Power button is blinking, see "Blinking lights on the control panel" in the for any anti-virus programs. 3 ...Double-click the My Computer icon. correctly Troubleshooting 43 c Select your operating system. Check power If the light is marked with the USB symbol...

Getting Started
Page 47
...on page 48 Copier does not respond Check the control panel for obstructions 1 Lift the scanner unit. 2 Remove any blinking lights Check power Software may not be installed correctly" on page 44. Select a lower print quality Software may not be installed correctly" on page ... right corner. Partial document or photo prints Check document placement Check paper size Make sure the document or photo is loaded facedown on , see "Power button is blinking, see "Software may not be installed correctly 1 From the software application, click File ΠPrint. 2 Click Properties, Preferences,...
...on page 48 Copier does not respond Check the control panel for obstructions 1 Lift the scanner unit. 2 Remove any blinking lights Check power Software may not be installed correctly" on page 44. Select a lower print quality Software may not be installed correctly" on page ... right corner. Partial document or photo prints Check document placement Check paper size Make sure the document or photo is loaded facedown on , see "Power button is blinking, see "Software may not be installed correctly 1 From the software application, click File ΠPrint. 2 Click Properties, Preferences,...

Getting Started
Page 49
... the light is not on, see "Blinking lights on the control panel" on page 42. The USB port is blinking, see "Power button is not lit" on page 53. Scan was not successful USB cable may not be connected Reboot computer Software may be installed correctly 1 Check the ... next to a lower value Close all programs not being used. 1 Load an original document facedown on the scanner glass. 2 From the desktop, double-click the Lexmark Imaging Studio icon. 3 From the left pane of the computer.
... the light is not on, see "Blinking lights on the control panel" on page 42. The USB port is blinking, see "Power button is not lit" on page 53. Scan was not successful USB cable may not be connected Reboot computer Software may be installed correctly 1 Check the ... next to a lower value Close all programs not being used. 1 Load an original document facedown on the scanner glass. 2 From the desktop, double-click the Lexmark Imaging Studio icon. 3 From the left pane of the computer.
Getting Started
Page 56
...required 54 blinking lights on the control panel 53 box contents 9 buttons, control panel 4x6 color copy 28 4x6 Copy 12 Black Copy 12 Cancel 12 Color Copy 12 Paper Feed 12 Power 12 Scan 12 buttons, Lexmark Imaging Studio Copy 13 E-mail 13 Fax 13 Photo Greeting Cards 13...glass 19 printing 21 E error messages troubleshooting Black and Color cartridge replacement required 54 Black cartridge replacement required 54 Cartridge Alert 54 Color cartridge replacement required 54 E-mail button 13 F fax receiving using the software 34 Fax button 13 fax troubleshooting 50 faxing using the software 33 ...
...required 54 blinking lights on the control panel 53 box contents 9 buttons, control panel 4x6 color copy 28 4x6 Copy 12 Black Copy 12 Cancel 12 Color Copy 12 Paper Feed 12 Power 12 Scan 12 buttons, Lexmark Imaging Studio Copy 13 E-mail 13 Fax 13 Photo Greeting Cards 13...glass 19 printing 21 E error messages troubleshooting Black and Color cartridge replacement required 54 Black cartridge replacement required 54 Cartridge Alert 54 Color cartridge replacement required 54 E-mail button 13 F fax receiving using the software 34 Fax button 13 fax troubleshooting 50 faxing using the software 33 ...
Getting Started
Page 57
... not feed paper, envelopes, or specialty media 52 L Lexmark Imaging Studio buttons Copy 13 E-mail 13 Fax 13 Photo Greeting Cards 13 Photo Packages 13 Scan 13 Slideshow 13 Transfer Photos 13 using 13 View / Print Photo Library 13 Lexmark Imaging Studio, using 13 loading documents on the scanner glass... at the edges of the page 46 poor scanned image quality 50 poor text and graphic quality 45 Poster 26 Poster button 13 power button is not lit 42 power supply port 11 print cartridge cleaning 38 print cartridge carrier 11 print cartridge nozzles, cleaning 38 print cartridges aligning 37 installing...
... not feed paper, envelopes, or specialty media 52 L Lexmark Imaging Studio buttons Copy 13 E-mail 13 Fax 13 Photo Greeting Cards 13 Photo Packages 13 Scan 13 Slideshow 13 Transfer Photos 13 using 13 View / Print Photo Library 13 Lexmark Imaging Studio, using 13 loading documents on the scanner glass... at the edges of the page 46 poor scanned image quality 50 poor text and graphic quality 45 Poster 26 Poster button 13 power button is not lit 42 power supply port 11 print cartridge cleaning 38 print cartridge carrier 11 print cartridge nozzles, cleaning 38 print cartridges aligning 37 installing...

Getting Started
Page 58
... too long or freezes the computer 49 setup troubleshooting page does not print 43 power button is not lit 42 software does not install 42 slideshow creating and viewing 26 software Lexmark Imaging Studio 13 Print Properties 16 removing and reinstalling 55 Solution Center 15 Toolbar ...48 poor copy quality 48 scanner unit does not close 47 troubleshooting, error messages Black and Color cartridge replacement required 54 Black cartridge replacement required 54 Cartridge Alert 54 Color cartridge replacement required 54 troubleshooting, fax 50 troubleshooting, jams and misfeeds banner paper jams 52 ...
... too long or freezes the computer 49 setup troubleshooting page does not print 43 power button is not lit 42 software does not install 42 slideshow creating and viewing 26 software Lexmark Imaging Studio 13 Print Properties 16 removing and reinstalling 55 Solution Center 15 Toolbar ...48 poor copy quality 48 scanner unit does not close 47 troubleshooting, error messages Black and Color cartridge replacement required 54 Black cartridge replacement required 54 Cartridge Alert 54 Color cartridge replacement required 54 troubleshooting, fax 50 troubleshooting, jams and misfeeds banner paper jams 52 ...


