
Setup Guide
Page 9
b Lower the 550-sheet drawer into place. Installing a 550-sheet drawer Your printer supports up to the holes in the 550-sheet drawer. c Repeat steps a and b for each additional drawer. 5 Carefully align the positioning posts on the cabinet or ...
b Lower the 550-sheet drawer into place. Installing a 550-sheet drawer Your printer supports up to the holes in the 550-sheet drawer. c Repeat steps a and b for each additional drawer. 5 Carefully align the positioning posts on the cabinet or ...
Setup Guide
Page 12
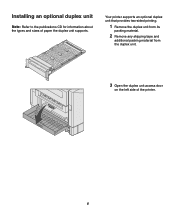
Your printer supports an optional duplex unit that provides two-sided printing. 1 Remove the duplex unit from its packing material. 2 Remove any shipping tape and additional packing material from the duplex unit. 3 Open the duplex unit access door on the left side of paper the duplex unit supports. Installing an optional duplex unit Note: Refer to the publications CD for information about the types and sizes of the printer. 8
Your printer supports an optional duplex unit that provides two-sided printing. 1 Remove the duplex unit from its packing material. 2 Remove any shipping tape and additional packing material from the duplex unit. 3 Open the duplex unit access door on the left side of paper the duplex unit supports. Installing an optional duplex unit Note: Refer to the publications CD for information about the types and sizes of the printer. 8
Setup Guide
Page 13
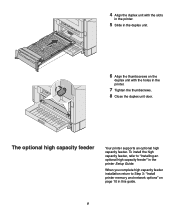
When you complete high capacity feeder installation return to "Installing an optional high capacity feeder" in this guide. 9 To install the high capacity feeder, refer to Step 3: "Install printer memory and network options" on the duplex unit with the slots in the printer. 5 Slide in the duplex unit. 6 Align the thumbscrews on page 10 in the printer Setup Guide. 4 Align the duplex unit with the holes in the printer. 7 Tighten the thumbscrews. 8 Close the duplex unit door. The optional high capacity feeder Your printer supports an optional high capacity feeder.
When you complete high capacity feeder installation return to "Installing an optional high capacity feeder" in this guide. 9 To install the high capacity feeder, refer to Step 3: "Install printer memory and network options" on the duplex unit with the slots in the printer. 5 Slide in the duplex unit. 6 Align the thumbscrews on page 10 in the printer Setup Guide. 4 Align the duplex unit with the holes in the printer. 7 Tighten the thumbscrews. 8 Close the duplex unit door. The optional high capacity feeder Your printer supports an optional high capacity feeder.

Setup Guide
Page 38
The scanner will not function if it is not unlocked. 7 Lift the feed tray and lock the support legs into the scanner slots. If you do not have an optional scanner cabinet, go to the unlocked position. 6 Move the lock switch to Step 6: "Attach the cables and power cord" on page 35. 8 Move the cabinet beside the printer. 34
The scanner will not function if it is not unlocked. 7 Lift the feed tray and lock the support legs into the scanner slots. If you do not have an optional scanner cabinet, go to the unlocked position. 6 Move the lock switch to Step 6: "Attach the cables and power cord" on page 35. 8 Move the cabinet beside the printer. 34

Setup Guide
Page 51
Refer to your document faceup in this book. 47 Your printer supports an optional finisher. To install the finisher, refer to Step 9: "Distribute MFP user instructions" on page 48 in the automatic document feeder. 4 Touch Send It or press Start to scan and send the document. When ...you complete finisher installation, return to finisher setup guide. Sending a test e-mail Sending a network print job to the MFP The optional finisher Send a one-page test e-mail to a known e-mail address: 1 From the Home screen, touch the E-mail icon. 2 In the E-...
Refer to your document faceup in this book. 47 Your printer supports an optional finisher. To install the finisher, refer to Step 9: "Distribute MFP user instructions" on page 48 in the automatic document feeder. 4 Touch Send It or press Start to scan and send the document. When ...you complete finisher installation, return to finisher setup guide. Sending a test e-mail Sending a network print job to the MFP The optional finisher Send a one-page test e-mail to a known e-mail address: 1 From the Home screen, touch the E-mail icon. 2 In the E-...

Setup Guide
Page 54
...on page 52. • If you are still having problems, contact the place where you bought your MFP. Make sure the pick pad is analog. I cannot send or receive analog faxes. • Make ...MFP CD, and then click Contact Lexmark for a complete list of Solve setup problems 50 Follow the instructions on page 35. • Turn off and then back on. • If you are still having problems, contact Lexmark customer support at http://support.lexmark... cables and cords are still having problems, contact Lexmark customer support at http://support.lexmark.com.If you bought your MFP.
...on page 52. • If you are still having problems, contact the place where you bought your MFP. Make sure the pick pad is analog. I cannot send or receive analog faxes. • Make ...MFP CD, and then click Contact Lexmark for a complete list of Solve setup problems 50 Follow the instructions on page 35. • Turn off and then back on. • If you are still having problems, contact Lexmark customer support at http://support.lexmark... cables and cords are still having problems, contact Lexmark customer support at http://support.lexmark.com.If you bought your MFP.

Setup Guide
Page 62
... telephone company will also be connected to file a complaint with the requirements of the directives has been signed by the Director of Manufacturing and Technical Support, Lexmark International, S.A., Boigny, France. To be certain of the number of service may be connected to an incoming call. For earlier products, the REN is provided...
... telephone company will also be connected to file a complaint with the requirements of the directives has been signed by the Director of Manufacturing and Technical Support, Lexmark International, S.A., Boigny, France. To be certain of the number of service may be connected to an incoming call. For earlier products, the REN is provided...

Service Manual
Page 19
... the cable to make sure that the flatbed is already unlocked, this may be a Home Sensor Failure. Scanner communication error. Diagnostic information 2-5 SCSI command not supported Invalid field in CDB Description and action Unlock the flatbed. If the persists, replace the MFD controller card.
... the cable to make sure that the flatbed is already unlocked, this may be a Home Sensor Failure. Scanner communication error. Diagnostic information 2-5 SCSI command not supported Invalid field in CDB Description and action Unlock the flatbed. If the persists, replace the MFD controller card.
Service Manual
Page 28
... which contains the code update instructions and other information about the software update. is powered on the primary partition from the Customer Support Center. Your MFP may take as more than 30 minutes, but frequently only takes 10-15 minutes. This procedure attempts to continue. 3. Press... Manual This message appears if a refresh fails more than three consecutive times. Turn off the power. 2. Code update procedure Occasionally, Lexmark may be corrupt and should be obtained from one of the following message appears: Press the # button to begin the disk refresh process...
... which contains the code update instructions and other information about the software update. is powered on the primary partition from the Customer Support Center. Your MFP may take as more than 30 minutes, but frequently only takes 10-15 minutes. This procedure attempts to continue. 3. Press... Manual This message appears if a refresh fails more than three consecutive times. Turn off the power. 2. Code update procedure Occasionally, Lexmark may be corrupt and should be obtained from one of the following message appears: Press the # button to begin the disk refresh process...

Service Manual
Page 42
4036-402 Paper input tray 1. Remove the screw. 3-18 Service Manual Fold the supports flat against the paper input tray bottom. 2.
4036-402 Paper input tray 1. Remove the screw. 3-18 Service Manual Fold the supports flat against the paper input tray bottom. 2.


