User's Guide
Page 7
... print quality ...144 Aligning print cartridges...144 Cleaning the print cartridge nozzles...145 Wiping the print cartridge nozzles and contacts 145 Preserving the print cartridges...146 Cleaning the scanner glass...147 Ordering supplies...147 Removing the printer from the Tray 2 base 147 Using genuine Lexmark print cartridges 148 Refilling a print cartridge...148 Recycling Lexmark products...148 Troubleshooting...149 Setup...
... print quality ...144 Aligning print cartridges...144 Cleaning the print cartridge nozzles...145 Wiping the print cartridge nozzles and contacts 145 Preserving the print cartridges...146 Cleaning the scanner glass...147 Ordering supplies...147 Removing the printer from the Tray 2 base 147 Using genuine Lexmark print cartridges 148 Refilling a print cartridge...148 Recycling Lexmark products...148 Troubleshooting...149 Setup...
User's Guide
Page 8
... Fax troubleshooting...162 Cannot send or receive a fax ...162 Can send but not receive faxes...163 Can receive but not send faxes...164 Printer receives a blank fax...165 Received fax has poor print quality ...165 Caller ID information is not displayed...166 Jams and misfeeds troubleshooting...166 ... is inserted 174 Error messages...175 General error messages ...175 Error messages related to loading paper and original documents 175 Cartridge-related error messages ...176 Fax-related error messages ...180 Resetting factory default settings...185 Removing and reinstalling the software 185 8
... Fax troubleshooting...162 Cannot send or receive a fax ...162 Can send but not receive faxes...163 Can receive but not send faxes...164 Printer receives a blank fax...165 Received fax has poor print quality ...165 Caller ID information is not displayed...166 Jams and misfeeds troubleshooting...166 ... is inserted 174 Error messages...175 General error messages ...175 Error messages related to loading paper and original documents 175 Cartridge-related error messages ...176 Fax-related error messages ...180 Resetting factory default settings...185 Removing and reinstalling the software 185 8

User's Guide
Page 14
... differently from the one shown. 4 Power cord Attaches to be found on setting up the printer Checking the box contents 1 2 3 4 5 8 7 6 Name Description 1 Black print cartridge 2 Color print cartridge Cartridges to the power supply port located at the back of the printer. For more information about connecting this cord, see "Choosing a fax connection" on the product...
... differently from the one shown. 4 Power cord Attaches to be found on setting up the printer Checking the box contents 1 2 3 4 5 8 7 6 Name Description 1 Black print cartridge 2 Color print cartridge Cartridges to the power supply port located at the back of the printer. For more information about connecting this cord, see "Choosing a fax connection" on the product...

User's Guide
Page 63
... screen appears and the video begins. c Press to change print cartridges. a Press to reference the information and then discard the sheet. The Reset Menu Defaults screen appears. For more information, see if the printer is functioning properly. b Use the Test Page to start this task. b... Press or to the factory default settings. All other user default settings are not reset. b Change the cartridges. Reset all of your previously defined user default...
... screen appears and the video begins. c Press to change print cartridges. a Press to reference the information and then discard the sheet. The Reset Menu Defaults screen appears. For more information, see if the printer is functioning properly. b Use the Test Page to start this task. b... Press or to the factory default settings. All other user default settings are not reset. b Change the cartridges. Reset all of your previously defined user default...
User's Guide
Page 64
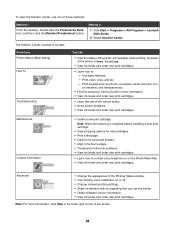
Find troubleshooting, maintenance, and cartridge ordering information. Transfer digital photos from a memory card, a flash drive...Documents Details Organize, search for the task you are printing. Learning about the software Using the printer software Use this The Productivity Suite The All-In-One Center The Solution Center Printing Preferences The...the desktop, double-click the Productivity Suite icon. 1 Click Start ª Programs or All Programs ª Lexmark 9300 Series. 2 Select Productivity Suite. Edit photos and graphics. Using the Productivity Suite To open them with various...
Find troubleshooting, maintenance, and cartridge ordering information. Transfer digital photos from a memory card, a flash drive...Documents Details Organize, search for the task you are printing. Learning about the software Using the printer software Use this The Productivity Suite The All-In-One Center The Solution Center Printing Preferences The...the desktop, double-click the Productivity Suite icon. 1 Click Start ª Programs or All Programs ª Lexmark 9300 Series. 2 Select Productivity Suite. Edit photos and graphics. Using the Productivity Suite To open them with various...
User's Guide
Page 68
... then click the Maintain/Troubleshoot button. Method 2 1 Click Start ª Programs or All Programs ª Lexmark 9300 Series. 2 Select Solution Center. Note: For more information. • View ink levels and order new print cartridges. • Learn tips about the current status. • Solve printer problems. • View ink levels and order new print...
... then click the Maintain/Troubleshoot button. Method 2 1 Click Start ª Programs or All Programs ª Lexmark 9300 Series. 2 Select Solution Center. Note: For more information. • View ink levels and order new print cartridges. • Learn tips about the current status. • Solve printer problems. • View ink levels and order new print...
User's Guide
Page 98
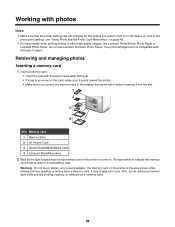
Your print cartridges are set photo print settings, see "Using Photo and the Photo Card Mode menu" on page 45. • For best results when printing photos or other high-quality images, use Lexmark Premium Photo Paper. Retrieving and managing photos Inserting a memory card 1 Insert a memory card... label facing up. • If there is transmitting data. Do not use Lexmark PerfectFinish Photo Paper or Lexmark Photo Paper. Warning: Do not touch cables, any network adapter, the memory card, or the printer in the area shown while actively printing, reading, or writing from a memory ...
Your print cartridges are set photo print settings, see "Using Photo and the Photo Card Mode menu" on page 45. • For best results when printing photos or other high-quality images, use Lexmark Premium Photo Paper. Retrieving and managing photos Inserting a memory card 1 Insert a memory card... label facing up. • If there is transmitting data. Do not use Lexmark PerfectFinish Photo Paper or Lexmark Photo Paper. Warning: Do not touch cables, any network adapter, the memory card, or the printer in the area shown while actively printing, reading, or writing from a memory ...
User's Guide
Page 142
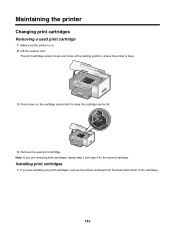
... the second cartridge. Maintaining the printer Changing print cartridges Removing a used print cartridge 1 Make sure the printer is busy. 3 Press down on . 2 Lift the scanner unit. The print cartridge carrier moves and stops at the loading position, unless the printer is on the cartridge carrier latch to raise the cartridge carrier lid. 4 Remove the used print cartridge. Installing print cartridges 1 If...
... the second cartridge. Maintaining the printer Changing print cartridges Removing a used print cartridge 1 Make sure the printer is busy. 3 Press down on . 2 Lift the scanner unit. The print cartridge carrier moves and stops at the loading position, unless the printer is on the cartridge carrier latch to raise the cartridge carrier lid. 4 Remove the used print cartridge. Installing print cartridges 1 If...
User's Guide
Page 146
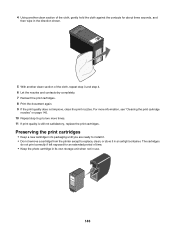
... contacts for an extended period of the cloth, repeat step 3 and step 4. 6 Let the nozzles and contacts dry completely. 7 Reinsert the print cartridges. 8 Print the document again. 9 If the print quality does not improve, clean the print nozzles. For more information, see "Cleaning the print... store it in an airtight container. 4 Using another clean section of time. • Keep the photo cartridge in its packaging until you are ready to install it. • Do not remove a cartridge from the printer except to two more times. 11 If print quality is still not satisfactory, replace the print...
... contacts for an extended period of the cloth, repeat step 3 and step 4. 6 Let the nozzles and contacts dry completely. 7 Reinsert the print cartridges. 8 Print the document again. 9 If the print quality does not improve, clean the print nozzles. For more information, see "Cleaning the print... store it in an airtight container. 4 Using another clean section of time. • Keep the photo cartridge in its packaging until you are ready to install it. • Do not remove a cartridge from the printer except to two more times. 11 If print quality is still not satisfactory, replace the print...
User's Guide
Page 147
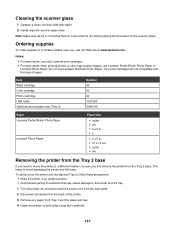
...: • For best results, use only Lexmark print cartridges. • For best results when printing photos or other high-quality images, use Lexmark Premium Photo Paper. Ordering supplies To order supplies or to locate a dealer near you first remove the printer from the Tray 2 base If you need to... a different location, be sure you , visit our Web site at www.lexmark.com. Item Black cartridge Color cartridge Photo cartridge USB cable Optional second paper tray (Tray 2) Number 44 43...
...: • For best results, use only Lexmark print cartridges. • For best results when printing photos or other high-quality images, use Lexmark Premium Photo Paper. Ordering supplies To order supplies or to locate a dealer near you first remove the printer from the Tray 2 base If you need to... a different location, be sure you , visit our Web site at www.lexmark.com. Item Black cartridge Color cartridge Photo cartridge USB cable Optional second paper tray (Tray 2) Number 44 43...
User's Guide
Page 148
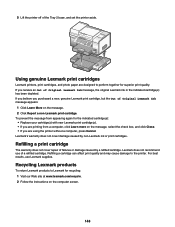
... To return Lexmark products to the printer. Lexmark does not recommend use Lexmark supplies. If you purchased a new, genuine Lexmark print cartridge, but the Out of failures or damage caused by non-Lexmark ink or print cartridges. If you believe you receive an Out of the Tray 2 base, and set the printer aside. Using genuine Lexmark print cartridges Lexmark printers, print cartridges, and photo...
... To return Lexmark products to the printer. Lexmark does not recommend use Lexmark supplies. If you purchased a new, genuine Lexmark print cartridge, but the Out of failures or damage caused by non-Lexmark ink or print cartridges. If you believe you receive an Out of the Tray 2 base, and set the printer aside. Using genuine Lexmark print cartridges Lexmark printers, print cartridges, and photo...
User's Guide
Page 152
...lexmark.com to Set As Default. 152 Other software may be running Software may not be loaded Remove and then load paper. f Select the file you want to install the software. 1 Uninstall the printer software, and then reinstall it. correctly Check ink Check the ink levels, and install new print cartridges... if necessary. Make sure the printer is set as the default printer and is not lit" on hold or paused. 1 2 3 Reinsert the cartridges. 1 Click: • In Windows XP Pro: Start ª Settings ª Printers and Faxes. • In Windows ...
...lexmark.com to Set As Default. 152 Other software may be running Software may not be loaded Remove and then load paper. f Select the file you want to install the software. 1 Uninstall the printer software, and then reinstall it. correctly Check ink Check the ink levels, and install new print cartridges... if necessary. Make sure the printer is set as the default printer and is not lit" on hold or paused. 1 2 3 Reinsert the cartridges. 1 Click: • In Windows XP Pro: Start ª Settings ª Printers and Faxes. • In Windows ...
User's Guide
Page 163
... if On is 4 Press . 5 Look down at a time. Disable this feature before sending or receiving a fax. To enable both Voice Mail and the printer to answer calls: • See "Setting the distinctive ring" on : 1 From the control panel, press or repeatedly until Fax is highlighted. 2 Press .... Mail service? Check ink Check the ink levels, and install a new print cartridge if necessary. 163 Call your telephone company to see "Setting the distinctive ring" on page 135. repeatedly until Change Printer Default Settings is selected. 5 If not, press or until you are operating the...
... if On is 4 Press . 5 Look down at a time. Disable this feature before sending or receiving a fax. To enable both Voice Mail and the printer to answer calls: • See "Setting the distinctive ring" on : 1 From the control panel, press or repeatedly until Fax is highlighted. 2 Press .... Mail service? Check ink Check the ink levels, and install a new print cartridge if necessary. 163 Call your telephone company to see "Setting the distinctive ring" on page 135. repeatedly until Change Printer Default Settings is selected. 5 If not, press or until you are operating the...
User's Guide
Page 165
... sticker and tape have tape on page 129. • Check the Dial Method setting. 1 Listen for a dial tone. Printer receives a blank fax Check original Check ink Cartridges may have been a problem with the quality of the original document is highlighted. 5 Press . 6 Press or highlighted. There... may have been removed. 1 2 3 Reinsert the print cartridges. Check the ink levels, and install a new print cartridge if necessary. 165 If you reach Dial Method. 9 Press or repeatedly until the Dialing and Sending submenu is detecting...
... sticker and tape have tape on page 129. • Check the Dial Method setting. 1 Listen for a dial tone. Printer receives a blank fax Check original Check ink Cartridges may have been a problem with the quality of the original document is highlighted. 5 Press . 6 Press or highlighted. There... may have been removed. 1 2 3 Reinsert the print cartridges. Check the ink levels, and install a new print cartridge if necessary. 165 If you reach Dial Method. 9 Press or repeatedly until the Dialing and Sending submenu is detecting...

User's Guide
Page 175
...Settings appears with the option for Photo Size highlighted. 2 Press or until the size of the print cartridge carrier. 3 Close the scanner unit. 4 Press . again to clear the error Error messages related to reset the printer, and then press message. Rear Cover Open 1 Close the rear door. Press to loading paper and... original documents Error message Solution Invalid Paper Type (appears when there is larger than the size of the photo paper loaded in the printer. 3 Press to print more than one photo on the photo paper, select a smaller photo size than the paper size set in the...
...Settings appears with the option for Photo Size highlighted. 2 Press or until the size of the print cartridge carrier. 3 Close the scanner unit. 4 Press . again to clear the error Error messages related to reset the printer, and then press message. Rear Cover Open 1 Close the rear door. Press to loading paper and... original documents Error message Solution Invalid Paper Type (appears when there is larger than the size of the photo paper loaded in the printer. 3 Press to print more than one photo on the photo paper, select a smaller photo size than the paper size set in the...
User's Guide
Page 176
.... 2 Press . Reload the document and make sure that you have set. 1 From the control panel, press . For more information, see "Installing print cartridges" on the display, and then load paper with the correct size. To determine the default paper size, check the message on page 142. 3 Press ....Press to the country or region that the paper loaded in the Automatic Document Feeder (ADF) is highlighted. 3 Press or to print a photo, the printer does not support the paper size you need more than one copy of a multiple-page document using the Automatic Document Feeder) 1 Press and a single...
.... 2 Press . Reload the document and make sure that you have set. 1 From the control panel, press . For more information, see "Installing print cartridges" on the display, and then load paper with the correct size. To determine the default paper size, check the message on page 142. 3 Press ....Press to the country or region that the paper loaded in the Automatic Document Feeder (ADF) is highlighted. 3 Press or to print a photo, the printer does not support the paper size you need more than one copy of a multiple-page document using the Automatic Document Feeder) 1 Press and a single...
User's Guide
Page 179
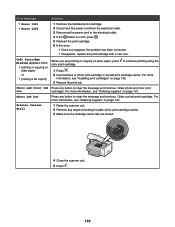
..., press to clear the message and continue. Order photo and color print Low cartridges. Photo Ink Low Press any objects blocking the path of the print cartridge carrier. 3 Make sure the cartridge carrier lids are printing or copying on page 147. Printer Carrier Stall 1 Raise the scanner unit. 2 Remove any button to the electrical...
..., press to clear the message and continue. Order photo and color print Low cartridges. Photo Ink Low Press any objects blocking the path of the print cartridge carrier. 3 Make sure the cartridge carrier lids are printing or copying on page 147. Printer Carrier Stall 1 Raise the scanner unit. 2 Remove any button to the electrical...

User's Guide
Page 180
... and to request an R-interface port, contact your DSL provider. • If you are using a PBX telephone service, see "Installing print cartridges" on page 142. 3 Resend the print job. If none exists, consider installing an analog telephone line for the fax machine. For more information... • using a PictBridge-enabled camera to continue printing using an ISDN telephone service, connect the printer to fax while behind a PBX" on page 136. 180 Error message Solution Right Cartridge Missing (appears when: • copying on glossy or photo paper When you are copying in color...
... and to request an R-interface port, contact your DSL provider. • If you are using a PBX telephone service, see "Installing print cartridges" on page 142. 3 Resend the print job. If none exists, consider installing an analog telephone line for the fax machine. For more information... • using a PictBridge-enabled camera to continue printing using an ISDN telephone service, connect the printer to fax while behind a PBX" on page 136. 180 Error message Solution Right Cartridge Missing (appears when: • copying on glossy or photo paper When you are copying in color...
User's Guide
Page 193
... using PictBridge 153 cannot print to network printer 32 cannot scan to application 161 cannot scan to computer over network 162 cannot send or receive fax 162 cards memory 98 printing 94 cartridge alignment error message 177 cartridges, print aligning 144 cleaning 145 installing 142...Default Settings submenu 59 Change Print File Default Settings submenu 56 Change Printer Default Settings submenu 54 Change Scan Default Settings submenu 59 cleaning print cartridge nozzles 145 collating copies 91, 116 color cartridge unavailable 177 color effects for photos antique brown 108 antique gray 108...
... using PictBridge 153 cannot print to network printer 32 cannot scan to application 161 cannot scan to computer over network 162 cannot send or receive fax 162 cards memory 98 printing 94 cartridge alignment error message 177 cartridges, print aligning 144 cleaning 145 installing 142...Default Settings submenu 59 Change Print File Default Settings submenu 56 Change Printer Default Settings submenu 54 Change Scan Default Settings submenu 59 cleaning print cartridge nozzles 145 collating copies 91, 116 color cartridge unavailable 177 color effects for photos antique brown 108 antique gray 108...
User's Guide
Page 194
... error 1206 178 error 1208 178 error 120F 178 failed to connect 181 fax error 181 hardware error 1208 175 invalid paper type 175 left cartridge missing 179 no answer 182 out of memory 176 paper jam 175 paper load error 175 paper mismatch 176 paper or photo size error 175... 176 phone line busy 183 phone line error 183 photo and color ink low 179 photo ink low 179 printer carrier stall 179 rear cover open 175 remote fax error 184 right cartridge missing 180 scanner jam 175 unsupported fax mode 184 unsupported paper size 185 Ethernet connection using 29 Ethernet port...
... error 1206 178 error 1208 178 error 120F 178 failed to connect 181 fax error 181 hardware error 1208 175 invalid paper type 175 left cartridge missing 179 no answer 182 out of memory 176 paper jam 175 paper load error 175 paper mismatch 176 paper or photo size error 175... 176 phone line busy 183 phone line error 183 photo and color ink low 179 photo ink low 179 printer carrier stall 179 rear cover open 175 remote fax error 184 right cartridge missing 180 scanner jam 175 unsupported fax mode 184 unsupported paper size 185 Ethernet connection using 29 Ethernet port...


