

Setup Guide
Page 3
Table of contents Preface v About your printer v About this book viii Other sources of information viii Viewing the Lexmark Publications CD ix Step 1: Unpack the printer 1 Attaching an operator panel overlay 2 Removing print cartridge packaging 2 Step 2: Install the print cartridge 4 Step 3: Install memory cards 6 Removing the printer side cover 6 Removing the system board shield 8 Installing a printer memory card 9 Installing a flash memory card 11 Reattaching the metal shield 13 Reattaching the side cover 14 Table of contents iii
Table of contents Preface v About your printer v About this book viii Other sources of information viii Viewing the Lexmark Publications CD ix Step 1: Unpack the printer 1 Attaching an operator panel overlay 2 Removing print cartridge packaging 2 Step 2: Install the print cartridge 4 Step 3: Install memory cards 6 Removing the printer side cover 6 Removing the system board shield 8 Installing a printer memory card 9 Installing a flash memory card 11 Reattaching the metal shield 13 Reattaching the side cover 14 Table of contents iii

Setup Guide
Page 5
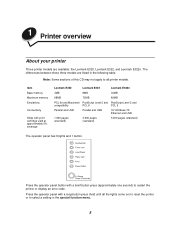
...Lexmark E320 4MB 68MB PCL 5e and Macintosh compatibility Parallel and USB Ships with print cartridge yield (at approximately 5% coverage) 1,500 pages (standard) Lexmark E322 Lexmark E322n 8MB 16MB 72MB 80MB PostScript Level 2 and PostScript Level 2 and PCL 6 PCL 6 Parallel and USB 3,000 pages (standard) 10/100 Base-TX Ethernet and USB... 3,000 pages (standard) Preface v The differences between these three models are available: the Lexmark E320, Lexmark E322, and Lexmark E322n. Preface About your printer Three printer...
...Lexmark E320 4MB 68MB PCL 5e and Macintosh compatibility Parallel and USB Ships with print cartridge yield (at approximately 5% coverage) 1,500 pages (standard) Lexmark E322 Lexmark E322n 8MB 16MB 72MB 80MB PostScript Level 2 and PostScript Level 2 and PCL 6 PCL 6 Parallel and USB 3,000 pages (standard) 10/100 Base-TX Ethernet and USB... 3,000 pages (standard) Preface v The differences between these three models are available: the Lexmark E320, Lexmark E322, and Lexmark E322n. Preface About your printer Three printer...
Setup Guide
Page 11
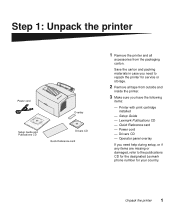
... Publications CD Drivers CD Quick Reference card 1 Remove the printer and all tape from the packaging carton. Save the carton and packing materials in case you need to the publications CD for the designated Lexmark phone number for service or storage. 2 Remove all accessories... from outside and inside the printer. 3 Make sure you need help during setup, or if any items are missing or damaged, refer to repack the printer for your country. Printer with print cartridge installed - Drivers CD...
... Publications CD Drivers CD Quick Reference card 1 Remove the printer and all tape from the packaging carton. Save the carton and packing materials in case you need to the publications CD for the designated Lexmark phone number for service or storage. 2 Remove all accessories... from outside and inside the printer. 3 Make sure you need help during setup, or if any items are missing or damaged, refer to repack the printer for your country. Printer with print cartridge installed - Drivers CD...

Setup Guide
Page 12
In direct sunlight - In dusty or dirty environments Attaching an operator panel overlay If you have a non-English operator panel overlay in a well-ventilated area near your printer box and wish to pull down the printer cover. 2 Unpack the printer Near heat sources or air conditioners - 4 Place the printer on the operator panel, and press it on a flat, stable surface in your computer. Do not place the printer: - Removing print cartridge packaging 1 Use the finger tab to use it, peel it off, align it into place.
In direct sunlight - In dusty or dirty environments Attaching an operator panel overlay If you have a non-English operator panel overlay in a well-ventilated area near your printer box and wish to pull down the printer cover. 2 Unpack the printer Near heat sources or air conditioners - 4 Place the printer on the operator panel, and press it on a flat, stable surface in your computer. Do not place the printer: - Removing print cartridge packaging 1 Use the finger tab to use it, peel it off, align it into place.

Setup Guide
Page 13
Discard the plastic piece, foam and paper. 5 Continue with "Install the print cartridge" on page 4. Unpack the printer 3 Cartridge handle 2 Grasp the cartridge handle and pull the print cartridge straight up. 3 Remove the protective foam packaging from the print cartridge. 4 Pull off the plastic piece attached to the ends of the print cartridge.
Discard the plastic piece, foam and paper. 5 Continue with "Install the print cartridge" on page 4. Unpack the printer 3 Cartridge handle 2 Grasp the cartridge handle and pull the print cartridge straight up. 3 Remove the protective foam packaging from the print cartridge. 4 Pull off the plastic piece attached to the ends of the print cartridge.

Setup Guide
Page 14
c Push down and guide it is firmly in the printer. Step 2: Install the print cartridge 1 Shake the cartridge to distribute the toner evenly. 4 Install the print cartridge 2 Insert the print cartridge: a Align the colored labels on the cartridge until it between the print cartridge grooves. b Holding the handle, tilt the print cartridge down on either side of the print cartridge with the corresponding labels in place.
c Push down and guide it is firmly in the printer. Step 2: Install the print cartridge 1 Shake the cartridge to distribute the toner evenly. 4 Install the print cartridge 2 Insert the print cartridge: a Align the colored labels on the cartridge until it between the print cartridge grooves. b Holding the handle, tilt the print cartridge down on either side of the print cartridge with the corresponding labels in place.

Setup Guide
Page 15
3 Close the printer cover. Task Install optional memory Install tray 2 Attach cables Go to page ... 6 15 17 Install the print cartridge 5 What do I do next?
3 Close the printer cover. Task Install optional memory Install tray 2 Attach cables Go to page ... 6 15 17 Install the print cartridge 5 What do I do next?

Setup Guide
Page 44
The printer is waiting until additional data is not installed. If both the Error light and Press Button lights are on, a secondary error has occurred: 1 Press the operator panel button with a double-button press to display the secondary error code. 2 Refer to Understanding the Operator Panel Lights section in the Lexmark Publications CD for information on what it means and what you can do. 34 Understanding the operator panel lights The printer top cover is open or the print cartridge is received.
The printer is waiting until additional data is not installed. If both the Error light and Press Button lights are on, a secondary error has occurred: 1 Press the operator panel button with a double-button press to display the secondary error code. 2 Refer to Understanding the Operator Panel Lights section in the Lexmark Publications CD for information on what it means and what you can do. 34 Understanding the operator panel lights The printer top cover is open or the print cartridge is received.

Setup Guide
Page 46
The printer detects a jam. Remove the print cartridge and shake it to print more pages before replacing it. (On the Lexmark E320, the Toner Low light does not come on if the standard 1,500-page print cartridge is getting low. The printer alerts you the toner is installed.) 36 Understanding the operator panel lights
The printer detects a jam. Remove the print cartridge and shake it to print more pages before replacing it. (On the Lexmark E320, the Toner Low light does not come on if the standard 1,500-page print cartridge is getting low. The printer alerts you the toner is installed.) 36 Understanding the operator panel lights

Setup Guide
Page 52
...to be low on . The operator panel lights do : Installing a print cartridge Characters appear light or blurred. • The print cartridge may be printing, but nothing prints. The paper sticks together/printer feeds multiple sheets of the paper. 42 Troubleshooting tips Loading paper Toner smudges...parallel cable, USB cable or Ethernet cable is firmly are not printing and the Error light is on solid. • Make sure the print cartridge is straight and unwrinkled. of the printer. printer and at the back of the page. Replace the cartridge. The printer is on ...
...to be low on . The operator panel lights do : Installing a print cartridge Characters appear light or blurred. • The print cartridge may be printing, but nothing prints. The paper sticks together/printer feeds multiple sheets of the paper. 42 Troubleshooting tips Loading paper Toner smudges...parallel cable, USB cable or Ethernet cable is firmly are not printing and the Error light is on solid. • Make sure the print cartridge is straight and unwrinkled. of the printer. printer and at the back of the page. Replace the cartridge. The printer is on ...

Setup Guide
Page 57
..., 25, 28 B B5, loading 23, 25, 28 C cable, connecting Ethernet 19 parallel 17 USB 18 card stock, loading 23 cautions iii CD drivers ix changing a print cartridge see Publications CD Reference connecting the printer using a parallel cable 17 Index using a USB cable 18 using an Ethernet cable 19 D drivers CD ix drivers, installing local...
..., 25, 28 B B5, loading 23, 25, 28 C cable, connecting Ethernet 19 parallel 17 USB 18 card stock, loading 23 cautions iii CD drivers ix changing a print cartridge see Publications CD Reference connecting the printer using a parallel cable 17 Index using a USB cable 18 using an Ethernet cable 19 D drivers CD ix drivers, installing local...

Setup Guide
Page 58
letter, loading 23, 25, 28 letterhead, loading 23, 25, 28 Lexmark Publications CD viii Lexmark Web site x loading card stock 23, 25 envelopes 23, 25 manual feed 24 paper A4 23, 25, 28 A5 23, 25, 28 B5 23, 25, ... the correct tray 43 menu settings page 30 multiple copies 24 setup page 30 Publications CD viii Q Quick Reference card ix R removing a print cartridge 2 replacing a print cartridge see the Publications CD resetting the printer 32 restoring factory defaults see the Publications CD S safety information iii, viii setup page, printing 30 special function menu
letter, loading 23, 25, 28 letterhead, loading 23, 25, 28 Lexmark Publications CD viii Lexmark Web site x loading card stock 23, 25 envelopes 23, 25 manual feed 24 paper A4 23, 25, 28 A5 23, 25, 28 B5 23, 25, ... the correct tray 43 menu settings page 30 multiple copies 24 setup page 30 Publications CD viii Q Quick Reference card ix R removing a print cartridge 2 replacing a print cartridge see the Publications CD resetting the printer 32 restoring factory defaults see the Publications CD S safety information iii, viii setup page, printing 30 special function menu

Setup Guide
Page 59
see the Publications CD T toner cartridge see print cartridge transparencies, loading 23, 25 tray 1, loading 21 tray 2, loading 27 troubleshooting attaching cables 42 installing a print cartridge 42 loading paper 42 paper jams see Publications CD or Quick Reference printing from the correct tray 43 restoring factory defaults see the Publications CD U unpacking the printer 1 USB cable 18 W warnings iii warranty 44 Web site, Lexmark x Windows printer drivers 39 Index 49
see the Publications CD T toner cartridge see print cartridge transparencies, loading 23, 25 tray 1, loading 21 tray 2, loading 27 troubleshooting attaching cables 42 installing a print cartridge 42 loading paper 42 paper jams see Publications CD or Quick Reference printing from the correct tray 43 restoring factory defaults see the Publications CD U unpacking the printer 1 USB cable 18 W warnings iii warranty 44 Web site, Lexmark x Windows printer drivers 39 Index 49
User's Guide
Page 7
...Press the operator panel with a long button press (hold until all printer models. Press the operator panel button with print cartridge yield at approximately 5% coverage Lexmark E320 Lexmark E322 Lexmark E322n 4MB 8MB 16MB 68MB 72MB 80MB PCL 5e and Macintosh PostScript Level 2 ...and PostScript Level 2 and compatibility PCL 6 PCL 6 Parallel and USB Parallel and USB 10/100 Base-TX Ethernet and USB 1,500...
...Press the operator panel with a long button press (hold until all printer models. Press the operator panel button with print cartridge yield at approximately 5% coverage Lexmark E320 Lexmark E322 Lexmark E322n 4MB 8MB 16MB 68MB 72MB 80MB PCL 5e and Macintosh PostScript Level 2 ...and PostScript Level 2 and compatibility PCL 6 PCL 6 Parallel and USB Parallel and USB 10/100 Base-TX Ethernet and USB 1,500...

User's Guide
Page 9
... or processing data. is getting low. alerts you to load media in tray 1, manual feed or tray 2 (if installed). cover is open or the print cartridge is ready to receive and process data. detects a jam. 2 Using the operator panel The operator panel has 6 lights and 1 operator panel button. When the: Ready... Toner Low light is on Load Paper light is on Paper Jam light is on Error light is on Press Button light is on The printer: is not installed.
... or processing data. is getting low. alerts you to load media in tray 1, manual feed or tray 2 (if installed). cover is open or the print cartridge is ready to receive and process data. detects a jam. 2 Using the operator panel The operator panel has 6 lights and 1 operator panel button. When the: Ready... Toner Low light is on Load Paper light is on Paper Jam light is on Error light is on Press Button light is on The printer: is not installed.

User's Guide
Page 43
14 Replacing the print cartridge Removing the old print cartridge The Toner Low light comes on toner. When it . Removing the print cartridge and shaking it lets you print more pages before replacing it 's time to replace the cartridge: 1 Use the finger tab to pull down the printer cover. 41 Note: On the Lexmark E320, the Toner Low light does not come on if the standard 1,500page print cartridge is getting low on when the print cartridge is installed.
14 Replacing the print cartridge Removing the old print cartridge The Toner Low light comes on toner. When it . Removing the print cartridge and shaking it lets you print more pages before replacing it 's time to replace the cartridge: 1 Use the finger tab to pull down the printer cover. 41 Note: On the Lexmark E320, the Toner Low light does not come on if the standard 1,500page print cartridge is getting low on when the print cartridge is installed.

User's Guide
Page 44
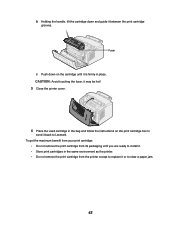
... piece and foam protective packaging. 3 Shake the cartridge to the ends of the print cartridge. WARNING: Lexmark does not recommend refilling used printer cartridges or purchasing refilled cartridges from a third party. Installing the new print cartridge 1 Take the new print cartridge out of the print cartridge with the corresponding labels in the printer. 42 a Align the colored labels on either...
... piece and foam protective packaging. 3 Shake the cartridge to the ends of the print cartridge. WARNING: Lexmark does not recommend refilling used printer cartridges or purchasing refilled cartridges from a third party. Installing the new print cartridge 1 Take the new print cartridge out of the print cartridge with the corresponding labels in the printer. 42 a Align the colored labels on either...
User's Guide
Page 45
...; Do not remove the print cartridge from the printer except to replace it back to Lexmark. To get the maximum benefit from your print cartridge: • Do not remove the print cartridge from its packaging until it between the print cartridge grooves. b Holding the handle, tilt the cartridge down on the print cartridge box to send it or...
...; Do not remove the print cartridge from the printer except to replace it back to Lexmark. To get the maximum benefit from your print cartridge: • Do not remove the print cartridge from its packaging until it between the print cartridge grooves. b Holding the handle, tilt the cartridge down on the print cartridge box to send it or...

User's Guide
Page 46
... recycling information. WARNING: Lexmark does not recommend refilling used cartridge back to you. The printer warranty does not cover damage caused by using refilled cartridges. 44 Print quality and printer reliability cannot be guaranteed if you bought your new cartridge came in a worldwide recycling effort at no cost to Lexmark. 15 Recycling the print cartridge Lexmark's Operation ReSourceSM program...
... recycling information. WARNING: Lexmark does not recommend refilling used cartridge back to you. The printer warranty does not cover damage caused by using refilled cartridges. 44 Print quality and printer reliability cannot be guaranteed if you bought your new cartridge came in a worldwide recycling effort at no cost to Lexmark. 15 Recycling the print cartridge Lexmark's Operation ReSourceSM program...

User's Guide
Page 47
... bought your empty cartridges only to order a new print cartridge, there are two Prebate™ print cartridges and two regular priced print cartridges specifically designed for your printer: Prebate print cartridge part number1 Average yield Print coverage (approximate) 08A0476 Prebate Print Cartridge 3,000 pages 08A0478 High Yield Prebate Print Cartridge 6,000 pages 5% 1 Sold at www.lexmark.com. 16 Ordering...
... bought your empty cartridges only to order a new print cartridge, there are two Prebate™ print cartridges and two regular priced print cartridges specifically designed for your printer: Prebate print cartridge part number1 Average yield Print coverage (approximate) 08A0476 Prebate Print Cartridge 3,000 pages 08A0478 High Yield Prebate Print Cartridge 6,000 pages 5% 1 Sold at www.lexmark.com. 16 Ordering...


