

Setup Guide
Page 2
...person. • This product is properly grounded. • The power cord must understand the section in your point of Lexmark International, Inc., registered in this product by calling 1-800-553-9727. This publication could include technical inaccuracies or typographical errors...in later editions. therefore, this publication may not apply to Lexmark International, Inc., Department F95/032-2, 740 West New Circle Road, Lexington, Kentucky 40550, U.S.A. Safety information • If your printer hardware or software. Comments about this statement may be incorporated ...
...person. • This product is properly grounded. • The power cord must understand the section in your point of Lexmark International, Inc., registered in this product by calling 1-800-553-9727. This publication could include technical inaccuracies or typographical errors...in later editions. therefore, this publication may not apply to Lexmark International, Inc., Department F95/032-2, 740 West New Circle Road, Lexington, Kentucky 40550, U.S.A. Safety information • If your printer hardware or software. Comments about this statement may be incorporated ...

Setup Guide
Page 3
Table of contents Preface v About your printer v About this book viii Other sources of information viii Viewing the Lexmark Publications CD ix Step 1: Unpack the printer 1 Attaching an operator panel overlay 2 Removing print cartridge packaging 2 Step 2: Install the print cartridge 4 Step 3: Install memory cards 6 Removing the printer side cover 6 Removing the system board shield 8 Installing a printer memory card 9 Installing a flash memory card 11 Reattaching the metal shield 13 Reattaching the side cover 14 Table of contents iii
Table of contents Preface v About your printer v About this book viii Other sources of information viii Viewing the Lexmark Publications CD ix Step 1: Unpack the printer 1 Attaching an operator panel overlay 2 Removing print cartridge packaging 2 Step 2: Install the print cartridge 4 Step 3: Install memory cards 6 Removing the printer side cover 6 Removing the system board shield 8 Installing a printer memory card 9 Installing a flash memory card 11 Reattaching the metal shield 13 Reattaching the side cover 14 Table of contents iii

Setup Guide
Page 4
Step 4: Install the tray 2 option 15 Step 5: Attach cables 17 Local printing 17 Network printing 19 Attaching a power cord 20 Step 6: Load paper 21 Loading tray 1 21 Loading the manual feed 24 Loading the optional tray 2 27 Step 7: Verify printer setup 30 Step 8: Understanding the operator panel lights 31 Step 9: Install printer drivers 38 Local printing 38 Network printing 39 Statement of limited warranty 44 Index 47 iv Table of contents
Step 4: Install the tray 2 option 15 Step 5: Attach cables 17 Local printing 17 Network printing 19 Attaching a power cord 20 Step 6: Load paper 21 Loading tray 1 21 Loading the manual feed 24 Loading the optional tray 2 27 Step 7: Verify printer setup 30 Step 8: Understanding the operator panel lights 31 Step 9: Install printer drivers 38 Local printing 38 Network printing 39 Statement of limited warranty 44 Index 47 iv Table of contents

Setup Guide
Page 5
... your printer Three printer models are listed in the following table. The differences between these three models are available: the Lexmark E320, Lexmark E322, and Lexmark E322n. Item Base memory Maximum memory Emulations Connectivity Lexmark E320 4MB 68MB PCL 5e and Macintosh compatibility Parallel and USB Ships with print cartridge yield (at approximately 5% coverage) 1,500 pages (standard) Lexmark E322 Lexmark E322n 8MB...
... your printer Three printer models are listed in the following table. The differences between these three models are available: the Lexmark E320, Lexmark E322, and Lexmark E322n. Item Base memory Maximum memory Emulations Connectivity Lexmark E320 4MB 68MB PCL 5e and Macintosh compatibility Parallel and USB Ships with print cartridge yield (at approximately 5% coverage) 1,500 pages (standard) Lexmark E322 Lexmark E322n 8MB...

Setup Guide
Page 6
... the top output bin. Adjust the width of other media. Stack printed documents face down. Support media in tray 1 and the manual feed. Increase your printer. Print on special media, for transparencies, labels, envelopes, and card stock. Load a single sheet of your paper capacity. Check the status of paper/other media...
... the top output bin. Adjust the width of other media. Stack printed documents face down. Support media in tray 1 and the manual feed. Increase your printer. Print on special media, for transparencies, labels, envelopes, and card stock. Load a single sheet of your paper capacity. Check the status of paper/other media...

Setup Guide
Page 7
... wall outlet with an Ethernet cable. Ethernet cable connector Connect your computer to the Lexmark E322n network port with a power cord. USB connector Connect your computer to your printer's USB port with a parallel cable. Lexmark E320 and E322 Parallel cable connector Lexmark E322n USB cable connector Power cord connector Power switch Ethernet connector Power cord connector Power switch...
... wall outlet with an Ethernet cable. Ethernet cable connector Connect your computer to the Lexmark E322n network port with a power cord. USB connector Connect your computer to your printer's USB port with a parallel cable. Lexmark E320 and E322 Parallel cable connector Lexmark E322n USB cable connector Power cord connector Power switch Ethernet connector Power cord connector Power switch...

Setup Guide
Page 8
... safety information on the light sequence, briefly (approximately 1 second) push the operator panel button to install printer drivers and utilities, and printing information from the Lexmark Publications CD. Depending on the inside of information Lexmark Publications CD The Lexmark Publications CD, which is connected to a network, MarkNet Web Pages, to change the paper source...
... safety information on the light sequence, briefly (approximately 1 second) push the operator panel button to install printer drivers and utilities, and printing information from the Lexmark Publications CD. Depending on the inside of information Lexmark Publications CD The Lexmark Publications CD, which is connected to a network, MarkNet Web Pages, to change the paper source...

Setup Guide
Page 9
Drivers CD The drivers CD contains all the necessary printer drivers to get your CD-ROM drive. If Acrobat Reader is not installed on your operating system, visit the Adobe Web site at www.lexmark.com. Quick Reference card The Quick Reference card provides easy ...access to download the Acrobat Reader version you are also located on your printer, it may also contain MarkVision Professional, other printer utilities, worldwide customer support phone numbers, screen...
Drivers CD The drivers CD contains all the necessary printer drivers to get your CD-ROM drive. If Acrobat Reader is not installed on your operating system, visit the Adobe Web site at www.lexmark.com. Quick Reference card The Quick Reference card provides easy ...access to download the Acrobat Reader version you are also located on your printer, it may also contain MarkVision Professional, other printer utilities, worldwide customer support phone numbers, screen...

Setup Guide
Page 10
x Preface Lexmark Web site Access our site on the World Wide Web for updated printer drivers and utilities, and other Lexmark E320/E322 printer documentation: www.lexmark.com.
x Preface Lexmark Web site Access our site on the World Wide Web for updated printer drivers and utilities, and other Lexmark E320/E322 printer documentation: www.lexmark.com.
Setup Guide
Page 11
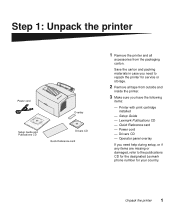
... following items: - Setup Guide - Power cord - Unpack the printer 1 Lexmark Publications CD - Save the carton and packing materials in case you need help during setup, or if any items are missing or damaged, refer to repack the printer for your country. Step 1: Unpack the printer Power cord Overlay Setup Guide and Publications CD Drivers...
... following items: - Setup Guide - Power cord - Unpack the printer 1 Lexmark Publications CD - Save the carton and packing materials in case you need help during setup, or if any items are missing or damaged, refer to repack the printer for your country. Step 1: Unpack the printer Power cord Overlay Setup Guide and Publications CD Drivers...

Setup Guide
Page 12
In dusty or dirty environments Attaching an operator panel overlay If you have a non-English operator panel overlay in a well-ventilated area near your printer box and wish to pull down the printer cover. 2 Unpack the printer Near heat sources or air conditioners - Do not place the printer: - Removing print cartridge packaging 1 Use the finger tab to use it, peel it off, align it into place. In direct sunlight - 4 Place the printer on the operator panel, and press it on a flat, stable surface in your computer.
In dusty or dirty environments Attaching an operator panel overlay If you have a non-English operator panel overlay in a well-ventilated area near your printer box and wish to pull down the printer cover. 2 Unpack the printer Near heat sources or air conditioners - Do not place the printer: - Removing print cartridge packaging 1 Use the finger tab to use it, peel it off, align it into place. In direct sunlight - 4 Place the printer on the operator panel, and press it on a flat, stable surface in your computer.

Setup Guide
Page 13
Unpack the printer 3 Cartridge handle 2 Grasp the cartridge handle and pull the print cartridge straight up. 3 Remove the protective foam packaging from the print cartridge. 4 Pull off the plastic piece attached to the ends of the print cartridge. Discard the plastic piece, foam and paper. 5 Continue with "Install the print cartridge" on page 4.
Unpack the printer 3 Cartridge handle 2 Grasp the cartridge handle and pull the print cartridge straight up. 3 Remove the protective foam packaging from the print cartridge. 4 Pull off the plastic piece attached to the ends of the print cartridge. Discard the plastic piece, foam and paper. 5 Continue with "Install the print cartridge" on page 4.

Setup Guide
Page 14
Step 2: Install the print cartridge 1 Shake the cartridge to distribute the toner evenly. 4 Install the print cartridge 2 Insert the print cartridge: a Align the colored labels on the cartridge until it between the print cartridge grooves. b Holding the handle, tilt the print cartridge down on either side of the print cartridge with the corresponding labels in place. c Push down and guide it is firmly in the printer.
Step 2: Install the print cartridge 1 Shake the cartridge to distribute the toner evenly. 4 Install the print cartridge 2 Insert the print cartridge: a Align the colored labels on the cartridge until it between the print cartridge grooves. b Holding the handle, tilt the print cartridge down on either side of the print cartridge with the corresponding labels in place. c Push down and guide it is firmly in the printer.

Setup Guide
Page 15
3 Close the printer cover. What do I do next? Task Install optional memory Install tray 2 Attach cables Go to page ... 6 15 17 Install the print cartridge 5
3 Close the printer cover. What do I do next? Task Install optional memory Install tray 2 Attach cables Go to page ... 6 15 17 Install the print cartridge 5

Setup Guide
Page 16
Step 3: Install memory cards Depending on your printer model, you can also install a 1MB, 2MB, or 4MB optional flash memory card for a total of up to 68MB (Lexmark E320), 72MB (Lexmark E322), and 80MB (Lexmark E322n). If you have a Lexmark E322 or E322n, you must remove the printer side cover. 6 Install memory cards Removing the printer Before installing any memory options, side cover you can increase printer memory for storing downloaded fonts or macros.
Step 3: Install memory cards Depending on your printer model, you can also install a 1MB, 2MB, or 4MB optional flash memory card for a total of up to 68MB (Lexmark E320), 72MB (Lexmark E322), and 80MB (Lexmark E322n). If you have a Lexmark E322 or E322n, you must remove the printer side cover. 6 Install memory cards Removing the printer Before installing any memory options, side cover you can increase printer memory for storing downloaded fonts or macros.

Setup Guide
Page 17
If you are installing memory cards sometime after setting up the printer, turn the printer off and unplug any attached peripherals before continuing. 1 Open the printer front cover. Install memory cards 7 CAUTION!
If you are installing memory cards sometime after setting up the printer, turn the printer off and unplug any attached peripherals before continuing. 1 Open the printer front cover. Install memory cards 7 CAUTION!

Setup Guide
Page 18
2 Firmly push in the two oval tabs as you pull open the side cover. 3 Remove the cover and set it aside. Removing the system board shield You will need a small Phillips screwdriver to remove the metal shield covering the printer system board. 8 Install memory cards
2 Firmly push in the two oval tabs as you pull open the side cover. 3 Remove the cover and set it aside. Removing the system board shield You will need a small Phillips screwdriver to remove the metal shield covering the printer system board. 8 Install memory cards

Setup Guide
Page 19
To install an optional printer memory card: 1 Unpack the printer memory card. Touch something metal on the printer before you touch a memory card. Installing a printer memory card Warning! Install memory cards 9 Printer memory cards are easily damaged by sliding it along the top and bottom grooves and set it aside. 2 Remove the metal shield by static electricity. 1 Remove the single screw and set it aside.
To install an optional printer memory card: 1 Unpack the printer memory card. Touch something metal on the printer before you touch a memory card. Installing a printer memory card Warning! Install memory cards 9 Printer memory cards are easily damaged by sliding it along the top and bottom grooves and set it aside. 2 Remove the metal shield by static electricity. 1 Remove the single screw and set it aside.

Setup Guide
Page 21
Installing a flash memory card Note: Flash memory cards are installing flash memory in a Lexmark E322 or E322n, continue. Touch something metal on either side of the connector snap into the connector until the latches on the printer before you are easily damaged by static electricity. Install memory cards 11 Otherwise, reattach the metal shield and side cover. See page 13 for instructions. 6 Push the memory card firmly into place. 7 If you touch a memory card. 1 Unpack the flash memory card.
Installing a flash memory card Note: Flash memory cards are installing flash memory in a Lexmark E322 or E322n, continue. Touch something metal on either side of the connector snap into the connector until the latches on the printer before you are easily damaged by static electricity. Install memory cards 11 Otherwise, reattach the metal shield and side cover. See page 13 for instructions. 6 Push the memory card firmly into place. 7 If you touch a memory card. 1 Unpack the flash memory card.

Setup Guide
Page 25
A drawer consists of a paper tray and a support unit. 1 Remove the tray from the support unit. 2 Remove all packing material and tape from the tray and the support unit. 3 Place the support unit in the location you have chosen for your printer. Install the tray 2 option 15 Step 4: Install the tray 2 option Support unit Paper tray You can increase paper capacity with the optional 250-sheet drawer, which attaches underneath the printer.
A drawer consists of a paper tray and a support unit. 1 Remove the tray from the support unit. 2 Remove all packing material and tape from the tray and the support unit. 3 Place the support unit in the location you have chosen for your printer. Install the tray 2 option 15 Step 4: Install the tray 2 option Support unit Paper tray You can increase paper capacity with the optional 250-sheet drawer, which attaches underneath the printer.

