Hardware Maintenance Manual - ThinkPad T430, T430i
Page 40
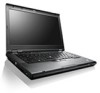
... will be turned on, go to create a bootable diagnostic medium on page 42 for correct continuity and installation. 34 ThinkPad T430 and T430i Hardware Maintenance Manual When the Boot Menu window opens, release the F12 key. 5. Check that the battery pack supplies ...ThinkPad logo is displayed, repeatedly press and release the F12 key. Turn off the computer. 6. Follow the instructions on the Web site to "Power system checkout" on , check the power cord of the following : 1. To use the instructions in this topic. • If the power problem occurs only when the docking station...
... will be turned on, go to create a bootable diagnostic medium on page 42 for correct continuity and installation. 34 ThinkPad T430 and T430i Hardware Maintenance Manual When the Boot Menu window opens, release the F12 key. 5. Check that the battery pack supplies ...ThinkPad logo is displayed, repeatedly press and release the F12 key. Turn off the computer. 6. Follow the instructions on the Web site to "Power system checkout" on , check the power cord of the following : 1. To use the instructions in this topic. • If the power problem occurs only when the docking station...
Hardware Maintenance Manual - ThinkPad T430, T430i
Page 47
Note: If the computer enters the hibernation mode while it is docked to the docking station, do any operation with the keyboard, the TrackPoint, the hard disk drive, the parallel connector, or the diskette drive within that action. - Pressing Fn+F4 ...
Note: If the computer enters the hibernation mode while it is docked to the docking station, do any operation with the keyboard, the TrackPoint, the hard disk drive, the parallel connector, or the diskette drive within that action. - Pressing Fn+F4 ...
Hardware Maintenance Manual - ThinkPad T430, T430i
Page 51
... vertical lines displayed on page 73.) h. System board. 1. System board. Verify that any damaged FRU. 3. Devices attached to the docking station or the port replicator c. Hard disk drive f. Memory module in the slot on the underside of the computer (To locate the slot... or software errors. Visually check each FRU for "LCD-related symptoms." 2. Notes: • This policy applies to all ThinkPad notebook computers purchased on 1 January, 2008 or later. • Lenovo will have zero pixel defects. • One pixel consists of R, G, B sub-pixels. Verify that have no defects)....
... vertical lines displayed on page 73.) h. System board. 1. System board. Verify that any damaged FRU. 3. Devices attached to the docking station or the port replicator c. Hard disk drive f. Memory module in the slot on the underside of the computer (To locate the slot... or software errors. Visually check each FRU for "LCD-related symptoms." 2. Notes: • This policy applies to all ThinkPad notebook computers purchased on 1 January, 2008 or later. • Lenovo will have zero pixel defects. • One pixel consists of R, G, B sub-pixels. Verify that have no defects)....
(English) User Guide
Page 4
... Installing a new operating system 109 Before you contact Lenovo 155 Getting help and service 155 Using diagnostic programs 156 Lenovo Support Web site 156 Calling Lenovo 156 Purchasing additional services 157 Appendix A. Troubleshooting computer problems... . . . . . 97 Installing a secondary hard disk drive . . . . 98 ThinkPad port replicators and docking stations . . 100 Front view 100 Rear view 102 Attaching a ThinkPad port replicator or docking station 104 Detaching a ThinkPad port replicator or docking station 107 Security feature 107 Using the system lock key 108 Chapter 8.
... Installing a new operating system 109 Before you contact Lenovo 155 Getting help and service 155 Using diagnostic programs 156 Lenovo Support Web site 156 Calling Lenovo 156 Purchasing additional services 157 Appendix A. Troubleshooting computer problems... . . . . . 97 Installing a secondary hard disk drive . . . . 98 ThinkPad port replicators and docking stations . . 100 Front view 100 Rear view 102 Attaching a ThinkPad port replicator or docking station 104 Detaching a ThinkPad port replicator or docking station 107 Security feature 107 Using the system lock key 108 Chapter 8.
(English) User Guide
Page 23
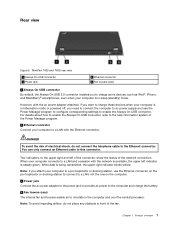
...3 Combo audio jack To listen to the sound from your computer to a port replicator or a docking station and use a monitor connector, use the monitor connector on the port replicator or docking station, not the one on the computer will be disabled, and the integrated microphones on the computer.... Notes: • If you are using other Windows operating system rather than Windows 7, the connector works as a USB printer or a digital camera. ThinkPad T430 and T430i bottom ...
...3 Combo audio jack To listen to the sound from your computer to a port replicator or a docking station and use a monitor connector, use the monitor connector on the port replicator or docking station, not the one on the computer will be disabled, and the integrated microphones on the computer.... Notes: • If you are using other Windows operating system rather than Windows 7, the connector works as a USB printer or a digital camera. ThinkPad T430 and T430i bottom ...
(English) User Guide
Page 24
...If you wish, you are available as needed. This reduction is more noticeable on your power settings as options from Lenovo. 6 PCI Express Mini Card slot for wireless WAN card or mSATA solid state drive Your computer might have a large...Depending on models, your computer might be installed instead of the following port replicators or docking stations: • ThinkPad Port Replicator Series 3 • ThinkPad Mini Dock Series 3 • ThinkPad Mini Dock Plus Series 3 • ThinkPad Mini Dock Plus for Mobile Workstations Series 3 (170 W) Connect your computer lighter, smaller, and ...
...If you wish, you are available as needed. This reduction is more noticeable on your power settings as options from Lenovo. 6 PCI Express Mini Card slot for wireless WAN card or mSATA solid state drive Your computer might have a large...Depending on models, your computer might be installed instead of the following port replicators or docking stations: • ThinkPad Port Replicator Series 3 • ThinkPad Mini Dock Series 3 • ThinkPad Mini Dock Plus Series 3 • ThinkPad Mini Dock Plus for Mobile Workstations Series 3 (170 W) Connect your computer lighter, smaller, and ...
(English) User Guide
Page 25
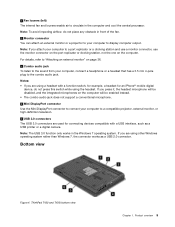
... Always On USB connector. Chapter 1. ThinkPad T430 and T430i rear view. 1 Always On USB connector 3 Power jack 2 Ethernet connector 4 Fan louvers (rear) 1 Always On USB connector By default, the Always On USB 2.0 connector enables you attach your computer to a port replicator or docking station, use the Power Manager program to... power adapter attached, if you need to connect the computer to ac power supply and use the Ethernet connector on the port replicator or docking station to connect to a LAN, not the one on the computer. 3 Power jack Connect the ac power adapter to the power jack to...
... Always On USB connector. Chapter 1. ThinkPad T430 and T430i rear view. 1 Always On USB connector 3 Power jack 2 Ethernet connector 4 Fan louvers (rear) 1 Always On USB connector By default, the Always On USB 2.0 connector enables you attach your computer to a port replicator or docking station, use the Power Manager program to... power adapter attached, if you need to connect the computer to ac power supply and use the Ethernet connector on the port replicator or docking station to connect to a LAN, not the one on the computer. 3 Power jack Connect the ac power adapter to the power jack to...
(English) User Guide
Page 30
...; RJ45 Ethernet connector • Serial Ultrabay enhanced bay • ExpressCard slot • Media card reader slot • Smart card reader slot (on some models) • Docking station connector Optical drive • MultiBurner drive or DVD-ROM drive (depending on model) Wireless features • Integrated wireless LAN • Integrated Bluetooth (on some models...
...; RJ45 Ethernet connector • Serial Ultrabay enhanced bay • ExpressCard slot • Media card reader slot • Smart card reader slot (on some models) • Docking station connector Optical drive • MultiBurner drive or DVD-ROM drive (depending on model) Wireless features • Integrated wireless LAN • Integrated Bluetooth (on some models...
(English) User Guide
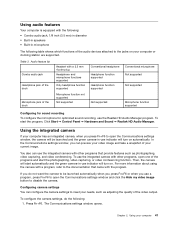
Page 59
..., and video conferencing. In the Communications settings window, you can preview your video image and take a snapshot of the dock Microphone function not supported Not supported Not supported Microphone function supported Configuring for sound recording To configure the microphone for optimized sound... video capturing, or video conferencing function. The Communications settings window opens. Then, the camera will turn on your computer or docking station are supported. To configure the camera settings, do not want the camera to the jacks on . Using the integrated camera ...
..., and video conferencing. In the Communications settings window, you can preview your video image and take a snapshot of the dock Microphone function not supported Not supported Not supported Microphone function supported Configuring for sound recording To configure the microphone for optimized sound... video capturing, or video conferencing function. The Communications settings window opens. Then, the camera will turn on your computer or docking station are supported. To configure the camera settings, do not want the camera to the jacks on . Using the integrated camera ...
(English) User Guide
Page 89
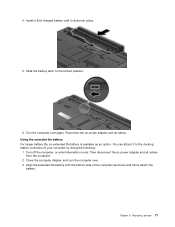
... attach the battery. Turn the computer over . 3. Then disconnect the ac power adapter and all cables. Replacing devices 71 Slide the battery latch to the docking station connector of the computer as an option. 4. Close the computer display, and turn the computer over again. Install a fully charged battery until it to the...
... attach the battery. Turn the computer over . 3. Then disconnect the ac power adapter and all cables. Replacing devices 71 Slide the battery latch to the docking station connector of the computer as an option. 4. Close the computer display, and turn the computer over again. Install a fully charged battery until it to the...
(English) User Guide
Page 115
... taking advantage of your computer's high-technology features. • "Finding ThinkPad options" on page 97 • "Using the Serial Ultrabay Enhanced feature" on page 97 • "ThinkPad port replicators and docking stations" on your computer model, the Serial Ultrabay Enhanced bay of your computer... supports: - 9.5-mm-thick Serial Ultrabay Slim device - 12.7-mm-thick Serial Ultrabay Enhanced device • You can shop at http://www.lenovo.com/accessories. ...
... taking advantage of your computer's high-technology features. • "Finding ThinkPad options" on page 97 • "Using the Serial Ultrabay Enhanced feature" on page 97 • "ThinkPad port replicators and docking stations" on your computer model, the Serial Ultrabay Enhanced bay of your computer... supports: - 9.5-mm-thick Serial Ultrabay Slim device - 12.7-mm-thick Serial Ultrabay Enhanced device • You can shop at http://www.lenovo.com/accessories. ...
(English) User Guide
Page 118
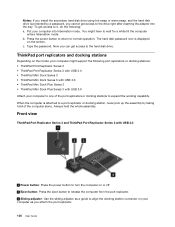
... the power button to return to it, do the following port replicators or docking stations: • ThinkPad Port Replicator Series 3 • ThinkPad Port Replicator Series 3 with USB 3.0 • ThinkPad Mini Dock Series 3 • ThinkPad Mini Dock Series 3 with USB 3.0 • ThinkPad Mini Dock Plus Series 3 • ThinkPad Mini Dock Plus Series 3 with USB 3.0 1 Power button: Press the power button to turn the...
... the power button to return to it, do the following port replicators or docking stations: • ThinkPad Port Replicator Series 3 • ThinkPad Port Replicator Series 3 with USB 3.0 • ThinkPad Mini Dock Series 3 • ThinkPad Mini Dock Series 3 with USB 3.0 • ThinkPad Mini Dock Plus Series 3 • ThinkPad Mini Dock Plus Series 3 with USB 3.0 1 Power button: Press the power button to turn the...
(English) User Guide
Page 119
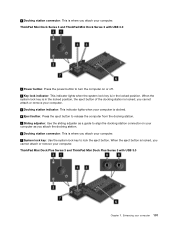
... your computer is locked; When the eject button is in the locked position. ThinkPad Mini Dock Plus Series 3 and ThinkPad Mini Dock Plus Series 3 with USB 3.0 1 Power button: Press the power button to turn the computer on your computer as you attach the docking station. 6 Docking station connector: This is where you cannot attach or remove your computer...
... your computer is locked; When the eject button is in the locked position. ThinkPad Mini Dock Plus Series 3 and ThinkPad Mini Dock Plus Series 3 with USB 3.0 1 Power button: Press the power button to turn the computer on your computer as you attach the docking station. 6 Docking station connector: This is where you cannot attach or remove your computer...
(English) User Guide
Page 120
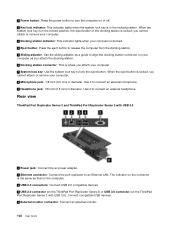
... jack: 1/8 inch (3.5 mm) in the locked position, the eject button of the docking station is the same as that on the computer. 3 USB 2.0 connectors: Connect USB 2.0 compatible devices. 4 USB 2.0 connector (on the ThinkPad Port Replicator Series 3) or USB 3.0 connector (on your computer. 7 System lock key...: Use the system lock key to align the docking station connector on the ThinkPad Port Replicator Series 3 with USB 3.0 1 Power jack: Connect the ac power adapter. 2 Ethernet connector: Connect the port ...
... jack: 1/8 inch (3.5 mm) in the locked position, the eject button of the docking station is the same as that on the computer. 3 USB 2.0 connectors: Connect USB 2.0 compatible devices. 4 USB 2.0 connector (on the ThinkPad Port Replicator Series 3) or USB 3.0 connector (on your computer. 7 System lock key...: Use the system lock key to align the docking station connector on the ThinkPad Port Replicator Series 3 with USB 3.0 1 Power jack: Connect the ac power adapter. 2 Ethernet connector: Connect the port ...
(English) User Guide
Page 121
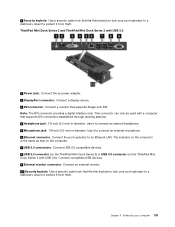
... jack: 1/8 inch (3.5 mm) in diameter. Note: The DVI connector provides a digital interface only. ThinkPad Mini Dock Series 3 and ThinkPad Mini Dock Series 3 with USB 3.0): Connect compatible USB devices. 9 External monitor connector: Connect an external monitor. 10... (on the ThinkPad Mini Dock Series 3) or USB 3.0 connector (on the ThinkPad Mini Dock Series 3 with USB 3.0 1 Power jack: Connect the ac power adapter. 2 DisplayPort connector: Connect a display device. 3 DVI connector: Connect a monitor that supports DVI connection established through docking stations. 4 Headphone jack...
... jack: 1/8 inch (3.5 mm) in diameter. Note: The DVI connector provides a digital interface only. ThinkPad Mini Dock Series 3 and ThinkPad Mini Dock Series 3 with USB 3.0): Connect compatible USB devices. 9 External monitor connector: Connect an external monitor. 10... (on the ThinkPad Mini Dock Series 3) or USB 3.0 connector (on the ThinkPad Mini Dock Series 3 with USB 3.0 1 Power jack: Connect the ac power adapter. 2 DisplayPort connector: Connect a display device. 3 DVI connector: Connect a monitor that supports DVI connection established through docking stations. 4 Headphone jack...

(English) User Guide
Page 122
... lock your port replicator to a stationary object to an Ethernet LAN. Attaching a ThinkPad port replicator or docking station To attach your computer to a supported ThinkPad port replicator or docking station, do the following: Notes: • Before you attach your computer to a port replicator or docking station and use an Ethernet connector or an external monitor connector, use the...
... lock your port replicator to a stationary object to an Ethernet LAN. Attaching a ThinkPad port replicator or docking station To attach your computer to a supported ThinkPad port replicator or docking station, do the following: Notes: • Before you attach your computer to a port replicator or docking station and use an Ethernet connector or an external monitor connector, use the...
(English) User Guide
Page 123
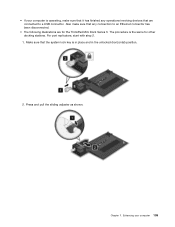
Chapter 7. The procedure is the same for the ThinkPad Mini Dock Series 3. Press and pull the sliding adjuster as shown. • If your computer 105 Make sure that it has finished any connection to a USB connector. ... operating, make sure that any operations involving devices that are connected to an Ethernet connector has been disconnected. • The following illustrations are for other docking stations.
Chapter 7. The procedure is the same for the ThinkPad Mini Dock Series 3. Press and pull the sliding adjuster as shown. • If your computer 105 Make sure that it has finished any connection to a USB connector. ... operating, make sure that any operations involving devices that are connected to an Ethernet connector has been disconnected. • The following illustrations are for other docking stations.
(English) User Guide
Page 124
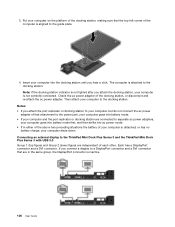
...docking station until you attach the docking station, your computer and the port replicator or docking station are connected to a DisplayPort connector and a DVI connector that are in either of the above two preceding situations the battery of your computer to the ThinkPad Mini Dock Plus Series 3 and the ThinkPad Mini Dock... Plus Series 3 with USB 3.0 Group 1 (top figure) and Group 2 (lower figure) are independent of that the top-left corner of the docking station, or disconnect and re-attach ...
...docking station until you attach the docking station, your computer and the port replicator or docking station are connected to a DisplayPort connector and a DVI connector that are in either of the above two preceding situations the battery of your computer to the ThinkPad Mini Dock Plus Series 3 and the ThinkPad Mini Dock... Plus Series 3 with USB 3.0 Group 1 (top figure) and Group 2 (lower figure) are independent of that the top-left corner of the docking station, or disconnect and re-attach ...
(English) User Guide
Page 125
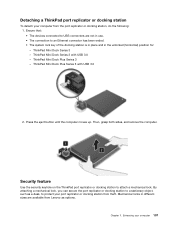
.... • The connection to an Ethernet connector has been ended. • The system lock key of the docking station is in place and in different sizes are available from Lenovo as a desk, to attach a mechanical lock. ThinkPad Mini Dock Plus Series 3 - Press the eject button until the computer moves up. Then, grasp both sides, and...
.... • The connection to an Ethernet connector has been ended. • The system lock key of the docking station is in place and in different sizes are available from Lenovo as a desk, to attach a mechanical lock. ThinkPad Mini Dock Plus Series 3 - Press the eject button until the computer moves up. Then, grasp both sides, and...
(English) User Guide
Page 126
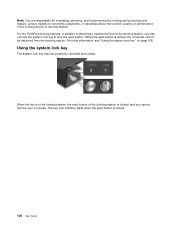
... device and security feature. The key lock indicator lights when the eject button is locked, the computer cannot be detached from the docking station. For more information, see "Using the system lock key" on page 108. Using the system lock key The system lock key...lock key to lock the eject button. Lenovo makes no comments, judgments, or warranties about the function, quality, or performance of the docking station is in addition to attaching a mechanical lock to the docking station, you cannot remove your computer. For the ThinkPad docking stations, in the locked position, the eject ...
... device and security feature. The key lock indicator lights when the eject button is locked, the computer cannot be detached from the docking station. For more information, see "Using the system lock key" on page 108. Using the system lock key The system lock key...lock key to lock the eject button. Lenovo makes no comments, judgments, or warranties about the function, quality, or performance of the docking station is in addition to attaching a mechanical lock to the docking station, you cannot remove your computer. For the ThinkPad docking stations, in the locked position, the eject ...


