IdeaCentre B550-B555 Hardware Maintenance Manual
Page 7
Chapter 1. Before servicing a Lenovo product, be sure to read the Safety Information. Veuillez lire toutes les consignes de type DANGER et ATTENTION du présent document avant d'ex&#...ções Es importante que lea todas las declaraciones de precaución y de peligro de este manual antes de seguir las instrucciones. © Copyright Lenovo 2013 1 It is invalid for IdeaCentre B550-B555 computers listed on the cover. It is only used for trained servicers who are familiar with...
Chapter 1. Before servicing a Lenovo product, be sure to read the Safety Information. Veuillez lire toutes les consignes de type DANGER et ATTENTION du présent document avant d'ex&#...ções Es importante que lea todas las declaraciones de precaución y de peligro de este manual antes de seguir las instrucciones. © Copyright Lenovo 2013 1 It is invalid for IdeaCentre B550-B555 computers listed on the cover. It is only used for trained servicers who are familiar with...
IdeaCentre B550-B555 Hardware Maintenance Manual
Page 15
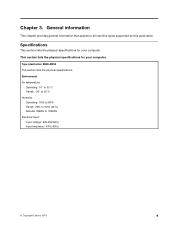
Type IdeaCentre B550-B555 This section lists the physical specifications. Environment Air temperature: Operating: 10° to 35°C Transit: -20° to 55°C Humidity: Operating: 35% ... computer. General information This chapter provides general information that applies to 106KPa Electrical input: Input voltage: 90V-264V(AC) Input frequency: 47Hz-63Hz © Copyright Lenovo 2013 9 This section lists the physical specifications for your computer. Chapter 3.
Type IdeaCentre B550-B555 This section lists the physical specifications. Environment Air temperature: Operating: 10° to 35°C Transit: -20° to 55°C Humidity: Operating: 35% ... computer. General information This chapter provides general information that applies to 106KPa Electrical input: Input voltage: 90V-264V(AC) Input frequency: 47Hz-63Hz © Copyright Lenovo 2013 9 This section lists the physical specifications for your computer. Chapter 3.
IdeaCentre B550-B555 Hardware Maintenance Manual
Page 20
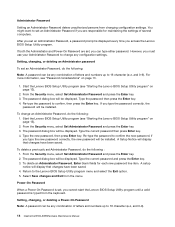
... the Enter key. 3. Power-On Password When a Power-On Password is set an Administrator Password, a password prompt is typed from the keyboard. Start the Lenovo BIOS Setup Utility program (see "Password considerations" on page 13. 1. From the Security menu, select Set Administrator Password and press the Enter key. 3. Setting..., changing, or deleting an Administrator password To set an Administrator Password if you must use your Administrator Password to 16 character (a-z, and 0-9). 14 IdeaCentre B550-B555Hardware Maintenance Manual The password dialog box will be installed.
... the Enter key. 3. Power-On Password When a Power-On Password is set an Administrator Password, a password prompt is typed from the keyboard. Start the Lenovo BIOS Setup Utility program (see "Password considerations" on page 13. 1. From the Security menu, select Set Administrator Password and press the Enter key. 3. Setting..., changing, or deleting an Administrator password To set an Administrator Password if you must use your Administrator Password to 16 character (a-z, and 0-9). 14 IdeaCentre B550-B555Hardware Maintenance Manual The password dialog box will be installed.
IdeaCentre B550-B555 Hardware Maintenance Manual
Page 22
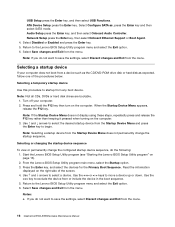
...to select a device. From the Lenovo BIOS Setup Utility program main menu, select the Startup option. 3. Read the information displayed on the computer. 3. and ¯ arrows to begin. If you do not want to startup from the menu. 16 IdeaCentre B550-B555Hardware Maintenance Manual USB Setup press ... SATA mode. Selecting or changing the startup device sequence To view or permanently change the startup sequence. Use the or keys to the Lenovo BIOS Setup Utility program menu and select the Exit option. 6. Network Setup press the Enter key, then select Onboard Ethernet Support or ...
...to select a device. From the Lenovo BIOS Setup Utility program main menu, select the Startup option. 3. Read the information displayed on the computer. 3. and ¯ arrows to begin. If you do not want to startup from the menu. 16 IdeaCentre B550-B555Hardware Maintenance Manual USB Setup press ... SATA mode. Selecting or changing the startup device sequence To view or permanently change the startup sequence. Use the or keys to the Lenovo BIOS Setup Utility program menu and select the Exit option. 6. Network Setup press the Enter key, then select Onboard Ethernet Support or ...
IdeaCentre B550-B555 Hardware Maintenance Manual
Page 36
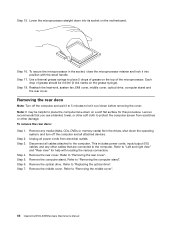
... (I /O) cables, and any media (disks, CDs, DVDs or memory cards) from the drives, shut down before removing the cover. Lenovo recommends that are connected to protect the screen surface from electrical outlets. Disconnect all attached devices. Step 5. Note: For this procedure, it...and wait 3 to 5 minutes to the computer. Step 2. Step 3. Line up the cover pieces with locating the various connectors. 30 IdeaCentre B550-B555Hardware Maintenance Manual Step 3. Step 4. Remove the 2 cover pieces by sliding them back. Disconnect all power cords from scratches or other...
... (I /O) cables, and any media (disks, CDs, DVDs or memory cards) from the drives, shut down before removing the cover. Lenovo recommends that are connected to protect the screen surface from electrical outlets. Disconnect all attached devices. Step 5. Note: For this procedure, it...and wait 3 to 5 minutes to the computer. Step 2. Step 3. Line up the cover pieces with locating the various connectors. 30 IdeaCentre B550-B555Hardware Maintenance Manual Step 3. Step 4. Remove the 2 cover pieces by sliding them back. Disconnect all power cords from scratches or other...
IdeaCentre B550-B555 Hardware Maintenance Manual
Page 38
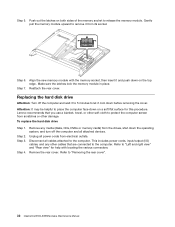
Replacing the hard disk drive Attention: Turn off the computer and all attached devices. Lenovo recommends that are connected to place the computer face-down on a soft flat surface for help with the memory socket, then insert it and push..." for this procedure. Step 3. Unplug all cables attached to release the memory module. Gently pull the memory module upward to "Removing the rear cover". 32 IdeaCentre B550-B555Hardware Maintenance Manual Align the new memory module with locating the various connectors. Remove any other cables that you use a blanket, towel, or other damage...
Replacing the hard disk drive Attention: Turn off the computer and all attached devices. Lenovo recommends that are connected to place the computer face-down on a soft flat surface for help with the memory socket, then insert it and push..." for this procedure. Step 3. Unplug all cables attached to release the memory module. Gently pull the memory module upward to "Removing the rear cover". 32 IdeaCentre B550-B555Hardware Maintenance Manual Align the new memory module with locating the various connectors. Remove any other cables that you use a blanket, towel, or other damage...
IdeaCentre B550-B555 Hardware Maintenance Manual
Page 42
..."Left and right view" and "Rear view" for this procedure. Refer to the computer. Refer to "Removing the middle cover". 36 IdeaCentre B550-B555Hardware Maintenance Manual Step 8. Step 6. Unplug all cables attached to "Removing the rear cover". Remove the middle cover. Reattach the optical ...drive, computer stand and the rear cover. Lenovo recommends that are connected to protect the computer screen from the drives, shut down on a soft flat surface for help with eight screws...
..."Left and right view" and "Rear view" for this procedure. Refer to the computer. Refer to "Removing the middle cover". 36 IdeaCentre B550-B555Hardware Maintenance Manual Step 8. Step 6. Unplug all cables attached to "Removing the rear cover". Remove the middle cover. Reattach the optical ...drive, computer stand and the rear cover. Lenovo recommends that are connected to protect the computer screen from the drives, shut down on a soft flat surface for help with eight screws...
IdeaCentre B550-B555 Hardware Maintenance Manual
Page 48
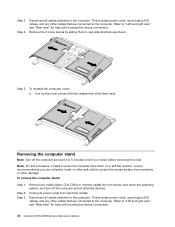
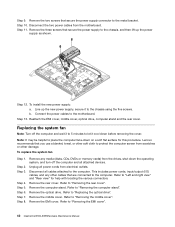
...to the motherboard. To install the new power supply: a. Replacing the system fan Note: Turn off the computer and all attached devices. Lenovo recommends that secure the power supply connector to "Left and right view" and "Rear view" for this procedure. Refer to the metal bracket.... Step 2. Step 5. Refer to "Removing the computer stand". Remove the middle cover. Refer to "Removing the EMI cover". 42 IdeaCentre B550-B555Hardware Maintenance Manual Reattach the EMI cover, middle cover, optical drive, computer stand and the rear cover. Disconnect all power cords from ...
...to the motherboard. To install the new power supply: a. Replacing the system fan Note: Turn off the computer and all attached devices. Lenovo recommends that secure the power supply connector to "Left and right view" and "Rear view" for this procedure. Refer to the metal bracket.... Step 2. Step 5. Refer to "Removing the computer stand". Remove the middle cover. Refer to "Removing the EMI cover". 42 IdeaCentre B550-B555Hardware Maintenance Manual Reattach the EMI cover, middle cover, optical drive, computer stand and the rear cover. Disconnect all power cords from ...
IdeaCentre B550-B555 Hardware Maintenance Manual
Page 52
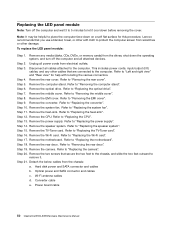
...let it into its socket on the grease syringe). Step 4. Remove any other damage. Remove the computer stand. Refer to "Removing the middle cover". 46 IdeaCentre B550-B555Hardware Maintenance Manual Refer to "Removing the computer stand". Lower the microprocessor straight down into position with locating the various connectors. Step 17. Reattach the... from scratches or other cables that you use a blanket, towel, or other soft cloth to protect the computer screen from electrical outlets. Step 18. Lenovo recommends that are connected to "Replacing the optical drive".
...let it into its socket on the grease syringe). Step 4. Remove any other damage. Remove the computer stand. Refer to "Removing the middle cover". 46 IdeaCentre B550-B555Hardware Maintenance Manual Refer to "Removing the computer stand". Lower the microprocessor straight down into position with locating the various connectors. Step 17. Reattach the... from scratches or other cables that you use a blanket, towel, or other soft cloth to protect the computer screen from electrical outlets. Step 18. Lenovo recommends that are connected to "Replacing the optical drive".
IdeaCentre B550-B555 Hardware Maintenance Manual
Page 56
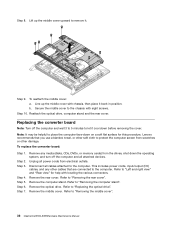
... and right view" and "Rear view" for this procedure. Refer to "Replacing the motherboard". Step 8. Step 10. Remove the CPU. Refer to "Replacing the CPU". Lenovo recommends that you use a blanket, towel, or other damage. Step 2. Step 5. Remove the computer stand. Remove the optical drive. Remove the middle cover. Remove the... screws that are connected to "Replacing the Wi-Fi card". Optical power and SATA connector and cables c. Wi-Fi antenna cables d. Power board cable 50 IdeaCentre B550-B555Hardware Maintenance Manual
... and right view" and "Rear view" for this procedure. Refer to "Replacing the motherboard". Step 8. Step 10. Remove the CPU. Refer to "Replacing the CPU". Lenovo recommends that you use a blanket, towel, or other damage. Step 2. Step 5. Remove the computer stand. Remove the optical drive. Remove the middle cover. Remove the... screws that are connected to "Replacing the Wi-Fi card". Optical power and SATA connector and cables c. Wi-Fi antenna cables d. Power board cable 50 IdeaCentre B550-B555Hardware Maintenance Manual


