Lenovo G470/G475/G570/G575 User Guide V1.0
Page 3
... use 10 Using AC adapter and battery ...12 Using the touchpad 14 Using the keyboard 15 Connecting external devices.......18 Special keys and buttons 20 System status indicators 21 Securing your computer 1 Top view 1 Left-side view 4 Right-side view 5 Front view 6 Bottom view 7 Chapter 2. Connecting to know your computer 22 Using Switchable Graphics (specific models only 24 Chapter 3. CRU instructions 31 Replacing the battery 31 Replacing the hard disk drive ....33 Replacing memory 37 Removing the optical drive...
... use 10 Using AC adapter and battery ...12 Using the touchpad 14 Using the keyboard 15 Connecting external devices.......18 Special keys and buttons 20 System status indicators 21 Securing your computer 1 Top view 1 Left-side view 4 Right-side view 5 Front view 6 Bottom view 7 Chapter 2. Connecting to know your computer 22 Using Switchable Graphics (specific models only 24 Chapter 3. CRU instructions 31 Replacing the battery 31 Replacing the hard disk drive ....33 Replacing memory 37 Removing the optical drive...
Lenovo G470/G475/G570/G575 User Guide V1.0
Page 8
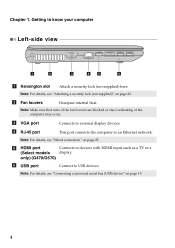
... a (Select models display. Chapter 1. Note: For details, see "Connecting a universal serial bus (USB) device" on page 19. 4 Note: For details, see "Wired connection" on page 22. e HDMI port Connects to USB devices. c VGA port Connects to an Ethernet network. d RJ-45 port This port connects the computer to external display devices. Note: Make sure that none of the fan louvers are blocked or else overheating of the computer may occur. b Fan louvers Dissipate internal heat...
... a (Select models display. Chapter 1. Note: For details, see "Connecting a universal serial bus (USB) device" on page 19. 4 Note: For details, see "Wired connection" on page 22. e HDMI port Connects to USB devices. c VGA port Connects to an Ethernet network. d RJ-45 port This port connects the computer to external display devices. Note: Make sure that none of the fan louvers are blocked or else overheating of the computer may occur. b Fan louvers Dissipate internal heat...
Lenovo G470/G475/G570/G575 User Guide V1.0
Page 9
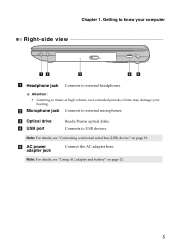
c Optical drive d USB port Reads/Burns optical disks. Connects to external microphones. b Microphone jack Connects to USB devices. e AC power adapter jack Connect the AC adapter here. Chapter 1. Getting to external headphones. Note: For details, see "Connecting a universal serial bus (USB) device" on page 12. 5 Note: For details, see "Using AC adapter and battery" on page 19. Attention: • Listening to music at high volume over extended periods of time may damage your computer Right-side view 12 3 45 a Headphone jack Connects to know your hearing.
c Optical drive d USB port Reads/Burns optical disks. Connects to external microphones. b Microphone jack Connects to USB devices. e AC power adapter jack Connect the AC adapter here. Chapter 1. Getting to external headphones. Note: For details, see "Connecting a universal serial bus (USB) device" on page 12. 5 Note: For details, see "Using AC adapter and battery" on page 19. Attention: • Listening to music at high volume over extended periods of time may damage your computer Right-side view 12 3 45 a Headphone jack Connects to know your hearing.
Lenovo G470/G475/G570/G575 User Guide V1.0
Page 17
... type recommended by Lenovo. • Keep the battery pack away from fire. • Do not expose the battery pack to water or rain. • Do not attempt to Lenovo for service, etc. remove the battery pack from children. • Do not put the battery pack in trash that is replaced with local ordinances or regulations and your computer to disassemble the battery...
... type recommended by Lenovo. • Keep the battery pack away from fire. • Do not expose the battery pack to water or rain. • Do not attempt to Lenovo for service, etc. remove the battery pack from children. • Do not put the battery pack in trash that is replaced with local ordinances or regulations and your computer to disassemble the battery...
Lenovo G470/G475/G570/G575 User Guide V1.0
Page 19
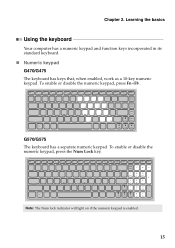
To enable or disable the numeric keypad, press Fn+F8 . G570/G575 The keyboard has a separate numeric keypad. To enable or disable the numeric keypad, press the Num Lock key. Chapter 2. Learning the basics Using the keyboard Your computer has a numeric keypad and function keys incorporated in its standard keyboard. „ Numeric keypad G470/G475 The keyboard has keys that, when enabled, work as a 10-key numeric keypad. Note: The Num lock indicator will light on if the numeric keypad is enabled. 15
To enable or disable the numeric keypad, press Fn+F8 . G570/G575 The keyboard has a separate numeric keypad. To enable or disable the numeric keypad, press the Num Lock key. Chapter 2. Learning the basics Using the keyboard Your computer has a numeric keypad and function keys incorporated in its standard keyboard. „ Numeric keypad G470/G475 The keyboard has keys that, when enabled, work as a 10-key numeric keypad. Note: The Num lock indicator will light on if the numeric keypad is enabled. 15
Lenovo G470/G475/G570/G575 User Guide V1.0
Page 21
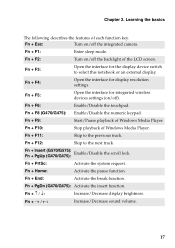
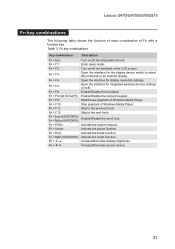
.... Fn + Home: Activate the pause function. Learning the basics The following describes the features of the LCD screen. Fn + F11: Skip to the next track. Fn + End: Activate the break function. Fn + F5: Open the interface for the display device switch to select this notebook or an external display. Fn + F4: Open the interface for display resolution settings. Fn + Insert (G570/G575): Fn + PgUp (G470/G475): Enable/Disable the scroll lock.
.... Fn + Home: Activate the pause function. Learning the basics The following describes the features of the LCD screen. Fn + F11: Skip to the next track. Fn + End: Activate the break function. Fn + F5: Open the interface for the display device switch to select this notebook or an external display. Fn + F4: Open the interface for display resolution settings. Fn + Insert (G570/G575): Fn + PgUp (G470/G475): Enable/Disable the scroll lock.
Lenovo G470/G475/G570/G575 User Guide V1.0
Page 26
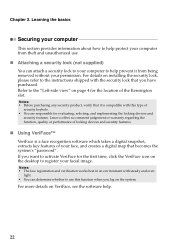
...'s "password". For more details on page 4 for the location of your facial image. If you have purchased. Notes: • The face registration and verification works best in an environment with this function when you log on the system. For details on the desktop to activate VeriFace for evaluating, selecting, and implementing the locking devices and security features. Lenovo...
...'s "password". For more details on page 4 for the location of your facial image. If you have purchased. Notes: • The face registration and verification works best in an environment with this function when you log on the system. For details on the desktop to activate VeriFace for evaluating, selecting, and implementing the locking devices and security features. Lenovo...
Lenovo G470/G475/G570/G575 User Guide V1.0
Page 35
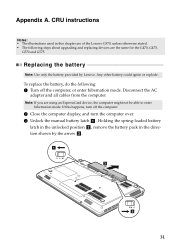
... about upgrading and replacing devices are using an ExpressCard device, the computer might not be able to enter hibernation mode. Note: If you are the same for the G470, G475, G570 and G575. Holding the spring-loaded battery latch in the unlocked position b , remove the battery pack in this happens, turn the computer over. 3 Unlock the manual battery latch a . If this chapter are of the Lenovo G570...
... about upgrading and replacing devices are using an ExpressCard device, the computer might not be able to enter hibernation mode. Note: If you are the same for the G470, G475, G570 and G575. Holding the spring-loaded battery latch in the unlocked position b , remove the battery pack in this happens, turn the computer over. 3 Unlock the manual battery latch a . If this chapter are of the Lenovo G570...
Lenovo G470/G475/G570/G575 User Guide V1.0
Page 37
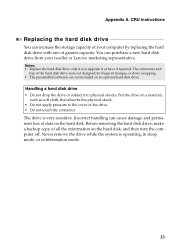
.... Before removing the hard disk drive, make a backup copy of data on a material, such as soft cloth, that absorbs the physical shock. • Do not apply pressure to physical shocks. CRU instructions Replacing the hard disk drive You can cause damage and permanent loss of all the information on an optional hard disk drive. The drive is operating, in sleep mode, or in hibernation mode. 33 You can purchase a new hard disk drive from...
.... Before removing the hard disk drive, make a backup copy of data on a material, such as soft cloth, that absorbs the physical shock. • Do not apply pressure to physical shocks. CRU instructions Replacing the hard disk drive You can cause damage and permanent loss of all the information on an optional hard disk drive. The drive is operating, in sleep mode, or in hibernation mode. 33 You can purchase a new hard disk drive from...
Lenovo G470/G475/G570/G575 User Guide V1.0
Page 41
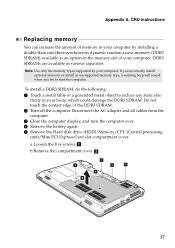
... install an unsupported memory type, a warning beep will sound when you try to reduce any static elec- tricity in various capacities. Appendix A. DDR3 SDRAMs are available in your computer. Disconnect the AC adapter and all cables from the computer. 3 Close the computer display, and turn the computer over. 4 Remove the battery again. 5 Remove the Hard disk drive (HDD)/Memory/CPU (Central processing unit)/Mini PCI Express Card slot compartment cover...
... install an unsupported memory type, a warning beep will sound when you try to reduce any static elec- tricity in various capacities. Appendix A. DDR3 SDRAMs are available in your computer. Disconnect the AC adapter and all cables from the computer. 3 Close the computer display, and turn the computer over. 4 Remove the battery again. 5 Remove the Hard disk drive (HDD)/Memory/CPU (Central processing unit)/Mini PCI Express Card slot compartment cover...
Lenovo G470/G475/G570/G575 User Guide V1.0
Page 45
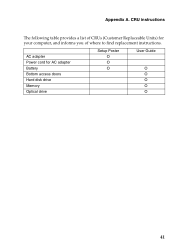
CRU instructions The following table provides a list of where to find replacement instructions. AC adapter Power cord for your computer, and informs you of CRUs (Customer Replaceable Units) for AC adapter Battery Bottom access doors Hard disk drive Memory Optical drive Setup Poster O O O User Guide O O O O O 41 Appendix A.
CRU instructions The following table provides a list of where to find replacement instructions. AC adapter Power cord for your computer, and informs you of CRUs (Customer Replaceable Units) for AC adapter Battery Bottom access doors Hard disk drive Memory Optical drive Setup Poster O O O User Guide O O O O O 41 Appendix A.
Hardware Maintenance Manual
Page 3
... Restoring the factory contents by using OneKey Recovery 23 Restore of factory default 23 Using recovery discs 23 Passwords 24 Power-on password 24 Supervisor password 24 Power management 25 Screen blank mode 25 Sleep (standby) mode 25 Hibernation mode 26 Lenovo G470/G475/G570/G575 27 Specifications 27 Status indicators 29 Fn key combinations 31 FRU replacement notices 32 Screw notices 32 Removing and replacing an FRU 33 1010 Battery pack 34 1020 Dummy cards 35 1030 Optical drive 36 1040 Hard disk drive (HDD)/Memory/CPU...
... Restoring the factory contents by using OneKey Recovery 23 Restore of factory default 23 Using recovery discs 23 Passwords 24 Power-on password 24 Supervisor password 24 Power management 25 Screen blank mode 25 Sleep (standby) mode 25 Hibernation mode 26 Lenovo G470/G475/G570/G575 27 Specifications 27 Status indicators 29 Fn key combinations 31 FRU replacement notices 32 Screw notices 32 Removing and replacing an FRU 33 1010 Battery pack 34 1020 Dummy cards 35 1030 Optical drive 36 1040 Hard disk drive (HDD)/Memory/CPU...

Hardware Maintenance Manual
Page 7
... safe operational condition. •• Do not use the approved probe leads and accessories for these precautions are in the off (EPO) switch, disconnecting the switch or electrical outlet. Do not use such kind of maintenance information. Ensure that has hazardous voltages. •• Disconnect all power before: - Important: Use only approved tools and test equipments. If you when working...
... safe operational condition. •• Do not use the approved probe leads and accessories for these precautions are in the off (EPO) switch, disconnecting the switch or electrical outlet. Do not use such kind of maintenance information. Ensure that has hazardous voltages. •• Disconnect all power before: - Important: Use only approved tools and test equipments. If you when working...
Hardware Maintenance Manual
Page 20
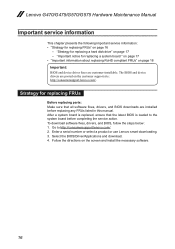
....lenovo.com/. 2. Enter a serial number or select a product or use Lenovo smart downloading. 3. "Strategy for replacing a hard disk drive" on page 18 Important: BIOS and device driver fixes are posted on the customer support site: http://consumersupport.lenovo.com/. Follow the directions on page 16 - Lenovo G470/G475/G570/G575 Hardware Maintenance Manual Important service information This chapter presents the following important service information: •• "Strategy for replacing FRUs" on the screen and install the necessary software...
....lenovo.com/. 2. Enter a serial number or select a product or use Lenovo smart downloading. 3. "Strategy for replacing a hard disk drive" on page 18 Important: BIOS and device driver fixes are posted on the customer support site: http://consumersupport.lenovo.com/. Follow the directions on page 16 - Lenovo G470/G475/G570/G575 Hardware Maintenance Manual Important service information This chapter presents the following important service information: •• "Strategy for replacing FRUs" on the screen and install the necessary software...

Hardware Maintenance Manual
Page 23
... you replace FRUs, use new nylon-coated screws. • Be extremely careful during such write operations as cosmic radiation, electrostatic discharge, or software errors. General checkout General checkout This chapter presents the following important notes: Important notes: • Only certified trained personnel can occur for a variety of reasons that the machine model and the FRU part number are servicing sequence...
... you replace FRUs, use new nylon-coated screws. • Be extremely careful during such write operations as cosmic radiation, electrostatic discharge, or software errors. General checkout General checkout This chapter presents the following important notes: Important notes: • Only certified trained personnel can occur for a variety of reasons that the machine model and the FRU part number are servicing sequence...
Hardware Maintenance Manual
Page 26
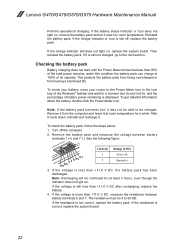
... is displayed. If the charge indicator still does not light on , remove the battery pack and let it ), and the percentage of the Windows® taskbar and wait for a while. Note: Recharging will be 4 to be charged. Lenovo G470/G475/G570/G575 Hardware Maintenance Manual Perform operational charging. If the battery status indicator or icon does not light on , replace the system board. Reinstall the battery pack. Then reinstall the battery pack...
... is displayed. If the charge indicator still does not light on , remove the battery pack and let it ), and the percentage of the Windows® taskbar and wait for a while. Note: Recharging will be 4 to be charged. Lenovo G470/G475/G570/G575 Hardware Maintenance Manual Perform operational charging. If the battery status indicator or icon does not light on , replace the system board. Reinstall the battery pack. Then reinstall the battery pack...

Hardware Maintenance Manual
Page 28
... the BIOS Setup Utility. Passwords As many as two passwords may be made available to the servicer, there is entered. Exception: If only an SVP is installed, the password prompt does not appear when the operating system is turned on by an unauthorized person. Power-on password A power-on password (POP) protects the system from being powered on . Lenovo G470/G475/G570/G575 Hardware Maintenance Manual When you use the recovery discs to boot your...
... the BIOS Setup Utility. Passwords As many as two passwords may be made available to the servicer, there is entered. Exception: If only an SVP is installed, the password prompt does not appear when the operating system is turned on by an unauthorized person. Power-on password A power-on password (POP) protects the system from being powered on . Lenovo G470/G475/G570/G575 Hardware Maintenance Manual When you use the recovery discs to boot your...
Hardware Maintenance Manual
Page 29
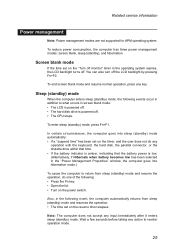
... enters sleep (standby) mode. Note: The computer does not accept any operation with the keyboard, the hard disk, the parallel connector, or the diskette drive within that time. •• If the battery indicator is amber, indicating that the battery power is powered off . •• The hard disk drive is low. (Alternatively, if Hibernate when battery becomes low has been selected in screen blank mode: •• The LCD is powered...
... enters sleep (standby) mode. Note: The computer does not accept any operation with the keyboard, the hard disk, the parallel connector, or the diskette drive within that time. •• If the battery indicator is amber, indicating that the battery power is powered off . •• The hard disk drive is low. (Alternatively, if Hibernate when battery becomes low has been selected in screen blank mode: •• The LCD is powered...
Hardware Maintenance Manual
Page 35
... of Windows Media Player. Fn + F9: Start/Pause playback of Fn with a function key. Fn + F12: Skip to the previous track. Fn + Home: Activate the pause function. Fn + / : Increase/Decrease sound volume. 31 Fn key combinations Key combination Description Fn + Esc: Turn on /off ). Fn + F1: Enter sleep mode. Fn + F6: Enable/Disable the touchpad. Table 3. Fn + / : Increase/Decrease display brightness. Fn + F3: Open the interface for display resolution settings. Fn + F5: Open the...
... of Windows Media Player. Fn + F9: Start/Pause playback of Fn with a function key. Fn + F12: Skip to the previous track. Fn + Home: Activate the pause function. Fn + / : Increase/Decrease sound volume. 31 Fn key combinations Key combination Description Fn + Esc: Turn on /off ). Fn + F1: Enter sleep mode. Fn + F6: Enable/Disable the touchpad. Table 3. Fn + / : Increase/Decrease display brightness. Fn + F3: Open the interface for display resolution settings. Fn + F5: Open the...
Hardware Maintenance Manual
Page 36
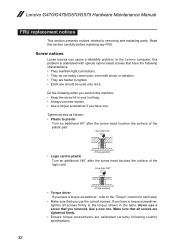
... that you removed. In the Lenovo computer, this section carefully before replacing any FRU. Lenovo G470/G475/G570/G575 Hardware Maintenance Manual FRU replacement notices This section presents notices related to the torque shown in your tool bag. •• Always use new screws. •• Use a torque screwdriver if you have a torque screwdriver, tighten all screws firmly to removing and replacing parts. Use a new one should...
... that you removed. In the Lenovo computer, this section carefully before replacing any FRU. Lenovo G470/G475/G570/G575 Hardware Maintenance Manual FRU replacement notices This section presents notices related to the torque shown in your tool bag. •• Always use new screws. •• Use a torque screwdriver if you have a torque screwdriver, tighten all screws firmly to removing and replacing parts. Use a new one should...


