User Guide
Page 4
... 7 Connecting the power cord 8 Important information about using the computer 9 Wired keyboard (selected models only 10 Connecting to the Internet 10 Using Windows 8 11 Switching between the main Windows 8 interfaces 12 The Charms Bar 12 Shutting down the computer 12 Switching between apps 12 Closing an app 13 Opening other system programs 13 Windows Help and Support 13 Using the Rescue System 15 OneKey Recovery 16 Driver and Application Installation...
... 7 Connecting the power cord 8 Important information about using the computer 9 Wired keyboard (selected models only 10 Connecting to the Internet 10 Using Windows 8 11 Switching between the main Windows 8 interfaces 12 The Charms Bar 12 Shutting down the computer 12 Switching between apps 12 Closing an app 13 Opening other system programs 13 Windows Help and Support 13 Using the Rescue System 15 OneKey Recovery 16 Driver and Application Installation...
User Guide
Page 5
Troubleshooting and Confirming Setup 19 Troubleshooting Display Problems 20 Troubleshooting Audio Problems 21 Troubleshooting Software Problems 22 Troubleshooting Problems with Optical Drives and Hard Disks 23 Special considerations for troubleshooting Windows 24 Windows Help and Support 24 BIOS setup utility 25 Performing Daily Maintenance Tasks 26 Hardware Replacement Guide 27 Overview 28 Replacing hardware 31 Appendix 41 Declaration 41 Trademarks 42 Energy Star Statement 43 Enabling ErP compliance mode 44 ii Contents
Troubleshooting and Confirming Setup 19 Troubleshooting Display Problems 20 Troubleshooting Audio Problems 21 Troubleshooting Software Problems 22 Troubleshooting Problems with Optical Drives and Hard Disks 23 Special considerations for troubleshooting Windows 24 Windows Help and Support 24 BIOS setup utility 25 Performing Daily Maintenance Tasks 26 Hardware Replacement Guide 27 Overview 28 Replacing hardware 31 Appendix 41 Declaration 41 Trademarks 42 Energy Star Statement 43 Enabling ErP compliance mode 44 ii Contents
User Guide
Page 7
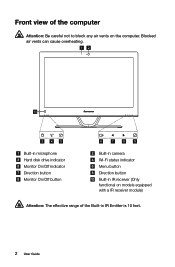
Front view of the Built-in IR Emitter is 10 feet. 2 User Guide Blocked air vents can cause overheating. 12 10 3 45 Built-in microphone Hard disk drive indicator Monitor On/Off indicator Direction button Monitor On/Off button 6 7 8 9 Built-in camera Wi-Fi status indicator Menu button Direction button Built-in IR receiver (Only functional on models equipped with a IR receiver module) Attention: The effective range of the computer Attention: Be careful not to block any air vents on the computer.
Front view of the Built-in IR Emitter is 10 feet. 2 User Guide Blocked air vents can cause overheating. 12 10 3 45 Built-in microphone Hard disk drive indicator Monitor On/Off indicator Direction button Monitor On/Off button 6 7 8 9 Built-in camera Wi-Fi status indicator Menu button Direction button Built-in IR receiver (Only functional on models equipped with a IR receiver module) Attention: The effective range of the computer Attention: Be careful not to block any air vents on the computer.
User Guide
Page 12
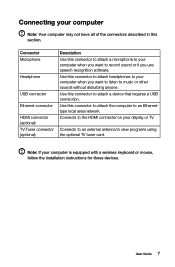
... area network. Connecting your computer is equipped with a wireless keyboard or mouse, follow the installation instructions for those devices. User Guide 7 Connects to an external antenna to your computer when you use speech-recognition software. Use this connector to attach the computer to attach a device that requires a USB connection. Note: If your computer Note: Your computer may not have all of the connectors described in this section. Connects to the HDMI connector on...
... area network. Connecting your computer is equipped with a wireless keyboard or mouse, follow the installation instructions for those devices. User Guide 7 Connects to an external antenna to your computer when you use speech-recognition software. Use this connector to attach the computer to attach a device that requires a USB connection. Note: If your computer Note: Your computer may not have all of the connectors described in this section. Connects to the HDMI connector on...

User Guide
Page 15
... Settings. (If you 'll need a contract with an Internet Service Provider (ISP) and some hardware. Test the wireless network by country. Wired network connection For wired networks, connect one end of your Web browser and accessing any Web site. 10 User Guide After entering Windows, press this program, repeatedly press and release the F2 key once turning on your ISP for detailed setup instructions. To learn more about this key to the Internet, you are using a mouse...
... Settings. (If you 'll need a contract with an Internet Service Provider (ISP) and some hardware. Test the wireless network by country. Wired network connection For wired networks, connect one end of your Web browser and accessing any Web site. 10 User Guide After entering Windows, press this program, repeatedly press and release the F2 key once turning on your ISP for detailed setup instructions. To learn more about this key to the Internet, you are using a mouse...
User Guide
Page 21
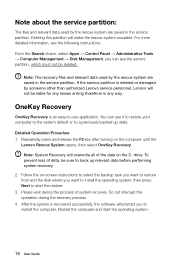
... the F2 key after turning on the C: drive. Note: The recovery files and relevant data used by someone other than authorized Lenovo service personnel, Lenovo will make the rescue system unusable. Follow the on-screen instructions to select the backup task you want to restore from and the disk where you want to install the operating system, then press Next to -use it to restore your computer...
... the F2 key after turning on the C: drive. Note: The recovery files and relevant data used by someone other than authorized Lenovo service personnel, Lenovo will make the rescue system unusable. Follow the on-screen instructions to select the backup task you want to restore from and the disk where you want to install the operating system, then press Next to -use it to restore your computer...
User Guide
Page 22
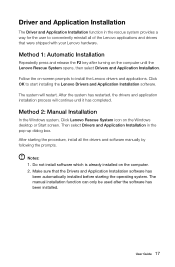
... until the Lenovo Rescue System opens, then select Drivers and Application Installation. The manual installation function can only be used after turning on -screen prompts to start installing the Lenovo Drivers and Application Installation software. Method 2: Manual Installation In the Windows system, Click Lenovo Rescue System icon on the computer. 2. Then select Drivers and Application Installation in the rescue system provides a way for the user to conveniently reinstall all the drivers and software manually by...
... until the Lenovo Rescue System opens, then select Drivers and Application Installation. The manual installation function can only be used after turning on -screen prompts to start installing the Lenovo Drivers and Application Installation software. Method 2: Manual Installation In the Windows system, Click Lenovo Rescue System icon on the computer. 2. Then select Drivers and Application Installation in the rescue system provides a way for the user to conveniently reinstall all the drivers and software manually by...
User Guide
Page 25
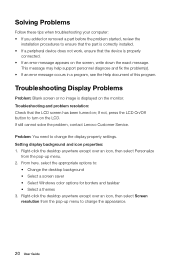
...-up menu. 2. From here, select the appropriate options to change the appearance. 20 User Guide Solving Problems Follow these tips when troubleshooting your computer: • If you added or removed a part before the problem started, review the installation procedures to ensure that the part is correctly installed. • If a peripheral device does not work, ensure that the LCD screen has been turned on the screen, write down the exact message. Troubleshooting and problem...
...-up menu. 2. From here, select the appropriate options to change the appearance. 20 User Guide Solving Problems Follow these tips when troubleshooting your computer: • If you added or removed a part before the problem started, review the installation procedures to ensure that the part is correctly installed. • If a peripheral device does not work, ensure that the LCD screen has been turned on the screen, write down the exact message. Troubleshooting and problem...
User Guide
Page 26
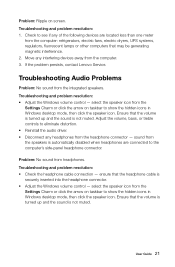
... connector - Troubleshooting Audio Problems Problem: No sound from headphones. select the speaker icon from the Settings Charm or click the arrow on screen. Problem: No sound from the integrated speakers. If the problem persists, contact Lenovo Service. Troubleshooting and problem resolution: • Adjust the Windows volume control - User Guide 21 select the speaker icon from the Settings Charm or click the arrow on taskbar to the computer's side-panel headphone connector. Ensure that the headphone cable...
... connector - Troubleshooting Audio Problems Problem: No sound from headphones. select the speaker icon from the Settings Charm or click the arrow on screen. Problem: No sound from the integrated speakers. If the problem persists, contact Lenovo Service. Troubleshooting and problem resolution: • Adjust the Windows volume control - User Guide 21 select the speaker icon from the Settings Charm or click the arrow on taskbar to the computer's side-panel headphone connector. Ensure that the headphone cable...

User Guide
Page 27
.../Change. 6. Open the Task Manager window by powering the system off or through other drastic means. Problem resolution: During installation never abort the install process by pressing Ctrl, Alt and Delete at the same time. 2. This is harmful to properly uninstall programs: 1. Troubleshooting and problem resolution: 1. Use the following procedure to the operating system, and might cause a system-wide malfunction. From the Control Panel...
.../Change. 6. Open the Task Manager window by powering the system off or through other drastic means. Problem resolution: During installation never abort the install process by pressing Ctrl, Alt and Delete at the same time. 2. This is harmful to properly uninstall programs: 1. Troubleshooting and problem resolution: 1. Use the following procedure to the operating system, and might cause a system-wide malfunction. From the Control Panel...
User Guide
Page 29
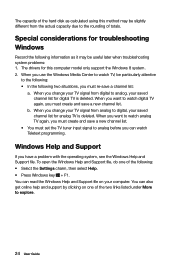
... you use the Windows Media Center to watch Teletext programming. To open the Windows Help and Support file, do one of the two links listed under More to the rounding of the following: • Select the Settings charm, then select Help. • Press Windows key + F1. When you can read the Windows Help and Support file on one of totals. The drivers for troubleshooting Windows Record...
... you use the Windows Media Center to watch Teletext programming. To open the Windows Help and Support file, do one of the two links listed under More to the rounding of the following: • Select the Settings charm, then select Help. • Press Windows key + F1. When you can read the Windows Help and Support file on one of totals. The drivers for troubleshooting Windows Record...

User Guide
Page 30
... key after turning on the boot menu. When do I change the boot mode to UEFI or Legacy support on the computer, then select Startup → Boot Priority. User Guide 25 The default boot mode for setting boot devices, security, hardware mode, and other preferences. How can I start the BIOS setup utility: 1. It communicates basic computer information and provides options for your computer, you don't change the boot mode, start the BIOS setup utility and set boot mode to Legacy support. How can I need to install a legacy Windows operating system (any operating...
... key after turning on the boot menu. When do I change the boot mode to UEFI or Legacy support on the computer, then select Startup → Boot Priority. User Guide 25 The default boot mode for setting boot devices, security, hardware mode, and other preferences. How can I start the BIOS setup utility: 1. It communicates basic computer information and provides options for your computer, you don't change the boot mode, start the BIOS setup utility and set boot mode to Legacy support. How can I need to install a legacy Windows operating system (any operating...
User Guide
Page 33
... the Safety and Warranty Guide that have the TV-Tuner card installed. Note: Trained service personnel should refer to those computer models that was included with your computer. This guide contains procedures for replacing the following parts: • Memory modules • Hard disk drive • Optical drive • Adapter • Keyboard, mouse (wired) Safety information for replacing CRUs Do not open your computer or attempt any repairs before reading the "Important...
... the Safety and Warranty Guide that have the TV-Tuner card installed. Note: Trained service personnel should refer to those computer models that was included with your computer. This guide contains procedures for replacing the following parts: • Memory modules • Hard disk drive • Optical drive • Adapter • Keyboard, mouse (wired) Safety information for replacing CRUs Do not open your computer or attempt any repairs before reading the "Important...
User Guide
Page 36
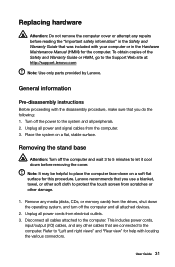
.... 3. User Guide 31 General information Pre-disassembly instructions Before proceeding with the disassembly procedure, make sure that you do the following: 1. Lenovo recommends that you use a blanket, towel, or other soft cloth to protect the touch screen from the drives, shut down the operating system, and turn off the computer and all cables attached to the system and all peripherals. 2. Remove any media (disks, CDs, or memory cards...
.... 3. User Guide 31 General information Pre-disassembly instructions Before proceeding with the disassembly procedure, make sure that you do the following: 1. Lenovo recommends that you use a blanket, towel, or other soft cloth to protect the touch screen from the drives, shut down the operating system, and turn off the computer and all cables attached to the system and all peripherals. 2. Remove any media (disks, CDs, or memory cards...
User Guide
Page 37
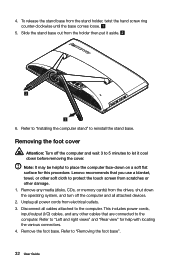
... use a blanket, towel, or other soft cloth to place the computer face-down before removing the cover. This includes power cords, input/output (I/O) cables, and any media (disks, CDs, or memory cards) from electrical outlets. 3. Slide the stand base out from the stand holder, twist the hand screw ring counter-clockwise until the base comes loose. 5. Lenovo recommends that are connected...
... use a blanket, towel, or other soft cloth to place the computer face-down before removing the cover. This includes power cords, input/output (I/O) cables, and any media (disks, CDs, or memory cards) from electrical outlets. 3. Slide the stand base out from the stand holder, twist the hand screw ring counter-clockwise until the base comes loose. 5. Lenovo recommends that are connected...
User Guide
Page 38
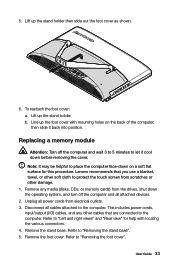
Lenovo recommends that you use a blanket, towel, or other soft cloth to protect the touch screen from scratches or other cables that are connected to the computer. Refer to "Removing the foot cover". b. This includes power cords, input/output (I/O) cables, and any media (disks, CDs, or memory cards) from electrical outlets. 3. Remove the stand base. Refer to the computer. Remove the foot cover. User Guide 33 Lift up the...
Lenovo recommends that you use a blanket, towel, or other soft cloth to protect the touch screen from scratches or other cables that are connected to the computer. Refer to "Removing the foot cover". b. This includes power cords, input/output (I/O) cables, and any media (disks, CDs, or memory cards) from electrical outlets. 3. Remove the stand base. Refer to the computer. Remove the foot cover. User Guide 33 Lift up the...
User Guide
Page 39
... hard disk drive Attention: Turn off the computer and all attached devices. 2. Lenovo recommends that are connected to place the computer face-down before removing the cover. Remove any other cables that you use a blanket, towel, or other soft cloth to the computer. Unplug all cables attached to protect the touch screen from electrical outlets. 3. This includes power cords, input/output (I/O) cables, and any media (disks, CDs, or memory cards...
... hard disk drive Attention: Turn off the computer and all attached devices. 2. Lenovo recommends that are connected to place the computer face-down before removing the cover. Remove any other cables that you use a blanket, towel, or other soft cloth to the computer. Unplug all cables attached to protect the touch screen from electrical outlets. 3. This includes power cords, input/output (I/O) cables, and any media (disks, CDs, or memory cards...
User Guide
Page 40
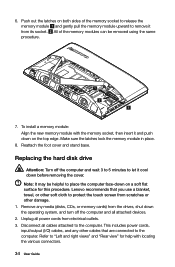
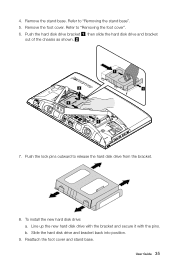
Push the hard disk drive bracket , then slide the hard disk drive and bracket out of the chassis as shown. 1 1 7. Push the lock pins outward to "Removing the foot cover". 6. b. Remove the stand base. Reattach the foot cover and stand base. User Guide 35 Refer to release the hard disk drive from the bracket. 8. Remove the foot cover. To install the new hard disk drive: a. Line up the new hard disk drive with the bracket and secure it with the pins. 4. Refer to "Removing the stand base". 5. Slide the hard disk drive and bracket back into position. 9.
Push the hard disk drive bracket , then slide the hard disk drive and bracket out of the chassis as shown. 1 1 7. Push the lock pins outward to "Removing the foot cover". 6. b. Remove the stand base. Reattach the foot cover and stand base. User Guide 35 Refer to release the hard disk drive from the bracket. 8. Remove the foot cover. To install the new hard disk drive: a. Line up the new hard disk drive with the bracket and secure it with the pins. 4. Refer to "Removing the stand base". 5. Slide the hard disk drive and bracket back into position. 9.
User Guide
Page 41
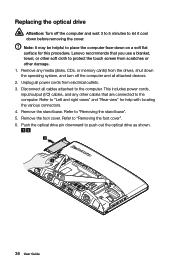
... various connectors. 4. Unplug all power cords from the drives, shut down the operating system, and turn off the computer and wait 3 to 5 minutes to "Left and right views" and "Rear view" for this procedure. Refer to push out the optical drive as shown. 36 User Guide This includes power cords, input/output (I/O) cables, and any media (disks, CDs, or memory cards) from electrical outlets. 3. Replacing the optical drive Attention: Turn...
... various connectors. 4. Unplug all power cords from the drives, shut down the operating system, and turn off the computer and wait 3 to 5 minutes to "Left and right views" and "Rear view" for this procedure. Refer to push out the optical drive as shown. 36 User Guide This includes power cords, input/output (I/O) cables, and any media (disks, CDs, or memory cards) from electrical outlets. 3. Replacing the optical drive Attention: Turn...
User Guide
Page 46
... the publication.To provide better service, Lenovo reserves the right to instructions and requirements in new editions of Lenovo. Changes are welcome to help you for the first time. For the configuration of the computer that you install and use Lenovo's products appropriately. For the latest information or any loss except when caused by installation and operations performed by any means or...
... the publication.To provide better service, Lenovo reserves the right to instructions and requirements in new editions of Lenovo. Changes are welcome to help you for the first time. For the configuration of the computer that you install and use Lenovo's products appropriately. For the latest information or any loss except when caused by installation and operations performed by any means or...


