Lenovo Safety and Warranty Guide V1.0.0
Page 17
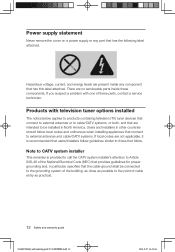
... to cable/CATV systems, or both, and that are no serviceable parts inside any part that has the following label attached. If you suspect a problem with television tuner options installed The notice below applies to products containing television (TV) tuner devices that connect to external antennas or to the point of these components. Users and installers in North America. Power supply statement Never remove the cover on a power supply...
... to cable/CATV systems, or both, and that are no serviceable parts inside any part that has the following label attached. If you suspect a problem with television tuner options installed The notice below applies to products containing television (TV) tuner devices that connect to external antennas or to the point of these components. Users and installers in North America. Power supply statement Never remove the cover on a power supply...
Lenovo Safety and Warranty Guide V1.0.0
Page 28
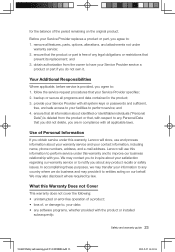
... our behalf. Lenovo will store, use this information to perform service; provide your Service Provider with all features, parts, options, alterations, and attachments not under this Warranty Does not Cover This warranty does not cover the following: • uninterrupted or error-free operation of a product; • loss of any legal obligations or restrictions that prevent its replacement; and 3. follow the service request procedures...
... our behalf. Lenovo will store, use this information to perform service; provide your Service Provider with all features, parts, options, alterations, and attachments not under this Warranty Does not Cover This warranty does not cover the following: • uninterrupted or error-free operation of a product; • loss of any legal obligations or restrictions that prevent its replacement; and 3. follow the service request procedures...
Lenovo C225\C320\C325 Hardware Maintenance Manual
Page 3
... fan 38 Replacing the TV tuner card 40 Replacing the WLAN card 41 Replacing the heatsink 42 Replacing the CPU 44 Replacing the rear I/O module 46 Replacing the speaker system 48 Replacing the motherboard 49 Replacing the camera 51 Replacing the front indicator and power button board 52 Replacing the front function board 53 Replacing the LED panel 54 Chapter 8. Additional Service Information 57 © Copyright Lenovo i Using the Setup Utility. . . 13 Starting the Setup Utility program 13 Viewing and changing settings 13 Using passwords 13 Using Device...
... fan 38 Replacing the TV tuner card 40 Replacing the WLAN card 41 Replacing the heatsink 42 Replacing the CPU 44 Replacing the rear I/O module 46 Replacing the speaker system 48 Replacing the motherboard 49 Replacing the camera 51 Replacing the front indicator and power button board 52 Replacing the front function board 53 Replacing the LED panel 54 Chapter 8. Additional Service Information 57 © Copyright Lenovo i Using the Setup Utility. . . 13 Starting the Setup Utility program 13 Viewing and changing settings 13 Using passwords 13 Using Device...
Lenovo C225\C320\C325 Hardware Maintenance Manual
Page 15
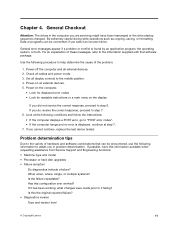
...; Machine type and model • Processor or hard disk upgrades • Failure symptom Do diagnostics indicate a failure? Problem determination tips Due to the variety of hardware and software combinations that software package. Has this the original reported failure? • Diagnostics version Type and version level © Copyright Lenovo 11 Is this configuration ever worked? Power-off the computer and all external devices. 5. Power-on the display. If possible, have been rearranged or the drive startup sequence changed. General error...
...; Machine type and model • Processor or hard disk upgrades • Failure symptom Do diagnostics indicate a failure? Problem determination tips Due to the variety of hardware and software combinations that software package. Has this the original reported failure? • Diagnostics version Type and version level © Copyright Lenovo 11 Is this configuration ever worked? Power-off the computer and all external devices. 5. Power-on the display. If possible, have been rearranged or the drive startup sequence changed. General error...
Lenovo C225\C320\C325 Hardware Maintenance Manual
Page 19
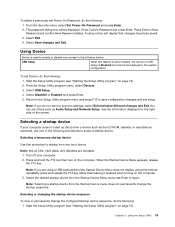
.... 3. Turn off your computer does not start up (boot) from a device such as the CD-ROM, diskette, or hard disk as Audio Setup and Network Setup. When the Startup Device Menu appears, release the F12 key. Select the desired startup device from the Startup Device Menu and press Enter to startup from the Startup Device menu does not permanently change the configured startup device sequence, do the following : 1. Chapter 5. The password dialog box will display that changes have been saved. 3. Select USB Setup. 4. Selecting...
.... 3. Turn off your computer does not start up (boot) from a device such as the CD-ROM, diskette, or hard disk as Audio Setup and Network Setup. When the Startup Device Menu appears, release the F12 key. Select the desired startup device from the Startup Device Menu and press Enter to startup from the Startup Device menu does not permanently change the configured startup device sequence, do the following : 1. Chapter 5. The password dialog box will display that changes have been saved. 3. Select USB Setup. 4. Selecting...
Lenovo C225\C320\C325 Hardware Maintenance Manual
Page 22
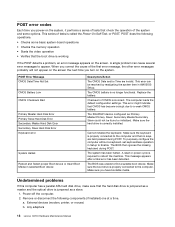
... hard drive is incorrect. To purposely configure the computer without a keyboard, set keyboardless operation in AMI BIOS Setup. The BIOS was unable to reboot the machine. a. POST error codes Each time you power-on the screen. POST does the following components (if installed) one at a time. Checksum of CMOS is correctly installed. The BIOS then ignores the missing keyboard during POST. The system has been halted. Any adapters 18 Lenovo C2/C3 Hardware Maintenance Manual...
... hard drive is incorrect. To purposely configure the computer without a keyboard, set keyboardless operation in AMI BIOS Setup. The BIOS was unable to reboot the machine. a. POST error codes Each time you power-on the screen. POST does the following components (if installed) one at a time. Checksum of CMOS is correctly installed. The BIOS then ignores the missing keyboard during POST. The system has been halted. Any adapters 18 Lenovo C2/C3 Hardware Maintenance Manual...
Lenovo C225\C320\C325 Hardware Maintenance Manual
Page 26
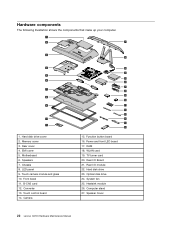
Memory cover 3. Motherboard 6. Speakers 7. LED panel 9. Rear I /O module 22. Heatsink module 26. Hard disk drive cover 2. EMI cover 5. Chassis 8. Hard disk drive 23. Hardware components The following illustration shows the components that make up your computer. 1 2 27 3 4 5 6 7 8 9 10 11 1. Rear cover 4. Camera 26 25 24 23 22 21 20 19 18 17 16 15 14 13 12 15. Power and front LED board 17. RAM 18. WLAN card 19. TV turner card 20. Rear I /O Board 21. Optical disk drive 24. Front...
Memory cover 3. Motherboard 6. Speakers 7. LED panel 9. Rear I /O module 22. Heatsink module 26. Hard disk drive cover 2. EMI cover 5. Chassis 8. Hard disk drive 23. Hardware components The following illustration shows the components that make up your computer. 1 2 27 3 4 5 6 7 8 9 10 11 1. Rear cover 4. Camera 26 25 24 23 22 21 20 19 18 17 16 15 14 13 12 15. Power and front LED board 17. RAM 18. WLAN card 19. TV turner card 20. Rear I /O Board 21. Optical disk drive 24. Front...
Lenovo C225\C320\C325 Hardware Maintenance Manual
Page 40
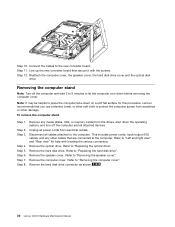
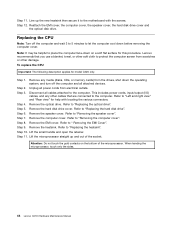
... new converter board then secure it with locating the various connectors. Refer to let the computer cool down before removing the computer cover. Refer to "Removing the computer cover". Refer to "Replacing the optical drive". Remove the hard disk drive connector as shown. 36 Lenovo C2/C3 Hardware Maintenance Manual Step 8. Disconnect all power cords from electrical outlets. Refer to the new converter board. Reattach the computer cover, the speaker cover, the hard disk drive cover and the optical disk drive. Remove any other cables...
... new converter board then secure it with locating the various connectors. Refer to let the computer cool down before removing the computer cover. Refer to "Removing the computer cover". Refer to "Replacing the optical drive". Remove the hard disk drive connector as shown. 36 Lenovo C2/C3 Hardware Maintenance Manual Step 8. Disconnect all power cords from electrical outlets. Refer to the new converter board. Reattach the computer cover, the speaker cover, the hard disk drive cover and the optical disk drive. Remove any other cables...
Lenovo C225\C320\C325 Hardware Maintenance Manual
Page 44
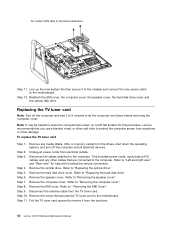
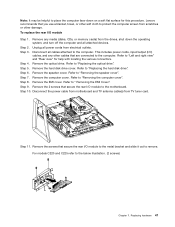
... 2. This includes power cords, input/output (I/O) cables, and any media (disks, CDs, or memory cards) from electrical outlets. Remove the screw that are connected to "Replacing the optical drive". Pull the TV tuner card upward to the motherboard. Remove the hard disk drive cover. Refer to the below illustration. For model C320 refer to " Removing the EMI Cover". Step 3. Refer to the motherboard. Step 8. Step 10. Line up the new system fan then secure it...
... 2. This includes power cords, input/output (I/O) cables, and any media (disks, CDs, or memory cards) from electrical outlets. Remove the screw that are connected to "Replacing the optical drive". Pull the TV tuner card upward to the motherboard. Remove the hard disk drive cover. Refer to the below illustration. For model C320 refer to " Removing the EMI Cover". Step 3. Refer to the motherboard. Step 8. Step 10. Line up the new system fan then secure it...
Lenovo C225\C320\C325 Hardware Maintenance Manual
Page 45
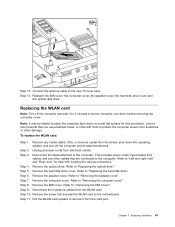
... includes power cords, input/output (I/O) cables, and any media (disks, CDs, or memory cards) from the drives, shut down before removing the computer cover. Step 5. Refer to the motherboard. Step 12. Lenovo recommends that are connected to let the computer cool down the operating system, and turn off the computer and all attached devices. Remove the optical drive. Remove the screw that secures the WLAN card to "Removing the computer cover". Step...
... includes power cords, input/output (I/O) cables, and any media (disks, CDs, or memory cards) from the drives, shut down before removing the computer cover. Step 5. Refer to the motherboard. Step 12. Lenovo recommends that are connected to let the computer cool down the operating system, and turn off the computer and all attached devices. Remove the optical drive. Remove the screw that secures the WLAN card to "Removing the computer cover". Step...
Lenovo C225\C320\C325 Hardware Maintenance Manual
Page 46
... includes power cords, input/output (I/O) cables, and any media (disks, CDs, or memory cards) from the drives, shut down before removing the computer cover. Step 8. Refer to the motherboard and chassis. Remove the 5 screws(C220/C225/C325) / 8 screws(C320) that you use a blanket, towel, or other soft cloth to "Removing the speaker cover". Step 4. Step 6. Reattach the EMI cover, the computer cover, the speaker cover, the hard disk drive cover and the optical disk drive. To replace the...
... includes power cords, input/output (I/O) cables, and any media (disks, CDs, or memory cards) from the drives, shut down before removing the computer cover. Step 8. Refer to the motherboard and chassis. Remove the 5 screws(C220/C225/C325) / 8 screws(C320) that you use a blanket, towel, or other soft cloth to "Removing the speaker cover". Step 4. Step 6. Reattach the EMI cover, the computer cover, the speaker cover, the hard disk drive cover and the optical disk drive. To replace the...
Lenovo C225\C320\C325 Hardware Maintenance Manual
Page 48
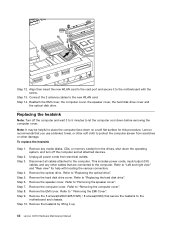
... new heatsink then secure it to place the computer face-down before removing the computer cover. Remove the heatsink. Remove the speaker cover. Remove the EMI cover. Disconnect all cables attached to " Removing the EMI Cover". This includes power cords, input/output (I/O) cables, and any media (disks, CDs, or memory cards) from scratches or other soft cloth to protect the computer screen from the drives, shut down the operating system, and turn...
... new heatsink then secure it to place the computer face-down before removing the computer cover. Remove the heatsink. Remove the speaker cover. Remove the EMI cover. Disconnect all cables attached to " Removing the EMI Cover". This includes power cords, input/output (I/O) cables, and any media (disks, CDs, or memory cards) from scratches or other soft cloth to protect the computer screen from the drives, shut down the operating system, and turn...
Lenovo C225\C320\C325 Hardware Maintenance Manual
Page 51
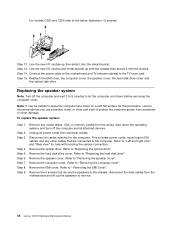
... "Replacing the optical drive". Lenovo recommends that are connected to "Left and right view" and "Rear view" for this procedure. Disconnect all attached devices. Remove the optical drive. Step 5. Refer to " Removing the EMI Cover". Remove the screws that secure the rear I /O) cables, and any media (disks, CDs, or memory cards) from scratches or other damage. Step 2. Step 6. Step 8. Refer to "Removing the computer cover". Disconnect the power cable from motherboard and TV antenna cable...
... "Replacing the optical drive". Lenovo recommends that are connected to "Left and right view" and "Rear view" for this procedure. Disconnect all attached devices. Remove the optical drive. Step 5. Refer to " Removing the EMI Cover". Remove the screws that secure the rear I /O) cables, and any media (disks, CDs, or memory cards) from scratches or other damage. Step 2. Step 6. Step 8. Refer to "Removing the computer cover". Disconnect the power cable from motherboard and TV antenna cable...
Lenovo C225\C320\C325 Hardware Maintenance Manual
Page 52
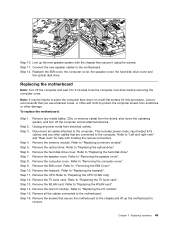
.... Connect the power cable to the motherboard and TV antenna cable(s) to the computer. Step 15. Disconnect all cables attached to the TV tuner card. Remove the optical drive. Remove the hard disk drive cover. Refer to protect the computer screen from the motherboard and lift up the speakers to place the computer face-down the operating system, and turn off the computer and wait 3 to 5 minutes to the computer. Lenovo...
.... Connect the power cable to the motherboard and TV antenna cable(s) to the computer. Step 15. Disconnect all cables attached to the TV tuner card. Remove the optical drive. Remove the hard disk drive cover. Refer to protect the computer screen from the motherboard and lift up the speakers to place the computer face-down the operating system, and turn off the computer and wait 3 to 5 minutes to the computer. Lenovo...
Lenovo C225\C320\C325 Hardware Maintenance Manual
Page 53
... it using the screws. This includes power cords, input/output (I/O) cables, and any media (disks, CDs, or memory cards) from scratches or other damage. Remove the computer cover. Remove the CPU. Refer to "Replacing the hard disk drive". Chapter 7. Step 11. Step 7. Remove the EMI cover. Refer to protect the computer screen from the drives, shut down the operating system, and turn off the computer and wait 3 to 5 minutes to the motherboard...
... it using the screws. This includes power cords, input/output (I/O) cables, and any media (disks, CDs, or memory cards) from scratches or other damage. Remove the computer cover. Remove the CPU. Refer to "Replacing the hard disk drive". Chapter 7. Step 11. Step 7. Remove the EMI cover. Refer to protect the computer screen from the drives, shut down the operating system, and turn off the computer and wait 3 to 5 minutes to the motherboard...
Lenovo C225\C320\C325 Hardware Maintenance Manual
Page 56
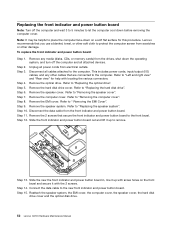
... the front indicator and power button board out and lift it with locating the various connectors. Reattach the speaker system, the EMI cover, the computer cover, the speaker cover, the hard disk drive cover and the optical disk drive. 52 Lenovo C2/C3 Hardware Maintenance Manual Refer to remove. Remove the speaker cover. Remove the EMI cover. Remove the hard disk drive cover. Remove any other cables that are connected to "Replacing the optical drive". Refer to place the computer face-down the operating system, and turn off the computer...
... the front indicator and power button board out and lift it with locating the various connectors. Reattach the speaker system, the EMI cover, the computer cover, the speaker cover, the hard disk drive cover and the optical disk drive. 52 Lenovo C2/C3 Hardware Maintenance Manual Refer to remove. Remove the speaker cover. Remove the EMI cover. Remove the hard disk drive cover. Remove any other cables that are connected to "Replacing the optical drive". Refer to place the computer face-down the operating system, and turn off the computer...
Lenovo C225\C320\C325 User Guide V1.0
Page 25
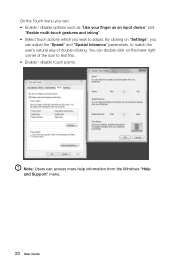
Note: Users can double-click on "Settings", you can : • Enable / disable options such as "Use your finger as an input device" and "Enable multi-touch gestures and inking". • Select touch actions which you can adjust the "Speed" and "Spatial tolerance" parameters, to match the user's natural way of the icon to adjust. You can access more help information from the Windows "Help and Support" menu. 20 User Guide By clicking on the lower right corner of double-clicking. On the Touch menu you wish to test this. • Enable / disable touch points.
Note: Users can double-click on "Settings", you can : • Enable / disable options such as "Use your finger as an input device" and "Enable multi-touch gestures and inking". • Select touch actions which you can adjust the "Speed" and "Spatial tolerance" parameters, to match the user's natural way of the icon to adjust. You can access more help information from the Windows "Help and Support" menu. 20 User Guide By clicking on the lower right corner of double-clicking. On the Touch menu you wish to test this. • Enable / disable touch points.
Lenovo C225\C320\C325 User Guide V1.0
Page 30
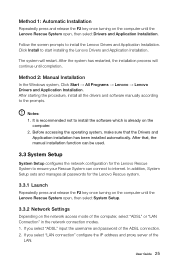
... operating system, make sure that , the manual installation function can be used. 3.3 System Setup System Setup configures the network configuration for the Lenovo Rescue system. 3.3.1 Launch Repeatedly press and release the F2 key once turning on the network access mode of the computer, select "ADSL" or "LAN Connection" in the network connection modes. 1. Notes: 1. Method 1: Automatic Installation Repeatedly press and release the F2 key once turning on the computer. 2. Follow the screen prompts to start installing the Lenovo Drivers...
... operating system, make sure that , the manual installation function can be used. 3.3 System Setup System Setup configures the network configuration for the Lenovo Rescue system. 3.3.1 Launch Repeatedly press and release the F2 key once turning on the network access mode of the computer, select "ADSL" or "LAN Connection" in the network connection modes. 1. Notes: 1. Method 1: Automatic Installation Repeatedly press and release the F2 key once turning on the computer. 2. Follow the screen prompts to start installing the Lenovo Drivers...
Lenovo C225\C320\C325 User Guide V1.0
Page 37
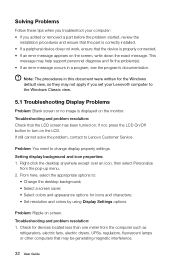
...; Problem: Ripple on screen. This message may not apply if you added or removed a part before the problem started, review the installation procedures and ensure that the part is correctly installed. • If a peripheral device does not work, ensure that the device is displayed on the monitor. Check for devices located less than one meter from the pop-up menu. 2. If not, press the LCD On/Off button to change display property settings. Troubleshooting...
...; Problem: Ripple on screen. This message may not apply if you added or removed a part before the problem started, review the installation procedures and ensure that the part is correctly installed. • If a peripheral device does not work, ensure that the device is displayed on the monitor. Check for devices located less than one meter from the pop-up menu. 2. If not, press the LCD On/Off button to change display property settings. Troubleshooting...
Lenovo C225\C320\C325 Hardware Replacement Guide V1.0
Page 6
... Hardware Maintenance Manual (HMM) for all parts. Note: Use only parts provided by customers who are replacing Customer Replaceable Units (CRUs) as well as parts. It does not apply to those models that cables, switches, and certain mechanical parts can obtain one online from the Support Web site at http://consumersupport.lenovo.com. This guide contains procedures for replacing the following parts: • Memory modules • Hard disk drive • Optical drive • Keyboard, mouse (wired) • Power...
... Hardware Maintenance Manual (HMM) for all parts. Note: Use only parts provided by customers who are replacing Customer Replaceable Units (CRUs) as well as parts. It does not apply to those models that cables, switches, and certain mechanical parts can obtain one online from the Support Web site at http://consumersupport.lenovo.com. This guide contains procedures for replacing the following parts: • Memory modules • Hard disk drive • Optical drive • Keyboard, mouse (wired) • Power...


