
Lenovo B460 Hardware Maintenance Manual V2.0
Page 3
... using OneKey Recovery 23 Restore of factory default 23 Using recovery discs 23 Passwords 24 Power-on password 24 Supervisor password 24 Power management 25 Screen blank mode 25 Sleep (standby) mode 25 Hibernation mode 26 Lenovo IdeaPad B460 27 Specifications 27 Status indicators 29 Fn key combinations 31 FRU replacement notices 32 Screw notices 32 Removing and replacing an FRU 33 1010 Battery pack 34 1020 Dummy cards and SIM card 35 1030 Hard disk drive(HDD)/Memory/Mini PCI Express Card slot compartment cover 36 1040 Hard disk drive...
... using OneKey Recovery 23 Restore of factory default 23 Using recovery discs 23 Passwords 24 Power-on password 24 Supervisor password 24 Power management 25 Screen blank mode 25 Sleep (standby) mode 25 Hibernation mode 26 Lenovo IdeaPad B460 27 Specifications 27 Status indicators 29 Fn key combinations 31 FRU replacement notices 32 Screw notices 32 Removing and replacing an FRU 33 1010 Battery pack 34 1020 Dummy cards and SIM card 35 1030 Hard disk drive(HDD)/Memory/Mini PCI Express Card slot compartment cover 36 1040 Hard disk drive...
Lenovo B460 Hardware Maintenance Manual V2.0
Page 7
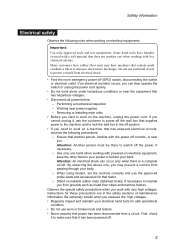
...; If you start to lock the wall box in the off the power, if necessary. - Removing or installing main units •• Before you need to protect yourself from passing through your back. When using testers, set the controls correctly and use such kind of maintenance information. Safety information Electrical safety Observe the following precautions: - First, check it to make sure that...
...; If you start to lock the wall box in the off the power, if necessary. - Removing or installing main units •• Before you need to protect yourself from passing through your back. When using testers, set the controls correctly and use such kind of maintenance information. Safety information Electrical safety Observe the following precautions: - First, check it to make sure that...
Lenovo B460 Hardware Maintenance Manual V2.0
Page 21
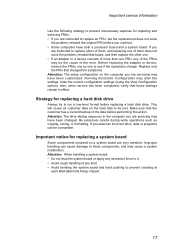
Before replacing the adapter or device, remove the FRUs one by one to replace either of them does not solve the problem, reinstall that those components, and may cause a system malfunction. Strategy for replacing a hard disk drive Always try to run a low-level format before you continue. •• Some computers have both a processor board and a system board. Attention: The drive startup sequence in effect. Important...
Before replacing the adapter or device, remove the FRUs one by one to replace either of them does not solve the problem, reinstall that those components, and may cause a system malfunction. Strategy for replacing a hard disk drive Always try to run a low-level format before you continue. •• Some computers have both a processor board and a system board. Attention: The drive startup sequence in effect. Important...
Lenovo B460 Hardware Maintenance Manual V2.0
Page 23
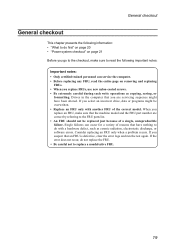
... defective, clear the error logs and run the test again. Drives in the computer that the machine model and the FRU part number are servicing sequence might be replaced just because of a single, unreproducible failure. If you are correct by referring to the FRU parts list. • An FRU should not be overwritten. • Replace an FRU only with a hardware defect, such...
... defective, clear the error logs and run the test again. Drives in the computer that the machine model and the FRU part number are servicing sequence might be replaced just because of a single, unreproducible failure. If you are correct by referring to the FRU parts list. • An FRU should not be overwritten. • Replace an FRU only with a hardware defect, such...
Lenovo B460 Hardware Maintenance Manual V2.0
Page 24
... problems with multiple labels •• Damaged or bent diskette eject button •• Fuses blown by attachment of a nonsupported device •• Forgotten computer password (making the computer unusable) •• Sticky keys caused by spilling a liquid onto the keyboard •• Use of an incorrect AC adapter on laptop products The following symptoms might indicate damage caused by nonwarranted activities...
... problems with multiple labels •• Damaged or bent diskette eject button •• Fuses blown by attachment of a nonsupported device •• Forgotten computer password (making the computer unusable) •• Sticky keys caused by spilling a liquid onto the keyboard •• Use of an incorrect AC adapter on laptop products The following symptoms might indicate damage caused by nonwarranted activities...
Lenovo B460 Hardware Maintenance Manual V2.0
Page 28
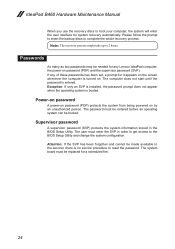
... turned on the screen whenever the computer is no service procedure to the BIOS Setup Utility and change the system configuration. Supervisor password A supervisor password (SVP) protects the system information stored in order to get access to reset the password. Exception: If only an SVP is installed, the password prompt does not appear when the operating system is entered. The system board must enter the SVP in the BIOS Setup Utility. If any Lenovo...
... turned on the screen whenever the computer is no service procedure to the BIOS Setup Utility and change the system configuration. Supervisor password A supervisor password (SVP) protects the system information stored in order to get access to reset the password. Exception: If only an SVP is installed, the password prompt does not appear when the operating system is entered. The system board must enter the SVP in the BIOS Setup Utility. If any Lenovo...
Lenovo B460 Hardware Maintenance Manual V2.0
Page 29
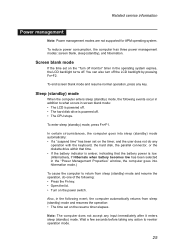
... screen blank mode: •• The LCD is powered off. •• The hard disk drive is powered off. •• The CPU stops. Sleep (standby) mode When the computer enters sleep (standby) mode, the following : •• Press the Fn key. •• Open the lid. •• Turn on the "Turn off monitor" timer in addition to return from sleep (standby) mode and resumes the operation: •• The time set...
... screen blank mode: •• The LCD is powered off. •• The hard disk drive is powered off. •• The CPU stops. Sleep (standby) mode When the computer enters sleep (standby) mode, the following : •• Press the Fn key. •• Open the lid. •• Turn on the "Turn off monitor" timer in addition to return from sleep (standby) mode and resumes the operation: •• The time set...
Lenovo B460 Hardware Maintenance Manual V2.0
Page 35
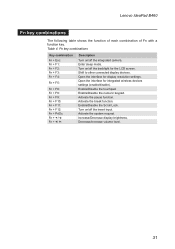
...the LCD screen. Activate the break function. Enable/Disable the touchpad. Activate the system request. Enable/Disable the Scroll Lock. Increase/Decrease display brightness. Enter sleep mode. Turn on/off the insert input. Shift to other connected display devices. Open the interface for integrated wireless devices settings (enable/disable). Lenovo IdeaPad B460 Fn key combinations The following table shows the function of each combination of Fn with a function key. Table 4. Enable/Disable the numeric keypad. Activate the pause function. Decrease/Increase volume level...
...the LCD screen. Activate the break function. Enable/Disable the touchpad. Activate the system request. Enable/Disable the Scroll Lock. Increase/Decrease display brightness. Enter sleep mode. Turn on/off the insert input. Shift to other connected display devices. Open the interface for integrated wireless devices settings (enable/disable). Lenovo IdeaPad B460 Fn key combinations The following table shows the function of each combination of Fn with a function key. Table 4. Enable/Disable the numeric keypad. Activate the pause function. Decrease/Increase volume level...
Lenovo B460 Hardware Maintenance Manual V2.0
Page 36
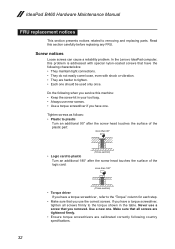
... in the table. Use a new one . IdeaPad B460 Hardware Maintenance Manual FRU replacement notices This section presents notices related to plastic Turn an additional 180° after the screw head touches the surface of the logic card: more than 180° (Cross-section) •• Torque driver If you use the correct screws. Screw notices Loose screws can cause a reliability problem. Tighten screws...
... in the table. Use a new one . IdeaPad B460 Hardware Maintenance Manual FRU replacement notices This section presents notices related to plastic Turn an additional 180° after the screw head touches the surface of the logic card: more than 180° (Cross-section) •• Torque driver If you use the correct screws. Screw notices Loose screws can cause a reliability problem. Tighten screws...
Lenovo B460 Hardware Maintenance Manual V2.0
Page 41
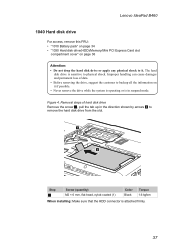
... remove the hard disk drive from the slot. 1 2 Step 1 Screw (quantity) M2 × 6 mm, flat-head, nylok-coated (1) Color Black Torque 1.6 kgfcm When installing: Make sure that the HDD connector is in the direction shown by arrows 2 to physical shock. Lenovo IdeaPad B460 1040 Hard disk drive For access, remove this FRU: •• "1010 Battery pack" on page 34 •• "1030 Hard disk drive(HDD)/Memory/Mini PCI Express Card slot compartment cover...
... remove the hard disk drive from the slot. 1 2 Step 1 Screw (quantity) M2 × 6 mm, flat-head, nylok-coated (1) Color Black Torque 1.6 kgfcm When installing: Make sure that the HDD connector is in the direction shown by arrows 2 to physical shock. Lenovo IdeaPad B460 1040 Hard disk drive For access, remove this FRU: •• "1010 Battery pack" on page 34 •• "1030 Hard disk drive(HDD)/Memory/Mini PCI Express Card slot compartment cover...
Lenovo B460 Hardware Maintenance Manual V2.0
Page 60
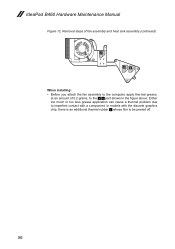
In models with the discrete graphics chip, there is an additional thermal rubber c whose film to imperfect contact with a component. IdeaPad B460 Hardware Maintenance Manual Figure 12. Either too much or too less grease application can cause a thermal problem due to be peeled off. 56 Removal steps of fan assembly and heat sink assembly (continued) c ab When installing: •• Before you attach the fan assembly to the computer, apply thermal grease, at an amount of 0.2 grams, to the a b part shown in the figure above.
In models with the discrete graphics chip, there is an additional thermal rubber c whose film to imperfect contact with a component. IdeaPad B460 Hardware Maintenance Manual Figure 12. Either too much or too less grease application can cause a thermal problem due to be peeled off. 56 Removal steps of fan assembly and heat sink assembly (continued) c ab When installing: •• Before you attach the fan assembly to the computer, apply thermal grease, at an amount of 0.2 grams, to the a b part shown in the figure above.
Lenovo B460 Hardware Maintenance Manual V2.0
Page 80
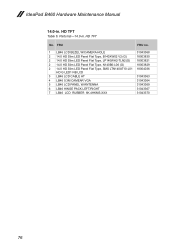
... Slim LED Panel Flat Type, N140B6-L06 (G) 18003829 2 14.0 HD Slim LED Panel Flat Type, SMS LTN140AT10-L01 18004036 HD G LED1 NB LCD 3 LB46 LCD CABLE HT 31043363 4 LB46 0.3M CAMEAR VGA 31043364 5 LB46 LCD PANEL W/ANTENNA 31043369 6 LB46 HINGE PACK LEFT/RIGHT 31043367 7 LB46 LCD RUBBER 6K.4HKMS.XXX 31043370 76 Parts list-14.0-in . HD TFT Table 6. HD TFT No. IdeaPad B460 Hardware Maintenance Manual 14...
... Slim LED Panel Flat Type, N140B6-L06 (G) 18003829 2 14.0 HD Slim LED Panel Flat Type, SMS LTN140AT10-L01 18004036 HD G LED1 NB LCD 3 LB46 LCD CABLE HT 31043363 4 LB46 0.3M CAMEAR VGA 31043364 5 LB46 LCD PANEL W/ANTENNA 31043369 6 LB46 HINGE PACK LEFT/RIGHT 31043367 7 LB46 LCD RUBBER 6K.4HKMS.XXX 31043370 76 Parts list-14.0-in . HD TFT Table 6. HD TFT No. IdeaPad B460 Hardware Maintenance Manual 14...
Lenovo B460 User Guide V1.0
Page 3
... instructions 30 Replacing the battery 30 Replacing the hard disk drive.... 31 Replacing memory 35 Removing the optical drive ........ 38 Appendix B. Lenovo limited warranty 39 Warranty information 45 Appendix C. Connecting to know your computer 20 Chapter 3. OneKey Rescue system 28 OneKey Rescue system 28 Appendix A. Specifications ...54 Index 55 i Learning the basics 8 First use 8 Using AC adapter and battery ...10 Using the touchpad 12 Using the keyboard 13 Connecting external devices.......15 Special keys and buttons 18...
... instructions 30 Replacing the battery 30 Replacing the hard disk drive.... 31 Replacing memory 35 Removing the optical drive ........ 38 Appendix B. Lenovo limited warranty 39 Warranty information 45 Appendix C. Connecting to know your computer 20 Chapter 3. OneKey Rescue system 28 OneKey Rescue system 28 Appendix A. Specifications ...54 Index 55 i Learning the basics 8 First use 8 Using AC adapter and battery ...10 Using the touchpad 12 Using the keyboard 13 Connecting external devices.......15 Special keys and buttons 18...

Lenovo B460 User Guide V1.0
Page 7
...) display. b VGA port Connects to external headphones. c Fan louvers Dissipate internal heat. Note: For details, see "Connecting a universal serial bus (USB) device" on page 16. h Headphone jack Connects to external display devices. B460 User Guide V1.0_en.book Page 3 Thursday, March 25, 2010 2:06 PM Chapter 1. Getting to music at high volume over extended periods of the computer may damage your computer Left-side view ab c d e f gh a Kensington slot Attach a security lock...
...) display. b VGA port Connects to external headphones. c Fan louvers Dissipate internal heat. Note: For details, see "Connecting a universal serial bus (USB) device" on page 16. h Headphone jack Connects to external display devices. B460 User Guide V1.0_en.book Page 3 Thursday, March 25, 2010 2:06 PM Chapter 1. Getting to music at high volume over extended periods of the computer may damage your computer Left-side view ab c d e f gh a Kensington slot Attach a security lock...
Lenovo B460 User Guide V1.0
Page 15
... to Lenovo for service, etc. The battery pack contains a small amount of time, or if you need to use the computer for an extended period of harmful substances. When disposing of the battery, comply with an incorrect type, there may be danger of in trash that is replaced with local ordinances or regulations and your computer to disassemble the battery...
... to Lenovo for service, etc. The battery pack contains a small amount of time, or if you need to use the computer for an extended period of harmful substances. When disposing of the battery, comply with an incorrect type, there may be danger of in trash that is replaced with local ordinances or regulations and your computer to disassemble the battery...
Lenovo B460 User Guide V1.0
Page 24
... enter BIOS setup utility, press F2 when the Lenovo logo appears on fingerprint reader, see the Help to seven alphanumeric characters in any security product, verify that you can attach a security lock to your computer to secure your password at the prompt. B460 User Guide V1.0_en.book Page 20 Thursday, March 25, 2010 2:06 PM Chapter 2. For more details on the screen...
... enter BIOS setup utility, press F2 when the Lenovo logo appears on fingerprint reader, see the Help to seven alphanumeric characters in any security product, verify that you can attach a security lock to your computer to secure your password at the prompt. B460 User Guide V1.0_en.book Page 20 Thursday, March 25, 2010 2:06 PM Chapter 2. For more details on the screen...

Lenovo B460 User Guide V1.0
Page 34
... display, and turn off the computer, or enter hibernation mode. a b a 4 Install a fully charged battery. 5 Slide the manual battery latch to the locked position. 6 Turn the computer over . 3 Unlock the battery latches in the unlocked position a, remove the battery pack in the direction shown by Lenovo. Note: If you are using an ExpressCard device, the computer might not be able to the computer again. 30 Disconnect the AC adapter and all cables...
... display, and turn off the computer, or enter hibernation mode. a b a 4 Install a fully charged battery. 5 Slide the manual battery latch to the locked position. 6 Turn the computer over . 3 Unlock the battery latches in the unlocked position a, remove the battery pack in the direction shown by Lenovo. Note: If you are using an ExpressCard device, the computer might not be able to the computer again. 30 Disconnect the AC adapter and all cables...
Lenovo B460 User Guide V1.0
Page 35
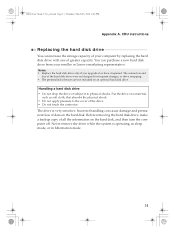
... reseller or Lenovo marketing representative. Incorrect handling can purchase a new hard disk drive from your computer by replacing the hard disk drive with one of data on the hard disk, and then turn the computer off. Never remove the drive while the system is very sensitive. B460 User Guide V1.0_en.book Page 31 Thursday, March 25, 2010 2:06 PM Appendix A. Notes: • Replace the hard disk drive only if you upgrade it...
... reseller or Lenovo marketing representative. Incorrect handling can purchase a new hard disk drive from your computer by replacing the hard disk drive with one of data on the hard disk, and then turn the computer off. Never remove the drive while the system is very sensitive. B460 User Guide V1.0_en.book Page 31 Thursday, March 25, 2010 2:06 PM Appendix A. Notes: • Replace the hard disk drive only if you upgrade it...

Lenovo B460 User Guide V1.0
Page 45
... original product. B460 User Guide V1.0_en.book Page 41 Thursday, March 25, 2010 2:06 PM Appendix B. Only unaltered Lenovo products and parts are in the product; 3 provide your Service Provider with all system keys or passwords and sufficient, free, and safe access to your Service Provider replaces a product or part, you agree to perform service; and 4 ensure that prevent its replacement; Lenovo limited warranty „ Replacement of a product...
... original product. B460 User Guide V1.0_en.book Page 41 Thursday, March 25, 2010 2:06 PM Appendix B. Only unaltered Lenovo products and parts are in the product; 3 provide your Service Provider with all system keys or passwords and sufficient, free, and safe access to your Service Provider replaces a product or part, you agree to perform service; and 4 ensure that prevent its replacement; Lenovo limited warranty „ Replacement of a product...
Lenovo B460 User Guide V1.0
Page 58
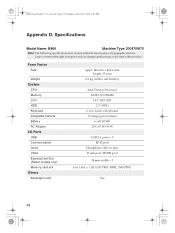
Specifications Model Name: B460 Machine Type 20047/0875 Note: The following specifications may contain technical inaccuracies or typographical errors. B460 User Guide V1.0_en.book Page 54 Thursday, March 25, 2010 2:06 PM Appendix D. Lenovo reserves the right to improve and/or change specifications at any time without notice. Form Factor Size Weight System CPU Memory LCD HDD Keyboard Integrated Camera Battery AC Adapter I/O Ports USB Communication Audio Video ExpressCard Slot (Select models only) Memory card slot Others Kensington slot Appr. 340...
Specifications Model Name: B460 Machine Type 20047/0875 Note: The following specifications may contain technical inaccuracies or typographical errors. B460 User Guide V1.0_en.book Page 54 Thursday, March 25, 2010 2:06 PM Appendix D. Lenovo reserves the right to improve and/or change specifications at any time without notice. Form Factor Size Weight System CPU Memory LCD HDD Keyboard Integrated Camera Battery AC Adapter I/O Ports USB Communication Audio Video ExpressCard Slot (Select models only) Memory card slot Others Kensington slot Appr. 340...


