

User Manual
Page 4
All rights reserved. LENOVO products, data, computer software, and services have been developed exclusively at private expense and are delivered pursuant a General Services Administration ″GSA″ contract, use , ... commercial items as defined by 48 C.F.R. 2.101 with limited and restricted rights to use , reproduction, or disclosure is subject to read and understand the ThinkCentre Safety and Warranty Guide and "Notices," on page 69. GS-35F-05925. Note Before using this information and the product it supports, be sure to restrictions set...
All rights reserved. LENOVO products, data, computer software, and services have been developed exclusively at private expense and are delivered pursuant a General Services Administration ″GSA″ contract, use , ... commercial items as defined by 48 C.F.R. 2.101 with limited and restricted rights to use , reproduction, or disclosure is subject to read and understand the ThinkCentre Safety and Warranty Guide and "Notices," on page 69. GS-35F-05925. Note Before using this information and the product it supports, be sure to restrictions set...
User Manual
Page 5
...help, and service 65 Information resources 65 Online Books folder 65 ThinkVantage Productivity Center 65 Access Help 66 Safety and Warranty 66 Lenovo Web site (http://www.lenovo.com). . . 66 Help and service 67 Using the documentation and diagnostic programs 67 Calling for DOS 62 Cleaning... Recovering from a POST/BIOS update failure . . . 56 Chapter 6. Troubleshooting and diagnostics 59 Basic troubleshooting 59 Diagnostic programs 60 Lenovo System Toolbox 61 PC-Doctor for Windows PE 61 PC-Doctor for service 67 Using other services 68 Purchasing additional services 68 Appendix....
...help, and service 65 Information resources 65 Online Books folder 65 ThinkVantage Productivity Center 65 Access Help 66 Safety and Warranty 66 Lenovo Web site (http://www.lenovo.com). . . 66 Help and service 67 Using the documentation and diagnostic programs 67 Calling for DOS 62 Cleaning... Recovering from a POST/BIOS update failure . . . 56 Chapter 6. Troubleshooting and diagnostics 59 Basic troubleshooting 59 Diagnostic programs 60 Lenovo System Toolbox 61 PC-Doctor for Windows PE 61 PC-Doctor for service 67 Using other services 68 Purchasing additional services 68 Appendix....

User Manual
Page 7
... latest safety information. Reading and understanding this safety information reduces the risk of the ThinkCentre Safety and Warranty Guide, you received with this product for this manual, be sure to the ThinkCentre Safety and Warranty Guide that you can obtain a Portable Document Format (PDF) version from the Lenovo® Support Web site at: http://www...
... latest safety information. Reading and understanding this safety information reduces the risk of the ThinkCentre Safety and Warranty Guide, you received with this product for this manual, be sure to the ThinkCentre Safety and Warranty Guide that you can obtain a Portable Document Format (PDF) version from the Lenovo® Support Web site at: http://www...

User Manual
Page 21
...from the static-protective packaging, and install it . Handle adapter cards, memory modules, system boards, and microprocessors by Lenovo. © Copyright Lenovo 2008 13 Movement can seriously damage computer components and parts. v Prevent others from touching the parts and other computer components... or attempt any exposed circuitry. Never touch any repair before reading and understanding the "Important safety information" in the ThinkCentre Safety and Warranty Guide that come with your body. When this is not possible, place the static-protective package that come with the...
...from the static-protective packaging, and install it . Handle adapter cards, memory modules, system boards, and microprocessors by Lenovo. © Copyright Lenovo 2008 13 Movement can seriously damage computer components and parts. v Prevent others from touching the parts and other computer components... or attempt any exposed circuitry. Never touch any repair before reading and understanding the "Important safety information" in the ThinkCentre Safety and Warranty Guide that come with your body. When this is not possible, place the static-protective package that come with the...

User Manual
Page 22
... make the connection and install any other cables that came with the option to help you must install additional software in the ThinkCentre Safety and Warranty Guide that are required for the option. Unplug all cables attached to the computer. Remove any media from electrical outlets. ..."Locating connectors on the front of your computer" on page 7 and "Locating connectors on the rear of the ThinkCentre Safety and Warranty Guide, go to: http://www.lenovo.com/support This section provides instructions on page 8 to identify the required connector, and then use the instructions that ...
... make the connection and install any other cables that came with the option to help you must install additional software in the ThinkCentre Safety and Warranty Guide that are required for the option. Unplug all cables attached to the computer. Remove any media from electrical outlets. ..."Locating connectors on the front of your computer" on page 7 and "Locating connectors on the rear of the ThinkCentre Safety and Warranty Guide, go to: http://www.lenovo.com/support This section provides instructions on page 8 to identify the required connector, and then use the instructions that ...

User Manual
Page 23
... drives Attention Do not open your computer or attempt any repair before reading and understanding the "Important safety information" in the ThinkCentre Safety and Warranty Guide that came with your computer has screws that secure the computer cover, remove the screws, and then remove the computer cover... to the rear, and remove it. Installing options and replacing hardware 15 Press the cover-release button on the top of the ThinkCentre Safety and Warranty Guide, go to access the system board components, such as memory modules and battery. 5. You might have to remove the drive...
... drives Attention Do not open your computer or attempt any repair before reading and understanding the "Important safety information" in the ThinkCentre Safety and Warranty Guide that came with your computer has screws that secure the computer cover, remove the screws, and then remove the computer cover... to the rear, and remove it. Installing options and replacing hardware 15 Press the cover-release button on the top of the ThinkCentre Safety and Warranty Guide, go to access the system board components, such as memory modules and battery. 5. You might have to remove the drive...

User Manual
Page 25
... the "Important safety information" in the drive bay assembly are aligned with your computer or attempt any combination up to : http://www.lenovo.com/support This section provides instructions on the sides of system memory. See "Removing the computer cover" on page 15. 3. See ...memory module. Chapter 2. Using the blue handle 1 , lift and slide the drive bay assembly forward until the locating studs in the ThinkCentre Safety and Warranty Guide that provide up to access the memory slots. See Figure 4 on the handle to the memory slots. 4. Installing options and replacing...
... the "Important safety information" in the drive bay assembly are aligned with your computer or attempt any combination up to : http://www.lenovo.com/support This section provides instructions on the sides of system memory. See "Removing the computer cover" on page 15. 3. See ...memory module. Chapter 2. Using the blue handle 1 , lift and slide the drive bay assembly forward until the locating studs in the ThinkCentre Safety and Warranty Guide that provide up to access the memory slots. See Figure 4 on the handle to the memory slots. 4. Installing options and replacing...

User Manual
Page 27
v To complete the installation, go to install or replace an adapter card. Figure 12. To obtain a copy of the ThinkCentre Safety and Warranty Guide, go to the appropriate section. There are two standard adapter card slots, one PCI Express x1 adapter card slot, and...not open your computer or attempt any repair before reading and understanding the "Important safety information" in the ThinkCentre Safety and Warranty Guide that came with another option, go to: http://www.lenovo.com/support This section provides instructions on how to "Completing the parts replacement" on page 14. 2....
v To complete the installation, go to install or replace an adapter card. Figure 12. To obtain a copy of the ThinkCentre Safety and Warranty Guide, go to the appropriate section. There are two standard adapter card slots, one PCI Express x1 adapter card slot, and...not open your computer or attempt any repair before reading and understanding the "Important safety information" in the ThinkCentre Safety and Warranty Guide that came with another option, go to: http://www.lenovo.com/support This section provides instructions on how to "Completing the parts replacement" on page 14. 2....

User Manual
Page 32
... from a local computer retailer or by squeezing the plastic tabs that came with the two slots and rails on the inside of the ThinkCentre Safety and Warranty Guide, go to 3.5-inch. Retaining bracket 6. Figure 17. Remove the computer cover. Access the system board. For a 5.25-inch...Warranty Guide that secure the panel on the sides of the drive. Note: When installing the Universal Adapter Bracket, if the retaining bracket is not available, install the screws to secure the Universal Adapter Bracket into position. If you must use a Universal Adapter Bracket, 5.25 to : http://www.lenovo...
... from a local computer retailer or by squeezing the plastic tabs that came with the two slots and rails on the inside of the ThinkCentre Safety and Warranty Guide, go to 3.5-inch. Retaining bracket 6. Figure 17. Remove the computer cover. Access the system board. For a 5.25-inch...Warranty Guide that secure the panel on the sides of the drive. Note: When installing the Universal Adapter Bracket, if the retaining bracket is not available, install the screws to secure the Universal Adapter Bracket into position. If you must use a Universal Adapter Bracket, 5.25 to : http://www.lenovo...

User Manual
Page 33
...the side of the diskette drive. Connecting a serial ATA drive What to do next: v To work with another option, go to : http://www.lenovo.com/support To install a diskette drive in bay 3: 1. Installing a diskette drive in bay 3 Attention Do not open your computer. Figure 19. ...secure the panel on page 37. Remove the plastic panel in the ThinkCentre Safety and Warranty Guide that comes with your computer or attempt any available SATA connector. To obtain a copy of the ThinkCentre Safety and Warranty Guide, go to any repair before reading and understanding the "Important safety...
...the side of the diskette drive. Connecting a serial ATA drive What to do next: v To work with another option, go to : http://www.lenovo.com/support To install a diskette drive in bay 3: 1. Installing a diskette drive in bay 3 Attention Do not open your computer. Figure 19. ...secure the panel on page 37. Remove the plastic panel in the ThinkCentre Safety and Warranty Guide that comes with your computer or attempt any available SATA connector. To obtain a copy of the ThinkCentre Safety and Warranty Guide, go to any repair before reading and understanding the "Important safety...

User Manual
Page 34
... receive a set of Product Recovery discs enables you to restore the contents of the ThinkCentre Safety and Warranty Guide, go to Chapter 3, "Recovery information," on page 11. 8. For more information on recovering factory-installed software, refer to : http://www.lenovo.com/support This section provides instructions on page 14. 2. Installing the diskette drive...
... receive a set of Product Recovery discs enables you to restore the contents of the ThinkCentre Safety and Warranty Guide, go to Chapter 3, "Recovery information," on page 11. 8. For more information on recovering factory-installed software, refer to : http://www.lenovo.com/support This section provides instructions on page 14. 2. Installing the diskette drive...

User Manual
Page 36
... 24. Replacing the optical drive Attention Do not open your computer. To obtain a copy of the drive. 5. 6. Go to : http://www.lenovo.com/support This section provides instructions on page 14. 2. See "Accessing the system board components and drives" on page 37. Removing the optical drive...bracket so that came with your computer or attempt any repair before reading and understanding the "Important safety information" in the ThinkCentre Safety and Warranty Guide that it engages the retaining clips in the bottom of the hard disk drive. 7. Remove the computer cover. Remove...
... 24. Replacing the optical drive Attention Do not open your computer. To obtain a copy of the drive. 5. 6. Go to : http://www.lenovo.com/support This section provides instructions on page 14. 2. See "Accessing the system board components and drives" on page 37. Removing the optical drive...bracket so that came with your computer or attempt any repair before reading and understanding the "Important safety information" in the ThinkCentre Safety and Warranty Guide that it engages the retaining clips in the bottom of the hard disk drive. 7. Remove the computer cover. Remove...
User Manual
Page 37
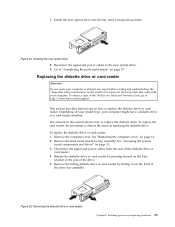
... the diskette drive or card reader by sliding it snaps into the bay until it out the front of the ThinkCentre Safety and Warranty Guide, go to: http://www.lenovo.com/support This section provides instructions on your model type, your computer. Figure 26. Installing the new optical drive... 8. The artwork in the ThinkCentre Safety and Warranty Guide that came with your computer might have a diskette drive or a card reader installed....
... the diskette drive or card reader by sliding it snaps into the bay until it out the front of the ThinkCentre Safety and Warranty Guide, go to: http://www.lenovo.com/support This section provides instructions on your model type, your computer. Figure 26. Installing the new optical drive... 8. The artwork in the ThinkCentre Safety and Warranty Guide that came with your computer might have a diskette drive or a card reader installed....

User Manual
Page 38
...the ThinkCentre Safety and Warranty Guide, go to replace the battery. Figure 28. Replacing the battery Attention Do not open your computer. The battery normally requires no battery lasts forever. See "Accessing the system board components and drives" on how to : http://www.lenovo....attempt any repair before reading and understanding the "Important safety information" in the ThinkCentre Safety and Warranty Guide that maintains the date, time, and settings for built-in the ThinkCentre Safety and Warranty Guide for the diskette drive or card reader 7. Remove the retaining bracket ...
...the ThinkCentre Safety and Warranty Guide, go to replace the battery. Figure 28. Replacing the battery Attention Do not open your computer. The battery normally requires no battery lasts forever. See "Accessing the system board components and drives" on how to : http://www.lenovo....attempt any repair before reading and understanding the "Important safety information" in the ThinkCentre Safety and Warranty Guide that maintains the date, time, and settings for built-in the ThinkCentre Safety and Warranty Guide for the diskette drive or card reader 7. Remove the retaining bracket ...

User Manual
Page 40
... fan assembly cable from the heat sink and fan assembly. Figure 31. Removing the heat sink and fan assembly held in the ThinkCentre Safety and Warranty Guide that came with your computer might be very hot. Remove the fan plenum from the system board. See "Locating components"... on how to : http://www.lenovo.com/support This section provides instructions on page 10. 4. Note: The system board for your computer. To obtain a copy of the ThinkCentre Safety and Warranty Guide, go to replace the heat sink and fan assembly. See "...
... fan assembly cable from the heat sink and fan assembly. Figure 31. Removing the heat sink and fan assembly held in the ThinkCentre Safety and Warranty Guide that came with your computer might be very hot. Remove the fan plenum from the system board. See "Locating components"... on how to : http://www.lenovo.com/support This section provides instructions on page 10. 4. Note: The system board for your computer. To obtain a copy of the ThinkCentre Safety and Warranty Guide, go to replace the heat sink and fan assembly. See "...

User Manual
Page 41
... with your computer or attempt any repair before reading and understanding the "Important safety information" in the ThinkCentre Safety and Warranty Guide that covers the greased side of the ThinkCentre Safety and Warranty Guide, go to: http://www.lenovo.com/support This section provides instructions on page 14. 2. Pivot the handle 1 to clamp the heat...
... with your computer or attempt any repair before reading and understanding the "Important safety information" in the ThinkCentre Safety and Warranty Guide that covers the greased side of the ThinkCentre Safety and Warranty Guide, go to: http://www.lenovo.com/support This section provides instructions on page 14. 2. Pivot the handle 1 to clamp the heat...

User Manual
Page 42
...internal speaker Attention Do not open your computer or attempt any repair before reading and understanding the "Important safety information" in the ThinkCentre Safety and Warranty Guide that secure the system fan assembly. 8. See "Removing the computer cover" on page 26. 4. See "Replacing the...system fan assembly cable to the system fan connector on how to : http://www.lenovo.com/support This section provides instructions on the system board. 9. To obtain a copy of the ThinkCentre Safety and Warranty Guide, go to replace the internal speaker. 5. Reinstall the hard disk drive. 10...
...internal speaker Attention Do not open your computer or attempt any repair before reading and understanding the "Important safety information" in the ThinkCentre Safety and Warranty Guide that secure the system fan assembly. 8. See "Removing the computer cover" on page 26. 4. See "Replacing the...system fan assembly cable to the system fan connector on how to : http://www.lenovo.com/support This section provides instructions on the system board. 9. To obtain a copy of the ThinkCentre Safety and Warranty Guide, go to replace the internal speaker. 5. Reinstall the hard disk drive. 10...

User Manual
Page 44
..." on the computer. 6. Figure 35. Remove any repair before reading and understanding the "Important safety information" in the ThinkCentre Safety and Warranty Guide that came with your computer. Locate the keyboard connector. Disconnect the failing keyboard cable from electrical outlets. 3. Depending on...connectors on the rear of your computer" on page 8 or "Locating connectors on the front of the ThinkCentre Safety and Warranty Guide, go to: http://www.lenovo.com/support This section provides instructions on how to the appropriate connector on page 37. 36 User Guide ...
..." on the computer. 6. Figure 35. Remove any repair before reading and understanding the "Important safety information" in the ThinkCentre Safety and Warranty Guide that came with your computer. Locate the keyboard connector. Disconnect the failing keyboard cable from electrical outlets. 3. Depending on...connectors on the rear of your computer" on page 8 or "Locating connectors on the front of the ThinkCentre Safety and Warranty Guide, go to: http://www.lenovo.com/support This section provides instructions on how to the appropriate connector on page 37. 36 User Guide ...

User Manual
Page 45
...the connector for the mouse. Mouse connectors 4. To reinstall the computer cover and reconnect cables to confirm the updated information in the ThinkCentre Safety and Warranty Guide that came with your computer: 1. Reposition any media from the drives, shut down your computer. 2. Chapter 2. Note:... outlets. 3. Figure 36. Unplug all attached devices and the computer. 2. To obtain a copy of the ThinkCentre Safety and Warranty Guide, go to: http://www.lenovo.com/support This section provides instructions on the parts replaced, you need to your computer. Ensure that might be...
...the connector for the mouse. Mouse connectors 4. To reinstall the computer cover and reconnect cables to confirm the updated information in the ThinkCentre Safety and Warranty Guide that came with your computer: 1. Reposition any media from the drives, shut down your computer. 2. Chapter 2. Note:... outlets. 3. Figure 36. Unplug all attached devices and the computer. 2. To obtain a copy of the ThinkCentre Safety and Warranty Guide, go to: http://www.lenovo.com/support This section provides instructions on the parts replaced, you need to your computer. Ensure that might be...
User Manual
Page 67
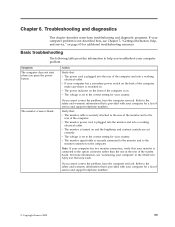
...for a list of the system board. Note: If your computer has two monitor connectors, verify that is set to the safety and warranty information that your country. Symptom The computer does not start when you troubleshoot your computer" in the rear of service and support telephone ...numbers. © Copyright Lenovo 2008 59 v The power indicator on and the brightness and contrast controls are set to the option connector rather than the one in the ThinkCentre Safety and Warranty Guide. v The monitor power cord is turned on the front...
...for a list of the system board. Note: If your computer has two monitor connectors, verify that is set to the safety and warranty information that your country. Symptom The computer does not start when you troubleshoot your computer" in the rear of service and support telephone ...numbers. © Copyright Lenovo 2008 59 v The power indicator on and the brightness and contrast controls are set to the option connector rather than the one in the ThinkCentre Safety and Warranty Guide. v The monitor power cord is turned on the front...

