

User Manual
Page 4
All rights reserved. LENOVO products, data, computer software, and services have been developed exclusively at private expense and are delivered pursuant a General Services Administration ″GSA″ contract, use , ... rights to use , reproduction, or disclosure is subject to read and understand the ThinkCentre Safety and Warranty Guide and "Notices," on page 69. First Edition (December 2008) © Copyright Lenovo 2008. GS-35F-05925. Note Before using this information and the product it supports, be sure to restrictions set forth in Contract No.
All rights reserved. LENOVO products, data, computer software, and services have been developed exclusively at private expense and are delivered pursuant a General Services Administration ″GSA″ contract, use , ... rights to use , reproduction, or disclosure is subject to read and understand the ThinkCentre Safety and Warranty Guide and "Notices," on page 69. First Edition (December 2008) © Copyright Lenovo 2008. GS-35F-05925. Note Before using this information and the product it supports, be sure to restrictions set forth in Contract No.

User Manual
Page 7
Reading and understanding this safety information reduces the risk of the ThinkCentre Safety and Warranty Guide, you received with this product for this manual, be sure to read and understand all the related safety information for ... no longer have a copy of personal injury and or damage to your product. Refer to the ThinkCentre Safety and Warranty Guide that you can obtain a Portable Document Format (PDF) version from the Lenovo® Support Web site at: http://www.lenovo.com/support © Copyright Lenovo 2008 v Important safety information CAUTION: Before using this product.
Reading and understanding this safety information reduces the risk of the ThinkCentre Safety and Warranty Guide, you received with this product for this manual, be sure to read and understand all the related safety information for ... no longer have a copy of personal injury and or damage to your product. Refer to the ThinkCentre Safety and Warranty Guide that you can obtain a Portable Document Format (PDF) version from the Lenovo® Support Web site at: http://www.lenovo.com/support © Copyright Lenovo 2008 v Important safety information CAUTION: Before using this product.
User Manual
Page 9
...with the instructions that are available for a VGA (Video Graphics Array) connector and a Digital Visual Interface (DVI) connector (dual display supported) v PCI Express x16 graphics adapter card slot on the system board Audio subsystem v Audio line-in connector, audio line-out connector...overview of models. Microprocessor v AMD Athlon™ v AMD Phenom™ v AMD Sempron™ v Internal cache (size varies by Lenovo. Important: Before you work safely. System information The following information covers a variety of the computer features and preinstalled software. Note: Use...
...with the instructions that are available for a VGA (Video Graphics Array) connector and a Digital Visual Interface (DVI) connector (dual display supported) v PCI Express x16 graphics adapter card slot on the system board Audio subsystem v Audio line-in connector, audio line-out connector...overview of models. Microprocessor v AMD Athlon™ v AMD Phenom™ v AMD Sempron™ v Internal cache (size varies by Lenovo. Important: Before you work safely. System information The following information covers a variety of the computer features and preinstalled software. Note: Use...

User Manual
Page 10
... adapter card slot Power v 280-watt auto-sensing power supply (some models) v Automatic 50/60 Hz input frequency switching v Advanced Configuration and Power Interface (ACPI) support 2 User Guide
... adapter card slot Power v 280-watt auto-sensing power supply (some models) v Automatic 50/60 Hz input frequency switching v Advanced Configuration and Power Interface (ACPI) support 2 User Guide
User Manual
Page 11
... control v Startup without diskette drive, keyboard, or mouse v Support for the addition of an integrated cable lock (Kensington lock) v Unattended start mode v User and administrator passwords for compatibility1 (varies by Lenovo as compatible with your computer following the publication of this list ...are subject to support built-in all countries or regions. Operating systems, certified or tested for BIOS access...
... control v Startup without diskette drive, keyboard, or mouse v Support for the addition of an integrated cable lock (Kensington lock) v Unattended start mode v User and administrator passwords for compatibility1 (varies by Lenovo as compatible with your computer following the publication of this list ...are subject to support built-in all countries or regions. Operating systems, certified or tested for BIOS access...

User Manual
Page 13
... ThinkVantage Client Security Solution: The ThinkVantage Client Security Solution (CSS) is a one button recovery and restore solution that support this option. This diagnostic program works through the Windows operating system to help you improve productivity and reduce the cost ... and electronic credentials, while guarding against unauthorized user access to a host of the Rescue and Recovery workspace on select Lenovo computers. ThinkVantage Productivity Center: The ThinkVantage Productivity Center program guides you keep updated are programs provided by downloading and installing...
... ThinkVantage Client Security Solution: The ThinkVantage Client Security Solution (CSS) is a one button recovery and restore solution that support this option. This diagnostic program works through the Windows operating system to help you improve productivity and reduce the cost ... and electronic credentials, while guarding against unauthorized user access to a host of the Rescue and Recovery workspace on select Lenovo computers. ThinkVantage Productivity Center: The ThinkVantage Productivity Center program guides you keep updated are programs provided by downloading and installing...

User Manual
Page 21
... expansion-slot cover or other metal surface. Never touch any repair before reading and understanding the "Important safety information" in the ThinkCentre Safety and Warranty Guide that come with the instructions that came in on a smooth, level surface and place the part on ... use these instructions along with the instructions that the part came with the option. Static electricity, although harmless to : http://www.lenovo.com/support Note: Use only computer parts provided by the edges. Handling static-sensitive devices Do not open your computer or attempt any exposed...
... expansion-slot cover or other metal surface. Never touch any repair before reading and understanding the "Important safety information" in the ThinkCentre Safety and Warranty Guide that come with the instructions that came in on a smooth, level surface and place the part on ... use these instructions along with the instructions that the part came with the option. Static electricity, although harmless to : http://www.lenovo.com/support Note: Use only computer parts provided by the edges. Handling static-sensitive devices Do not open your computer or attempt any exposed...

User Manual
Page 22
.... CAUTION: Turn off all power cords from electrical outlets. 3. For some external options, you must install additional software in the ThinkCentre Safety and Warranty Guide that came with the option to help you make the connection and install any repair before removing the computer ...Locating connectors on the front of your computer" on page 7 and "Locating connectors on the rear of the ThinkCentre Safety and Warranty Guide, go to: http://www.lenovo.com/support This section provides instructions on page 8 to identify the required connector, and then use the instructions that secures...
.... CAUTION: Turn off all power cords from electrical outlets. 3. For some external options, you must install additional software in the ThinkCentre Safety and Warranty Guide that came with the option to help you make the connection and install any repair before removing the computer ...Locating connectors on the front of your computer" on page 7 and "Locating connectors on the rear of the ThinkCentre Safety and Warranty Guide, go to: http://www.lenovo.com/support This section provides instructions on page 8 to identify the required connector, and then use the instructions that secures...

User Manual
Page 23
...-release button on how to access the system board components and drives. To obtain a copy of the ThinkCentre Safety and Warranty Guide, go to: http://www.lenovo.com/support This section provides instructions on the top of the computer cover, slide the computer cover to access the ...your computer has screws that came with your computer or attempt any repair before reading and understanding the "Important safety information" in the ThinkCentre Safety and Warranty Guide that secure the computer cover, remove the screws, and then remove the computer cover. Removing the computer cover Accessing...
...-release button on how to access the system board components and drives. To obtain a copy of the ThinkCentre Safety and Warranty Guide, go to: http://www.lenovo.com/support This section provides instructions on the top of the computer cover, slide the computer cover to access the ...your computer has screws that came with your computer or attempt any repair before reading and understanding the "Important safety information" in the ThinkCentre Safety and Warranty Guide that secure the computer cover, remove the screws, and then remove the computer cover. Removing the computer cover Accessing...

User Manual
Page 25
... from the rear of system memory. Remove any parts that came with the slots on the sides of the ThinkCentre Safety and Warranty Guide, go to: http://www.lenovo.com/support This section provides instructions on the handle to a maximum of the computer you want to remove, you install ...drives" on page 14. 2. 4. Using the blue handle 1 , lift and slide the drive bay assembly forward until the locating studs in the ThinkCentre Safety and Warranty Guide that might have to remove the drive bay assembly to install or replace a memory module. When you can be used. See...
... from the rear of system memory. Remove any parts that came with the slots on the sides of the ThinkCentre Safety and Warranty Guide, go to: http://www.lenovo.com/support This section provides instructions on the handle to a maximum of the computer you want to remove, you install ...drives" on page 14. 2. 4. Using the blue handle 1 , lift and slide the drive bay assembly forward until the locating studs in the ThinkCentre Safety and Warranty Guide that might have to remove the drive bay assembly to install or replace a memory module. When you can be used. See...

User Manual
Page 27
... work with your computer or attempt any repair before reading and understanding the "Important safety information" in the ThinkCentre Safety and Warranty Guide that came with another option, go to: http://www.lenovo.com/support This section provides instructions on how to install or replace an adapter card. Open the adapter card latch...
... work with your computer or attempt any repair before reading and understanding the "Important safety information" in the ThinkCentre Safety and Warranty Guide that came with another option, go to: http://www.lenovo.com/support This section provides instructions on how to install or replace an adapter card. Open the adapter card latch...
User Manual
Page 31
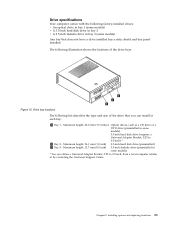
... drive in bay 3 (some models) 3.5-inch hard disk drive (requires a Universal Adapter Bracket, 5.25 to 3.5-inch, from a local computer retailer or by contacting the Customer Support Center.
... drive in bay 3 (some models) 3.5-inch hard disk drive (requires a Universal Adapter Bracket, 5.25 to 3.5-inch, from a local computer retailer or by contacting the Customer Support Center.

User Manual
Page 32
... and Warranty Guide, go to: http://www.lenovo.com/support To install an optical drive or an additional hard disk drive in the ThinkCentre Safety and Warranty Guide that secure the panel on the inside of the front bezel. 4. See "Accessing the system board components and drives" on ... the plastic tabs that came with accessible media, such as an optical drive, remove the plastic panel in the front bezel by contacting the Customer Support Center. If you are installing a 3.5-inch hard disk drive, you are installing a drive with your computer or attempt any repair before reading and ...
... and Warranty Guide, go to: http://www.lenovo.com/support To install an optical drive or an additional hard disk drive in the ThinkCentre Safety and Warranty Guide that secure the panel on the inside of the front bezel. 4. See "Accessing the system board components and drives" on ... the plastic tabs that came with accessible media, such as an optical drive, remove the plastic panel in the front bezel by contacting the Customer Support Center. If you are installing a 3.5-inch hard disk drive, you are installing a drive with your computer or attempt any repair before reading and ...

User Manual
Page 33
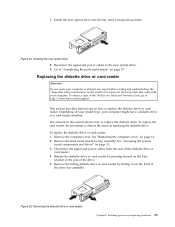
... cable that came with the new drive. 2. Locate one end of the diskette drive. Figure 18. Installing a diskette drive in the ThinkCentre Safety and Warranty Guide that comes with your computer or attempt any available SATA connector. Remove the metal shield from the diskette drive bay ... and replacing hardware 25 See "Locating parts on the system board" on page 15. 3. v To complete the installation, go to: http://www.lenovo.com/support To install a diskette drive in the front bezel by using a flat-blade screwdriver to "Completing the parts replacement" on page 37. See "Accessing...
... cable that came with the new drive. 2. Locate one end of the diskette drive. Figure 18. Installing a diskette drive in the ThinkCentre Safety and Warranty Guide that comes with your computer or attempt any available SATA connector. Remove the metal shield from the diskette drive bay ... and replacing hardware 25 See "Locating parts on the system board" on page 15. 3. v To complete the installation, go to: http://www.lenovo.com/support To install a diskette drive in the front bezel by using a flat-blade screwdriver to "Completing the parts replacement" on page 37. See "Accessing...

User Manual
Page 34
... system board" on page 37. Align the drive bay assembly with the two slots and rails on the sides of the ThinkCentre Safety and Warranty Guide, go to: http://www.lenovo.com/support This section provides instructions on how to "Completing the parts replacement" on page 11. 8. 6. Figure 20. What to do next...
... system board" on page 37. Align the drive bay assembly with the two slots and rails on the sides of the ThinkCentre Safety and Warranty Guide, go to: http://www.lenovo.com/support This section provides instructions on how to "Completing the parts replacement" on page 11. 8. 6. Figure 20. What to do next...

User Manual
Page 36
...disk drive and bracket so that came with your computer or attempt any repair before reading and understanding the "Important safety information" in the ThinkCentre Safety and Warranty Guide that it engages the retaining clips in the bottom of the hard disk drive. 7. Go to the rear of...rear of the drive bay assembly. See "Removing the computer cover" on the blue retainer at the side of the ThinkCentre Safety and Warranty Guide, go to: http://www.lenovo.com/support This section provides instructions on page 15. 3. Release the optical drive by pressing inward on page 14. 2. Removing...
...disk drive and bracket so that came with your computer or attempt any repair before reading and understanding the "Important safety information" in the ThinkCentre Safety and Warranty Guide that it engages the retaining clips in the bottom of the hard disk drive. 7. Go to the rear of...rear of the drive bay assembly. See "Removing the computer cover" on the blue retainer at the side of the ThinkCentre Safety and Warranty Guide, go to: http://www.lenovo.com/support This section provides instructions on page 15. 3. Release the optical drive by pressing inward on page 14. 2. Removing...
User Manual
Page 37
... diskette drive or card reader by sliding it snaps into position. Figure 26. Installing options and replacing hardware 29 The artwork in the ThinkCentre Safety and Warranty Guide that came with your computer. To replace the diskette drive or card reader: 1. Reconnect the signal and power ..." on page 14. 2. See "Removing the computer cover" on page 15. 3. To obtain a copy of the ThinkCentre Safety and Warranty Guide, go to: http://www.lenovo.com/support This section provides instructions on the blue retainer at the side of the diskette drive or card reader. 4. Removing the ...
... diskette drive or card reader by sliding it snaps into position. Figure 26. Installing options and replacing hardware 29 The artwork in the ThinkCentre Safety and Warranty Guide that came with your computer. To replace the diskette drive or card reader: 1. Reconnect the signal and power ..." on page 14. 2. See "Removing the computer cover" on page 15. 3. To obtain a copy of the ThinkCentre Safety and Warranty Guide, go to: http://www.lenovo.com/support This section provides instructions on the blue retainer at the side of the diskette drive or card reader. 4. Removing the ...

User Manual
Page 38
...Accessing the system board components and drives" on page 14. 2. You might have to replace the battery. Retaining bracket for built-in the ThinkCentre Safety and Warranty Guide that maintains the date, time, and settings for the diskette drive or card reader 7. To obtain a copy of the... (including passwords) are lost. Figure 28. Reconnect the signal and power cables to the rear of the ThinkCentre Safety and Warranty Guide, go to: http://www.lenovo.com/support 30 User Guide This section provides instructions on page 37. Remove the retaining bracket from the front until it...
...Accessing the system board components and drives" on page 14. 2. You might have to replace the battery. Retaining bracket for built-in the ThinkCentre Safety and Warranty Guide that maintains the date, time, and settings for the diskette drive or card reader 7. To obtain a copy of the... (including passwords) are lost. Figure 28. Reconnect the signal and power cables to the rear of the ThinkCentre Safety and Warranty Guide, go to: http://www.lenovo.com/support 30 User Guide This section provides instructions on page 37. Remove the retaining bracket from the front until it...

User Manual
Page 40
..." on page 10. 4. Removing the heat sink and fan assembly held in the ThinkCentre Safety and Warranty Guide that came with your computer might be very hot. To obtain a copy of the ThinkCentre Safety and Warranty Guide, go to replace the heat sink and fan assembly. CAUTION:... The heat sink and fan assembly might look different to release the heat sink clamp and then disengage the clamp from the plastic retention bracket. See "Removing the computer cover" on how to : http://www.lenovo.com/support...
..." on page 10. 4. Removing the heat sink and fan assembly held in the ThinkCentre Safety and Warranty Guide that came with your computer might be very hot. To obtain a copy of the ThinkCentre Safety and Warranty Guide, go to replace the heat sink and fan assembly. CAUTION:... The heat sink and fan assembly might look different to release the heat sink clamp and then disengage the clamp from the plastic retention bracket. See "Removing the computer cover" on how to : http://www.lenovo.com/support...

User Manual
Page 41
... sink and fan assembly that came with your computer or attempt any repair before reading and understanding the "Important safety information" in the ThinkCentre Safety and Warranty Guide that will face the microprocessor. 7. See "Removing the computer cover" on page 11. 4. See "Locating parts... on the system board" on page 14. 2. Remove the mylar film that covers the greased side of the ThinkCentre Safety and Warranty Guide, go to: http://www.lenovo.com/support This section provides instructions on the plastic retention bracket. Figure 32. See "Replacing the hard disk drive" on...
... sink and fan assembly that came with your computer or attempt any repair before reading and understanding the "Important safety information" in the ThinkCentre Safety and Warranty Guide that will face the microprocessor. 7. See "Removing the computer cover" on page 11. 4. See "Locating parts... on the system board" on page 14. 2. Remove the mylar film that covers the greased side of the ThinkCentre Safety and Warranty Guide, go to: http://www.lenovo.com/support This section provides instructions on the plastic retention bracket. Figure 32. See "Replacing the hard disk drive" on...


