
Owners Manual
Page 1
PLASMA TV MODELS: RU=42PZ61/71 RU=50PZ61 RU=60PZ61 this require service. and serial number of the TV in the back cover and relate this manual carefully and completely before future reference.
PLASMA TV MODELS: RU=42PZ61/71 RU=50PZ61 RU=60PZ61 this require service. and serial number of the TV in the back cover and relate this manual carefully and completely before future reference.
Owners Manual
Page 2
...MATCH WIDE BLADE OF PLUG TO WIDE SLOT, FULLY INSERT. The code provides guidelines for proper grounding and, in accordance with the instruction manual, may be connected to the grounding system of the building, as close to Article 820-40 of the cable entry as practical. REGULATORY...against harmful interference when the equipment is intended to alert the user to radio communications. The exclamation point within an equilateral triangle, is : LG Electronics U.S.A., Inc 1000 Sylvan Avenue, Englewood Cliffs, NJ 07632 1-201-816-2000 http://www.lgusa.com 2 Plasma TV Any changes or ...
...MATCH WIDE BLADE OF PLUG TO WIDE SLOT, FULLY INSERT. The code provides guidelines for proper grounding and, in accordance with the instruction manual, may be connected to the grounding system of the building, as close to Article 820-40 of the cable entry as practical. REGULATORY...against harmful interference when the equipment is intended to alert the user to radio communications. The exclamation point within an equilateral triangle, is : LG Electronics U.S.A., Inc 1000 Sylvan Avenue, Englewood Cliffs, NJ 07632 1-201-816-2000 http://www.lgusa.com 2 Plasma TV Any changes or ...
Owners Manual
Page 3
... your product dealer or local power company. Power Sources This product should use liquid cleaners or aerosol cleaners. PORTABLE CART WARNING J Owner's Manual 3 This product complies with a three-wire grounding type plug, a plug having a third (grounding) pin. The product may cause the...you are unable to the product. Retain Instructions The safety and operating instructions should not be followed. 3. Attachments Do not use this manual can result in mind. Quick stops, excessive force, and uneven surfaces may slide or fall, causing serious injury to a child or ...
... your product dealer or local power company. Power Sources This product should use liquid cleaners or aerosol cleaners. PORTABLE CART WARNING J Owner's Manual 3 This product complies with a three-wire grounding type plug, a plug having a third (grounding) pin. The product may cause the...you are unable to the product. Retain Instructions The safety and operating instructions should not be followed. 3. Attachments Do not use this manual can result in mind. Quick stops, excessive force, and uneven surfaces may slide or fall, causing serious injury to a child or ...
Owners Manual
Page 5
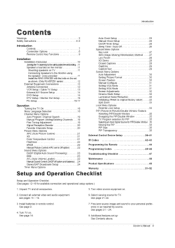
...Speakers to the Monitor using the speaker wires provided 11 Install the RING SPACER with the bolts on the set as shown. (Only RU-60PZ61 series 12 External Equipment Connections 12 Antenna Connection 12 VCR Setup I Cable TV Setup External A/V Source Setup DVD Setup DTV Setup ... 20 Favorite Channels Setup 20 Picture Menu Options APC (Auto Picture Control 21 XD 21 Color Temperature Control 21 Fleshtone 22 sRGB 22 Manual Picture Control (APC set up a n d Operation Checklist Setup and Operation Checklist (See pages 12-16 for TV. Select viewing ...
...Speakers to the Monitor using the speaker wires provided 11 Install the RING SPACER with the bolts on the set as shown. (Only RU-60PZ61 series 12 External Equipment Connections 12 Antenna Connection 12 VCR Setup I Cable TV Setup External A/V Source Setup DVD Setup DTV Setup ... 20 Favorite Channels Setup 20 Picture Menu Options APC (Auto Picture Control 21 XD 21 Color Temperature Control 21 Fleshtone 22 sRGB 22 Manual Picture Control (APC set up a n d Operation Checklist Setup and Operation Checklist (See pages 12-16 for TV. Select viewing ...
Owners Manual
Page 7
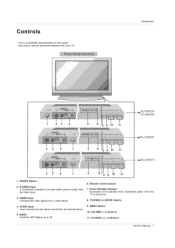
... turned on or off. 6. Remote Control Sensor 7. CHANNEL (E, D) Buttons Owner's Manual 7 VIDEO Input Connects the video signal from your TV. ON/OFF Button 2. TVNIDEO or ENTER Button 9. INDEX Switches LED Display on . 8. - Introduction RU-50PZ61 RU-60PZ61 4 78 9 10 11 6 8 9 10 11 _,RU-42PZ61 _, RU-42PZ71 1. AUDIO Input Use to connect to provide better picture quality...
... turned on or off. 6. Remote Control Sensor 7. CHANNEL (E, D) Buttons Owner's Manual 7 VIDEO Input Connects the video signal from your TV. ON/OFF Button 2. TVNIDEO or ENTER Button 9. INDEX Switches LED Display on . 8. - Introduction RU-50PZ61 RU-60PZ61 4 78 9 10 11 6 8 9 10 11 _,RU-42PZ61 _, RU-42PZ71 1. AUDIO Input Use to connect to provide better picture quality...
Owners Manual
Page 8
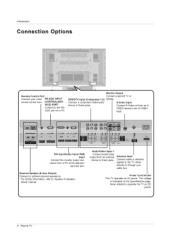
... Connect a second TV or DVD/DTV Input (Component 1-2) Monitor. External Speaker (8 ohm Output) Connect to optional external speaker(s). * For further information, refer to 'Speaker Stand' manual. & Speaker I S-Video Input device to the TV, either directly or through your wired RS-232C IN PUT remote control here. (CONTROL/SER- Antenna Input Connect...
... Connect a second TV or DVD/DTV Input (Component 1-2) Monitor. External Speaker (8 ohm Output) Connect to optional external speaker(s). * For further information, refer to 'Speaker Stand' manual. & Speaker I S-Video Input device to the TV, either directly or through your wired RS-232C IN PUT remote control here. (CONTROL/SER- Antenna Input Connect...
Owners Manual
Page 9
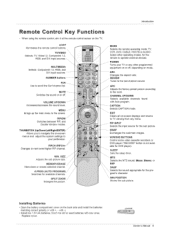
...; Install two 1 .hV AA batteries. Switches between PIP, and Double Window modes. j POWER Turns your preference. ram's character. \ WIN.POSITION Moves the sub picture. Owner's Manual 9 Introduction Contro! PIPCH-/PIPCH+ Changes to the room. DASP Selects the sound appropriate for the sub picture. j APC Adjusts the factory preset picture according to...
...; Install two 1 .hV AA batteries. Switches between PIP, and Double Window modes. j POWER Turns your preference. ram's character. \ WIN.POSITION Moves the sub picture. Owner's Manual 9 Introduction Contro! PIPCH-/PIPCH+ Changes to the room. DASP Selects the sound appropriate for the sub picture. j APC Adjusts the factory preset picture according to...
Owners Manual
Page 10
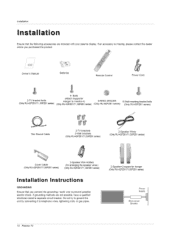
... Hanger to monitor-4) (Only RU-42PZ61/71, 50PZ61 sedes) 6-RING SPACER (Only RU-60PZ61 series) 6-Wall mounting bracket bolts (Only RU-60PZ61 series) 75_2 Round Cable 2-TV brackets 2-Wall brackets (Only RU-42PZ61/71,50PZ61 series) 2-Speaker Wires (Only RU-42PZ61/71,50PZ61 sedes) Cover Cable (Only RU-42PZ61/71,50PZ61 series) ... the grounding / earth wire to telephone wires, lightening rods, or gas pipes. 2-Speaker+2-su pporter hanger (Only RU-42PZ61/71,50PZ61 series) Power Supply Short-circuit Breaker 10 Plasma TV If grounding methods are included with your plasma display. Owner...
... Hanger to monitor-4) (Only RU-42PZ61/71, 50PZ61 sedes) 6-RING SPACER (Only RU-60PZ61 series) 6-Wall mounting bracket bolts (Only RU-60PZ61 series) 75_2 Round Cable 2-TV brackets 2-Wall brackets (Only RU-42PZ61/71,50PZ61 series) 2-Speaker Wires (Only RU-42PZ61/71,50PZ61 sedes) Cover Cable (Only RU-42PZ61/71,50PZ61 series) ... the grounding / earth wire to telephone wires, lightening rods, or gas pipes. 2-Speaker+2-su pporter hanger (Only RU-42PZ61/71,50PZ61 series) Power Supply Short-circuit Breaker 10 Plasma TV If grounding methods are included with your plasma display. Owner...
Owners Manual
Page 11
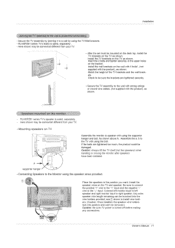
... bolt. If the bolts are tightened securely. • Secure the TV assembly to the "-" input. Install the speaker wires on the bracket. Owner's Manual 11 RU-60PZ61 series TV's stand is saled, separately. Here shown may be bunched into the wire holders provided, see(_ above A, Assemble the a, b to a...the brackets are tightened too much, the product could be mounted on the desk top, install the TV brackets on the TV as shown. RU-60PZ61 series TV's speaker is saled, separately. - Install the TV brackets on the TV as shown. Be sure to connect the positive "+" wire...
... bolt. If the bolts are tightened securely. • Secure the TV assembly to the "-" input. Install the speaker wires on the bracket. Owner's Manual 11 RU-60PZ61 series TV's stand is saled, separately. Here shown may be bunched into the wire holders provided, see(_ above A, Assemble the a, b to a...the brackets are tightened too much, the product could be mounted on the desk top, install the TV brackets on the TV as shown. RU-60PZ61 series TV's speaker is saled, separately. - Install the TV brackets on the TV as shown. Be sure to connect the positive "+" wire...
Owners Manual
Page 13
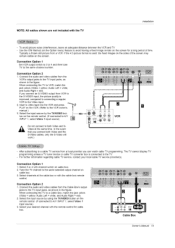
... control. (If connected to A/V INPUT 1, select Video 1 input source) 3. When connecting the TV to the Video input. [] 2. When connecting the TV to the VCR owner's T manual.) / 3. Insert a video tape into the VCR and press PLAY on the VCR. (Refer to VCR, match the jack colors (Video = yellow, Audio Left = white, and... TV Use the ISM Method (on the Option menu) feature to avoid having a fixed image remain on the screen for cable box. [] Cable Box Owner3 Manual 13 Typically a frozen still picture from a VCR.
... control. (If connected to A/V INPUT 1, select Video 1 input source) 3. When connecting the TV to the Video input. [] 2. When connecting the TV to the VCR owner's T manual.) / 3. Insert a video tape into the VCR and press PLAY on the VCR. (Refer to VCR, match the jack colors (Video = yellow, Audio Left = white, and... TV Use the ISM Method (on the Option menu) feature to avoid having a fixed image remain on the screen for cable box. [] Cable Box Owner3 Manual 13 Typically a frozen still picture from a VCR.
Owners Manual
Page 14
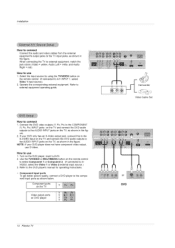
... component video output, use 1. Operate the corresponding external equipment. How to the AUDIO INPUT jacks on the remote control. (If connected to the DVD player's manual for operating instructions. Select the input source by using the TVNIDEO button on the TV, as shown in the figure. NOTE: If your DVD only...
... component video output, use 1. Operate the corresponding external equipment. How to the AUDIO INPUT jacks on the remote control. (If connected to the DVD player's manual for operating instructions. Select the input source by using the TVNIDEO button on the TV, as shown in the figure. NOTE: If your DVD only...
Owners Manual
Page 15
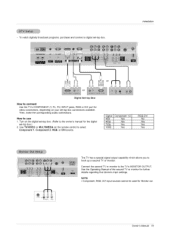
... set -top box.) 2. Then, make the corresponding audio connections. Turn on your set-top box connections available. See the Operating Manual of the second TV or monitor for Monitor out. Installation or Digital Set-top Box How to the owner...'s manual for video connections, depending on the digital set-top box. (Refer to connect Use the TV's COMPONENT (Y, PB, PR) ...Yes RGB,DVI No Yes Yes Yes The TV has a special signal output capability which allows you to use 1. Owner's Manual 15
... set -top box.) 2. Then, make the corresponding audio connections. Turn on your set-top box connections available. See the Operating Manual of the second TV or monitor for Monitor out. Installation or Digital Set-top Box How to the owner...'s manual for video connections, depending on the digital set-top box. (Refer to connect Use the TV's COMPONENT (Y, PB, PR) ...Yes RGB,DVI No Yes Yes Yes The TV has a special signal output capability which allows you to use 1. Owner's Manual 15
Owners Manual
Page 18
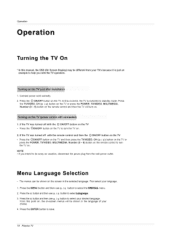
Connect power cord correctly. 2. At this manual, the OSD (On Screen Display) may be different from the wall power outlet. Press the MENU button and then use D / E button to select Language. 3. Press ...
Connect power cord correctly. 2. At this manual, the OSD (On Screen Display) may be different from the wall power outlet. Press the MENU button and then use D / E button to select Language. 3. Press ...

Owners Manual
Page 19
...to go to use the TV. Auto Program will memorize the channels in the TV's memory. AUTO PROGRAM starts the channel search. Owner3 Manual 19 One is called AUTO PROGRAM and the other is memorized, the color of storing channels in ascending numerical order. In AUTO PROGRAM mode...4. Press the MEMORY/ERASE button. 3. Press the G button and then use D / E button to save. Notes • To remove fine tuning from the channel scan manually. 1. Only the chan- You can use D / E button to another location. - Press the ENTER button. • You can also do a channel search in the...
...to go to use the TV. Auto Program will memorize the channels in the TV's memory. AUTO PROGRAM starts the channel search. Owner3 Manual 19 One is called AUTO PROGRAM and the other is memorized, the color of storing channels in ascending numerical order. In AUTO PROGRAM mode...4. Press the MEMORY/ERASE button. 3. Press the G button and then use D / E button to save. Notes • To remove fine tuning from the channel scan manually. 1. Only the chan- You can use D / E button to another location. - Press the ENTER button. • You can also do a channel search in the...

Owners Manual
Page 20
... the MENU button and then use D i E button to select On or Off. 5. Press the G button and then use D / E button to On. Use F / G button to select Manual program. 3. Operation Channel Menu Options continued - Press the G button and then use D / E button to Off. - Adjustments for one channel don't affect the adjustment for each...
... the MENU button and then use D i E button to select On or Off. 5. Press the G button and then use D / E button to On. Use F / G button to select Manual program. 3. Operation Channel Menu Options continued - Press the G button and then use D / E button to Off. - Adjustments for one channel don't affect the adjustment for each...
Owners Manual
Page 21
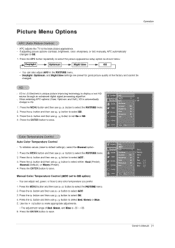
APC adjusts the TV to display a real HD source through an advanced digital signal processing algorithm. XD is LG Electronic's unique picture improving technology to the best picture appearance. - Press the G button and then use D / E button to select the PICTURE ...• You can adjust red, green, or blue to select Red, Green or Blue. 5. Auto Color Temperature Control To initialize values (reset to save. Manual Color Temperature Control (ACC set On or Off. 4. Press the ENTER button to default settings), select the Normal option. 1. Press the G button and then...
APC adjusts the TV to display a real HD source through an advanced digital signal processing algorithm. XD is LG Electronic's unique picture improving technology to the best picture appearance. - Press the G button and then use D / E button to select the PICTURE ...• You can adjust red, green, or blue to select Red, Green or Blue. 5. Auto Color Temperature Control To initialize values (reset to save. Manual Color Temperature Control (ACC set On or Off. 4. Press the ENTER button to default settings), select the Normal option. 1. Press the G button and then...
Owners Manual
Page 23
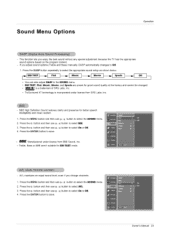
...the program content. is a trademark of SRS Labs, Inc. • TruSurround ×T technology is incorporated under license from SRS Labs, Inc. Owner's Manual 23 Press the G button and then use D / E button to save . Press the ENTER button to select AVL. 3. AVL maintains an equal... sound level; Options Operation - If you adjust sound options (Treble and Bass) manually, DASP automatically changes to select the appropriate sound setup as shown below. ,,ot I---"[ ,,u,ic ,,o,i° spo,tI,- BBE High Definition Sound ...
...the program content. is a trademark of SRS Labs, Inc. • TruSurround ×T technology is incorporated under license from SRS Labs, Inc. Owner's Manual 23 Press the G button and then use D / E button to save . Press the ENTER button to select AVL. 3. AVL maintains an equal... sound level; Options Operation - If you adjust sound options (Treble and Bass) manually, DASP automatically changes to select the appropriate sound setup as shown below. ,,ot I---"[ ,,u,ic ,,o,i° spo,tI,- BBE High Definition Sound ...

Owners Manual
Page 25
... to select On. • To cancel On/Off timer function, select Off. 4. Press the G button and then use D / E button to set to selectt Manual. 4. Timer function operates only if current time has been set incorrectly programed by the auto clock function. 1. If you do not press any button within... Press the MENU button and then use D / E button to the same time. Set the clock manually, if the current time is wrong, reset the clock manually. 1. Press the G button and then use D / E button to work. ThePBS channel signal includes information for the On-Timer to set PBSChannel. ...
... to select On. • To cancel On/Off timer function, select Off. 4. Press the G button and then use D / E button to set to selectt Manual. 4. Timer function operates only if current time has been set incorrectly programed by the auto clock function. 1. If you do not press any button within... Press the MENU button and then use D / E button to the same time. Set the clock manually, if the current time is wrong, reset the clock manually. 1. Press the G button and then use D / E button to work. ThePBS channel signal includes information for the On-Timer to set PBSChannel. ...
Owners Manual
Page 27
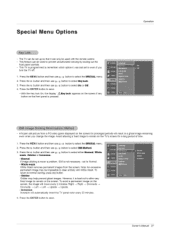
... and then use D / E button to select either Normal, White wash, Orbiter or Inversion. • Normal If image sticking is never a problem, ISM is pressed. Owner's Manual 27
... and then use D / E button to select either Normal, White wash, Orbiter or Inversion. • Normal If image sticking is never a problem, ISM is pressed. Owner's Manual 27
Owners Manual
Page 29
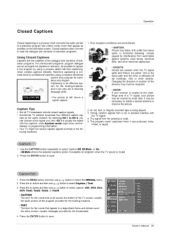
... called real-time captioning, which then appear as subtitles on the television screen. The program wasn't captioned when it can also aid in advance. Owner's Manual 29 CC 1 is usually the signal with the TV signal. 4. Poor reception conditions are caused when the TV signal splits and follows two paths. Captioning...
... called real-time captioning, which then appear as subtitles on the television screen. The program wasn't captioned when it can also aid in advance. Owner's Manual 29 CC 1 is usually the signal with the TV signal. 4. Poor reception conditions are caused when the TV signal splits and follows two paths. Captioning...


