Owner's Manual (English)
Page 2
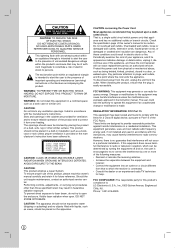
...DO NOT EXPOSE THIS PRODUCT TO RAIN OR MOISTURE. That is : LG Electronics U.S.A., Inc.,1000 Sylvan Avenue, Englewood Cliffs, NJ. Overloaded wall outlets, loose or damaged wall outlets, extension cords, frayed power cords, or damaged or cracked wire insulation are provided for future reference...expressly approved in a particular installation. FCC COMPLIANCE: The responsible party for help. Phone: 1-201-816-2000. 2 Protect the power cord from that to which the receiver is encouraged to try to radio communications. Visible laser radiation when open the enclosure. Do ...
...DO NOT EXPOSE THIS PRODUCT TO RAIN OR MOISTURE. That is : LG Electronics U.S.A., Inc.,1000 Sylvan Avenue, Englewood Cliffs, NJ. Overloaded wall outlets, loose or damaged wall outlets, extension cords, frayed power cords, or damaged or cracked wire insulation are provided for future reference...expressly approved in a particular installation. FCC COMPLIANCE: The responsible party for help. Phone: 1-201-816-2000. 2 Protect the power cord from that to which the receiver is encouraged to try to radio communications. Visible laser radiation when open the enclosure. Do ...
Owner's Manual (English)
Page 3
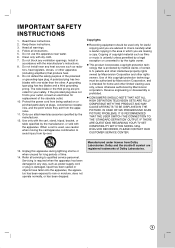
... intellectual property rights owned by the rights owner. IF THERE ARE QUESTIONS REGARDING YOUR TV SET COMPATIBILITY WITH THIS MODEL 525p DVD+VCR RECORDER, PLEASE CONTACT OUR CUSTOMER SERVICE CENTER. 13. Refer all servicing to check carefully what is damaged, liquid has been spilled..., does not operate normally, or has been dropped. Read these instructions. 3. tors, heat registers, stoves, or other . Protect the power cord from being walked on or pinched particularly at plugs, convenience receptacles, and the point where they exit from Dolby Laboratories. Copyrights Recording ...
... intellectual property rights owned by the rights owner. IF THERE ARE QUESTIONS REGARDING YOUR TV SET COMPATIBILITY WITH THIS MODEL 525p DVD+VCR RECORDER, PLEASE CONTACT OUR CUSTOMER SERVICE CENTER. 13. Refer all servicing to check carefully what is damaged, liquid has been spilled..., does not operate normally, or has been dropped. Read these instructions. 3. tors, heat registers, stoves, or other . Protect the power cord from being walked on or pinched particularly at plugs, convenience receptacles, and the point where they exit from Dolby Laboratories. Copyrights Recording ...
Owner's Manual (English)
Page 13
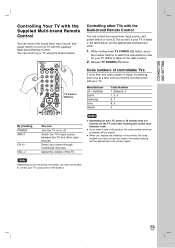
... manufacturer code. 1. While holding down through memorized channels. You can control the sound level, input source, and power switch of non-LG TVs as well. Set the appropriate code number again. TV INPUT TV Control Buttons Controlling other input sources. Release TV... on your TV (Refer to the default setting. When you replace the batteries of the TV. Manufacturer LG / GoldStar Zenith Samsung Sony Hitachi Code Number 1 (Default), 2 1, 3, 4 6, 7 8, 9 4 By pressing POWER INPUT CH +/- Switch the TV's input source between the TV and other TVs with the supplied Multi-...
... manufacturer code. 1. While holding down through memorized channels. You can control the sound level, input source, and power switch of non-LG TVs as well. Set the appropriate code number again. TV INPUT TV Control Buttons Controlling other input sources. Release TV... on your TV (Refer to the default setting. When you replace the batteries of the TV. Manufacturer LG / GoldStar Zenith Samsung Sony Hitachi Code Number 1 (Default), 2 1, 3, 4 6, 7 8, 9 4 By pressing POWER INPUT CH +/- Switch the TV's input source between the TV and other TVs with the supplied Multi-...
Owner's Manual (English)
Page 16
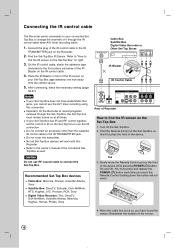
... Box Digital Video Recorder or Other Set-Top Boxes VIDEO AUDIO OUT OUT IR Blaster Front IR Control Cable Rear of the device while pressing POWER (1) button On and Off. Yes 3. Remember the location of the connected SetTop Box as well. Notes If your Set-Top Box does not have found... the Remote Control of the Set-Top Box so that it through the Set-Top Box, the Set-Top box must press and release the POWER (1) button each time you cannot use this IR connection Do not connect an accessory other than the supplied IR control cable to the flat surface...
... Box Digital Video Recorder or Other Set-Top Boxes VIDEO AUDIO OUT OUT IR Blaster Front IR Control Cable Rear of the device while pressing POWER (1) button On and Off. Yes 3. Remember the location of the connected SetTop Box as well. Notes If your Set-Top Box does not have found... the Remote Control of the Set-Top Box so that it through the Set-Top Box, the Set-Top box must press and release the POWER (1) button each time you cannot use this IR connection Do not connect an accessory other than the supplied IR control cable to the flat surface...
Owner's Manual (English)
Page 17
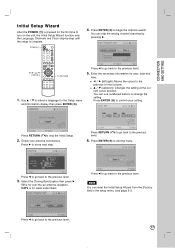
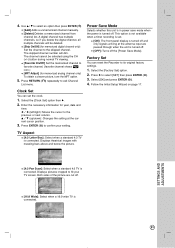
... then press ENTER ( ). Press b to go back to skip the Initial Setup. 2. CONNECTION AND SETTING Initial Setup Wizard After the POWER (1) is pressed for the first time to the previous level. 3. POWER 1 4. Press ENTER ( ) to select a language for over-the-air antenna reception. You can reset the Initial Setup Wizard from the...
... then press ENTER ( ). Press b to go back to skip the Initial Setup. 2. CONNECTION AND SETTING Initial Setup Wizard After the POWER (1) is pressed for the first time to the previous level. 3. POWER 1 4. Press ENTER ( ) to select a language for over-the-air antenna reception. You can reset the Initial Setup Wizard from the...
Owner's Manual (English)
Page 21
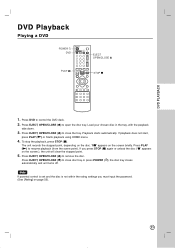
..., press STOP (x). Press EJECT, OPEN/CLOSE (Z) to control the DVD deck. 2. Press EJECT, OPEN/CLOSE (Z) to close disc tray or press POWER (1), the disc tray closes automatically and unit turns off. Note If parental control is set and the disc is not within the rating settings you... press STOP (x) again or unload the disc ("x" appears on the screen briefly. DVD PLAYBACK DVD Playback Playing a DVD POWER 1 DVD PLAY EJECT OPEN/CLOSE Z STOP * 1. The unit records the stopped point, depending on page 53). 21 If you must input the password...
..., press STOP (x). Press EJECT, OPEN/CLOSE (Z) to control the DVD deck. 2. Press EJECT, OPEN/CLOSE (Z) to close disc tray or press POWER (1), the disc tray closes automatically and unit turns off. Note If parental control is set and the disc is not within the rating settings you... press STOP (x) again or unload the disc ("x" appears on the screen briefly. DVD PLAYBACK DVD Playback Playing a DVD POWER 1 DVD PLAY EJECT OPEN/CLOSE Z STOP * 1. The unit records the stopped point, depending on page 53). 21 If you must input the password...
Owner's Manual (English)
Page 30
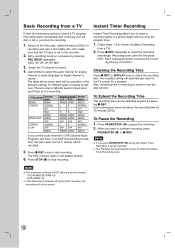
...Each subsequent press increases the recording time by 10 minutes. When you to record a TV program. DVD+R/RW: 49 If the Recorder is powered off when the Instant Timer Recording ends. Set a recording mode as shown left (Basic Recording from a TV Instant Timer Recording Follow the instructions... of a preset length without using the program timer. 1. Instant Timer Recording allows you want to start recording. The Recorder will automatically power off during the Instant Timer Recording, it is no SAP channel being broadcast, the main audio (mono or stereo) will be extended ...
...Each subsequent press increases the recording time by 10 minutes. When you to record a TV program. DVD+R/RW: 49 If the Recorder is powered off when the Instant Timer Recording ends. Set a recording mode as shown left (Basic Recording from a TV Instant Timer Recording Follow the instructions... of a preset length without using the program timer. 1. Instant Timer Recording allows you want to start recording. The Recorder will automatically power off during the Instant Timer Recording, it is no SAP channel being broadcast, the main audio (mono or stereo) will be extended ...
Owner's Manual (English)
Page 31
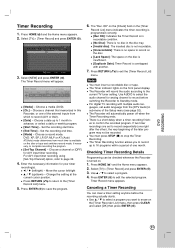
... program. The Recorder will appear. [Media] - The Timer Recording function allows you want to record (AV1 or AV2). [Date] - The Timer Record menu will automatically power off when the Timer Recording ends. For digital TV recording with another. 7. Select [TV] > [Timer Record] and press ENTER ( ). 3. Press ENTER ( ) to confirm the recorded...
... program. The Recorder will appear. [Media] - The Timer Recording function allows you want to record (AV1 or AV2). [Date] - The Timer Record menu will automatically power off when the Timer Recording ends. For digital TV recording with another. 7. Select [TV] > [Timer Record] and press ENTER ( ). 3. Press ENTER ( ) to confirm the recorded...
Owner's Manual (English)
Page 32
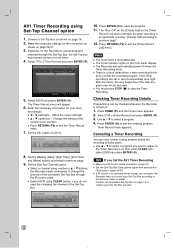
... your Set-Top Box provider. 32 Important, for your Set-Top Box according to the device's maker or status. The Timer Record menu will automatically power off when the Timer Recording ends. Select [NEW] and press ENTER ( ). Checking Timer Recording Details Programming can clear a timer setting anytime before the recording actually...
... your Set-Top Box provider. 32 Important, for your Set-Top Box according to the device's maker or status. The Timer Record menu will automatically power off when the Timer Recording ends. Select [NEW] and press ENTER ( ). Checking Timer Recording Details Programming can clear a timer setting anytime before the recording actually...
Owner's Manual (English)
Page 42
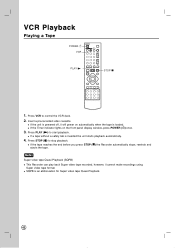
... tape Quasi Playback. 42 SQPB is inserted the unit starts playback automatically. 4. VCR Playback Playing a Tape POWER 1 VCR PLAY STOP * 1. If the Timer indicator lights on automatically when the tape is powered off, it cannot make recordings using Super video tape format. Insert a pre-recorded...video tape Quasi Playback (SQPB) This Recorder can play back Super video tape recorded, however, it will power on the front panel display window, press POWER (1) once. 3. Press VCR to start playback. Press STOP (x) to stop playback. If the tape reaches the end before you press ...
... tape Quasi Playback. 42 SQPB is inserted the unit starts playback automatically. 4. VCR Playback Playing a Tape POWER 1 VCR PLAY STOP * 1. If the Timer indicator lights on automatically when the tape is powered off, it cannot make recordings using Super video tape format. Insert a pre-recorded...video tape Quasi Playback (SQPB) This Recorder can play back Super video tape recorded, however, it will power on the front panel display window, press POWER (1) once. 3. Press VCR to start playback. Press STOP (x) to stop playback. If the tape reaches the end before you press ...

Owner's Manual (English)
Page 44
...to be extended anytime by 30 minutes (maximum 540 minutes). VCR: Each subsequent press increases the record- Please confirm the VIDEO tape has enough remaining time to stop the recording. 1. The recalled setting will automatically power off when the Instant Timer Recording ends. 44 When you ... REC once to pause the recording. 2. Instant Timer Recording Instant Timer Recording allows you 'll hear as necessary by 30 minutes (VCR). Each subsequent press increases the recording time by pressing REC MODE repeatedly. Switch on the different settings for digital channel to record a ...
...to be extended anytime by 30 minutes (maximum 540 minutes). VCR: Each subsequent press increases the record- Please confirm the VIDEO tape has enough remaining time to stop the recording. 1. The recalled setting will automatically power off when the Instant Timer Recording ends. 44 When you ... REC once to pause the recording. 2. Instant Timer Recording Instant Timer Recording allows you 'll hear as necessary by 30 minutes (VCR). Each subsequent press increases the recording time by pressing REC MODE repeatedly. Switch on the different settings for digital channel to record a ...

Owner's Manual (English)
Page 45
...the timer recording is programmed correctly. [Rec OK]: Indicates the Timer Record is in recordable condition. [No Tape]: There is no tape in the VCR deck. [Invalid tape]: The inserted tape is not recordable. [Duplicate Date]: Timer Record is a short delay when a timer recording finishes to ...tape and switches record mode, if necessary, to stop the Timer Recording. For digital TV recording with another. 7. The Recorder will automatically power off when the Timer Recording ends. If two timer recordings are set audio language from which to edit the selected program. You must ...
...the timer recording is programmed correctly. [Rec OK]: Indicates the Timer Record is in recordable condition. [No Tape]: There is no tape in the VCR deck. [Invalid tape]: The inserted tape is not recordable. [Duplicate Date]: Timer Record is a short delay when a timer recording finishes to ...tape and switches record mode, if necessary, to stop the Timer Recording. For digital TV recording with another. 7. The Recorder will automatically power off when the Timer Recording ends. If two timer recordings are set audio language from which to edit the selected program. You must ...

Owner's Manual (English)
Page 46
...(s). Notes You must press STOP (x) to stop the Timer Recording. The Recorder will appear. 6. You must insert a recordable tape. The Timer Record menu will automatically power off when the Timer Recording ends. Move the cursor left /right) - Set the [Media], [Date], [Start Time], [End Time], and [Mode] options according to [AV1...
...(s). Notes You must press STOP (x) to stop the Timer Recording. The Recorder will appear. 6. You must insert a recordable tape. The Timer Record menu will automatically power off when the Timer Recording ends. Move the cursor left /right) - Set the [Media], [Date], [Start Time], [End Time], and [Mode] options according to [AV1...
Owner's Manual (English)
Page 49
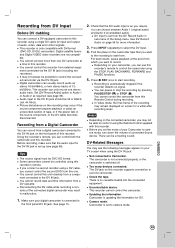
.... Press INPUT repeatedly to start from. Press z REC once to select the DV input. 4. In Video mode, the final frame of tape, or if the power fails in malfunction. 1. DV-Related Messages You may occur if the source component pauses playback or plays an unrecorded section of the recording may not...
.... Press INPUT repeatedly to start from. Press z REC once to select the DV input. 4. In Video mode, the final frame of tape, or if the power fails in malfunction. 1. DV-Related Messages You may occur if the source component pauses playback or plays an unrecorded section of the recording may not...
Owner's Manual (English)
Page 51
...the CH (+/-) button during normal TV viewing. [Favorite On/Off] Set the memorized channel to fill your setting. Power Save Mode Selects whether this unit is in power save mode when the power is turned off . [16:9 Wide]: Select when a 16:9 wide TV is connected. Select the [Factory Set...Pan Scan]: Select when a standard 4:3 TV is connected. Both sides of the picture are passed through when the unit is turned off the [Power Save Mode]. 4. A digital channel has multiple channels, so if you delete the digital channel, all multiple channels will dim. Follow the Initial Setup...
...the CH (+/-) button during normal TV viewing. [Favorite On/Off] Set the memorized channel to fill your setting. Power Save Mode Selects whether this unit is in power save mode when the power is turned off . [16:9 Wide]: Select when a 16:9 wide TV is connected. Select the [Factory Set...Pan Scan]: Select when a standard 4:3 TV is connected. Both sides of the picture are passed through when the unit is turned off the [Power Save Mode]. 4. A digital channel has multiple channels, so if you delete the digital channel, all multiple channels will dim. Follow the Initial Setup...
Owner's Manual (English)
Page 59
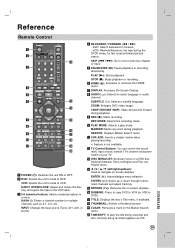
...Marker Search menu. ENTER ( ): Acknowledges menu selection. p DUBBING: Press to copy DVD to VCR (or VCR to DVD. c 0-9 numerical buttons: Selects numbered options in the VCR deck. f HOME ( ): Accesses or removes the HOME menu. MARKER: Marks any point .... r THUMBNAIL: Selects a thumbnail picture. t TIMESHIFT: To play mode. Reference Remote Control a b l c d e f m n g o h p i q j r * k s t a POWER (1): Switches the unit ON or OFF. EJECT, OPEN/CLOSE: Opens and closes the disc tray, and ejects the tape in a menu. PLAY (N): Starts playback. g DISPLAY...
...Marker Search menu. ENTER ( ): Acknowledges menu selection. p DUBBING: Press to copy DVD to VCR (or VCR to DVD. c 0-9 numerical buttons: Selects numbered options in the VCR deck. f HOME ( ): Accesses or removes the HOME menu. MARKER: Marks any point .... r THUMBNAIL: Selects a thumbnail picture. t TIMESHIFT: To play mode. Reference Remote Control a b l c d e f m n g o h p i q j r * k s t a POWER (1): Switches the unit ON or OFF. EJECT, OPEN/CLOSE: Opens and closes the disc tray, and ejects the tape in a menu. PLAY (N): Starts playback. g DISPLAY...

Owner's Manual (English)
Page 60
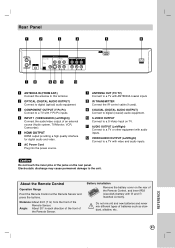
.... Front Panel a b c d e fg h i / I CH CH jkl m n DV IN 2 op q a 1 / I (POWER) Switches the Recorder ON and OFF. REC The Recorder is selected. p RES. h AV IN 2 (VIDEO /AUDIO (Left/Right)) Connect the audio/video output of an external source (Audio system, TV/ Monitor, VCR, Camcorder, etc.). k x (STOP) Stops playback l z (REC) Starts recording. Sets the...
.... Front Panel a b c d e fg h i / I CH CH jkl m n DV IN 2 op q a 1 / I (POWER) Switches the Recorder ON and OFF. REC The Recorder is selected. p RES. h AV IN 2 (VIDEO /AUDIO (Left/Right)) Connect the audio/video output of an external source (Audio system, TV/ Monitor, VCR, Camcorder, etc.). k x (STOP) Stops playback l z (REC) Starts recording. Sets the...
Owner's Manual (English)
Page 61
... (DIGITAL AUDIO OUTPUT) Connect to the unit. Battery installation Remove the battery cover on the rear of an external source (Audio system, TV/Monitor, VCR, Camcorder). d INPUT 1 (VIDEO/AUDIO (Left/Right)) Connect the audio/video output of the Remote Control, and insert R03 (size AAA) battery with... 3 and # matched correctly. f AC Power Cord Plug into the power source. j S-VIDEO OUTPUT Connect to a S-Video Input on the rear panel. k AUDIO OUTPUT (Left/Right) Connect to a TV with ...
... (DIGITAL AUDIO OUTPUT) Connect to the unit. Battery installation Remove the battery cover on the rear of an external source (Audio system, TV/Monitor, VCR, Camcorder). d INPUT 1 (VIDEO/AUDIO (Left/Right)) Connect the audio/video output of the Remote Control, and insert R03 (size AAA) battery with... 3 and # matched correctly. f AC Power Cord Plug into the power source. j S-VIDEO OUTPUT Connect to a S-Video Input on the rear panel. k AUDIO OUTPUT (Left/Right) Connect to a TV with ...
Owner's Manual (English)
Page 65
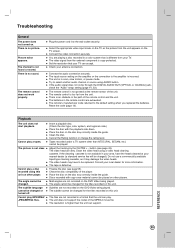
The remote control does not work properly. b Plug the power cord into the wall outlet securely. b The video signal from the external component is in a format that your antenna connection. b Check your TV can accept. b ... pointed at your TV. b Place the disc on this unit. b Multi-angles are not recorded on the TV screen. JPEG/MPEG4 files. Troubleshooting General The power does not turned on the DVD Video being played. b Connect the audio connection securely. b Clean the disc. If the cleaning cassette is no sound. b The...
The remote control does not work properly. b Plug the power cord into the wall outlet securely. b The video signal from the external component is in a format that your antenna connection. b Check your TV can accept. b ... pointed at your TV. b Place the disc on this unit. b Multi-angles are not recorded on the TV screen. JPEG/MPEG4 files. Troubleshooting General The power does not turned on the DVD Video being played. b Connect the audio connection securely. b Clean the disc. If the cleaning cassette is no sound. b The...
Owner's Manual (English)
Page 66
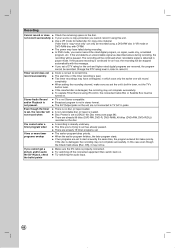
...-protected, you set to TV A/V In jacks. not record successfully. b The time you cannot record the rated digital program, no disc (or tape) loaded. b The power may have failed during recording, the recording will be . If the unit detects an unrecordable signal as described above during recording. b Disc Protect is continued...
...-protected, you set to TV A/V In jacks. not record successfully. b The time you cannot record the rated digital program, no disc (or tape) loaded. b The power may have failed during recording, the recording will be . If the unit detects an unrecordable signal as described above during recording. b Disc Protect is continued...
