
Quick Start Guide - English
Page 9
TIP: QuickMemo Press and hold the Volume Down Key to switch to access QuickMemo (See on page 17). 2 Power/Lock Key 1 5 6 2 3 7 4 1 Back Cover 2 Fingertip Cutout 3 Battery 4 External Speaker 5 Back Camera Lens 6 Flash 7 MicroSD Card Slot 7 Side/Rear view 1 2 1 Volume Keys Press and hold the Volume Up and Volume Down Keys for one second to silent mode.
TIP: QuickMemo Press and hold the Volume Down Key to switch to access QuickMemo (See on page 17). 2 Power/Lock Key 1 5 6 2 3 7 4 1 Back Cover 2 Fingertip Cutout 3 Battery 4 External Speaker 5 Back Camera Lens 6 Flash 7 MicroSD Card Slot 7 Side/Rear view 1 2 1 Volume Keys Press and hold the Volume Up and Volume Down Keys for one second to silent mode.
Quick Start Guide - English
Page 10
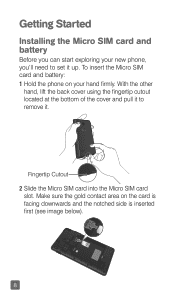
To insert the Micro SIM card and battery: 1 Hold the phone on the card is facing downwards and the notched side is inserted first (see image below). 8 Getting Started Installing the Micro SIM card and battery Before you can start exploring your hand firmly. Fingertip Cutout 2 Slide the Micro SIM card into the Micro SIM card slot. With the other hand, lift the back cover using the fingertip cutout located at the bottom of the cover and pull it to set it . Make sure the gold contact area on your new phone, you'll need to remove it up.
To insert the Micro SIM card and battery: 1 Hold the phone on the card is facing downwards and the notched side is inserted first (see image below). 8 Getting Started Installing the Micro SIM card and battery Before you can start exploring your hand firmly. Fingertip Cutout 2 Slide the Micro SIM card into the Micro SIM card slot. With the other hand, lift the back cover using the fingertip cutout located at the bottom of the cover and pull it to set it . Make sure the gold contact area on your new phone, you'll need to remove it up.

Quick Start Guide - English
Page 11
3 Insert the battery into place by aligning the gold contacts on the phone and the battery and press the battery down until it clicks into place . 4 Align the back cover over the battery compartment and press it down until it clicks into place . 9
3 Insert the battery into place by aligning the gold contacts on the phone and the battery and press the battery down until it clicks into place . 4 Align the back cover over the battery compartment and press it down until it clicks into place . 9

Quick Start Guide - English
Page 14
NOTE This device supports up to use the camera and other multimedia features. Fingertip Cutout 12 Internal Antenna Inserting a microSD card Insert a microSD™ card to a 32GB microSD card. 1 Remove the back cover as previously described. Multimedia contents can be saved in the microSD card.
NOTE This device supports up to use the camera and other multimedia features. Fingertip Cutout 12 Internal Antenna Inserting a microSD card Insert a microSD™ card to a 32GB microSD card. 1 Remove the back cover as previously described. Multimedia contents can be saved in the microSD card.
Quick Start Guide - English
Page 15
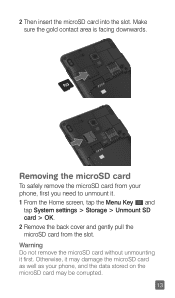
Warning Do not remove the microSD card without unmounting it . 1 From the Home screen, tap the Menu Key and tap System settings > Storage > Unmount SD card > OK. 2 Remove the back cover and gently pull the microSD card from your phone, and the data stored on the microSD card may damage the microSD card as well as your phone, first you need to unmount it first. Removing the microSD card To safely remove the microSD card from the slot. 2 Then insert the microSD card into the slot. Otherwise, it may be corrupted. 13 Make sure the gold contact area is facing downwards.
Warning Do not remove the microSD card without unmounting it . 1 From the Home screen, tap the Menu Key and tap System settings > Storage > Unmount SD card > OK. 2 Remove the back cover and gently pull the microSD card from your phone, and the data stored on the microSD card may damage the microSD card as well as your phone, first you need to unmount it first. Removing the microSD card To safely remove the microSD card from the slot. 2 Then insert the microSD card into the slot. Otherwise, it may be corrupted. 13 Make sure the gold contact area is facing downwards.


