

Owners Manual
Page 2
... in any way without written authorization from LG Electronics. NO USER SERVICEABLE PARTS INSIDE. The lightning flash with the instructions, may be determined by the party responsible for this equipment does cause harmful interference to radio or television reception, which can radiate radio frequency energy and, if not installed and used in a particular installation. CAUTION: Do not attempt to persons. REFER...
... in any way without written authorization from LG Electronics. NO USER SERVICEABLE PARTS INSIDE. The lightning flash with the instructions, may be determined by the party responsible for this equipment does cause harmful interference to radio or television reception, which can radiate radio frequency energy and, if not installed and used in a particular installation. CAUTION: Do not attempt to persons. REFER...
Owners Manual
Page 5
... Controls 7 Connection Options 8 Remote Control Key Functions 9 Installation Installation Instructions 10~11 External Equipment Connections 12~16 VCR Setup 12 Cable TV Setup 12 External A/V Source Setup 13 DVD Setup 13 DTV Setup 14 PC Setup 15~16 Operation Turning on the Monitor 17 Menu Language Selection 17 Picture Menu Options APC (Auto Picture Control 18 XD 18 Color Temperature Control 18 Fleshtone 19 sRGB 19 Manual Picture Control(Off option 19 Sound Menu Options DASP (Digital Auto Sound Processing 20 BBE 20 AVL (Auto Volume Leveler 20 Manual Sound Control (DASP set...
... Controls 7 Connection Options 8 Remote Control Key Functions 9 Installation Installation Instructions 10~11 External Equipment Connections 12~16 VCR Setup 12 Cable TV Setup 12 External A/V Source Setup 13 DVD Setup 13 DTV Setup 14 PC Setup 15~16 Operation Turning on the Monitor 17 Menu Language Selection 17 Picture Menu Options APC (Auto Picture Control 18 XD 18 Color Temperature Control 18 Fleshtone 19 sRGB 19 Manual Picture Control(Off option 19 Sound Menu Options DASP (Digital Auto Sound Processing 20 BBE 20 AVL (Auto Volume Leveler 20 Manual Sound Control (DASP set...

Owners Manual
Page 8
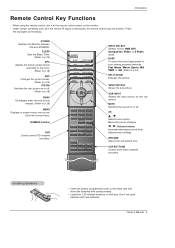
...) INPUT SOCKETS Connect audio/video output from a PC to these jacks. 6. Back Connection Panel REMOTE RS-232C INPUT CONTROL (CONTROL/SERVICE) DVI INPUT AUDIO INPUT RGB INPUT RGB OUTPUT 1 2 3 4 Y PB PR COMPONENT INPUT R L AUDIO INPUT S-VIDEO 5 6 R L (MONO) AUDIO INPUT VIDEO INPUT 7 ( )R( ) ( )L( ) EXTERNAL SPEAKER AC INPUT 8 9 1. POWER CORD SOCKET This Monitor operates on another monitor, connect RGB OUTPUT to another monitor's PC input port. 5. Connection panels shown may be somewhat different from an S-VIDEO device to the RS-232C port on the Specifications...
...) INPUT SOCKETS Connect audio/video output from a PC to these jacks. 6. Back Connection Panel REMOTE RS-232C INPUT CONTROL (CONTROL/SERVICE) DVI INPUT AUDIO INPUT RGB INPUT RGB OUTPUT 1 2 3 4 Y PB PR COMPONENT INPUT R L AUDIO INPUT S-VIDEO 5 6 R L (MONO) AUDIO INPUT VIDEO INPUT 7 ( )R( ) ( )L( ) EXTERNAL SPEAKER AC INPUT 8 9 1. POWER CORD SOCKET This Monitor operates on another monitor, connect RGB OUTPUT to another monitor's PC input port. 5. Connection panels shown may be somewhat different from an S-VIDEO device to the RS-232C port on the Specifications...
Owners Manual
Page 9
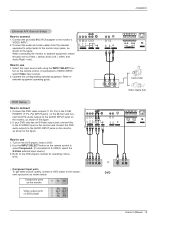
... again as if the remote IR signal is interrupted, the remote control may not function. POWER SLEEP APC ARC PIP/DW SWAP MENU INPUT SELECT DASP SPLIT ZOOM WIN.POSITION SUB INPUT MUTE VOL OK VOL 1 2 3 4 5 6 7 8 9 0 WIN.SIZE POWER STOP PAUSE REW PLAY SKIP DVD FF OPEN/CLOSE POWER STOP VCR P/STILL REC REW PLAY FF INPUT SELECT Selects source: RGB, DVI, Component, Video, or S-Video mode. DASP To select the sound appropriate to your viewing program character: Flat, Music, Movie, Sports...
... again as if the remote IR signal is interrupted, the remote control may not function. POWER SLEEP APC ARC PIP/DW SWAP MENU INPUT SELECT DASP SPLIT ZOOM WIN.POSITION SUB INPUT MUTE VOL OK VOL 1 2 3 4 5 6 7 8 9 0 WIN.SIZE POWER STOP PAUSE REW PLAY SKIP DVD FF OPEN/CLOSE POWER STOP VCR P/STILL REC REW PLAY FF INPUT SELECT Selects source: RGB, DVI, Component, Video, or S-Video mode. DASP To select the sound appropriate to your viewing program character: Flat, Music, Movie, Sports...

Owners Manual
Page 12
... regarding cable TV service, contact your desired channel with using the INPUT SELECT button on the screen. If you connect an S-VIDEO output from a local provider and installing a converter, you can watch cable TV programming. Insert a video tape into the VCR and press PLAY on the remote control. (If connected to VIDEO INPUT, select Video input source) RGB OUTPUT Y PB PR COMPONENT INPUT R L AUDIO INPUT S-VIDEO S-VIDEO OUT (R) AUDIO (L) IN VIDEO R L (MONO) AUDIO INPUT VIDEO INPUT VCR ( )R( ) ( )L( ) EXTERNAL SPEAKER AC INPUT Cable TV Setup - To avoid picture noise...
... regarding cable TV service, contact your desired channel with using the INPUT SELECT button on the screen. If you connect an S-VIDEO output from a local provider and installing a converter, you can watch cable TV programming. Insert a video tape into the VCR and press PLAY on the remote control. (If connected to VIDEO INPUT, select Video input source) RGB OUTPUT Y PB PR COMPONENT INPUT R L AUDIO INPUT S-VIDEO S-VIDEO OUT (R) AUDIO (L) IN VIDEO R L (MONO) AUDIO INPUT VIDEO INPUT VCR ( )R( ) ( )L( ) EXTERNAL SPEAKER AC INPUT Cable TV Setup - To avoid picture noise...
Owners Manual
Page 13
...= red). Y PB PR COMPONENT INPUT R L AUDIO INPUT S-VIDEO R L (MONO) AUDIO INPUT VIDEO INPUT R AUDIO L VIDEO ( )R( ) ( )L( ) EXTERNAL SPEAKER AC INPUT Camcorder Video Game Set DVD Setup How to use 1. Y PB PR COMPONENT INPUT R L AUDIO INPUT S-VIDEO R L (MONO) AUDIO INPUT VIDEO INPUT ( )R( ) ( )L( ) EXTERNAL SPEAKER AC INPUT How to connect 1. Refer to the DVD player's manual for operating instructions. • Component Input ports To get better picture quality, connect a DVD player to the AUDIO INPUT jacks on the monitor and connect the DVD audio outputs to...
...= red). Y PB PR COMPONENT INPUT R L AUDIO INPUT S-VIDEO R L (MONO) AUDIO INPUT VIDEO INPUT R AUDIO L VIDEO ( )R( ) ( )L( ) EXTERNAL SPEAKER AC INPUT Camcorder Video Game Set DVD Setup How to use 1. Y PB PR COMPONENT INPUT R L AUDIO INPUT S-VIDEO R L (MONO) AUDIO INPUT VIDEO INPUT ( )R( ) ( )L( ) EXTERNAL SPEAKER AC INPUT How to connect 1. Refer to the DVD player's manual for operating instructions. • Component Input ports To get better picture quality, connect a DVD player to the AUDIO INPUT jacks on the monitor and connect the DVD audio outputs to...

Owners Manual
Page 14
...DTV OUTPUT (R) AUDIO (L) (R) AUDIO (L) RGB-DTV OUTPUT B R (R) AUDIO (L) Digital Set-top Box How to connect Use the monitor's COMPONENT (Y, PB, PR) INPUT, RGB or DVI jack for video connections, depending on the digital set-top box. (Refer to the owner's manual for the digital set-top box.) 2. Turn on your set -top box. To watch digitally broadcast programs, purchase and connect a digital set -top box connector. Use INPUT SELECT on the remote control to use 1. Installation DTV Setup - Signal 480i 480p 720p 1080i Component Yes Yes Yes Yes RGB,DVI No Yes Yes Yes 14 Plasma...
...DTV OUTPUT (R) AUDIO (L) (R) AUDIO (L) RGB-DTV OUTPUT B R (R) AUDIO (L) Digital Set-top Box How to connect Use the monitor's COMPONENT (Y, PB, PR) INPUT, RGB or DVI jack for video connections, depending on the digital set-top box. (Refer to the owner's manual for the digital set-top box.) 2. Turn on your set -top box. To watch digitally broadcast programs, purchase and connect a digital set -top box connector. Use INPUT SELECT on the remote control to use 1. Installation DTV Setup - Signal 480i 480p 720p 1080i Component Yes Yes Yes Yes RGB,DVI No Yes Yes Yes 14 Plasma...

Owners Manual
Page 15
... a DVI cable. • Avoid keeping a fixed image on the monitor's screen for video connections, depending on your monitor. The fixed image may be changed, change the refresh rate to another rate or adjust the brightness and contrast on the PC and the Monitor . 2. Owner's Manual 15 Then, make the corresponding audio connection. REMOTE CONTROL RS-232C INPUT (CONTROL/SERVICE) DVI INPUT AUDIO INPUT RGB INPUT RGB OUTPUT Installation How to connect 1. If using a sound card, adjust the PC sound as required. Use the Monitor's RGB INPUT or DVI (Digital Visual Interface) INPUT port...
... a DVI cable. • Avoid keeping a fixed image on the monitor's screen for video connections, depending on your monitor. The fixed image may be changed, change the refresh rate to another rate or adjust the brightness and contrast on the PC and the Monitor . 2. Owner's Manual 15 Then, make the corresponding audio connection. REMOTE CONTROL RS-232C INPUT (CONTROL/SERVICE) DVI INPUT AUDIO INPUT RGB INPUT RGB OUTPUT Installation How to connect 1. If using a sound card, adjust the PC sound as required. Use the Monitor's RGB INPUT or DVI (Digital Visual Interface) INPUT port...
Owners Manual
Page 17
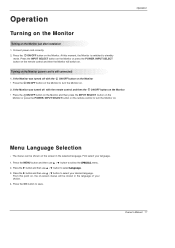
... POWER, INPUT SELECT button on the remote control and then the Monitor will be shown on the Monitor just after installation 1. Press the MENU button and then use D / E button to standby mode. Press the OK button to select your language. 1. Turning on . 2. First select your desired language. Owner's Manual 17 The menus can be shown in the selected language. Press the G button and then use D / E button to turn the Monitor on . Operation Menu Language Selection - Press the G button and then use D / E button...
... POWER, INPUT SELECT button on the remote control and then the Monitor will be shown on the Monitor just after installation 1. Press the MENU button and then use D / E button to standby mode. Press the OK button to select your language. 1. Turning on . 2. First select your desired language. Owner's Manual 17 The menus can be shown in the selected language. Press the G button and then use D / E button to turn the Monitor on . Operation Menu Language Selection - Press the G button and then use D / E button...
Owners Manual
Page 18
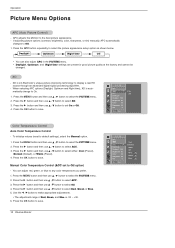
...the G button and then use D / E button to default settings), select the Normal option. 1. Operation Picture Menu Options APC (Auto Picture Control) - XD - Press the MENU button and then use D / E button to display a real HD source through an advanced digital signal processing algorithm. - Cool Normal Warm Off Red 0 Green 0 Blue 0 To initialize values (reset to select the PICTURE menu. 2. APC adjusts the Monitor to Off. 1. If adjusting picture options (contrast, brightness, color, sharpness, or tint) manually, APC automatically changes to the best picture appearance...
...the G button and then use D / E button to default settings), select the Normal option. 1. Operation Picture Menu Options APC (Auto Picture Control) - XD - Press the MENU button and then use D / E button to display a real HD source through an advanced digital signal processing algorithm. - Cool Normal Warm Off Red 0 Green 0 Blue 0 To initialize values (reset to select the PICTURE menu. 2. APC adjusts the Monitor to Off. 1. If adjusting picture options (contrast, brightness, color, sharpness, or tint) manually, APC automatically changes to the best picture appearance...

Owners Manual
Page 19
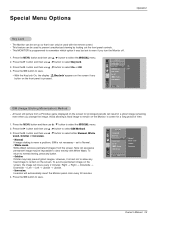
... G button and then use D / E button to Off option) - Press the OK button to select On or Off. 4. Press the G button and then use F / G button to save . PICTURE APC ACC Fleshtone G 0 Contrast 100 Brightness 55 Color 55 Sharpness 60 Tint 0 Menu Prev. Manual Picture Control (APC set sRGB to On to adjust for the color difference. 1. Operation Fleshtone ( RGB-DTV, and DVI-DTV Mode only) - Press the OK button to make appropriate adjustments. 4.
... G button and then use D / E button to Off option) - Press the OK button to select On or Off. 4. Press the G button and then use F / G button to save . PICTURE APC ACC Fleshtone G 0 Contrast 100 Brightness 55 Color 55 Sharpness 60 Tint 0 Menu Prev. Manual Picture Control (APC set sRGB to On to adjust for the color difference. 1. Operation Fleshtone ( RGB-DTV, and DVI-DTV Mode only) - Press the OK button to make appropriate adjustments. 4.
Owners Manual
Page 23
Special Menu Options Operation Key Lock - Press the G button and then use D / E button to select the SPECIAL menu. 2. Avoid allowing a fixed image to remain on the front panel is programmed to remember which option it can only be set up so that it was last set to even if you change the image. set to Normal. • White wash White Wash removes permanent images from a PC/video game displayed on the screen. However, it...
Special Menu Options Operation Key Lock - Press the G button and then use D / E button to select the SPECIAL menu. 2. Avoid allowing a fixed image to remain on the front panel is programmed to remember which option it can only be set up so that it was last set to even if you change the image. set to Normal. • White wash White Wash removes permanent images from a PC/video game displayed on the screen. However, it...

Owners Manual
Page 25
..., your Monitor is , more enlarged at both sides, to view the picture without any alteration. This function works in DVI mode. 1. SCREEN Auto config. Press the MENU button and then use D / E / F / G button to select the desired picture format. Owner's Manual 25 The Auto config. ARC Position G Manual config Reset D F G E Menu Prev. Press the G button and then use D / E button to save. Set every aspect ratio for other RGB-PC and DVI-PC sources. - SCREEN Auto config. Press the ARC button repeatedly to adjust the position...
..., your Monitor is , more enlarged at both sides, to view the picture without any alteration. This function works in DVI mode. 1. SCREEN Auto config. Press the MENU button and then use D / E / F / G button to select the desired picture format. Owner's Manual 25 The Auto config. ARC Position G Manual config Reset D F G E Menu Prev. Press the G button and then use D / E button to save. Set every aspect ratio for other RGB-PC and DVI-PC sources. - SCREEN Auto config. Press the ARC button repeatedly to adjust the position...
Owners Manual
Page 31
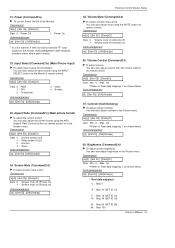
... on remote control. Acknowledgement [f][ ][Set ID][ ][OK][Data][x] 07. You can also adjust brightness in the Picture menu. Volume Mute (Command2:e) G To control volume mute on remote control or in the Picture menu. You can also adjust mute using the ARC (Aspect Ratio Control) button on /off . 01. Transmission [k][b][ ][Set ID][ ][Data][Cr] Data 0 : RGB 1 : DVI 2 : Component 3 : Video 4 : S-video Acknowledgement [b][ ][Set ID][ ][OK][Data][x] 03. Aspect Ratio (Command2:c) (Main picture format) G To adjust the screen format. Screen Mute (Command2:d) G To select screen mute...
... on remote control. Acknowledgement [f][ ][Set ID][ ][OK][Data][x] 07. You can also adjust brightness in the Picture menu. Volume Mute (Command2:e) G To control volume mute on remote control or in the Picture menu. You can also adjust mute using the ARC (Aspect Ratio Control) button on /off . 01. Transmission [k][b][ ][Set ID][ ][Data][Cr] Data 0 : RGB 1 : DVI 2 : Component 3 : Video 4 : S-video Acknowledgement [b][ ][Set ID][ ][OK][Data][x] 03. Aspect Ratio (Command2:c) (Main picture format) G To adjust the screen format. Screen Mute (Command2:d) G To select screen mute...

Owners Manual
Page 32
... adjust the sub picture position using the PIP/DW button on screen Acknowledgement [q][ ][Set ID][ ][OK][Data][x] 17. Acknowledgement [i][ ][Set ID][ ][OK][Data][x] 10. Remote Control Lock Mode (Command2:m) G To lock the remote control and the front panel controls on the remote control or in the PIP/DW menu. Transmission [k][m][ ][Set ID][ ][Data][Cr] Data 0: Lock off 1: OSD on the monitor, use this mode. Acknowledgement [p][ ][Set ID][ ][OK][Data][x] * Real data mapping 2 0 : Reset split zoom 21: Selection...
... adjust the sub picture position using the PIP/DW button on screen Acknowledgement [q][ ][Set ID][ ][OK][Data][x] 17. Acknowledgement [i][ ][Set ID][ ][OK][Data][x] 10. Remote Control Lock Mode (Command2:m) G To lock the remote control and the front panel controls on the remote control or in the PIP/DW menu. Transmission [k][m][ ][Set ID][ ][Data][Cr] Data 0: Lock off 1: OSD on the monitor, use this mode. Acknowledgement [p][ ][Set ID][ ][OK][Data][x] * Real data mapping 2 0 : Reset split zoom 21: Selection...

Owners Manual
Page 33
... shown right. Abnormal State (Command2:z) G To recognize an abnormal state. Acknowledgement [w][ ][Set ID][ ][OK][Data][x] External Control Device Setup 23. Transmission [k][y][ ][Set ID][ ][Data][Cr] Data 0: RGB 1: DVI 2: Component 3: Video 4: S-video Acknowledgement [y][ ][Set ID][ ][OK][Data][x] 25. You can also adjust balance in color temperature. Owner's Manual 33 Balance (Command2:t) G To adjust balance. Acknowledgement [$][ ][Set ID][ ][OK][Data][x] * Real data mapping 3 0 : -30 1 : -29 2 : -28 1E : 0 3A...
... shown right. Abnormal State (Command2:z) G To recognize an abnormal state. Acknowledgement [w][ ][Set ID][ ][OK][Data][x] External Control Device Setup 23. Transmission [k][y][ ][Set ID][ ][Data][Cr] Data 0: RGB 1: DVI 2: Component 3: Video 4: S-video Acknowledgement [y][ ][Set ID][ ][OK][Data][x] 25. You can also adjust balance in color temperature. Owner's Manual 33 Balance (Command2:t) G To adjust balance. Acknowledgement [$][ ][Set ID][ ][OK][Data][x] * Real data mapping 3 0 : -30 1 : -29 2 : -28 1E : 0 3A...
Owners Manual
Page 37
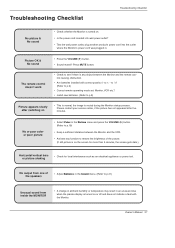
... VOLUME (G) button. • Sound muted? No output from inside the MONITOR • A change in ambient humidity or temperature may result in an unusual noise when the plasma display is turned on or off and does not indicate a fault with correct polarity (+ to restore the brightness of the speakers • Adjust Balance in . Troubleshooting Checklist Troubleshooting Checklist No picture & No sound • Check whether the Monitor is turned...
... VOLUME (G) button. • Sound muted? No output from inside the MONITOR • A change in ambient humidity or temperature may result in an unusual noise when the plasma display is turned on or off and does not indicate a fault with correct polarity (+ to restore the brightness of the speakers • Adjust Balance in . Troubleshooting Checklist Troubleshooting Checklist No picture & No sound • Check whether the Monitor is turned...

Owners Manual
Page 39
..., Hawaii, and U.S. In-Home Service: Please retain dealer's dated bill of sale or delivery ticket as evidence of the product. Some states do not function normally. This warranty is in the repair may be repaired or replaced with manufacturer's specifications, indicating that any pixel defects do not effect the operation or use , during the warranty period ("Warranty Period") listed below, effective from...
..., Hawaii, and U.S. In-Home Service: Please retain dealer's dated bill of sale or delivery ticket as evidence of the product. Some states do not function normally. This warranty is in the repair may be repaired or replaced with manufacturer's specifications, indicating that any pixel defects do not effect the operation or use , during the warranty period ("Warranty Period") listed below, effective from...

Owners Manual
Page 40
... installation, including incorrect or insufficient AC supply (please consult the owner's manual for power supply requirements) G installation or repair of antenna systems, cable converters, cable company supplied equipment, or other components in a video system G set-up or adjustment on the remote control. To assure proper credit and avoid unnecessary charges, you may be at the owner's expense. G product where the original factory serial numbers have been removed, defaced or changed in any other product G replacement...
... installation, including incorrect or insufficient AC supply (please consult the owner's manual for power supply requirements) G installation or repair of antenna systems, cable converters, cable company supplied equipment, or other components in a video system G set-up or adjustment on the remote control. To assure proper credit and avoid unnecessary charges, you may be at the owner's expense. G product where the original factory serial numbers have been removed, defaced or changed in any other product G replacement...

Service Manual
Page 5
... ) EXTERNAL SPEAKER AC INPUT 8 9 1. REMOTE CONTROL Connect your monitor. DESCRIPTION OF CONTROLS Connection Options - COMPONENT INPUT/AUDIO INPUT JACKS Connect a component video/audio device to operate the Monitor on the Monitor. 2. The voltage is worked by L(mono). 7. NOTE: AUDIO INPUT of S-VIDEO is indicated on an AC power. Never attempt to these jacks. 8. RGB OUTPUT PORT You can watch the RGB signal on a PC. 3. VIDEO / AUDIO (L/MONO) INPUT SOCKETS Connect audio/video output from your wired remote control to the appropriate input port. 4. POWER CORD SOCKET This...
... ) EXTERNAL SPEAKER AC INPUT 8 9 1. REMOTE CONTROL Connect your monitor. DESCRIPTION OF CONTROLS Connection Options - COMPONENT INPUT/AUDIO INPUT JACKS Connect a component video/audio device to operate the Monitor on the Monitor. 2. The voltage is worked by L(mono). 7. NOTE: AUDIO INPUT of S-VIDEO is indicated on an AC power. Never attempt to these jacks. 8. RGB OUTPUT PORT You can watch the RGB signal on a PC. 3. VIDEO / AUDIO (L/MONO) INPUT SOCKETS Connect audio/video output from your wired remote control to the appropriate input port. 4. POWER CORD SOCKET This...

