Owners Manual
Page 2
... RAIN OR MOISTURE. CAUTION: This DVD/HDTV Receiver employs a Laser System. Connect the product into an outlet on the apparatus. When recording and playing the pictures of the cable entry as close to radio communications. Reverse engineering or disassembly is provided to call the cable TV system installer's attention to persons. SERIAL NUMBER: Locate the serial number on a VCR, the picture noise will not occur in a residential...
... RAIN OR MOISTURE. CAUTION: This DVD/HDTV Receiver employs a Laser System. Connect the product into an outlet on the apparatus. When recording and playing the pictures of the cable entry as close to radio communications. Reverse engineering or disassembly is provided to call the cable TV system installer's attention to persons. SERIAL NUMBER: Locate the serial number on a VCR, the picture noise will not occur in a residential...

Owners Manual
Page 4
... Guide 36 Information Displays 37-38 Channel Banner Display 37 Program Information Display 38 4 DTV OPERATION Program and Station Guide 39 Normal Operation 40 Channel Selection 40 Volume Adjustment 40 Signal 40 DVD MENU OPERATION DVD On-screen Display 41 General Explanation 41 On-Screen Displays 41 Initial Settings 42-43 Initial Settings General Operation 42 Language 42 Picture 42 Sound 43 Others 43 Parental Control 44 DVD OPERATION DVD and Video CD Operation 45-48 Playing a DVD or Video CD 45 General Features 45-47 Special DVD Features 47 Audio...
... Guide 36 Information Displays 37-38 Channel Banner Display 37 Program Information Display 38 4 DTV OPERATION Program and Station Guide 39 Normal Operation 40 Channel Selection 40 Volume Adjustment 40 Signal 40 DVD MENU OPERATION DVD On-screen Display 41 General Explanation 41 On-Screen Displays 41 Initial Settings 42-43 Initial Settings General Operation 42 Language 42 Picture 42 Sound 43 Others 43 Parental Control 44 DVD OPERATION DVD and Video CD Operation 45-48 Playing a DVD or Video CD 45 General Features 45-47 Special DVD Features 47 Audio...
Owners Manual
Page 5
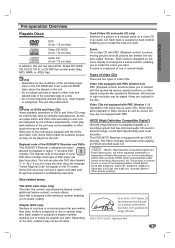
... of region "1" encoded DVD 1 software. Moreover, still pictures of Pacific Microsonics, Inc. Video CDs not equipped with PBC (Version 1.1) Operated in the disc. ENERGY STAR® is prohibited by software manufacturers. Each scene is assigned a title reference number enabling you want . HDCD (High Definition Compatible Digital®) HDCD® (High Definition Compatible Digital®) is equipped with PBC (Playback control) functions, moving pictures and still pictures...
... of region "1" encoded DVD 1 software. Moreover, still pictures of Pacific Microsonics, Inc. Video CDs not equipped with PBC (Version 1.1) Operated in the disc. ENERGY STAR® is prohibited by software manufacturers. Each scene is assigned a title reference number enabling you want . HDCD (High Definition Compatible Digital®) HDCD® (High Definition Compatible Digital®) is equipped with PBC (Playback control) functions, moving pictures and still pictures...

Owners Manual
Page 7
.... POWER Turns the DVD/HDTV Receiver on the screen. If the SELECT button is pressed while you to navigate on-screen menus and to adjust the system settings and preferences. Use the arrow keys to move to a menu option and then use the SELECT button to page 19) Display Window Remote Control Sensor Receives signals from the remote control. INTRODUCTION Front Panel Controls Forward Skip/Scan ( > / M ) Go to normal viewing by -frame playback. MENU/SETUP Shows the main menu on or off. STOP ( x ) Stops playback...
.... POWER Turns the DVD/HDTV Receiver on the screen. If the SELECT button is pressed while you to navigate on-screen menus and to adjust the system settings and preferences. Use the arrow keys to move to a menu option and then use the SELECT button to page 19) Display Window Remote Control Sensor Receives signals from the remote control. INTRODUCTION Front Panel Controls Forward Skip/Scan ( > / M ) Go to normal viewing by -frame playback. MENU/SETUP Shows the main menu on or off. STOP ( x ) Stops playback...
Owners Manual
Page 9
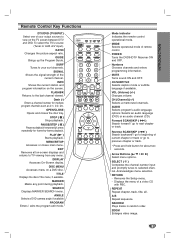
... displays and returns to view on the TV screen between DTV and DVD. MENU/SETUP Accesses or closes main menu. SELECT ( ) Completes the channel number input and promptly tunes to your output sources to TV viewing from any point during playback. To select the TV's source (Tuner or AUX A/V input). OPEN/CLOSE Opens and closes the disc tray. Numbers Chooses channels and enters programming information. Selects an audio language (DVD) or an audio channel (CD). RANDOM Plays tracks in random order. STOP ( x ) Stops playback. Mode Indicator Indicates the remote control operational...
... displays and returns to view on the TV screen between DTV and DVD. MENU/SETUP Accesses or closes main menu. SELECT ( ) Completes the channel number input and promptly tunes to your output sources to TV viewing from any point during playback. To select the TV's source (Tuner or AUX A/V input). OPEN/CLOSE Opens and closes the disc tray. Numbers Chooses channels and enters programming information. Selects an audio language (DVD) or an audio channel (CD). RANDOM Plays tracks in random order. STOP ( x ) Stops playback. Mode Indicator Indicates the remote control operational...
Owners Manual
Page 10
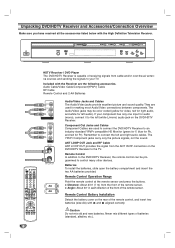
...the signals to the left (white L/mono) audio jack on the DVD/HDTV Receiver. AA Remote Control Battery Installation Detach the battery cover on the DVD/HDTV Receiver to control many other devices. Audio Cable/Video Cable/Component(YPbPr) Cable RF Cable Remote Control and 2 AA Batteries Audio/Video Jacks and Cables The Audio/Video jacks provide excellent picture and sound quality. Batteries To install the batteries, slide open the battery compartment and insert the two AA batteries provided. Remote Control In addition to the DVD/HDTV Receiver, the remote control can be color coded...
...the signals to the left (white L/mono) audio jack on the DVD/HDTV Receiver. AA Remote Control Battery Installation Detach the battery cover on the DVD/HDTV Receiver to control many other devices. Audio Cable/Video Cable/Component(YPbPr) Cable RF Cable Remote Control and 2 AA Batteries Audio/Video Jacks and Cables The Audio/Video jacks provide excellent picture and sound quality. Batteries To install the batteries, slide open the battery compartment and insert the two AA batteries provided. Remote Control In addition to the DVD/HDTV Receiver, the remote control can be color coded...

Owners Manual
Page 13
... available for VIDEO, S-VIDEO, and COMPONENT VIDEO outputs. • The HDTV Tuner has two digital audio outputs; INSTALLATION Connections (Continued) Display Formats Overview • The HDTV Tuner offers various display formats and multiple video outputs. The HDTV Tuner sends out a digital audio signal to OPTICAL and COAXIAL audio outputs when digital broadcasts are available for RGB and DVI outputs. • 480i mode is equipped with an S-Video jack, use the S-VIDEO OUT jack. 13 If your TV using RCA-type cables. When the HDTV Tuner is connected to the...
... available for VIDEO, S-VIDEO, and COMPONENT VIDEO outputs. • The HDTV Tuner has two digital audio outputs; INSTALLATION Connections (Continued) Display Formats Overview • The HDTV Tuner offers various display formats and multiple video outputs. The HDTV Tuner sends out a digital audio signal to OPTICAL and COAXIAL audio outputs when digital broadcasts are available for RGB and DVI outputs. • 480i mode is equipped with an S-Video jack, use the S-VIDEO OUT jack. 13 If your TV using RCA-type cables. When the HDTV Tuner is connected to the...

Owners Manual
Page 14
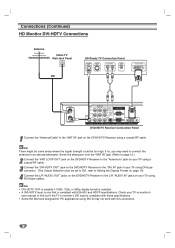
..., 480i, native, variable 1, variable 2, or variable 3 display format is selected. 14 If so, you may need to connect the antenna to an optional attenuator. Connections (Continued) HD Monitor Component (YPbPr) Connections Antenna Cable TV Wall Jack Panel HD Ready TV Connection Panel ANTENNA INPUT COMPONENT VIDEO INPUT AUDIO INPUT VIDEO INPUT Pr Pb Y L R OR DVD/HDTV Receiver Connection Panel 1 Connect the "Antenna/Cable" to the "ANT IN" jack on your TV using RCA-type cables. (The Output Selection must be too high.
..., 480i, native, variable 1, variable 2, or variable 3 display format is selected. 14 If so, you may need to connect the antenna to an optional attenuator. Connections (Continued) HD Monitor Component (YPbPr) Connections Antenna Cable TV Wall Jack Panel HD Ready TV Connection Panel ANTENNA INPUT COMPONENT VIDEO INPUT AUDIO INPUT VIDEO INPUT Pr Pb Y L R OR DVD/HDTV Receiver Connection Panel 1 Connect the "Antenna/Cable" to the "ANT IN" jack on your TV using RCA-type cables. (The Output Selection must be too high.

Owners Manual
Page 15
... 1, variable 2, or variable 3 display format is selected. • RGB signal is not output through the "RGB OUT" jack during playing back a DVD which copy protection signals are recorded. INSTALLATION Connections (Continued) HD Monitor RGB Connections Antenna Cable TV Wall Jack Panel OR HD Ready TV Connection Panel ANTENNA INPUT S-VIDEO INPUT AUDIO INPUT VIDEO INPUT RGB INPUT L R DVD/HDTV Receiver Connection Panel 11 Connect the "Antenna/Cable" to the "ANT IN" jack on your TV using VGA-type connector. (The Output Selection must be too high...
... 1, variable 2, or variable 3 display format is selected. • RGB signal is not output through the "RGB OUT" jack during playing back a DVD which copy protection signals are recorded. INSTALLATION Connections (Continued) HD Monitor RGB Connections Antenna Cable TV Wall Jack Panel OR HD Ready TV Connection Panel ANTENNA INPUT S-VIDEO INPUT AUDIO INPUT VIDEO INPUT RGB INPUT L R DVD/HDTV Receiver Connection Panel 11 Connect the "Antenna/Cable" to the "ANT IN" jack on your TV using VGA-type connector. (The Output Selection must be too high...
Owners Manual
Page 16
... work with EIA-861 and HDCP specifications. Connections (Continued) HD Monitor DVI-HDTV Connections Antenna Cable TV Wall Jack Panel OR HD Ready TV Connection Panel ANTENNA INPUT S-VIDEO INPUT AUDIO INPUT VIDEO INPUT L R DVI-HDTV INPUT DVD/HDTV Receiver Connection Panel 11 Connect the "Antenna/Cable" to the L/R "AUDIO IN" jacks on your TV using RCA-type cables. ote There might be some areas where the signal strength could be set to DVI, refer to Setting the Display Format on page 19) 4 Connect the L/R "AUDIO...
... work with EIA-861 and HDCP specifications. Connections (Continued) HD Monitor DVI-HDTV Connections Antenna Cable TV Wall Jack Panel OR HD Ready TV Connection Panel ANTENNA INPUT S-VIDEO INPUT AUDIO INPUT VIDEO INPUT L R DVI-HDTV INPUT DVD/HDTV Receiver Connection Panel 11 Connect the "Antenna/Cable" to the L/R "AUDIO IN" jacks on your TV using RCA-type cables. ote There might be some areas where the signal strength could be set to DVI, refer to Setting the Display Format on page 19) 4 Connect the L/R "AUDIO...

Owners Manual
Page 17
INSTALLATION Connections (Continued) VCR Connections VCR Connection Panel AUDIO INPUT VIDEO INPUT L R L DVD/HDTV Receiver Connection Panel Connect the L/R "AUDIO OUT" jacks and "VIDEO OUT" jack on the DVD/HDTV Receiver to the "A/V in" jacks on your VCR using RCA-type cables. (If your VCR is equipped with an S-Video jack, use the "S-Video" jack.) Caution If 480i display format is selected, the VCR will record an onscreen display onto the tape during recording if: the channel is changed with CH (+/-) the sound level is adjusted with VOL (+/-) or by pressing the SELECT button, etc. 17
INSTALLATION Connections (Continued) VCR Connections VCR Connection Panel AUDIO INPUT VIDEO INPUT L R L DVD/HDTV Receiver Connection Panel Connect the L/R "AUDIO OUT" jacks and "VIDEO OUT" jack on the DVD/HDTV Receiver to the "A/V in" jacks on your VCR using RCA-type cables. (If your VCR is equipped with an S-Video jack, use the "S-Video" jack.) Caution If 480i display format is selected, the VCR will record an onscreen display onto the tape during recording if: the channel is changed with CH (+/-) the sound level is adjusted with VOL (+/-) or by pressing the SELECT button, etc. 17
Owners Manual
Page 18
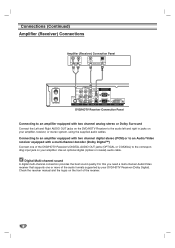
...Use an optional digital (optical or coaxial) audio cable. Digital Multi-channel sound A digital multi-channel connection provides the best sound quality. Connections (Continued) Amplifier (Receiver) Connections Amplifier (Receiver) Connection Panel R L AUDIO INPUT COAXIAL OPTICAL DIGITAL INPUT DVD/HDTV Receiver Connection Panel Connecting to an amplifier equipped with a multi-channel decoder (Dolby Digital™) Connect one or more of the audio formats supported by your DVD/HDTV Receiver (Dolby Digital). Connecting to an amplifier equipped with two channel digital stereo (PCM...
...Use an optional digital (optical or coaxial) audio cable. Digital Multi-channel sound A digital multi-channel connection provides the best sound quality. Connections (Continued) Amplifier (Receiver) Connections Amplifier (Receiver) Connection Panel R L AUDIO INPUT COAXIAL OPTICAL DIGITAL INPUT DVD/HDTV Receiver Connection Panel Connecting to an amplifier equipped with a multi-channel decoder (Dolby Digital™) Connect one or more of the audio formats supported by your DVD/HDTV Receiver (Dolby Digital). Connecting to an amplifier equipped with two channel digital stereo (PCM...
Owners Manual
Page 19
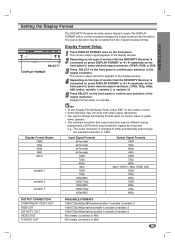
... the display window. 2 Depending on the type of monitor that the DVD/HDTV Receiver is changed to 480i 19 e.g., The ouput resolution is connected to, press DISPLAY FORMAT or b / B repeatedly on the front panel to select desired output resolution. (1080i, 720p, 480p, 480i, native, variable 1, variable 2, or variable 3) 5 Press SELECT on -screen menu or guide menu appears. • The selected resolution and ouput resolution may be different during playing back a DVD which copy protection signals are recorded. Display Format Modes 1080i...
... the display window. 2 Depending on the type of monitor that the DVD/HDTV Receiver is changed to 480i 19 e.g., The ouput resolution is connected to, press DISPLAY FORMAT or b / B repeatedly on the front panel to select desired output resolution. (1080i, 720p, 480p, 480i, native, variable 1, variable 2, or variable 3) 5 Press SELECT on -screen menu or guide menu appears. • The selected resolution and ouput resolution may be different during playing back a DVD which copy protection signals are recorded. Display Format Modes 1080i...

Owners Manual
Page 42
...The original language set your selection. Other: To select another language, use v/V to select the desired setting. 4 Press (SELECT) to Aspect Ratio on the DVD/HDTV Receiver's DVD part. Language Disc Language DVD Select a language for the disc is selected. Disc Audio Disc Subtitle Disc Menu Rating Country Code TV Aspect Menu Language Digital Audio Output English Spanish French Others Picture TV Aspect DVD Lets you enter the wrong language Disc Audio Disc Subtitle Disc Menu Rating Country Code TV Aspect Menu Language Digital Audio Output Others Original English French...
...The original language set your selection. Other: To select another language, use v/V to select the desired setting. 4 Press (SELECT) to Aspect Ratio on the DVD/HDTV Receiver's DVD part. Language Disc Language DVD Select a language for the disc is selected. Disc Audio Disc Subtitle Disc Menu Rating Country Code TV Aspect Menu Language Digital Audio Output English Spanish French Others Picture TV Aspect DVD Lets you enter the wrong language Disc Audio Disc Subtitle Disc Menu Rating Country Code TV Aspect Menu Language Digital Audio Output Others Original English French...

Owners Manual
Page 43
...DOLBY DIGITAL/PCM: Select "DOLBY DIGITAL/PCM" if you connect the DVD/HDTV Receiver's DIGITAL OUT jack to the type of audio output options. when you play a DVD video disc recorded on or off using (SELECT). If your system can be turned on a Dolby Digital, MPEG1, or MPEG2 recording system. Disc Audio Disc Subtitle Disc Menu Rating Country Code TV Aspect Menu Language Digital Audio Output Others PBC On PBC Set Playback Control (PBC) to the PBC. Off: Video CDs with a DTS decoder, Dolby Digital decoder or MPEG decoder. DVD MENU OPERATION Before Operation (Continued) Sound Digital Audio...
...DOLBY DIGITAL/PCM: Select "DOLBY DIGITAL/PCM" if you connect the DVD/HDTV Receiver's DIGITAL OUT jack to the type of audio output options. when you play a DVD video disc recorded on or off using (SELECT). If your system can be turned on a Dolby Digital, MPEG1, or MPEG2 recording system. Disc Audio Disc Subtitle Disc Menu Rating Country Code TV Aspect Menu Language Digital Audio Output Others PBC On PBC Set Playback Control (PBC) to the PBC. Off: Video CDs with a DTS decoder, Dolby Digital decoder or MPEG decoder. DVD MENU OPERATION Before Operation (Continued) Sound Digital Audio...

Owners Manual
Page 44
... (SELECT). 6. Ratings 1 to the list (See "Country Code List", page 59.). Country Code DVD Enter the code of a country/area whose standards were used to rate the DVD video disc, referring to 8: Some discs contain scenes not suitable for children. The 4-digit password is found, playback will not be played. The Parental Control feature allows you have not entered a password yet. Disc Audio Disc Subtitle Disc Menu Rating Country Code TV Aspect Menu Language Digital Audio Output Others 8 7 6 5 4 3 2 1 Unlock Change 1 Select "Rating" on the Setup menu using the v/V buttons...
... (SELECT). 6. Ratings 1 to the list (See "Country Code List", page 59.). Country Code DVD Enter the code of a country/area whose standards were used to rate the DVD video disc, referring to 8: Some discs contain scenes not suitable for children. The 4-digit password is found, playback will not be played. The Parental Control feature allows you have not entered a password yet. Disc Audio Disc Subtitle Disc Menu Rating Country Code TV Aspect Menu Language Digital Audio Output Others 8 7 6 5 4 3 2 1 Unlock Change 1 Select "Rating" on the Setup menu using the v/V buttons...

Owners Manual
Page 45
... during playback. Still Picture and Frame-by pressing PAUSE/STEP repeatedly on the remote control. 3. The DVD/HDTV Receiver will go into SEARCH mode. 2. You also may set and the disc is displayed A menu screen may have a region code different from the DVD/HDTV Receiver. If Parental Control is set PBC to the beginning of the current chapter/track. DVDs may be displayed first after loading a DVD or Video CD with the playback side down. 3 Press OPEN/CLOSE to select a title number...
... during playback. Still Picture and Frame-by pressing PAUSE/STEP repeatedly on the remote control. 3. The DVD/HDTV Receiver will go into SEARCH mode. 2. You also may set and the disc is displayed A menu screen may have a region code different from the DVD/HDTV Receiver. If Parental Control is set PBC to the beginning of the current chapter/track. DVDs may be displayed first after loading a DVD or Video CD with the playback side down. 3 Press OPEN/CLOSE to select a title number...
Owners Manual
Page 56
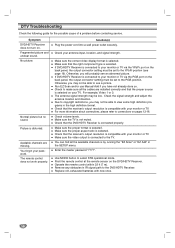
... cables are missing. Use MODE button to the DVD/HDTV Receiver. DTV Troubleshooting Check the following guide for the possible cause of a problem before contacting service. No picture. Make sure the TV is by running the "EZ Scan" or "EZ Add" in the SETUP menu. Symptom DVD/HDTV Receiver does not turn on pages 12-18. Fragmented picture and unclear sound. Normal picture but no sound. Picture is selected. Available channels are installed correctly and that the receiver's output resolution is connected...
... cables are missing. Use MODE button to the DVD/HDTV Receiver. DTV Troubleshooting Check the following guide for the possible cause of a problem before contacting service. No picture. Make sure the TV is by running the "EZ Scan" or "EZ Add" in the SETUP menu. Symptom DVD/HDTV Receiver does not turn on pages 12-18. Fragmented picture and unclear sound. Normal picture but no sound. Picture is selected. Available channels are installed correctly and that the receiver's output resolution is connected...
Owners Manual
Page 57
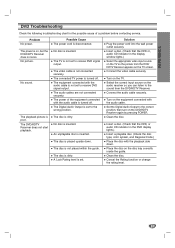
... playback picture is turned off . Clean the disc. Clean the disc. The power of a problem before contacting service. Connect the video cable securely. Connect the audio cable securely. The power is on the equipment connected with the audio cable is set . The disc is dirty. The disc is dirty. Insert a disc. (Check that the DVD or, audio CD indicator in the DVD display lights.) Insert a playable disc. (Check the disc type, color system, and Regional Code.) Place the disc with the audio cable is poor. REFERENCE DVD Troubleshooting...
... playback picture is turned off . Clean the disc. Clean the disc. The power of a problem before contacting service. Connect the video cable securely. Connect the audio cable securely. The power is on the equipment connected with the audio cable is set . The disc is dirty. The disc is dirty. Insert a disc. (Check that the DVD or, audio CD indicator in the DVD display lights.) Insert a playable disc. (Check the disc type, color system, and Regional Code.) Place the disc with the audio cable is poor. REFERENCE DVD Troubleshooting...
Owners Manual
Page 64
... warranty period ("Warranty Period") listed below, effective from normal wear and tear, misuse, abuse, operation outside environmental specifications or contrary to maintain, or separate system components; USA This LG Electronics product, marketed by Zenith, will be borne by inadequate home antenna or faulty antenna connections, computer software, institutional or commercial use , during the Warranty Period. PARTS: One Year from shipping, installation, adjustment of Purchase. LG...
... warranty period ("Warranty Period") listed below, effective from normal wear and tear, misuse, abuse, operation outside environmental specifications or contrary to maintain, or separate system components; USA This LG Electronics product, marketed by Zenith, will be borne by inadequate home antenna or faulty antenna connections, computer software, institutional or commercial use , during the Warranty Period. PARTS: One Year from shipping, installation, adjustment of Purchase. LG...


