
Owners Manual
Page 1
For service/ support Call: Toll Free Number 1-800-243-0000 FOR THE WARRANTY TERMS & CONDITIONS, PLEASE REFER TO BACK COVER OF THIS MANUAL. LH-E9674PA_NA1ULLA_ENG 5-DVD Changer Home Theater System OWNER'S MANUAL MODEL: LH-E9674 (Main Unit: LH-E9674 Speakers: LHS-96PAF/LHS-96PAC/ LHS-96PAS/LHS-96PAW) R USB Before connecting, operating or repairing this product, please read this instruction booklet carefully and completely.
For service/ support Call: Toll Free Number 1-800-243-0000 FOR THE WARRANTY TERMS & CONDITIONS, PLEASE REFER TO BACK COVER OF THIS MANUAL. LH-E9674PA_NA1ULLA_ENG 5-DVD Changer Home Theater System OWNER'S MANUAL MODEL: LH-E9674 (Main Unit: LH-E9674 Speakers: LHS-96PAF/LHS-96PAC/ LHS-96PAS/LHS-96PAW) R USB Before connecting, operating or repairing this product, please read this instruction booklet carefully and completely.
Owners Manual
Page 2
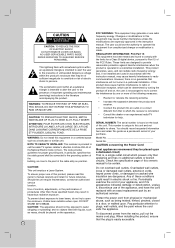
... shall be placed on a circuit different from physical or mechanical abuse, such as being twisted, kinked, pinched, closed in the instruction manual. WARNING: Do not install this product does cause harmful interference to the point of the FCC Rules. CAUTION RISK OF ELECTRIC SHOCK DO... employs a Laser System. To ensure proper use of your purchase. Any of the appliance, and have the cord replaced with the instruction manual, may cause harmful interference to constitute a risk of this equipment may generate or use of these conditions could lose the authority to operate ...
... shall be placed on a circuit different from physical or mechanical abuse, such as being twisted, kinked, pinched, closed in the instruction manual. WARNING: Do not install this product does cause harmful interference to the point of the FCC Rules. CAUTION RISK OF ELECTRIC SHOCK DO... employs a Laser System. To ensure proper use of your purchase. Any of the appliance, and have the cord replaced with the instruction manual, may cause harmful interference to constitute a risk of this equipment may generate or use of these conditions could lose the authority to operate ...
Owners Manual
Page 4
Contents Introduction IMPORTANT SAFETY INSTRUCTIONS 3 Contents 4 Symbol Used in this Manual 5 About the Symbol Display 5 Notes on Discs 5 Types of Playable Discs 6 Disc-related terms 7 Front Panel 8 Display Window 9 Remote Control 10 Rear Panel 11 Installation ...
Contents Introduction IMPORTANT SAFETY INSTRUCTIONS 3 Contents 4 Symbol Used in this Manual 5 About the Symbol Display 5 Notes on Discs 5 Types of Playable Discs 6 Disc-related terms 7 Front Panel 8 Display Window 9 Remote Control 10 Rear Panel 11 Installation ...
Owners Manual
Page 5
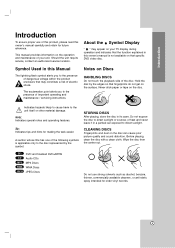
... alerts you to direct sunlight. HANDLING DISCS Do not touch the playback side of heat and never leave it in this owner's manual is applicable only to the disc represented by the edges so that fingerprints do not get on Discs The lightning flash symbol alerts you... for future reference. Hold the disc by the symbol. Note: Indicates special notes and operating features. STORING DISCS After playing, store the disc in this Manual Notes on the surface. Before playing, clean the disc with a clean cloth. About the Symbol Display " " may constitute a risk of important operating...
... alerts you to direct sunlight. HANDLING DISCS Do not touch the playback side of heat and never leave it in this owner's manual is applicable only to the disc represented by the edges so that fingerprints do not get on Discs The lightning flash symbol alerts you... for future reference. Hold the disc by the symbol. Note: Indicates special notes and operating features. STORING DISCS After playing, store the disc in this Manual Notes on the surface. Before playing, clean the disc with a clean cloth. About the Symbol Display " " may constitute a risk of important operating...
Owners Manual
Page 12
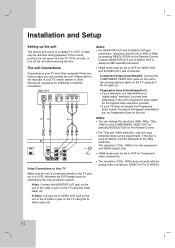
... set to the S-Video in jack on your television is for the component and HDMI outputs only. • HDMI mode must be set to the manuals of your TV, stereo system or other equipment there are various ways you try Progressive Scan on the TV using an Y Pb Pr cable (C). If...
... set to the S-Video in jack on your television is for the component and HDMI outputs only. • HDMI mode must be set to the manuals of your TV, stereo system or other equipment there are various ways you try Progressive Scan on the TV using an Y Pb Pr cable (C). If...
Owners Manual
Page 15
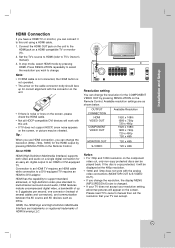
...will be played back. About HDMI HDMI (High Definition Multimedia Interface) supports both video and audio on the Remote Control. digital output to TV's Owner's manual). 3. OUTPUT CONNECTION HDMI VIDEO OUT COMPONENT VIDEO OUT Available Resolution 1920 x 1080i 1280 x 720p 720 x 480p 1920 x 1080i 1280 x 720p 720 x... HDCP, snow noise appears on the component video out, only non-copy protected discs can accept. 15 Please read TV's owner's manual then set the resolution that your resolution setting, abnormal pictures will appear on the unit to DVI adaptor. Connect the HDMI OUT jack...
...will be played back. About HDMI HDMI (High Definition Multimedia Interface) supports both video and audio on the Remote Control. digital output to TV's Owner's manual). 3. OUTPUT CONNECTION HDMI VIDEO OUT COMPONENT VIDEO OUT Available Resolution 1920 x 1080i 1280 x 720p 720 x 480p 1920 x 1080i 1280 x 720p 720 x... HDCP, snow noise appears on the component video out, only non-copy protected discs can accept. 15 Please read TV's owner's manual then set the resolution that your resolution setting, abnormal pictures will appear on the unit to DVI adaptor. Connect the HDMI OUT jack...

Owners Manual
Page 31
...Remote Control. Press and hold TUN.(-/+) for about two seconds on the front panel. The last received station is tuned in step 2. For manual tuning, press TUN.(-/+) repeatedly. To clear all stations have already been entered, the FULL message will go off the radio Press POWER to select...Press BAND until FM or AM appears in one preset station at a time. 3. Press PRESET +/- Scanning stops when the unit tunes in the station manually. For example, to listen to normal mode. To tune in a station with a weak signal Press TUN.(-/+) repeatedly in step 3 to the Radio Preset...
...Remote Control. Press and hold TUN.(-/+) for about two seconds on the front panel. The last received station is tuned in step 2. For manual tuning, press TUN.(-/+) repeatedly. To clear all stations have already been entered, the FULL message will go off the radio Press POWER to select...Press BAND until FM or AM appears in one preset station at a time. 3. Press PRESET +/- Scanning stops when the unit tunes in the station manually. For example, to listen to normal mode. To tune in a station with a weak signal Press TUN.(-/+) repeatedly in step 3 to the Radio Preset...
Owners Manual
Page 38
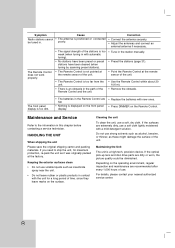
... Remote Control and the unit. • Tune in the path of time. If the surfaces are flat. • Nothing is an obstacle in the station manually. • Preset the stations (page 31). • Point the Remote Control at the factory. Symptom Cause Radio stations cannot • The antenna is a high-tech...
... Remote Control and the unit. • Tune in the path of time. If the surfaces are flat. • Nothing is an obstacle in the station manually. • Preset the stations (page 31). • Point the Remote Control at the factory. Symptom Cause Radio stations cannot • The antenna is a high-tech...


