Owners Manual
Page 2
... the instruction manual. REGULATORY INFORMATION: FCC Part 15 This epuipment has been tested and found on the back of the National Electric Code (U.S.A.). This number is intended to alert the user to this owner's manual carefully and retain for help. To ensure proper use radio frequency energy. Overloaded wall outlets, loose or damaged wall outlets, extension cords, frayed power cords, or damaged or cracked wire insulation are designed to plugs, wall...
... the instruction manual. REGULATORY INFORMATION: FCC Part 15 This epuipment has been tested and found on the back of the National Electric Code (U.S.A.). This number is intended to alert the user to this owner's manual carefully and retain for help. To ensure proper use radio frequency energy. Overloaded wall outlets, loose or damaged wall outlets, extension cords, frayed power cords, or damaged or cracked wire insulation are designed to plugs, wall...
Owners Manual
Page 4
... Playable Discs 6 Disc-related terms 7 Front Panel 8 Display Window 9 Remote Control 10 Rear Panel 11 Installation and Setup Setting up the unit 12 The unit Connections 12 Audio Connection to Optional Equipment . . . . .13 Antenna Connections 14 HDMI Connection 15 Assembling and Connecting to the Speakers . .16 Speaker System Connection 16 Speaker Positioning 17 Selecting the Input/Output Source 18 Mini Glossary for Audio Stream & Surround Mode19 Sound Mode 19 VIRTUAL sound 19 XTS/XTS pro 20 Displaying Disc Information on-screen 20 Initial Settings 20 General Operation...
... Playable Discs 6 Disc-related terms 7 Front Panel 8 Display Window 9 Remote Control 10 Rear Panel 11 Installation and Setup Setting up the unit 12 The unit Connections 12 Audio Connection to Optional Equipment . . . . .13 Antenna Connections 14 HDMI Connection 15 Assembling and Connecting to the Speakers . .16 Speaker System Connection 16 Speaker Positioning 17 Selecting the Input/Output Source 18 Mini Glossary for Audio Stream & Surround Mode19 Sound Mode 19 VIRTUAL sound 19 XTS/XTS pro 20 Displaying Disc Information on-screen 20 Initial Settings 20 General Operation...

Owners Manual
Page 6
... you try to play a DVD with one or more numbers in malfunctions. This unit plays DVDs according to the audio system, turn down the volume before playing back such discs, adjust the volume gradually, and keep the volume level low. This number must be intentionally programmed by the software manufacturer, therefore some CD-R/RW (or DVD -R, DVD -RW) discs cannot be exhibited from your unit's regional code or the disc cannot play. • If you...
... you try to play a DVD with one or more numbers in malfunctions. This unit plays DVDs according to the audio system, turn down the volume before playing back such discs, adjust the volume gradually, and keep the volume level low. This number must be intentionally programmed by the software manufacturer, therefore some CD-R/RW (or DVD -R, DVD -RW) discs cannot be exhibited from your unit's regional code or the disc cannot play. • If you...
Owners Manual
Page 8
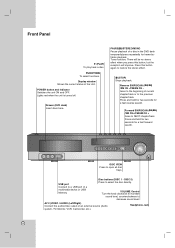
... source (Audio system, TV/ Monitor, VCR, Camcorder, etc.). Drawer (DVD deck) Insert discs here. VOLUME Control Turn the knob clockwise to increase sound level, counterclockwise to open all disc trays. Press and hold for two seconds for a fast forward search. DISC 5) Press to NEXT chapter/track. Forward SKIP/SCAN (R/T) /XM CH+/FM/AM CH + Goes to select the disc directly. Headphone Jack 8 Front Panel B (PLAY) To play back a disc. USB port Connect to a USB port...
... source (Audio system, TV/ Monitor, VCR, Camcorder, etc.). Drawer (DVD deck) Insert discs here. VOLUME Control Turn the knob clockwise to increase sound level, counterclockwise to open all disc trays. Press and hold for two seconds for a fast forward search. DISC 5) Press to NEXT chapter/track. Forward SKIP/SCAN (R/T) /XM CH+/FM/AM CH + Goes to select the disc directly. Headphone Jack 8 Front Panel B (PLAY) To play back a disc. USB port Connect to a USB port...

Owners Manual
Page 10
... disc. 0-9 numerical buttons Selects numbered options in DVD mode. ENTER Acknowledges menu selection. VOLUME (+/-) Adjusts speaker sound level. Skip to beginning of the display window on the front panel during playback. SCAN(bb) For fast reverse picture search. - INPUT: Selects the TV's source. - D.INPUT To listen to an audio source connected to previous DVD/CD chapter or track. - CLEAR Removes a track number on the program menu or a mark on a DVD disc. MUTE Turns the sound on status. 10 POWER: Switches TV ON and OFF. - Remote Control POWER Turns...
... disc. 0-9 numerical buttons Selects numbered options in DVD mode. ENTER Acknowledges menu selection. VOLUME (+/-) Adjusts speaker sound level. Skip to beginning of the display window on the front panel during playback. SCAN(bb) For fast reverse picture search. - INPUT: Selects the TV's source. - D.INPUT To listen to an audio source connected to previous DVD/CD chapter or track. - CLEAR Removes a track number on the program menu or a mark on a DVD disc. MUTE Turns the sound on status. 10 POWER: Switches TV ON and OFF. - Remote Control POWER Turns...

Owners Manual
Page 11
... video inputs. COMPONENT VIDEO OUT (Y Pb Pr ) Connect to the unit. Introduction Rear Panel AC Power Cord Plug into the power source. AV1 IN (VIDEO IN/AUDIO IN (Left/Right)) Connect the audio/video output of Digital Device. SPEAKER CONNECTORS Connect the six supplied speakers to a TV with Y Pb Pr inputs. MONITOR OUT Connect to these terminals. OPTICAL IN Connector Connect an optical output of an external source (Audio system, TV/Monitor, etc.). COAXIAL IN Connector Connect an coaxial output of the jacks on TV. FOR DVD VIEWING...
... video inputs. COMPONENT VIDEO OUT (Y Pb Pr ) Connect to the unit. Introduction Rear Panel AC Power Cord Plug into the power source. AV1 IN (VIDEO IN/AUDIO IN (Left/Right)) Connect the audio/video output of Digital Device. SPEAKER CONNECTORS Connect the six supplied speakers to a TV with Y Pb Pr inputs. MONITOR OUT Connect to these terminals. OPTICAL IN Connector Connect an optical output of an external source (Audio system, TV/Monitor, etc.). COAXIAL IN Connector Connect an coaxial output of the jacks on TV. FOR DVD VIEWING...
Owners Manual
Page 12
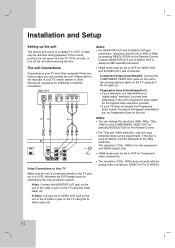
... displayed at 480i standard resolution. • HDMI mode must be set to Your TV Make sure the unit is a high-definition or "digital ready" television, you may take advantage of a nearby TV, VCR, or radio may be played back. COAXAL IN COMPONENT VIDEO OUT MONITOR OUT FM Video Connections to 480i or 480p by pressing RESOLUTION on the TV using the SVideo cable (S). Installation and Setup Setting...
... displayed at 480i standard resolution. • HDMI mode must be set to Your TV Make sure the unit is a high-definition or "digital ready" television, you may take advantage of a nearby TV, VCR, or radio may be played back. COAXAL IN COMPONENT VIDEO OUT MONITOR OUT FM Video Connections to 480i or 480p by pressing RESOLUTION on the TV using the SVideo cable (S). Installation and Setup Setting...
Owners Manual
Page 13
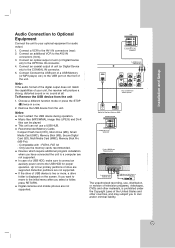
... Laws of a USB HDD, make sure to connect an auxiliary power cord to the USB HDD for audio output. 1. Note: If the audio format of the digital output does not match the capabilities of the unit. Compatable with : FAT16, FAT 32 - Connect an optical output of unit (or Digital Device etc) to the COAXIAL IN connector. 5. Notes: Don't extract the USB device during operation. Recommended Memory Cards Compact Flash Card (CFC...
... Laws of a USB HDD, make sure to connect an auxiliary power cord to the USB HDD for audio output. 1. Note: If the audio format of the digital output does not match the capabilities of the unit. Compatable with : FAT16, FAT 32 - Connect an optical output of unit (or Digital Device etc) to the COAXIAL IN connector. 5. Notes: Don't extract the USB device during operation. Recommended Memory Cards Compact Flash Card (CFC...
Owners Manual
Page 15
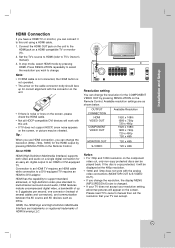
... on the component video out, only non-copy protected discs can be vibrated. Installation and Setup HDMI Connection If you have a HDMI TV or monitor, you can connect it will be displayed at the 480p resolution. • 1080i and 720p does not work with this unit using a HDMI cable. 1. Connect the HDMI OUT jack on the unit to TV's Owner's manual). 3. About HDMI HDMI (High Definition Multimedia Interface) supports both video and audio on the screen.
... on the component video out, only non-copy protected discs can be vibrated. Installation and Setup HDMI Connection If you have a HDMI TV or monitor, you can connect it will be displayed at the 480p resolution. • 1080i and 720p does not work with this unit using a HDMI cable. 1. Connect the HDMI OUT jack on the unit to TV's Owner's manual). 3. About HDMI HDMI (High Definition Multimedia Interface) supports both video and audio on the screen.

Owners Manual
Page 16
.... Front speaker (Right) Center speaker Front speaker (Left) Rear speaker (Right surround) Subwoofer Rear speaker (Left surround) Notes: • Be sure to match the speaker cable to the appropriate terminal on the components: + to + and - Assembling and Connecting to the Speakers The front speakers are reversed, the sound will be distorted and will lack base. • If you use front speakers with low maximum input rating, adjust the volume carefully to avoid excessive output on...
.... Front speaker (Right) Center speaker Front speaker (Left) Rear speaker (Right surround) Subwoofer Rear speaker (Left surround) Notes: • Be sure to match the speaker cable to the appropriate terminal on the components: + to + and - Assembling and Connecting to the Speakers The front speakers are reversed, the sound will be distorted and will lack base. • If you use front speakers with low maximum input rating, adjust the volume carefully to avoid excessive output on...

Owners Manual
Page 18
... source connected to the VIDEO IN jack of AV IN (for rear panel) or LINE IN 2 (AV 2) (for front panel). Selecting the Input/Output Source BAND DVD AUX D.INPUT Follow these guidelines to select and switch among the various unit input and output sources: • DVD/CD To view output from the DVD deck: Press DVD on the remote or FUNCTION on the front panel until the DVD indicator on the front panel lights and output from an external source connected to the VIDEO...
... source connected to the VIDEO IN jack of AV IN (for rear panel) or LINE IN 2 (AV 2) (for front panel). Selecting the Input/Output Source BAND DVD AUX D.INPUT Follow these guidelines to select and switch among the various unit input and output sources: • DVD/CD To view output from the DVD deck: Press DVD on the remote or FUNCTION on the front panel until the DVD indicator on the front panel lights and output from an external source connected to the VIDEO...
Owners Manual
Page 19
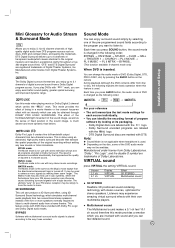
.... Mini Glossary for Audio Stream & Surround Mode Allows you enjoy up to 6 channels of transparent audio(which means identical to the original masters) and results in the sound image, is much clearer and more speakers normally required to listen to multi-channel audio from a home theatre. Dolby Surround encoded programs are involved with their own multimedia players. Use this mode when playing movie or Dolby Digital 2 channel which you press SOUND button, the sound mode is inserted...
.... Mini Glossary for Audio Stream & Surround Mode Allows you enjoy up to 6 channels of transparent audio(which means identical to the original masters) and results in the sound image, is much clearer and more speakers normally required to listen to multi-channel audio from a home theatre. Dolby Surround encoded programs are involved with their own multimedia players. Use this mode when playing movie or Dolby Digital 2 channel which you press SOUND button, the sound mode is inserted...
Owners Manual
Page 20
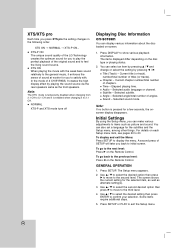
... the Setup menu. 20 Audio - Press SETUP. XTS ON When playing the movie with . The items displayed differ depending on the Remote Control. Chapter - Time - Subtitle - Selected subtitle. You can display various information about the disc loaded on the Remote Control. GENERAL OPERATION 1. The screen shows the current setting for a few seconds, the onscreen display disappears. Use v / V to select the desired setting then press ENTER to 2.1 CH. Note: The XTS mode...
... the Setup menu. 20 Audio - Press SETUP. XTS ON When playing the movie with . The items displayed differ depending on the Remote Control. Chapter - Time - Subtitle - Selected subtitle. You can display various information about the disc loaded on the Remote Control. GENERAL OPERATION 1. The screen shows the current setting for a few seconds, the onscreen display disappears. Use v / V to select the desired setting then press ENTER to 2.1 CH. Note: The XTS mode...
Owners Manual
Page 22
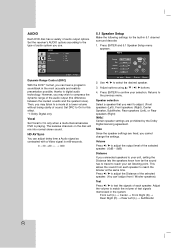
... Dolby Digital licensing agreement. Adjust the volume to On only when a multi-channel karaoke DVD is playing. Volume Press b / B to compress the dynamic range of sound. However, you use. HD AV Sync You can hear a program's soundtrack in the most accurate and realistic presentation possible, thanks to adjust. (Front speakers (Left), Front speakers (Right), Center Speaker, SubWoofer, Rear speakers (Left), or Rear speakers (Right) Note: Certain speaker settings are fixed, you connected speakers to your set listening point. Set the receiver's AUDIO...
... Dolby Digital licensing agreement. Adjust the volume to On only when a multi-channel karaoke DVD is playing. Volume Press b / B to compress the dynamic range of sound. However, you use. HD AV Sync You can hear a program's soundtrack in the most accurate and realistic presentation possible, thanks to adjust. (Front speakers (Left), Front speakers (Right), Center Speaker, SubWoofer, Rear speakers (Left), or Rear speakers (Right) Note: Certain speaker settings are fixed, you connected speakers to your set listening point. Set the receiver's AUDIO...
Owners Manual
Page 23
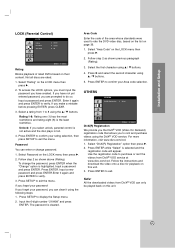
...® VOD (Video On Demand) registration code that allows you select unlock, parental control is the least restrictive. Select "Area Code" on the LOCK menu then press B. 2. Follow the instructions and download the video onto a disc for playback on their content. Input a new password and press ENTER.Enter it again and press ENTER to exit. Press SETUP to rent and purchase videos using the v / V buttons. If you make a mistake before...
...® VOD (Video On Demand) registration code that allows you select unlock, parental control is the least restrictive. Select "Area Code" on the LOCK menu then press B. 2. Follow the instructions and download the video onto a disc for playback on their content. Input a new password and press ENTER.Enter it again and press ENTER to exit. Press SETUP to rent and purchase videos using the v / V buttons. If you make a mistake before...

Owners Manual
Page 26
... and "--:--:--" appears. 3. Using Headphone Jack Connect a stereo headphone plug ( 3.5mm) into the PHONES connector. If you switch off the receiver before the unit turns off → Display window make din → Display window and Button's light are automatically disconnected when you press SLEEP the setting changes in the display window. The marker search menu appears on the marker search menu. Press v / V to remove the numbers you want to select a marker number that has...
... and "--:--:--" appears. 3. Using Headphone Jack Connect a stereo headphone plug ( 3.5mm) into the PHONES connector. If you switch off the receiver before the unit turns off → Display window make din → Display window and Button's light are automatically disconnected when you press SLEEP the setting changes in the display window. The marker search menu appears on the marker search menu. Press v / V to remove the numbers you want to select a marker number that has...

Owners Manual
Page 31
... wish to turn off or select another function mode (DVD/CD, AV 1, etc.,). Press PRESET +/- To listen to tune in the display window. 2. If you have accidentally entered into the "ERASE ALL" mode and you press the button, the unit tunes in step 2. Presetting the Radio Stations You can use the number buttons on the Remote Control to preset station 19, press 1 then 9 (within 3 seconds). The last received station is tuned in the display window...
... wish to turn off or select another function mode (DVD/CD, AV 1, etc.,). Press PRESET +/- To listen to tune in the display window. 2. If you have accidentally entered into the "ERASE ALL" mode and you press the button, the unit tunes in step 2. Presetting the Radio Stations You can use the number buttons on the Remote Control to preset station 19, press 1 then 9 (within 3 seconds). The last received station is tuned in the display window...

Owners Manual
Page 32
..., rear cover, or by 3 bars with high quality digital sound. The letter I, O, S, and F are not used 3. To activate via the internet: Visit http://www.xmradio.com/activation To activate via phone: Call 1-800-XM-RADIO (967-2346) A one -time activation fee may apply. XM Satellite Radio connections Connect the XM Digital Antenna to receive XM service (sold separately. When user edits or change XM display mode. All...
..., rear cover, or by 3 bars with high quality digital sound. The letter I, O, S, and F are not used 3. To activate via the internet: Visit http://www.xmradio.com/activation To activate via phone: Call 1-800-XM-RADIO (967-2346) A one -time activation fee may apply. XM Satellite Radio connections Connect the XM Digital Antenna to receive XM service (sold separately. When user edits or change XM display mode. All...
Owners Manual
Page 37
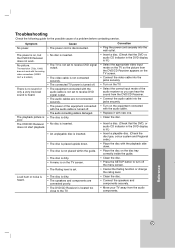
....) • Select the appropriate video input mode on the TV so the picture from the DVD/CD Receiver appears on the TV screen. • Connect the video cable into the jacks securely. • Turn on the TV screen. • Clean the disc. • Press the SETUP button to turn off . • The audio connecting cable is located too close to receive DVD signal output. • The video cable is not connected securely. • The connected TV power is not set . •...
....) • Select the appropriate video input mode on the TV so the picture from the DVD/CD Receiver appears on the TV screen. • Connect the video cable into the jacks securely. • Turn on the TV screen. • Clean the disc. • Press the SETUP button to turn off . • The audio connecting cable is located too close to receive DVD signal output. • The video cable is not connected securely. • The connected TV power is not set . •...
Owners Manual
Page 38
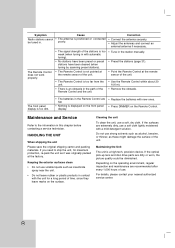
... authorized service center. 38 Correction • Connect the antenna securely. • Adjust the antennas and connect an external antenna if necessary. The Remote Control does not work properly. • The signal strength of the stations is an obstacle in the Remote Control are recommended after every 1,000 hours of the unit. Do not use a soft, dry cloth. since they leave marks on the Remote Control. Depending on the operating...
... authorized service center. 38 Correction • Connect the antenna securely. • Adjust the antennas and connect an external antenna if necessary. The Remote Control does not work properly. • The signal strength of the stations is an obstacle in the Remote Control are recommended after every 1,000 hours of the unit. Do not use a soft, dry cloth. since they leave marks on the Remote Control. Depending on the operating...

