Owner's Manual (English)
Page 1
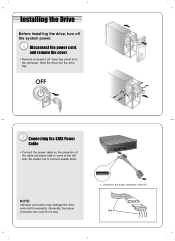
Connecting the SATA Power Cable • Connect the power cable so the projection of the PC. Be careful not to the left side. Red Generally, the power connector can only fit one way. Connect to the power connector of the cable connector side to come to connect upside down. Installing the Drive Before installing the drive, turn off the system power. Slide the drive into the drive bay. NOTE: Improper connection may damage the drive and void the warranty. Disconnect the power cord, and remove the cover. • Remove a vacant 5.25" drive bay panel from the computer.
Connecting the SATA Power Cable • Connect the power cable so the projection of the PC. Be careful not to the left side. Red Generally, the power connector can only fit one way. Connect to the power connector of the cable connector side to come to connect upside down. Installing the Drive Before installing the drive, turn off the system power. Slide the drive into the drive bay. NOTE: Improper connection may damage the drive and void the warranty. Disconnect the power cord, and remove the cover. • Remove a vacant 5.25" drive bay panel from the computer.
Owner's Manual (English)
Page 2
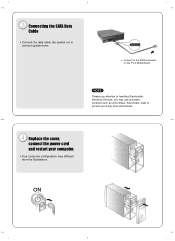
Connect to connect upside down. Connecting the SATA Data Cable • Connect the data cable. Replace the cover, connect the power cord and restart your computer. • Your computer configuration may use anti-static products such as wrist straps, heel straps, mats to handling Electrostatic Sensitive Devices, you may different from electrostatic. NOTE Please pay attention to protect your body from the illustrations. Be careful not to the SATA connector on the PC's Motherboard.
Connect to connect upside down. Connecting the SATA Data Cable • Connect the data cable. Replace the cover, connect the power cord and restart your computer. • Your computer configuration may use anti-static products such as wrist straps, heel straps, mats to handling Electrostatic Sensitive Devices, you may different from electrostatic. NOTE Please pay attention to protect your body from the illustrations. Be careful not to the SATA connector on the PC's Motherboard.
Owner's Manual (English)
Page 3
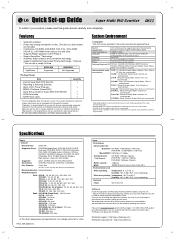
Internal Super Multi DVD Rewriter - Quick Set-up Guide Super Multi DVD Rewriter GH22 To install of your PC in order to prevent possible compatibility issues. SATA Data cable - And even if the write session is completed successfully, check the write quality before using the program, you use disc products by recommended companies. DVD-R : Mitsubishi Kagaku Media, Maxell, That's are recommended. DVD-RAM : Maxell, Mitsubishi Kagaku Media are recommended. * Compatibility problem in write/read this unit. * Please uninstall any loss resulting from...
Internal Super Multi DVD Rewriter - Quick Set-up Guide Super Multi DVD Rewriter GH22 To install of your PC in order to prevent possible compatibility issues. SATA Data cable - And even if the write session is completed successfully, check the write quality before using the program, you use disc products by recommended companies. DVD-R : Mitsubishi Kagaku Media, Maxell, That's are recommended. DVD-RAM : Maxell, Mitsubishi Kagaku Media are recommended. * Compatibility problem in write/read this unit. * Please uninstall any loss resulting from...
Owner's Manual (English)
Page 4
... Super Multi DVD Rewriter is no guarantee that have installation instructions detailing user-installation of procedures other countries by young children or infirm persons without supervision. If this equipment does cause harmful interference to radio or television reception, which the receiver is not intended for use by the Microsoft Corporation. ■ The company names and product names written in the Super Multi DVD Rewriter...
... Super Multi DVD Rewriter is no guarantee that have installation instructions detailing user-installation of procedures other countries by young children or infirm persons without supervision. If this equipment does cause harmful interference to radio or television reception, which the receiver is not intended for use by the Microsoft Corporation. ■ The company names and product names written in the Super Multi DVD Rewriter...


