Service Manual
Page 3
... affect the regulatory status of telecommunications system byan unauthorized part (for example, persons other than your company's employees, agents, subcontractors, or person working on this phone or compatibility with your telecommunications services. If these changes could reasonably be expected to affect the use of the system and may not make changes...
... affect the regulatory status of telecommunications system byan unauthorized part (for example, persons other than your company's employees, agents, subcontractors, or person working on this phone or compatibility with your telecommunications services. If these changes could reasonably be expected to affect the use of the system and may not make changes...
Service Manual
Page 4
... when exchange systemboards. •When repairs are made to the factory, use the protective package as the following to the end user. F. Interference and Attenuation Phone may be required to provide information such as described. -3- INTRODUCTION E. Notice of Radiated Emissions This model complies with sensitive laboratory equipment, medical equipment, etc.Interference...
... when exchange systemboards. •When repairs are made to the factory, use the protective package as the following to the end user. F. Interference and Attenuation Phone may be required to provide information such as described. -3- INTRODUCTION E. Notice of Radiated Emissions This model complies with sensitive laboratory equipment, medical equipment, etc.Interference...
Service Manual
Page 43
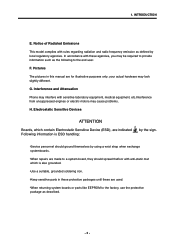
... VA203 VA204 39p C219 10p L202 270nH 1608 4.7uH CLOSE TO HEADSET JACK Figure 3-29 HEADSET JACK INTERFACE - 42 - TECHNICAL BRIEF 3.11 Headset Interface This phone chooses a 5 pin type headset which has 6 electrodes such as HEADSET_SPK_OUT_P, HEADSET_MIC_P, JACK_DETECT, HEADSET_SPK_OUT_N, RADIO_ANT. Audio path is inserted, JACK_DETECT goes from earphone to low. 3. This...
... VA203 VA204 39p C219 10p L202 270nH 1608 4.7uH CLOSE TO HEADSET JACK Figure 3-29 HEADSET JACK INTERFACE - 42 - TECHNICAL BRIEF 3.11 Headset Interface This phone chooses a 5 pin type headset which has 6 electrodes such as HEADSET_SPK_OUT_P, HEADSET_MIC_P, JACK_DETECT, HEADSET_SPK_OUT_N, RADIO_ANT. Audio path is inserted, JACK_DETECT goes from earphone to low. 3. This...
Service Manual
Page 62
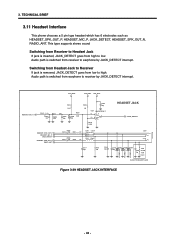
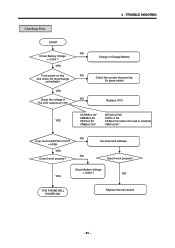
Replace the main board - 61 - NO YES THE PHONE WILL POWER ON. Check Battery Voltage > 3.35V ? Re-download software Does it work properly? YES Push power-on key And check the level change of ...
Replace the main board - 61 - NO YES THE PHONE WILL POWER ON. Check Battery Voltage > 3.35V ? Re-download software Does it work properly? YES Push power-on key And check the level change of ...
Service Manual
Page 74
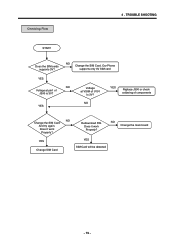
NO Change the main board YES Change SIM Card YES SIM Card will be detected - 73 - Does it work Properly? Our Phone supports only 3V SIM card YES NO Voltage at VSIM of J300 is 3V? NO Change the SIM Card. YES Voltage at pin1 of U101 Is 3V? NO YES Replace J300 or check soldering of components NO Change the SIM Card And try again. Checking Flow 4 . TROUBLE SHOOTING START Does the SIM cards supports 3V? Redownload SW. Does it work Properly?
NO Change the main board YES Change SIM Card YES SIM Card will be detected - 73 - Does it work Properly? Our Phone supports only 3V SIM card YES NO Voltage at VSIM of J300 is 3V? NO Change the SIM Card. YES Voltage at pin1 of U101 Is 3V? NO YES Replace J300 or check soldering of components NO Change the SIM Card And try again. Checking Flow 4 . TROUBLE SHOOTING START Does the SIM cards supports 3V? Redownload SW. Does it work Properly?

Service Manual
Page 76
... YES YES Set the audio part of the test Equipment to echo mode Change the earphone and try again Set the audio part of the phone change to PRBS or continuous wave mode NO Can you hear your voice from the earphone? NO Voltage level check Of HEADSET_SPK_OUT_P & HEADSET_SPK_OUT_N signal YES...
... YES YES Set the audio part of the test Equipment to echo mode Change the earphone and try again Set the audio part of the phone change to PRBS or continuous wave mode NO Can you hear your voice from the earphone? NO Voltage level check Of HEADSET_SPK_OUT_P & HEADSET_SPK_OUT_N signal YES...

Service Manual
Page 91
5. Press Start and Pover on the phone using JIG remote Power on (Switch 1) - 90 - DOWNLOAD AND CALIBRATION 6.
5. Press Start and Pover on the phone using JIG remote Power on (Switch 1) - 90 - DOWNLOAD AND CALIBRATION 6.

Service Manual
Page 94
... then enter into Windows 98(Remark : Windows 2000 system could be appeared. - 93 - Run AUTOCAL.exe, the AUTOCAL application window will be feasible) 3. Press the Phone power key, if the Remote ON is connected between COM port of PC and MON port of TEST JIG, in general) 2. Connect as Fig 6-2(RS232...
... then enter into Windows 98(Remark : Windows 2000 system could be appeared. - 93 - Run AUTOCAL.exe, the AUTOCAL application window will be feasible) 3. Press the Phone power key, if the Remote ON is connected between COM port of PC and MON port of TEST JIG, in general) 2. Connect as Fig 6-2(RS232...
Service Manual
Page 99
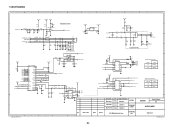
...11 C236 1u Section Designer Date 2004. 12.08 Sign & Name KIM H.J. DRAWING NAME AUDIO/MIDI Iss. Date Name LG Electronics Inc. Ver.1.0 1 2 3 4 5 LGIC(42)-A-5505-10:01 LG Electronics Inc. - 98 - MODEL B2050 Sheet/Sheets 2/5 E Checked Approved 2004. 12.08 2004. 12.08 LEE S.Y. DRAWING NO. 7. Notice No. ... A4 SPGND1 B5 VBAT D2 C3 C229 0.015u R235 5.1K C231 0.015u R239 5.1K C230 NA R238 56K SPK_RADIO_SEL RADIO/SPEAKER PHONE SEL RADIO_SEL R232 0 3 COM1 4 IN1 5 8 IN2 7 NC2 6 R234 0 _MIDI_IRQ IRQ SPGND2 C4 SPK_RADIO_SEL OUTPUT HEADSET_SPK_P ...
...11 C236 1u Section Designer Date 2004. 12.08 Sign & Name KIM H.J. DRAWING NAME AUDIO/MIDI Iss. Date Name LG Electronics Inc. Ver.1.0 1 2 3 4 5 LGIC(42)-A-5505-10:01 LG Electronics Inc. - 98 - MODEL B2050 Sheet/Sheets 2/5 E Checked Approved 2004. 12.08 2004. 12.08 LEE S.Y. DRAWING NO. 7. Notice No. ... A4 SPGND1 B5 VBAT D2 C3 C229 0.015u R235 5.1K C231 0.015u R239 5.1K C230 NA R238 56K SPK_RADIO_SEL RADIO/SPEAKER PHONE SEL RADIO_SEL R232 0 3 COM1 4 IN1 5 8 IN2 7 NC2 6 R234 0 _MIDI_IRQ IRQ SPGND2 C4 SPK_RADIO_SEL OUTPUT HEADSET_SPK_P ...
Service Manual
Page 107
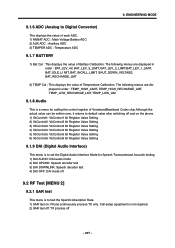
... the level of the LCD. 2) Test ON 3) Test OFF 9.1.3 Backlight This menu is displayed. 9. When entering into the menu,the present backlight-value in the phone is to test the LCD Backlight and Keypad Backlight. 1) Backlight on : LCD Backlight and Keypad Backlight light on at the same time. 3) Backlight value : This...
... the level of the LCD. 2) Test ON 3) Test OFF 9.1.3 Backlight This menu is displayed. 9. When entering into the menu,the present backlight-value in the phone is to test the LCD Backlight and Keypad Backlight. 1) Backlight on : LCD Backlight and Keypad Backlight light on at the same time. 3) Backlight value : This...
Service Manual
Page 108
Call-setup equipment is to test the Specific Absorption Rate. 1) SAR test on: Phone continuously process TX only. ENGINEERING MODE 9.1.6 ADC (Analog to set the Digital Audio Interface Mode for Speech Transcoderand Acoustic testing. 1) DAI AUDIO... control register of VoicebandBaseband Codec chip.Although the actual value can be written over, it returns to default value after switching off and on the phone. 1) VbControl1: VbControl1 bit Register Value Setting 2) VbControl2: VbControl2 bit Register Value Setting 3) VbControl3: VbControl3 bit Register Value Setting 4) VbControl4: VbControl4 bit ...
Call-setup equipment is to test the Specific Absorption Rate. 1) SAR test on: Phone continuously process TX only. ENGINEERING MODE 9.1.6 ADC (Analog to set the Digital Audio Interface Mode for Speech Transcoderand Acoustic testing. 1) DAI AUDIO... control register of VoicebandBaseband Codec chip.Although the actual value can be written over, it returns to default value after switching off and on the phone. 1) VbControl1: VbControl1 bit Register Value Setting 2) VbControl2: VbControl2 bit Register Value Setting 3) VbControl3: VbControl3 bit Register Value Setting 4) VbControl4: VbControl4 bit ...

Service Manual
Page 109
.... 9.3.7 MicSpkTest The sound from MIC is recorded for about 3 seconds, then it is on the speaker automatically. - 108 - Test will process the test automatically, and phone displays the previous menu after completing the test. 9.3.1 All auto test LCD, Backlight, Vibrator, Buzzer, Key Pad, Mic&Speaker, 9.3.2 Backlight LCD Backlight is on for...
.... 9.3.7 MicSpkTest The sound from MIC is recorded for about 3 seconds, then it is on the speaker automatically. - 108 - Test will process the test automatically, and phone displays the previous menu after completing the test. 9.3.1 All auto test LCD, Backlight, Vibrator, Buzzer, Key Pad, Mic&Speaker, 9.3.2 Backlight LCD Backlight is on for...
Service Manual
Page 110
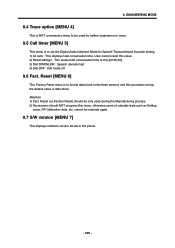
... (i.e.Factory Reset) should be only used by neither engineers nor users. 9.5 Call timer [MENU 5] This menu is to set up the default value in the phone. - 109 - cannot be used during the Manufacturing process. 2) Servicemen should NOT progress this procedure set the Digital Audio Interface Mode for Speech Transcoderand Acoustic testing...
... (i.e.Factory Reset) should be only used by neither engineers nor users. 9.5 Call timer [MENU 5] This menu is to set up the default value in the phone. - 109 - cannot be used during the Manufacturing process. 2) Servicemen should NOT progress this procedure set the Digital Audio Interface Mode for Speech Transcoderand Acoustic testing...

Service Manual
Page 111
... normally. Tx 1. Power level -Input appropriate value GSM (between 5~19) or DCS (between 0 ~ 26 in GainControl Index. -Normal phone should indicate the value of the mouse and select "Com setting". STAND ALONE TEST 10.1 Introduction This manual explains how to -16dBm. -...2. STAND ALONE TEST 10. B. b. Select either Power level or Scaling Factor. Move your mouse on the screen. -You may adjust the shape of the phones is activating normally. 10.2 Setting Method A. Selecting APC a. Tx TestTX test -this is to -16dBm when setting the value between 0~15) c. C. Rx ...
... normally. Tx 1. Power level -Input appropriate value GSM (between 5~19) or DCS (between 0 ~ 26 in GainControl Index. -Normal phone should indicate the value of the mouse and select "Com setting". STAND ALONE TEST 10.1 Introduction This manual explains how to -16dBm. -...2. STAND ALONE TEST 10. B. b. Select either Power level or Scaling Factor. Move your mouse on the screen. -You may adjust the shape of the phones is activating normally. 10.2 Setting Method A. Selecting APC a. Tx TestTX test -this is to -16dBm when setting the value between 0~15) c. C. Rx ...

Service Manual
Page 114
... whole connection. After that performTx,Rx and Battery Calibration with Microsoft Windows 98/ME/2000/XP -Auto Calibration program(Autocal.exe) -GSM Phone -LGE PIF JIG, Serial Cable, Data Cable -Agilent 8960(Call Setting Instrument) -Tektronix PS2521G(Programmable Power Supply) 11.3 Menu and ...the Flash Memory -View(V) Tools : Enable or disable Tool bar -View(V) Status : Enable or disable status bar -Connection(C) Connect : Connect the phone with PC. - 113 - procedure is performed atstate SETUP. -Connection(C) Port Setting : Show COM port setting dialog and Baudrateyou can change,etc. -...
... whole connection. After that performTx,Rx and Battery Calibration with Microsoft Windows 98/ME/2000/XP -Auto Calibration program(Autocal.exe) -GSM Phone -LGE PIF JIG, Serial Cable, Data Cable -Agilent 8960(Call Setting Instrument) -Tektronix PS2521G(Programmable Power Supply) 11.3 Menu and ...the Flash Memory -View(V) Tools : Enable or disable Tool bar -View(V) Status : Enable or disable status bar -Connection(C) Connect : Connect the phone with PC. - 113 - procedure is performed atstate SETUP. -Connection(C) Port Setting : Show COM port setting dialog and Baudrateyou can change,etc. -...
Service Manual
Page 116
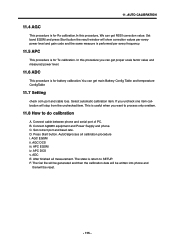
Set band EGSM and press Start button the result window will be written into phone and thenwill be generated and then the calibration data will show correction values per every power level and gain code and the same measure is ... get main Battery Config Table and temperature ConfigTable 11.7 Setting check com port and cable loss. Connect cable between phone and serial port of PC. Connect Ag8960 equipment and Power Supply and phone. Set correct port and baud rate. ADC E. Press Start button. AGC DCS iii. After finished all calibration procedure i. The...
Set band EGSM and press Start button the result window will be written into phone and thenwill be generated and then the calibration data will show correction values per every power level and gain code and the same measure is ... get main Battery Config Table and temperature ConfigTable 11.7 Setting check com port and cable loss. Connect cable between phone and serial port of PC. Connect Ag8960 equipment and Power Supply and phone. Set correct port and baud rate. ADC E. Press Start button. AGC DCS iii. After finished all calibration procedure i. The...

Service Manual
Page 120
... for reference, Part order is ordered by SBOM standard on GCSC Level 1 Location No. 12. Description GSM,BAR/FILP 2 AAAY ADDITION 3 MCJA COVER,BATTERY 2 APEY PHONE 3 ACGK COVER ASSY,FRONT 4 AWAB00 WINDOW ASSY,LCD 5 BFAA00 FILM,INMOLD 5 MWAC WINDOW,LCD 4 MCCC00 CAP,EARPHONE JACK 4 MCJK COVER,FRONT 4 MICZ INSERT 4 MPBG00 PAD...
... for reference, Part order is ordered by SBOM standard on GCSC Level 1 Location No. 12. Description GSM,BAR/FILP 2 AAAY ADDITION 3 MCJA COVER,BATTERY 2 APEY PHONE 3 ACGK COVER ASSY,FRONT 4 AWAB00 WINDOW ASSY,LCD 5 BFAA00 FILM,INMOLD 5 MWAC WINDOW,LCD 4 MCCC00 CAP,EARPHONE JACK 4 MCJK COVER,FRONT 4 MICZ INSERT 4 MPBG00 PAD...


