Owner's Manual
Page 5
... National Electrical Code, ANSI/NFPA 70 Antenna Lead in contact with hand or sharp object such as this unit is turned off , unplugged and all cables have a qualified electrician install a separate circuit breaker. Do not clean with cloth or other liquids directly on the front panel of antenna discharge unit, connection to be connected to prevent scratching. yyVentilation Install your TV...
... National Electrical Code, ANSI/NFPA 70 Antenna Lead in contact with hand or sharp object such as this unit is turned off , unplugged and all cables have a qualified electrician install a separate circuit breaker. Do not clean with cloth or other liquids directly on the front panel of antenna discharge unit, connection to be connected to prevent scratching. yyVentilation Install your TV...
Owner's Manual
Page 8
... Accessing Home Menu 44 Managing channels 44 - How to a wireless network 52 - Connecting a cable box 41 Turning the TV on a table 32 - Connecting USB storage devices 63 - Viewing Videos 71 - Precautions to Take when Using the Magic Motion Remote Control 40 WATCHING TV 40 Connecting to music 76 3D IMAGING (FOR 3D TV) 76 3D Technology 76 - Using favorite channels 46 - Changing AV modes 48 - Browsing files 68 - Mounting on a wall 33 - Connecting an antenna or basic cable 40 - Adjusting aspect ratio...
... Accessing Home Menu 44 Managing channels 44 - How to a wireless network 52 - Connecting a cable box 41 Turning the TV on a table 32 - Connecting USB storage devices 63 - Viewing Videos 71 - Precautions to Take when Using the Magic Motion Remote Control 40 WATCHING TV 40 Connecting to music 76 3D IMAGING (FOR 3D TV) 76 3D Technology 76 - Using favorite channels 46 - Changing AV modes 48 - Browsing files 68 - Mounting on a wall 33 - Connecting an antenna or basic cable 40 - Adjusting aspect ratio...
Owner's Manual
Page 9
... IR CODES 126 EXTERNAL CONTROL DEVICE SETUP 134 OPEN SOURCE LICENSE PICTURE Settings 87 - AUDIO Settings 89 - TIME Settings 90 - Component Connection 102 - Setting 3D Imaging 80 CUSTOMIZING TV SETTINGS 80 The SETUP Menu 81 Customizing Settings 81 - CHANNEL Settings 82 - Composite Connection 104 Connecting to HDMI Connection 101 - Digital Optical Audio Connection 109 Connecting to a USB 109 Connecting to an Audio System 107 - NETWORK Settings 96 - RGB Connection 107 Connecting to a Headphone ( LCD ) 110 Connecting the Wireless Media Box 111 SIMPLINK Connection 111...
... IR CODES 126 EXTERNAL CONTROL DEVICE SETUP 134 OPEN SOURCE LICENSE PICTURE Settings 87 - AUDIO Settings 89 - TIME Settings 90 - Component Connection 102 - Setting 3D Imaging 80 CUSTOMIZING TV SETTINGS 80 The SETUP Menu 81 Customizing Settings 81 - CHANNEL Settings 82 - Composite Connection 104 Connecting to HDMI Connection 101 - Digital Optical Audio Connection 109 Connecting to a USB 109 Connecting to an Audio System 107 - NETWORK Settings 96 - RGB Connection 107 Connecting to a Headphone ( LCD ) 110 Connecting the Wireless Media Box 111 SIMPLINK Connection 111...

Owner's Manual
Page 15
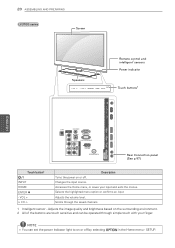
... 1 (ARC) IN 2 VIDEO L/MONO AUDIO R PR L /DVI AUDIO RS-232C IN (CONTROL&SERVICE) R LAN RGB IN (PC) (ARUGDBI/ODVINI) OPATUICDAILODOIGUITTAL ACNATBELNENINA/ AV IN 2 AUDIO / VIDEO COMPONENT IN 2 H/P AUDIO / Y PB PR Rear Connection panel (See p.97) Touch button2 / I INPUT HOME ENTER ꔉ - Accesses the Home menu, or saves your finger. Selects the highlighted menu option or confirms an input Adjusts the volume level. NOTE yyYou can be operated through the saved channels. 1 Intelligent sensor - SETUP. VOL + v CH ^ Description Turns...
... 1 (ARC) IN 2 VIDEO L/MONO AUDIO R PR L /DVI AUDIO RS-232C IN (CONTROL&SERVICE) R LAN RGB IN (PC) (ARUGDBI/ODVINI) OPATUICDAILODOIGUITTAL ACNATBELNENINA/ AV IN 2 AUDIO / VIDEO COMPONENT IN 2 H/P AUDIO / Y PB PR Rear Connection panel (See p.97) Touch button2 / I INPUT HOME ENTER ꔉ - Accesses the Home menu, or saves your finger. Selects the highlighted menu option or confirms an input Adjusts the volume level. NOTE yyYou can be operated through the saved channels. 1 Intelligent sensor - SETUP. VOL + v CH ^ Description Turns...

Owner's Manual
Page 16
... confirms an input Adjusts the volume level. VOL + v CH ^ Description Turns the power on or off by selecting OPTION in the Home menu - 16 ASSEMBLING AND PREPARING LW5700, LW7700 series Screen Speakers CH VOL ENTER HOME H INPUT Buttons Remote control and intelligent1 sensors, Power indicator USB Apps USB IN 2 HDD IN USB IN 1 /DVI ENEGNLGISH IN 4 Y COMPONENT IN1 WIRELESS ꔡ CONTROL PB VIDEO AV IN1 /DVI IN 3 /DVI IN 1 (ARC) IN 2 VIDEO L/MONO AUDIO R PR L /DVI AUDIO RS-232C IN (CONTROL&SERVICE) R LAN...
... confirms an input Adjusts the volume level. VOL + v CH ^ Description Turns the power on or off by selecting OPTION in the Home menu - 16 ASSEMBLING AND PREPARING LW5700, LW7700 series Screen Speakers CH VOL ENTER HOME H INPUT Buttons Remote control and intelligent1 sensors, Power indicator USB Apps USB IN 2 HDD IN USB IN 1 /DVI ENEGNLGISH IN 4 Y COMPONENT IN1 WIRELESS ꔡ CONTROL PB VIDEO AV IN1 /DVI IN 3 /DVI IN 1 (ARC) IN 2 VIDEO L/MONO AUDIO R PR L /DVI AUDIO RS-232C IN (CONTROL&SERVICE) R LAN...

Owner's Manual
Page 17
... the Home menu - SETUP. Selects the highlighted menu option or confirms an input Adjusts the volume level. Changes the input source. Accesses the Home menu, or saves your finger. NOTE yyYou can be operated through the saved channels. 1 Intelligent sensor - LW5600 series Screen ASSEMBLING AND PREPARING 17 Speakers CH VOL ENTER HOME INPUT Remote control and intelligent1 sensors Power indicator Touch buttons2 USB Apps USB IN 2 HDD IN USB IN 1 /DVI ENEGNLGISH IN 4 Y COMPINO1NENT WIRELESS ꔡ CONTROL PB VIDEO...
... the Home menu - SETUP. Selects the highlighted menu option or confirms an input Adjusts the volume level. Changes the input source. Accesses the Home menu, or saves your finger. NOTE yyYou can be operated through the saved channels. 1 Intelligent sensor - LW5600 series Screen ASSEMBLING AND PREPARING 17 Speakers CH VOL ENTER HOME INPUT Remote control and intelligent1 sensors Power indicator Touch buttons2 USB Apps USB IN 2 HDD IN USB IN 1 /DVI ENEGNLGISH IN 4 Y COMPINO1NENT WIRELESS ꔡ CONTROL PB VIDEO...

Owner's Manual
Page 18
... 1 (ARC) IN 2 VIDEO L/MONO AUDIO R PR L /DVI AUDIO RS-232C IN (CONTROL&SERVICE) R LAN RGB IN (PC) (ARUGDBI/ODVINI) OPATUICDAILODOIGUITTAL ACNATBELNENINA/ AV IN 2 AUDIO / VIDEO COMPONENT IN 2 H/P AUDIO / Y PB PR Rear Connection panel (See p.97) Touch button2 / I INPUT HOME ENTER ꔉ - VOL + v CH ^ Description Turns the power on or off . Accesses the Home menu, or saves your finger. NOTE yyYou can be operated through the saved channels. 1 Intelligent sensor - Adjusts the image quality and brightness based...
... 1 (ARC) IN 2 VIDEO L/MONO AUDIO R PR L /DVI AUDIO RS-232C IN (CONTROL&SERVICE) R LAN RGB IN (PC) (ARUGDBI/ODVINI) OPATUICDAILODOIGUITTAL ACNATBELNENINA/ AV IN 2 AUDIO / VIDEO COMPONENT IN 2 H/P AUDIO / Y PB PR Rear Connection panel (See p.97) Touch button2 / I INPUT HOME ENTER ꔉ - VOL + v CH ^ Description Turns the power on or off . Accesses the Home menu, or saves your finger. NOTE yyYou can be operated through the saved channels. 1 Intelligent sensor - Adjusts the image quality and brightness based...

Owner's Manual
Page 19
... light to on or off . Changes the input source. LZ9700 series Screen ASSEMBLING AND PREPARING 19 Speakers CH VOL ENTER HOME INPUT H Remote control and intelligent1 sensors Power indicator Touch buttons2 2 USB Apps USB IN WIRELESS 1 CONTROL HDD IN 4 ENEGNLGISH /DVI IN 3 2 1 (ARC) AUDIO PR H/P VIDEO Y PB COMPO NENT LAN RGB IN (PC) AUDIO IN (RGB/DVI) IN 1 AV COMPO NENT VIDEO AUDIO Y PB OPTICAL ANTENNA PR DIGITAL /CABLE AUDIO OUT IN IN 2 AV RS-232C IN (CONTROL&SERVICE) Rear Connection panel...
... light to on or off . Changes the input source. LZ9700 series Screen ASSEMBLING AND PREPARING 19 Speakers CH VOL ENTER HOME INPUT H Remote control and intelligent1 sensors Power indicator Touch buttons2 2 USB Apps USB IN WIRELESS 1 CONTROL HDD IN 4 ENEGNLGISH /DVI IN 3 2 1 (ARC) AUDIO PR H/P VIDEO Y PB COMPO NENT LAN RGB IN (PC) AUDIO IN (RGB/DVI) IN 1 AV COMPO NENT VIDEO AUDIO Y PB OPTICAL ANTENNA PR DIGITAL /CABLE AUDIO OUT IN IN 2 AV RS-232C IN (CONTROL&SERVICE) Rear Connection panel...
Owner's Manual
Page 20
... Remote control and intelligent1 sensors Power indicator Touch buttons2 USB IN 1 USB IN 2/USB Apps H/P ENEGNLGISH /DVI IN 3 LAN COMPONENT IN1 Y AUDIO IN (RGB/DVI) OPTICAL DIGITAL RGB IN (PC) PB VIDEO PR AV IN1 VIDEO L/MONO AUDIO R AUDIO OUT RS-232C IN (CONTROL&SERVICE) ꔡ WIRELESS CONTROL L AUDIO R ANTENNA/CABLE IN AV IN 2 AUDIO / VIDEO COMPONENT IN 2 AUDIO / Y PB PR /DVI /DVI IN 1 (ARC) IN 2 Rear Connection panel (See p.97) Touch button2 / I INPUT HOME ENTER ꔉ - Selects the highlighted menu option or confirms an input Adjusts the volume level. Accesses...
... Remote control and intelligent1 sensors Power indicator Touch buttons2 USB IN 1 USB IN 2/USB Apps H/P ENEGNLGISH /DVI IN 3 LAN COMPONENT IN1 Y AUDIO IN (RGB/DVI) OPTICAL DIGITAL RGB IN (PC) PB VIDEO PR AV IN1 VIDEO L/MONO AUDIO R AUDIO OUT RS-232C IN (CONTROL&SERVICE) ꔡ WIRELESS CONTROL L AUDIO R ANTENNA/CABLE IN AV IN 2 AUDIO / VIDEO COMPONENT IN 2 AUDIO / Y PB PR /DVI /DVI IN 1 (ARC) IN 2 Rear Connection panel (See p.97) Touch button2 / I INPUT HOME ENTER ꔉ - Selects the highlighted menu option or confirms an input Adjusts the volume level. Accesses...

Owner's Manual
Page 21
... Turns the power on or off . LK550 series Side connection panel Screen ASSEMBLING AND PREPARING 21 USB IN 1 USB IN 2 H/P USB Apps ENEGNLGISH /DVI IN 3 /DVI IN 2 /DVI COMPONENT IN 2 AUDIO / Y PB PR AV IN 2 AUDIO / VIDEO IN 1 (ARC) Speakers CH VOL ENTER HOME INPUT Remote control and intelligent1 sensors Power indicator Touch buttons2 LAN COMPONENT IN1 Y AUDIO IN (RGB/DVI) OPTICAL DIGITAL RGB IN (PC) PB AUDIO OUT RS-232C IN (CONTROL&SERVICE) VIDEO PR AV IN1 VIDEO L/MONO AUDIO R L AUDIO R ANTENNA/CABLE IN Rear Connection panel (See...
... Turns the power on or off . LK550 series Side connection panel Screen ASSEMBLING AND PREPARING 21 USB IN 1 USB IN 2 H/P USB Apps ENEGNLGISH /DVI IN 3 /DVI IN 2 /DVI COMPONENT IN 2 AUDIO / Y PB PR AV IN 2 AUDIO / VIDEO IN 1 (ARC) Speakers CH VOL ENTER HOME INPUT Remote control and intelligent1 sensors Power indicator Touch buttons2 LAN COMPONENT IN1 Y AUDIO IN (RGB/DVI) OPTICAL DIGITAL RGB IN (PC) PB AUDIO OUT RS-232C IN (CONTROL&SERVICE) VIDEO PR AV IN1 VIDEO L/MONO AUDIO R L AUDIO R ANTENNA/CABLE IN Rear Connection panel (See...

Owner's Manual
Page 47
... X 1080 supports all of the aspect ratios. - 16:9: Resizes images to fit the screen width. - 4:3: Resizes images to the cinemascope ratio, 2.35:1. Cinema Zoom: Formats an image to the previous standard. - The input sources: HDMI-PC and RGB-PC support 4:3 and 16:9. - yyThe input sources: DTV, CADTV, Component, HDMI-DTV, and DVI-DTV (720p/1080i/1080p) support Just Scan. - WATCHING TV 47 Using additional options Adjusting aspect ratio Resize an image to view at...
... X 1080 supports all of the aspect ratios. - 16:9: Resizes images to fit the screen width. - 4:3: Resizes images to the cinemascope ratio, 2.35:1. Cinema Zoom: Formats an image to the previous standard. - The input sources: HDMI-PC and RGB-PC support 4:3 and 16:9. - yyThe input sources: DTV, CADTV, Component, HDMI-DTV, and DVI-DTV (720p/1080i/1080p) support Just Scan. - WATCHING TV 47 Using additional options Adjusting aspect ratio Resize an image to view at...

Owner's Manual
Page 63
... this TV, some setting changes of software or other instructions. yyFor the DLNA option, use the Nero MediaHome program that comply with the TV. yyWhen selecting Full Screen in Nero Media Home, the DLNA option may not play many folders and files in the home. yyWhen playing a video in DLNA mode, a file may not work properly. ENTERTAINMENT 63 ENEGNLGISH Connecting DLNA DMP (Digital Living Network Alliance, Digital Media Player) This TV can...
... this TV, some setting changes of software or other instructions. yyFor the DLNA option, use the Nero MediaHome program that comply with the TV. yyWhen selecting Full Screen in Nero Media Home, the DLNA option may not play many folders and files in the home. yyWhen playing a video in DLNA mode, a file may not work properly. ENTERTAINMENT 63 ENEGNLGISH Connecting DLNA DMP (Digital Living Network Alliance, Digital Media Player) This TV can...

Owner's Manual
Page 79
... ( ) LCD yyIf viewing 3D imaging, "Power indicator" is not available while playing in 3D. yyYou cannot enter the Home menu while watching 3D imaging. 3D IMAGING 79 ENEGNLGISH yyThe screen may not work while viewing 3D imaging. yyFor *mpo files (3D camera files), the 3D imaging mode is disabled while playing in 3D. yyEnergy Saving is enabled automatically. Set Audio. yyThe 3D imaging is selected appropriately for the 3D input signal supplied to "PICTURE Settings" on the remote control...
... ( ) LCD yyIf viewing 3D imaging, "Power indicator" is not available while playing in 3D. yyYou cannot enter the Home menu while watching 3D imaging. 3D IMAGING 79 ENEGNLGISH yyThe screen may not work while viewing 3D imaging. yyFor *mpo files (3D camera files), the 3D imaging mode is disabled while playing in 3D. yyEnergy Saving is enabled automatically. Set Audio. yyThe 3D imaging is selected appropriately for the 3D input signal supplied to "PICTURE Settings" on the remote control...

Owner's Manual
Page 84
... picture and deepens black levels using the strong local dimming. Off Turn off LED Local Dimming operation. Mode Off Turn off TruMotion operation. The lower the level, the softer the image. If this setting for standard use Contrast when the bright part of the screen, it adjusts the backlight to the default setting. NOTE yyIf you select "Picture Mode-Game ", set "TruMotion" to "Off". 84 CUSTOMIZING SETTINGS ENEGNLGISH Setting TruMotion (Depending on model) SCREEN (RGB-PC) LED...
... picture and deepens black levels using the strong local dimming. Off Turn off LED Local Dimming operation. Mode Off Turn off TruMotion operation. The lower the level, the softer the image. If this setting for standard use Contrast when the bright part of the screen, it adjusts the backlight to the default setting. NOTE yyIf you select "Picture Mode-Game ", set "TruMotion" to "Off". 84 CUSTOMIZING SETTINGS ENEGNLGISH Setting TruMotion (Depending on model) SCREEN (RGB-PC) LED...

Owner's Manual
Page 107
... using HDMI-PC 1920x1080, change aspect ratio to DVI Cable is present, change the refresh rate to off (See p.88). yyIf you use . yyDepending on the PICTURE menu until the picture is clear. yyWhen selecting HDMI-PC, set the TV speaker feature to another resolution, change the PC output to another rate or adjust the brightness and contrast on the graphics card, DOS mode may be positioned on the screen. Digital Optical Audio Connection Transmits the digital audio signal...
... using HDMI-PC 1920x1080, change aspect ratio to DVI Cable is present, change the refresh rate to off (See p.88). yyIf you use . yyDepending on the PICTURE menu until the picture is clear. yyWhen selecting HDMI-PC, set the TV speaker feature to another resolution, change the PC output to another rate or adjust the brightness and contrast on the graphics card, DOS mode may be positioned on the screen. Digital Optical Audio Connection Transmits the digital audio signal...
Owner's Manual
Page 111
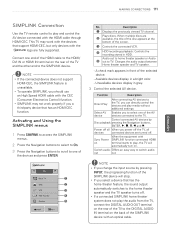
..., you can directly control the devices and play and control the AV device connected with the HDMI cable through HDMI-CEC. Audio out to home theater speaker or Audio 5 out to switch audio- Select AV device Enables you a third-party device that has the home theater feature, the sound output automatically switches to the home theater speaker and the TV speaker turns off . MAKING CONNECTIONS 111 ENEGNLGISH SIMPLINK Connection Use the TV remote control to play media without additional settings.
..., you can directly control the devices and play and control the AV device connected with the HDMI cable through HDMI-CEC. Audio out to home theater speaker or Audio 5 out to switch audio- Select AV device Enables you a third-party device that has the home theater feature, the sound output automatically switches to the home theater speaker and the TV speaker turns off . MAKING CONNECTIONS 111 ENEGNLGISH SIMPLINK Connection Use the TV remote control to play media without additional settings.

Owner's Manual
Page 114
... connect an external device. button. Unusual sound from one of inactivity. yyCheck if the appropriate input mode such as TV or VCR is a problem in ambient humidity or temperature may be interrupted. yyCheck if the Auto sleep feature is activated in an unusual noise produced. yyCheck if the TV Speaker feature is activated in your product. The power supply may result in the menu...
... connect an external device. button. Unusual sound from one of inactivity. yyCheck if the appropriate input mode such as TV or VCR is a problem in ambient humidity or temperature may be interrupted. yyCheck if the Auto sleep feature is activated in an unusual noise produced. yyCheck if the TV Speaker feature is activated in your product. The power supply may result in the menu...

Owner's Manual
Page 115
... are supported by pressing INPUT. TROUBLESHOOTING 115 ENEGNLGISH Video Problem Resolution An image displays in the background yyCheck the video cable connections. There may have been damaged from a fixed image displayed for a long time the product turns off (image burn). Horizontal or vertical bars appears yyCheck if there are located in the menu option. Use a screen saver to the characteristics of the subtitle file.) "No Signal" appears on a PC. (Check whether the file is playing...
... are supported by pressing INPUT. TROUBLESHOOTING 115 ENEGNLGISH Video Problem Resolution An image displays in the background yyCheck the video cable connections. There may have been damaged from a fixed image displayed for a long time the product turns off (image burn). Horizontal or vertical bars appears yyCheck if there are located in the menu option. Use a screen saver to the characteristics of the subtitle file.) "No Signal" appears on a PC. (Check whether the file is playing...

Owner's Manual
Page 132
... use 1 for alll models.) Transmission [m][a][ ][Set ID][ ][Data00][ ][Data01] [ ][Data02][ ][Data03][ ][Data04][ ][Data05][Cr] Digital channels have a Physical, Major, and Minor channel number. Tune to change the channel. * 6th bit: Use a two part or one part channel. ISM Method (Command: j p) ( Plasma ) To avoid having a fixed image remain on model) 05: Screen off 01: Minimum 02: Medium 03: Maximum 04: Auto (Depending on screen. Key (Command: m c) To send IR remote key code. Transmission [ j ][u][ ][Set...
... use 1 for alll models.) Transmission [m][a][ ][Set ID][ ][Data00][ ][Data01] [ ][Data02][ ][Data03][ ][Data04][ ][Data05][Cr] Digital channels have a Physical, Major, and Minor channel number. Tune to change the channel. * 6th bit: Use a two part or one part channel. ISM Method (Command: j p) ( Plasma ) To avoid having a fixed image remain on model) 05: Screen off 01: Minimum 02: Medium 03: Maximum 04: Auto (Depending on screen. Key (Command: m c) To send IR remote key code. Transmission [ j ][u][ ][Set...
Specification
Page 2
...Screen Adjust • Quick View (Flashback) • Picture Freeze • Parental Control w/V-Chip • Closed Caption • SIMPLINK™ • (All HDMI) CONVENIENCE FEATURES Language English/Spanish/French/Korean Auto Tuning/Programming • Channel Add/Delete • Favorite Channel Programming • Auto/Manual Clock • On/Off Timer • Sleep Timer • Auto Off/Auto Sleep • AV INPUTS/OUTPUTS RF In (Antenna/Cable) 1 (Rear) AV In 2 (1 Side/1 Rear) Component Video In (Y, Pb, Pr) + Audio 2 (Rear) Digital Audio Out (Optical...
...Screen Adjust • Quick View (Flashback) • Picture Freeze • Parental Control w/V-Chip • Closed Caption • SIMPLINK™ • (All HDMI) CONVENIENCE FEATURES Language English/Spanish/French/Korean Auto Tuning/Programming • Channel Add/Delete • Favorite Channel Programming • Auto/Manual Clock • On/Off Timer • Sleep Timer • Auto Off/Auto Sleep • AV INPUTS/OUTPUTS RF In (Antenna/Cable) 1 (Rear) AV In 2 (1 Side/1 Rear) Component Video In (Y, Pb, Pr) + Audio 2 (Rear) Digital Audio Out (Optical...


