
Owner's Manual
Page 5
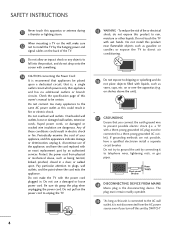
...cord replaced with liquids, such as being twisted, kinked, pinched, closed in . Short-circuit Breaker Power Supply 18 DISCONNECTING DEVICE FROM MAINS Mains plug is recommend that appliances be certain. SAFETY INSTRUCTIONS 11 Never touch this product to rain, moisture or other liquids. When mounting a TV on the wall..., make the TV with wet hands. Do not make sure 12 not to install the TV by connecting it , discontinue use a damaged or loose power cord. Be sure do not expose this apparatus or antenna during a thunder or lighting storm....
...cord replaced with liquids, such as being twisted, kinked, pinched, closed in . Short-circuit Breaker Power Supply 18 DISCONNECTING DEVICE FROM MAINS Mains plug is recommend that appliances be certain. SAFETY INSTRUCTIONS 11 Never touch this product to rain, moisture or other liquids. When mounting a TV on the wall..., make the TV with wet hands. Do not make sure 12 not to install the TV by connecting it , discontinue use a damaged or loose power cord. Be sure do not expose this apparatus or antenna during a thunder or lighting storm....
Owner's Manual
Page 7
... Panel Information 13 Stand Instruction 15 Cable Management 17 Desktop Pedestal Installation 18 Swivel Stand 18 VESA Wall Mounting 19 Securing the TV to the wall to prevent falling when the TV is used on a stand 20 Antenna or Cable Connection 21 EXTERNAL EQUIPMENT SETUP HD Receiver Setup 22 DVD Setup 25 VCR Setup 27 Other A/V Source Setup 28 USB Connection 28 Audio Out Connection 29 PC Setup 30 WATCHING TV / CHANNEL CONTROL Remote Control Functions 36 Turning On TV 38 Channel Selection 38 Volume Adjustment 38 Initial Setting...
... Panel Information 13 Stand Instruction 15 Cable Management 17 Desktop Pedestal Installation 18 Swivel Stand 18 VESA Wall Mounting 19 Securing the TV to the wall to prevent falling when the TV is used on a stand 20 Antenna or Cable Connection 21 EXTERNAL EQUIPMENT SETUP HD Receiver Setup 22 DVD Setup 25 VCR Setup 27 Other A/V Source Setup 28 USB Connection 28 Audio Out Connection 29 PC Setup 30 WATCHING TV / CHANNEL CONTROL Remote Control Functions 36 Turning On TV 38 Channel Selection 38 Volume Adjustment 38 Initial Setting...

Owner's Manual
Page 9
... the sound of ambient light, LG's "Intelligent Sensor" uses 4,096 sensing steps to music on the screen. View videos and photos and listen to evaluate its surroundings. The result is displayed on model). The resulting ISF "day" and "night" modes will then be made through USB 2.0 ('videos' dependent on the TV for it can also save up to quickly switch between common settings. High-resolution digital television broadcast...
... the sound of ambient light, LG's "Intelligent Sensor" uses 4,096 sensing steps to music on the screen. View videos and photos and listen to evaluate its surroundings. The result is displayed on model). The resulting ISF "day" and "night" modes will then be made through USB 2.0 ('videos' dependent on the TV for it can also save up to quickly switch between common settings. High-resolution digital television broadcast...
Owner's Manual
Page 14
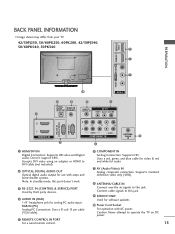
... DIGITAL AUDIO OUT Optical digital audio output for audio. 7 AV (Audio/Video) IN Analog composite connection. RGB IN (PC) Analog PC Connection. Supports HD video and Digital audio. Uses a D-sub 15 pin cable (VGA cable). 5 REMOTE CONTROL IN PORT For a wired remote control. 6 COMPONENT IN Analog Connection. Supports standard definition video only (480i). 8 ANTENNA/CABLE IN Connect over-the air signals to operate the TV on DC power. 13 R VIDEO L/MONO AUDIO R HDMI IN 3 SERVICE ONLY R R PREPARATION BACK PANEL INFORMATION I Image shown may differ from your TV. 42/50PJ250, 50/60PK250...
... DIGITAL AUDIO OUT Optical digital audio output for audio. 7 AV (Audio/Video) IN Analog composite connection. RGB IN (PC) Analog PC Connection. Supports HD video and Digital audio. Uses a D-sub 15 pin cable (VGA cable). 5 REMOTE CONTROL IN PORT For a wired remote control. 6 COMPONENT IN Analog Connection. Supports standard definition video only (480i). 8 ANTENNA/CABLE IN Connect over-the air signals to operate the TV on DC power. 13 R VIDEO L/MONO AUDIO R HDMI IN 3 SERVICE ONLY R R PREPARATION BACK PANEL INFORMATION I Image shown may differ from your TV. 42/50PJ250, 50/60PK250...
Owner's Manual
Page 23
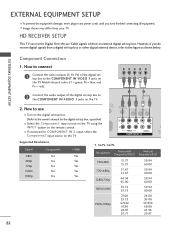
... plug in any power cords until you do receive digital signals from your TV. HD RECEIVER SETUP This TV can receive Digital Over-the-air/Cable signals without an external digital set -top box. (Refer to COMPONENT IN 2 input, select the Component2 input source on the remote control. I If connected to the owner's manual for the digital set -top box or other digital external device, refer to the COMPONENT IN VIDEO 1 jacks on the TV. 2. How to use I Select the Component1 input source...
... plug in any power cords until you do receive digital signals from your TV. HD RECEIVER SETUP This TV can receive Digital Over-the-air/Cable signals without an external digital set -top box. (Refer to COMPONENT IN 2 input, select the Component2 input source on the remote control. I If connected to the owner's manual for the digital set -top box or other digital external device, refer to the COMPONENT IN VIDEO 1 jacks on the TV. 2. How to use I Select the Component1 input source...
Owner's Manual
Page 24
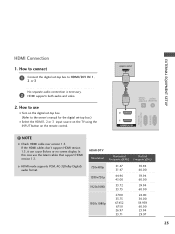
....00 59.94 60.00 24.00 30.00 59.939 60.00 23.94 29.97 23 EXTERNAL EQUIPMENT SETUP HDMI Connection 1. In this case use I Select the HDMI1, 2 or 3 input source on the TV using the INPUT button on the remote control. How to connect 1 Connect the digital set -top box.) I Turn on the digital set-top box. (Refer to the owner's manual for the digital set -top box to use the latest cables that support HDMI version 1.3.
....00 59.94 60.00 24.00 30.00 59.939 60.00 23.94 29.97 23 EXTERNAL EQUIPMENT SETUP HDMI Connection 1. In this case use I Select the HDMI1, 2 or 3 input source on the TV using the INPUT button on the remote control. How to connect 1 Connect the digital set -top box.) I Turn on the digital set-top box. (Refer to the owner's manual for the digital set -top box to use the latest cables that support HDMI version 1.3.
Owner's Manual
Page 25
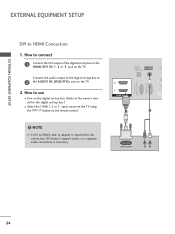
... G A DVI to HDMI cable or adapter is necessary. OPTICAL DIGITAL AUDIO OUT AUDIO IN (RGB/DVI) R CO RS-232C IN (CONTROL & SERVICE) RGB IN (PC) 2 2 1 1 HDMI/DVI IN 1 2 DVI-DTV OUTPUT R L 24 How to the owner's manual for this connection. How to use I Turn on the digital set-top box. (Refer to connect 1 Connect the DVI output of the digital set-top box to HDMI Connection 1. Connect the audio output of the digital set -top box.) I Select the HDMI1, 2 or 3 input source on the TV using the INPUT button on the remote control. ! DVI doesn't support audio...
... G A DVI to HDMI cable or adapter is necessary. OPTICAL DIGITAL AUDIO OUT AUDIO IN (RGB/DVI) R CO RS-232C IN (CONTROL & SERVICE) RGB IN (PC) 2 2 1 1 HDMI/DVI IN 1 2 DVI-DTV OUTPUT R L 24 How to the owner's manual for this connection. How to use I Turn on the digital set-top box. (Refer to connect 1 Connect the DVI output of the digital set-top box to HDMI Connection 1. Connect the audio output of the digital set -top box.) I Select the HDMI1, 2 or 3 input source on the TV using the INPUT button on the remote control. ! DVI doesn't support audio...
Owner's Manual
Page 32
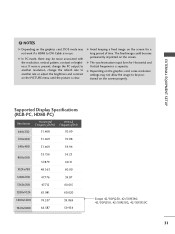
EXTERNAL EQUIPMENT SETUP ! G The synchronization input form for a long period of time. If noise is present, change the PC output to another resolution, change the refresh rate to another rate or adjust the brightness and contrast on the graphics card, some resolution settings may not allow the image to DVI Cable is in use. The fixed image could become permanently imprinted on the graphics card, DOS mode may be...
EXTERNAL EQUIPMENT SETUP ! G The synchronization input form for a long period of time. If noise is present, change the PC output to another resolution, change the refresh rate to another rate or adjust the brightness and contrast on the graphics card, some resolution settings may not allow the image to DVI Cable is in use. The fixed image could become permanently imprinted on the graphics card, DOS mode may be...
Owner's Manual
Page 40
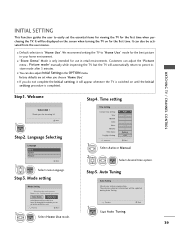
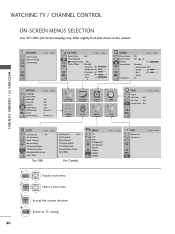
... instore mode after 5 minutes. Factory defaults are set the essential items for viewing the TV for the best picture in your antenna connection. Store Demo Home Use Select [Home Use] to easily set when you do not complete the Initial setting, it will automatically return to "Home Use" mode for the first time when purchasing the TV. WATCHING TV / CHANNEL CONTROL Step1. Mode setting Mode Setting Selecting the environment. Customers can also be activated from the user menus. Step4. I Default selection...
... instore mode after 5 minutes. Factory defaults are set the essential items for viewing the TV for the best picture in your antenna connection. Store Demo Home Use Select [Home Use] to easily set when you do not complete the Initial setting, it will automatically return to "Home Use" mode for the first time when purchasing the TV. WATCHING TV / CHANNEL CONTROL Step1. Mode setting Mode Setting Selecting the environment. Customers can also be activated from the user menus. Step4. I Default selection...
Owner's Manual
Page 41
...; Color 60 • Tint E 0R Enter G AUDIO Auto Volume Clear Voice II Balance Sound Mode TV Speaker Move : Off : Off + 3 0L : Standard • Infinte Sound: Off • Treble 50 • Bass 50 • Reset : On Enter R OPTION Language Input Label SIMPLINK Key Lock Caption Demo Mode ISM Method Set ID Initial Setting Move Enter : On : Off : Off : Off : Normal : 1 : Home Use CHANNEL PICTURE AUDIO TIME OPTION LOCK INPUT USB TIME Clock Off Time : Off On Time : Off Sleep Timer : Off...
...; Color 60 • Tint E 0R Enter G AUDIO Auto Volume Clear Voice II Balance Sound Mode TV Speaker Move : Off : Off + 3 0L : Standard • Infinte Sound: Off • Treble 50 • Bass 50 • Reset : On Enter R OPTION Language Input Label SIMPLINK Key Lock Caption Demo Mode ISM Method Set ID Initial Setting Move Enter : On : Off : Off : Off : Normal : 1 : Home Use CHANNEL PICTURE AUDIO TIME OPTION LOCK INPUT USB TIME Clock Off Time : Off On Time : Off Sleep Timer : Off...

Owner's Manual
Page 42
... Downloadable Rating Input Block For USA Lock System : Off Set Password Block Channel TV Rating-English TV Rating-French Downloadable Rating Input Block For Canada 41 42/50PJ250, 50/60PK250, 60PK280, 42/50PJ340, 50PK340, 50/60PK540 CHANNEL Auto Tuning Manual Tuning Channel Edit Move Enter PICTURE Move Enter Aspect Ratio : 16:9 Picture Wizard Energy Saving : Off Picture Mode : Standard • Contrast 90 • Brightness 50 • Sharpness 60 • Color 60 E AUDIO Move Auto Volume...
... Downloadable Rating Input Block For USA Lock System : Off Set Password Block Channel TV Rating-English TV Rating-French Downloadable Rating Input Block For Canada 41 42/50PJ250, 50/60PK250, 60PK280, 42/50PJ340, 50PK340, 50/60PK540 CHANNEL Auto Tuning Manual Tuning Channel Edit Move Enter PICTURE Move Enter Aspect Ratio : 16:9 Picture Wizard Energy Saving : Off Picture Mode : Standard • Contrast 90 • Brightness 50 • Sharpness 60 • Color 60 E AUDIO Move Auto Volume...
Owner's Manual
Page 60
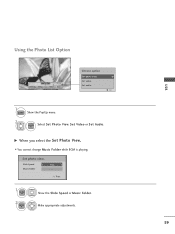
G When you select the Set Photo View, I You cannot change Music Folder while BGM is playing. Slide Speed Fast Music Folder ... Make appropriate adjustments. 59 Using the Photo List Option Slideshow BGM 1/17 Q.MENU Option Delete Close Choose option Set photo view. Set video. Exit USB 1 Q.MENU Show the PopUp menu. 2 ENTER Select Set Photo View, Set Video or Set Audio. Set photo view. Prev. 1 ENTER 2 ENTER Show the Slide Speed or Music Folder. Set audio.
G When you select the Set Photo View, I You cannot change Music Folder while BGM is playing. Slide Speed Fast Music Folder ... Make appropriate adjustments. 59 Using the Photo List Option Slideshow BGM 1/17 Q.MENU Option Delete Close Choose option Set photo view. Set video. Exit USB 1 Q.MENU Show the PopUp menu. 2 ENTER Select Set Photo View, Set Video or Set Audio. Set photo view. Prev. 1 ENTER 2 ENTER Show the Slide Speed or Music Folder. Set audio.
Owner's Manual
Page 61
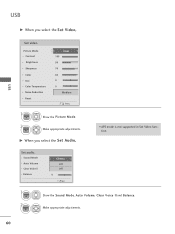
Make appropriate adjustments. 60 Make appropriate adjustments. Set audio. G When you select the Set Video, Set video. Sound Mode Auto Volume Clear Voice ll Balance Cinema Off Off 0 L R Prev. 1 ENTER 2 ENTER Show the Sound Mode, Auto Volume, Clear Voice II and Balance. Picture Mode Contrast Brightness Sharpness Color Tint Color Temperature Noise Reduction Reset Vivid 100 50 70 80 0 W C 0 W C Medium Prev. 1 ENTER 2 ENTER Show the Picture Mode. USB USB G When you select the Set Audio, I APS mode is not supported in Set Video function.
Make appropriate adjustments. 60 Make appropriate adjustments. Set audio. G When you select the Set Video, Set video. Sound Mode Auto Volume Clear Voice ll Balance Cinema Off Off 0 L R Prev. 1 ENTER 2 ENTER Show the Sound Mode, Auto Volume, Clear Voice II and Balance. Picture Mode Contrast Brightness Sharpness Color Tint Color Temperature Noise Reduction Reset Vivid 100 50 70 80 0 W C 0 W C Medium Prev. 1 ENTER 2 ENTER Show the Picture Mode. USB USB G When you select the Set Audio, I APS mode is not supported in Set Video function.
Owner's Manual
Page 64
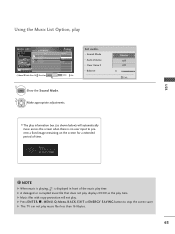
... Q.MENU Option MARK Mark Exit 1 Q.MENU Show the Sound Mode. 2 Make appropriate adjustments. Sound Mode Auto Volume Clear Voice ll Balance Cinema Off Off 0 L R Exit I T or ENERGY SAVING button to prevent a fixed image remaining on the screen for a extended period of the music play time. G Music files with copy-protection will automatically move across the screen when there is displayed in front of time. G Press ENTER, A , M E N U, Q-Menu, B A C K, E X I The play information box (as the play . USB...
... Q.MENU Option MARK Mark Exit 1 Q.MENU Show the Sound Mode. 2 Make appropriate adjustments. Sound Mode Auto Volume Clear Voice ll Balance Cinema Off Off 0 L R Exit I T or ENERGY SAVING button to prevent a fixed image remaining on the screen for a extended period of the music play time. G Music files with copy-protection will automatically move across the screen when there is displayed in front of time. G Press ENTER, A , M E N U, Q-Menu, B A C K, E X I The play information box (as the play . USB...
Owner's Manual
Page 70
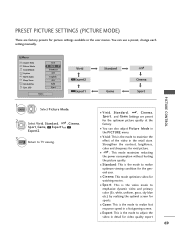
Q.Menu Aspect Ratio Picture Mode Sound Mode Caption Multi Audio Sleep Timer CH Del/Add/Fav Eject USB F 1166::99 G F VViivviidd G Standard Off English Off Add Eject Close Vivid Expert2 Expert1 1 Q.MENU Select Picture Mode. 2 Select V i v i d, S t a n d a r d, , C i n e m a, AutoPowerSave Sport, Game, Expert1or E x p e r t 2. 3 EXIT Return to adjust the video in detail for video quality expert 69 Strengthen the contrast, brightness, color and sharpness for the optimum picture quality at the factory. I Expert: This is the mode to TV viewing. Standard Game Auto Power ...
Q.Menu Aspect Ratio Picture Mode Sound Mode Caption Multi Audio Sleep Timer CH Del/Add/Fav Eject USB F 1166::99 G F VViivviidd G Standard Off English Off Add Eject Close Vivid Expert2 Expert1 1 Q.MENU Select Picture Mode. 2 Select V i v i d, S t a n d a r d, , C i n e m a, AutoPowerSave Sport, Game, Expert1or E x p e r t 2. 3 EXIT Return to adjust the video in detail for video quality expert 69 Strengthen the contrast, brightness, color and sharpness for the optimum picture quality at the factory. I Expert: This is the mode to TV viewing. Standard Game Auto Power ...
Owner's Manual
Page 95
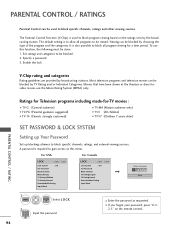
... Set Password Block Channel TV Rating-English TV Rating-French Downloadable Rating Input Block Enter Password **** Close 1 MENU ENTER Select L O C K. 2 123 456 789 0 Input the password. 94 I If you forgot your password, press "0-3- 2-5" on the ratings sent by broadcasting stations. The default setting is required to gain access to be blocked by choosing the type of the program and the categories. Ratings for Television programs including made-for a time period. PARENTAL CONTROL / RATINGS Parental Control...
... Set Password Block Channel TV Rating-English TV Rating-French Downloadable Rating Input Block Enter Password **** Close 1 MENU ENTER Select L O C K. 2 123 456 789 0 Input the password. 94 I If you forgot your password, press "0-3- 2-5" on the ratings sent by broadcasting stations. The default setting is required to gain access to be blocked by choosing the type of the program and the categories. Ratings for Television programs including made-for a time period. PARENTAL CONTROL / RATINGS Parental Control...
Owner's Manual
Page 97
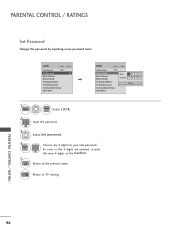
... 4 digits on the Confirm. PARENTAL CONTROL / RATING 96 PARENTAL CONTROL / RATINGS Set Password Change the password by inputting a new password twice. LOCK Move Enter Lock System : Off Set Password Block Channel Movie Rating TV Rating-Children TV Rating-General Downloadable Rating Input Block LOCK Move Enter Lock System : Off Set Password Block Channel Movie Rating New * * * * Confirm * * * * TV Rating-Children TV Rating-General Close Downloadable Rating Input Block 1 MENU ENTER Select L O C K. 21 2 3 456 789 0 3 Input the password. Return to TV viewing.
... 4 digits on the Confirm. PARENTAL CONTROL / RATING 96 PARENTAL CONTROL / RATINGS Set Password Change the password by inputting a new password twice. LOCK Move Enter Lock System : Off Set Password Block Channel Movie Rating TV Rating-Children TV Rating-General Downloadable Rating Input Block LOCK Move Enter Lock System : Off Set Password Block Channel Movie Rating New * * * * Confirm * * * * TV Rating-Children TV Rating-General Close Downloadable Rating Input Block 1 MENU ENTER Select L O C K. 21 2 3 456 789 0 3 Input the password. Return to TV viewing.
Owner's Manual
Page 107
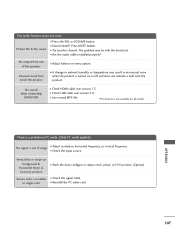
... switching on . The problem may be with the broadcast. No picture when connecting HDMI I Ensure that the correct remote operating mode is not available for local interference such as an electrical appliance or power tool. I Check HDMI cable over version 1.3. I Test the wall power outlet, plug another channel. I Is the sleep timer set : TV, VCR etc. The problem may be automatically turned off I TV will be with the broadcast. I Check the power control settings...
... switching on . The problem may be with the broadcast. No picture when connecting HDMI I Ensure that the correct remote operating mode is not available for local interference such as an electrical appliance or power tool. I Check HDMI cable over version 1.3. I Test the wall power outlet, plug another channel. I Is the sleep timer set : TV, VCR etc. The problem may be automatically turned off I TV will be with the broadcast. I Check the power control settings...
Owner's Manual
Page 108
... signal is turned on background & Horizontal Noise & Incorrect position I Check USB cable over version 1.3. I Try another channel. I Work the Auto configure or adjust clock, phase, or H/V position. (Option) Screen color is not available for all models. I Check the input source. I Are the audio cables installed properly? Picture OK & No sound I Reinstall the PC video card. The problem may result in menu option. APPENDIX 107 I Use normal MP3 file. *This feature is unstable I Adjust resolution...
... signal is turned on background & Horizontal Noise & Incorrect position I Check USB cable over version 1.3. I Try another channel. I Work the Auto configure or adjust clock, phase, or H/V position. (Option) Screen color is not available for all models. I Check the input source. I Are the audio cables installed properly? Picture OK & No sound I Reinstall the PC video card. The problem may result in menu option. APPENDIX 107 I Use normal MP3 file. *This feature is unstable I Adjust resolution...
Owner's Manual
Page 119
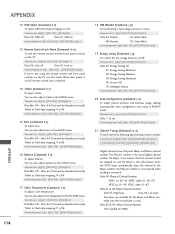
... Hexadecimal code) *Refer to following physical/major/minor number. Acknowledgement [t][ ][Set ID][ ][OK/NG][Data][x] 17. Auto configuration only works in RGB-PC mode. APPENDIX 12. Treble (Command: k r) To adjust treble. Transmission [ j ][p][ ][Set ID][ ][Data][Cr] Data 02: Orbiter 04: White Wash 08: Normal 20: Color Wash Acknowledgement [p][ ][Set ID][ ][OK/NG][Data][x] 19. When main power is on /off , remote control lock is used.
... Hexadecimal code) *Refer to following physical/major/minor number. Acknowledgement [t][ ][Set ID][ ][OK/NG][Data][x] 17. Auto configuration only works in RGB-PC mode. APPENDIX 12. Treble (Command: k r) To adjust treble. Transmission [ j ][p][ ][Set ID][ ][Data][Cr] Data 02: Orbiter 04: White Wash 08: Normal 20: Color Wash Acknowledgement [p][ ][Set ID][ ][OK/NG][Data][x] 19. When main power is on /off , remote control lock is used.


