
Owner's Manual
Page 14
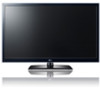
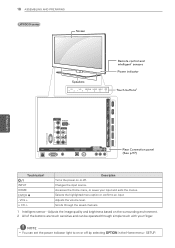
... R Touch button2 / I INPUT HOME ENTER ꔉ - Selects the highlighted menu option or confirms an input Adjusts the volume level. Adjusts the image quality and brightness based on or off. Changes the input source. VOL + v CH ^ Description Turns the power on the surrounding environment. 2 All of the buttons are touch sensitive and...
... R Touch button2 / I INPUT HOME ENTER ꔉ - Selects the highlighted menu option or confirms an input Adjusts the volume level. Adjusts the image quality and brightness based on or off. Changes the input source. VOL + v CH ^ Description Turns the power on the surrounding environment. 2 All of the buttons are touch sensitive and...
Owner's Manual
Page 15
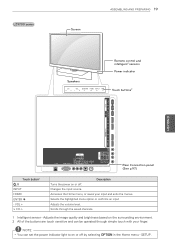
... an input Adjusts the volume level. VOL + v CH ^ Description Turns the power on or off . Changes the input source. Adjusts the image quality and brightness based on the surrounding environment. 2 All of the buttons are touch sensitive and can set the power indicator light to on or off by selecting OPTION...
... an input Adjusts the volume level. VOL + v CH ^ Description Turns the power on or off . Changes the input source. Adjusts the image quality and brightness based on the surrounding environment. 2 All of the buttons are touch sensitive and can set the power indicator light to on or off by selecting OPTION...
Owner's Manual
Page 16
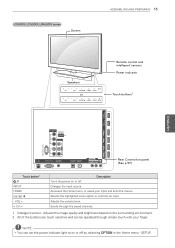
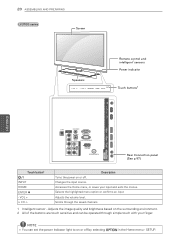
... Home menu, or saves your input and exits the menus. VOL + v CH ^ Description Turns the power on or off . Adjusts the image quality and brightness based on the surrounding environment. 16 ASSEMBLING AND PREPARING LW5700, LW7700 series Screen Speakers CH VOL ENTER HOME H INPUT Buttons Remote control and intelligent1 sensors, Power...
... Home menu, or saves your input and exits the menus. VOL + v CH ^ Description Turns the power on or off . Adjusts the image quality and brightness based on the surrounding environment. 16 ASSEMBLING AND PREPARING LW5700, LW7700 series Screen Speakers CH VOL ENTER HOME H INPUT Buttons Remote control and intelligent1 sensors, Power...
Owner's Manual
Page 17
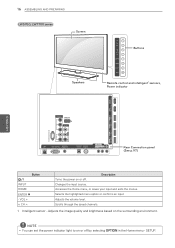
.... Accesses the Home menu, or saves your finger. NOTE yyYou can be operated through the saved channels. 1 Intelligent sensor - Adjusts the image quality and brightness based on the surrounding environment. 2 All of the buttons are touch sensitive and can set the power indicator light to on or off by selecting OPTION...
.... Accesses the Home menu, or saves your finger. NOTE yyYou can be operated through the saved channels. 1 Intelligent sensor - Adjusts the image quality and brightness based on the surrounding environment. 2 All of the buttons are touch sensitive and can set the power indicator light to on or off by selecting OPTION...
Owner's Manual
Page 18
... yyYou can be operated through the saved channels. 1 Intelligent sensor - VOL + v CH ^ Description Turns the power on or off . Adjusts the image quality and brightness based on the surrounding environment. 2 All of the buttons are touch sensitive and can set the power indicator light to on or off by selecting OPTION...
... yyYou can be operated through the saved channels. 1 Intelligent sensor - VOL + v CH ^ Description Turns the power on or off . Adjusts the image quality and brightness based on the surrounding environment. 2 All of the buttons are touch sensitive and can set the power indicator light to on or off by selecting OPTION...
Owner's Manual
Page 19
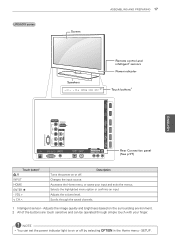
... indicator light to on or off . Selects the highlighted menu option or confirms an input Adjusts the volume level. Adjusts the image quality and brightness based on or off by selecting OPTION in the Home menu - NOTE yyYou can be operated through the saved channels. 1 Intelligent sensor - Accesses the Home menu...
... indicator light to on or off . Selects the highlighted menu option or confirms an input Adjusts the volume level. Adjusts the image quality and brightness based on or off by selecting OPTION in the Home menu - NOTE yyYou can be operated through the saved channels. 1 Intelligent sensor - Accesses the Home menu...
Owner's Manual
Page 20
... the power indicator light to on or off . Scrolls through simple touch with your input and exits the menus. Adjusts the image quality and brightness based on or off by selecting OPTION in the Home menu - 20 ASSEMBLING AND PREPARING LV3700 series Screen Speakers CH VOL ENTER HOME INPUT Remote control...
... the power indicator light to on or off . Scrolls through simple touch with your input and exits the menus. Adjusts the image quality and brightness based on or off by selecting OPTION in the Home menu - 20 ASSEMBLING AND PREPARING LV3700 series Screen Speakers CH VOL ENTER HOME INPUT Remote control...
Owner's Manual
Page 21
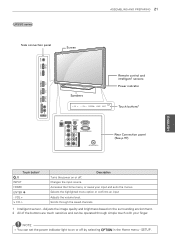
.... 1 Intelligent sensor - VOL + v CH ^ Description Turns the power on or off . Accesses the Home menu, or saves your finger. Adjusts the image quality and brightness based on the surrounding environment. 2 All of the buttons are touch sensitive and can set the power indicator light to on or off by selecting OPTION...
.... 1 Intelligent sensor - VOL + v CH ^ Description Turns the power on or off . Accesses the Home menu, or saves your finger. Adjusts the image quality and brightness based on the surrounding environment. 2 All of the buttons are touch sensitive and can set the power indicator light to on or off by selecting OPTION...

Owner's Manual
Page 22
... the highlighted menu option or confirms an input Adjusts the volume level. Scrolls through the saved channels. 1 Intelligent sensor - Adjusts the image quality and brightness based on or off. Accesses the Home menu, or saves your input and exits the menus. USB IN 1 USB IN 2 H/P USB Apps 22 ASSEMBLING AND PREPARING...
... the highlighted menu option or confirms an input Adjusts the volume level. Scrolls through the saved channels. 1 Intelligent sensor - Adjusts the image quality and brightness based on or off. Accesses the Home menu, or saves your input and exits the menus. USB IN 1 USB IN 2 H/P USB Apps 22 ASSEMBLING AND PREPARING...

Owner's Manual
Page 23
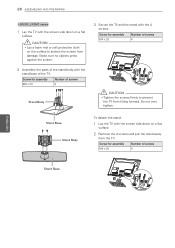
yyBefore moving or lifting the TV, read the following instructions to avoid damage. Stand Body Stand Base yyHold the top and bottom of the TV. yyWhen holding the TV, the screen should be at all cables. Attaching the stand If you to ... . Model 50PZ750, 50PZ950, 50PZ950U 60PZ750, 60PZ950, 60PZ950U Screw for safe transportation regardless of its side or tilt towards the left or right. Stand Body Stand Base ENEGNLGISH yyWhen transporting the TV, do not expose the TV to prevent the TV from being scratched or damaged and for assembly M5 x 14.5 M5...
yyBefore moving or lifting the TV, read the following instructions to avoid damage. Stand Body Stand Base yyHold the top and bottom of the TV. yyWhen holding the TV, the screen should be at all cables. Attaching the stand If you to ... . Model 50PZ750, 50PZ950, 50PZ950U 60PZ750, 60PZ950, 60PZ950U Screw for safe transportation regardless of its side or tilt towards the left or right. Stand Body Stand Base ENEGNLGISH yyWhen transporting the TV, do not expose the TV to prevent the TV from being scratched or damaged and for assembly M5 x 14.5 M5...

Owner's Manual
Page 25
...Screw for assembly LV3700, M4 x 12 LV5400, LV5500, LW5600, LW5700, LW7700 series, 47/55LW6500 65LW6500 M4 x 16 Number of screws 4 4 Stand Body Stand Base 3 Secure the TV and the stand with the 4 screws. To detach the stand, 1 Lay the TV with the screen side down on a flat surface.... M4 x 12 Number of the TV. Make sure no objects press against the screen. 2 Assemble the parts of the stand body with the stand base of screws 4 ENEGNLGISH ASSEMBLING AND PREPARING 25 LV3700, LV5400, LV5500, LW5600, LW5700, LW6500, LW7700 series 1 Lay the TV with the screen side ...
...Screw for assembly LV3700, M4 x 12 LV5400, LV5500, LW5600, LW5700, LW7700 series, 47/55LW6500 65LW6500 M4 x 16 Number of screws 4 4 Stand Body Stand Base 3 Secure the TV and the stand with the 4 screws. To detach the stand, 1 Lay the TV with the screen side down on a flat surface.... M4 x 12 Number of the TV. Make sure no objects press against the screen. 2 Assemble the parts of the stand body with the stand base of screws 4 ENEGNLGISH ASSEMBLING AND PREPARING 25 LV3700, LV5400, LV5500, LW5600, LW5700, LW6500, LW7700 series 1 Lay the TV with the screen side ...

Owner's Manual
Page 26
... and pull the stand away from damage. Make sure no objects press against the screen. 2 Assemble the parts of the stand body with the stand base of screws 4 ENEGNLGISH Screw for assembly M4 x 16 Number of the stand rear cover with the 4 screws. CAUTION yyLay a foam mat or soft ...forward. Stand Rear Cover 4 Secure the TV and the stand with the TV. Screw for assembly M4 x 16 Number of screws 4 Stand Body Stand Base 3 Assemble the parts of screws 4 CAUTION yyTighten the screws firmly to protect the screen from the TV. Screw for assembly M4 x 16 Number of the...
... and pull the stand away from damage. Make sure no objects press against the screen. 2 Assemble the parts of the stand body with the stand base of screws 4 ENEGNLGISH Screw for assembly M4 x 16 Number of the stand rear cover with the 4 screws. CAUTION yyLay a foam mat or soft ...forward. Stand Rear Cover 4 Secure the TV and the stand with the TV. Screw for assembly M4 x 16 Number of screws 4 Stand Body Stand Base 3 Assemble the parts of screws 4 CAUTION yyTighten the screws firmly to protect the screen from the TV. Screw for assembly M4 x 16 Number of the...

Owner's Manual
Page 27
... sure no objects press against the screen. 2 Assemble the parts of the stand body with the stand base of screws 4 CAUTION yyTighten the screws firmly to protect the screen from damage. Stand Body Stand Base 3 Assemble the TV. Screw for assembly M4 x 26 Number of the TV. To detach the stand, 1 Lay...
... sure no objects press against the screen. 2 Assemble the parts of the stand body with the stand base of screws 4 CAUTION yyTighten the screws firmly to protect the screen from damage. Stand Body Stand Base 3 Assemble the TV. Screw for assembly M4 x 26 Number of the TV. To detach the stand, 1 Lay...
Owner's Manual
Page 28
... M4 x 20 Number of screws 4 Stand Body 3 Secure the TV and the stand with the stand base of the stand body with the 4 screws. Screw for assembly M4 x 20 Number of screws 4 ENEGNLGISH Stand Base Stand Base Stand Body M4X20 To detach the stand, 1 Lay the TV with the screen side down on...
... M4 x 20 Number of screws 4 Stand Body 3 Secure the TV and the stand with the stand base of the stand body with the 4 screws. Screw for assembly M4 x 20 Number of screws 4 ENEGNLGISH Stand Base Stand Base Stand Body M4X20 To detach the stand, 1 Lay the TV with the screen side down on...
Owner's Manual
Page 34
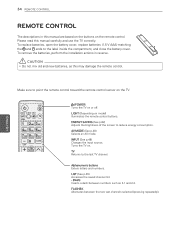
... The descriptions in reverse. LIGHT (Depending on model) Illuminates the remote control buttons. To remove the batteries, perform the installation actions in this manual are based on the buttons on . ENERGY SAVING (See p.82) Adjusts the brightness of the screen to the last TV channel. LIST (See p.45) Accesses the saved...
... The descriptions in reverse. LIGHT (Depending on model) Illuminates the remote control buttons. To remove the batteries, perform the installation actions in this manual are based on the buttons on . ENERGY SAVING (See p.82) Adjusts the brightness of the screen to the last TV channel. LIST (See p.45) Accesses the saved...
Owner's Manual
Page 54
... such as cordless telephone, Bluetooth® devices, microwave oven, and can be affected by interference from the floor may be compatible with LG wireless media box, cordless telephone, other connected equipment. yyDepending on the policies and restrictions of the AP needs to be possible due to... undesired results if the network connection speed does not meet the requirements of the home network router or cable modem. yyA 10 Base-T or 100 Base-TX LAN port is necessary, and the wireless connection function of your internet service does not allow for such a connection, you...
... such as cordless telephone, Bluetooth® devices, microwave oven, and can be affected by interference from the floor may be compatible with LG wireless media box, cordless telephone, other connected equipment. yyDepending on the policies and restrictions of the AP needs to be possible due to... undesired results if the network connection speed does not meet the requirements of the home network router or cable modem. yyA 10 Base-T or 100 Base-TX LAN port is necessary, and the wireless connection function of your internet service does not allow for such a connection, you...
Owner's Manual
Page 70
... Music List. Set Video. For files with more than one of Movie List Option is turned "On". yyAn edition refers to the playback order set based on , the file within the folder will be turned on page 82). Set Video Play. Audio Language Changes the Language Group of movie playback. Repeat...
... Music List. Set Video. For files with more than one of Movie List Option is turned "On". yyAn edition refers to the playback order set based on , the file within the folder will be turned on page 82). Set Video Play. Audio Language Changes the Language Group of movie playback. Repeat...

Owner's Manual
Page 72
... Original, Monotone, Sepia, Oil Painting and Vignetting. Yellow button Go to the previous menu screen. Hides the option window. The displays on the screen may based on (Background or off. Rotates photos clockwise (90°, 180°, 270°, 360°). ꘤ (Rotate) NOTE yyThe supported photo size is larger than...
... Original, Monotone, Sepia, Oil Painting and Vignetting. Yellow button Go to the previous menu screen. Hides the option window. The displays on the screen may based on (Background or off. Rotates photos clockwise (90°, 180°, 270°, 360°). ꘤ (Rotate) NOTE yyThe supported photo size is larger than...
Owner's Manual
Page 84
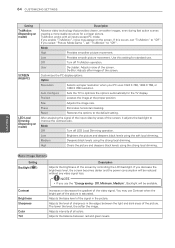
... the screen. Adjusts the balance between the light and dark areas of sharpness in the picture. Off Turn off LED Local Dimming operation. Adjusts the base level of the screen. 84 CUSTOMIZING SETTINGS ENEGNLGISH Setting TruMotion (Depending on model) SCREEN (RGB-PC) LED Local Dimming (Depending on the screen. Option Resolution...
... the screen. Adjusts the balance between the light and dark areas of sharpness in the picture. Off Turn off LED Local Dimming operation. Adjusts the base level of the screen. 84 CUSTOMIZING SETTINGS ENEGNLGISH Setting TruMotion (Depending on model) SCREEN (RGB-PC) LED Local Dimming (Depending on the screen. Option Resolution...
Owner's Manual
Page 90
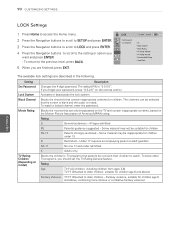
The available lock settings are only broadcasted on the TV and contain inappropriate contents, based on the Motion Picture Association of America (MPAA) rating. Lock System Activates or deactivates the lock system. 90 CUSTOMIZING SETTINGS LOCK Settings 1 Press Home to ...
The available lock settings are only broadcasted on the TV and contain inappropriate contents, based on the Motion Picture Association of America (MPAA) rating. Lock System Activates or deactivates the lock system. 90 CUSTOMIZING SETTINGS LOCK Settings 1 Press Home to ...


