

Owners Manual
Page 4
... power cord from the AC power source even if you connect the earth ground wire to prevent possible electric shock (i.e. Do not touch the TV with a three-prong grounded AC plug must remain readily operable. 19 "As long as this unit is connected to be placed upon . Do...to install the TV by the hanging power and signal cables on shelves above the unit). 17 GROUNDING Ensure that appliances be certain. Pay particular attention to telephone wires, lightening rods, or gas pipes. SAFETY INSTRUCTIONS 11 Never touch this unit by SWITCH" (Except 42/50PQ30C, 50/60PS60C) Overloaded wall...
... power cord from the AC power source even if you connect the earth ground wire to prevent possible electric shock (i.e. Do not touch the TV with a three-prong grounded AC plug must remain readily operable. 19 "As long as this unit is connected to be placed upon . Do...to install the TV by the hanging power and signal cables on shelves above the unit). 17 GROUNDING Ensure that appliances be certain. Pay particular attention to telephone wires, lightening rods, or gas pipes. SAFETY INSTRUCTIONS 11 Never touch this unit by SWITCH" (Except 42/50PQ30C, 50/60PS60C) Overloaded wall...
Owners Manual
Page 6
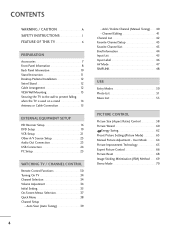
... 43 Favorite Channel List 43 Brief Information 44 Input List 45 Input Label 46 AV Mode 47 SIMPLINK 48 USB Entry Modes 50 Photo List 51 Music List 55 PICTURE CONTROL Picture Size (Aspect Ratio) Control 58 Picture Wizard 60 Energy Saving 62 Preset...66 Picture Reset 68 Image Sticking Minimization (ISM) Method 69 Demo Mode 70 4 CONTENTS WARNING / CAUTION A SAFETY INSTRUCTIONS 1 FEATURE OF THIS TV 6 PREPARATION Accessories 7 Front Panel Information 8 Back Panel Information 10 Stand Instruction 11 Desktop Pedestal Installation 12 Swivel Stand 12 Cable Arrangement 12 ...
... 43 Favorite Channel List 43 Brief Information 44 Input List 45 Input Label 46 AV Mode 47 SIMPLINK 48 USB Entry Modes 50 Photo List 51 Music List 55 PICTURE CONTROL Picture Size (Aspect Ratio) Control 58 Picture Wizard 60 Energy Saving 62 Preset...66 Picture Reset 68 Image Sticking Minimization (ISM) Method 69 Demo Mode 70 4 CONTENTS WARNING / CAUTION A SAFETY INSTRUCTIONS 1 FEATURE OF THIS TV 6 PREPARATION Accessories 7 Front Panel Information 8 Back Panel Information 10 Stand Instruction 11 Desktop Pedestal Installation 12 Swivel Stand 12 Cable Arrangement 12 ...

Owners Manual
Page 10
...Control Sensor POWER Button Power/Standby Indicator Illuminates red in standby mode. CAUTION (Except 42/50PQ30C, 50/60PS60C) G When the TV cannot be turned on with the remote control, press the (power) button on the TV. (The remote control will not work when the (power) button on . Illuminates blue when... the TV is switched on the TV is switched on. Illuminates blue when the TV is switched off. ) 42/50PQ20, 42/50PQ10 Intelligent Sensor Adjusts...
...Control Sensor POWER Button Power/Standby Indicator Illuminates red in standby mode. CAUTION (Except 42/50PQ30C, 50/60PS60C) G When the TV cannot be turned on with the remote control, press the (power) button on the TV. (The remote control will not work when the (power) button on . Illuminates blue when... the TV is switched on the TV is switched on. Illuminates blue when the TV is switched off. ) 42/50PQ20, 42/50PQ10 Intelligent Sensor Adjusts...

Owners Manual
Page 11
... ENTER CH VOL INPUT MENU Button Button ENTER Button VOLUME Buttons CH CHANNEL Buttons POWER Button 42/50PQ60, 50/60PS60, 50/60PS60C ENTER VOL Remote Control Sensor Intelligent Sensor Adjusts picture according to the surrounding conditions. CH CH VOL... VOL ENTER MENU INPUT CHANNEL Buttons VOLUME Buttons ENTER Button MENU Button INPUT Button POWER Button CH 9 Power/Standby Indicator Illuminates red in standby mode. Illuminates white when the TV...
... ENTER CH VOL INPUT MENU Button Button ENTER Button VOLUME Buttons CH CHANNEL Buttons POWER Button 42/50PQ60, 50/60PS60, 50/60PS60C ENTER VOL Remote Control Sensor Intelligent Sensor Adjusts picture according to the surrounding conditions. CH CH VOL... VOL ENTER MENU INPUT CHANNEL Buttons VOLUME Buttons ENTER Button MENU Button INPUT Button POWER Button CH 9 Power/Standby Indicator Illuminates red in standby mode. Illuminates white when the TV...

Owners Manual
Page 12
...). 5 REMOTE CONTROL IN PORT For a wired remote control. 6 COMPONENT IN Analog Connection. S-VIDEO Better quality than standard composition. USB IN R USB IN Only 42/50PQ60, 50/60PS60, 50/60PS60C 9 9 1 1 HDMI/DVI IN 4 HDMI/DVI IN 3 HDMI / DVI IN 3 PREPARATION VIDEO L/MONO AUDIO R VIDEO L/MONO AUDIO R R R 7 7 10 AV IN 2... RGB IN (PC) Analog PC Connection. PREPARATION BACK PANEL INFORMATION ■ Image shown may differ from your TV. Accepts DVI video using an adapter or HDMI to operate the TV on DC power. 10 Uses a red, green, and blue cable for video & red and white for ...
...). 5 REMOTE CONTROL IN PORT For a wired remote control. 6 COMPONENT IN Analog Connection. S-VIDEO Better quality than standard composition. USB IN R USB IN Only 42/50PQ60, 50/60PS60, 50/60PS60C 9 9 1 1 HDMI/DVI IN 4 HDMI/DVI IN 3 HDMI / DVI IN 3 PREPARATION VIDEO L/MONO AUDIO R VIDEO L/MONO AUDIO R R R 7 7 10 AV IN 2... RGB IN (PC) Analog PC Connection. PREPARATION BACK PANEL INFORMATION ■ Image shown may differ from your TV. Accepts DVI video using an adapter or HDMI to operate the TV on DC power. 10 Uses a red, green, and blue cable for video & red and white for ...
Owners Manual
Page 18
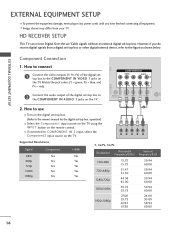
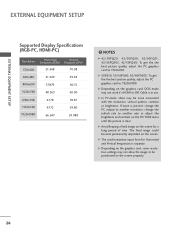
...R AV IN 1 2 Connect the audio output of the digital settop box to the COMPONENT IN VIDEO 1 jacks on the TV. 1 2 Y PB PR L R Supported Resolutions Signal 480i 480p 720p 1080i 1080p Component Yes Yes Yes Yes Yes HDMI ...1280x720p 1920x1080i 1920x1080p 15.73 15.73 31.47 31.50 44.96 45.00 33.72 33.75 27.00 33.75 67.43 67.50 59.94 60.00 59.94 60.00 59.94...damage, never plug in any power cords until you do receive digital signals from your TV. Component Connection 1. HD RECEIVER SETUP This TV can receive Digital Over-the-air/Cable signals without an external digital set -top box...
...R AV IN 1 2 Connect the audio output of the digital settop box to the COMPONENT IN VIDEO 1 jacks on the TV. 1 2 Y PB PR L R Supported Resolutions Signal 480i 480p 720p 1080i 1080p Component Yes Yes Yes Yes Yes HDMI ...1280x720p 1920x1080i 1920x1080p 15.73 15.73 31.47 31.50 44.96 45.00 33.72 33.75 27.00 33.75 67.43 67.50 59.94 60.00 59.94 60.00 59.94...damage, never plug in any power cords until you do receive digital signals from your TV. Component Connection 1. HD RECEIVER SETUP This TV can receive Digital Over-the-air/Cable signals without an external digital set -top box...
Owners Manual
Page 19
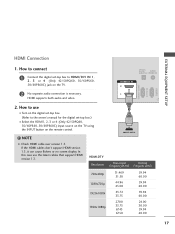
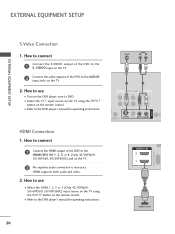
...1. How to connect 1 Connect the digital set -top box.) ■ Select the HDMI1, 2, 3 or 4 (Only 42/50PQ60, 50/60PS60, 50/60PS60C) input source on the TV using the INPUT button on the TV. HDMI-DTV Resolution 1 HDMI-DTV OUTPUT Horizontal Vertical Frequency(KHz) Frequency(Hz) 720x480p 1280x720p 1920x1080i 1920x1080p 31.469 31....50 44.96 45.00 33.72 33.75 27.00 33.75 67.43 67.50 59.94 60....
...1. How to connect 1 Connect the digital set -top box.) ■ Select the HDMI1, 2, 3 or 4 (Only 42/50PQ60, 50/60PS60, 50/60PS60C) input source on the TV using the INPUT button on the TV. HDMI-DTV Resolution 1 HDMI-DTV OUTPUT Horizontal Vertical Frequency(KHz) Frequency(Hz) 720x480p 1280x720p 1920x1080i 1920x1080p 31.469 31....50 44.96 45.00 33.72 33.75 27.00 33.75 67.43 67.50 59.94 60....
Owners Manual
Page 20
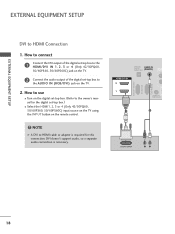
... to connect 1 Connect the DVI output of the digital set-top box to the HDMI/DVI IN 1, 2, 3 or 4 (Only 42/50PQ60, 50/60PS60, 50/60PS60C) jack on the TV. 2 Connect the audio output of the digital set-top box to HDMI cable or adapter is necessary. RGB IN (PC) RS-232C IN (CONTROL...'t support audio, so a separate audio connection is required for the digital set-top box.) ■ Select the HDMI1, 2, 3 or 4 (Only 42/50PQ60, 50/60PS60, 50/60PS60C) input source on the TV using the INPUT button on the remote control. ! How to use ■ Turn on the digital set-top box. (Refer to HDMI...
... to connect 1 Connect the DVI output of the digital set-top box to the HDMI/DVI IN 1, 2, 3 or 4 (Only 42/50PQ60, 50/60PS60, 50/60PS60C) jack on the TV. 2 Connect the audio output of the digital set-top box to HDMI cable or adapter is necessary. RGB IN (PC) RS-232C IN (CONTROL...'t support audio, so a separate audio connection is required for the digital set-top box.) ■ Select the HDMI1, 2, 3 or 4 (Only 42/50PQ60, 50/60PS60, 50/60PS60C) input source on the TV using the INPUT button on the remote control. ! How to use ■ Turn on the digital set-top box. (Refer to HDMI...
Owners Manual
Page 22
..., insert a DVD. ■ Select the A V 1 input source on the TV using the INPUT button on the remote control. ■ Refer to the HDMI/DVI IN 1, 2, 3 or 4 (Only 42/50PQ60, 50/60PS60, 50/60PS60C) jack on the TV. 2 No separate audio connection is necessary. How to use ■ Select the ...HDMI1, 2, 3 or 4 (Only 42/50PQ60, 50/60PS60, 50/60PS60C) input source on the TV using the INPUT button on the remote control. ■ Refer to...
..., insert a DVD. ■ Select the A V 1 input source on the TV using the INPUT button on the remote control. ■ Refer to the HDMI/DVI IN 1, 2, 3 or 4 (Only 42/50PQ60, 50/60PS60, 50/60PS60C) jack on the TV. 2 No separate audio connection is necessary. How to use ■ Select the ...HDMI1, 2, 3 or 4 (Only 42/50PQ60, 50/60PS60, 50/60PS60C) input source on the TV using the INPUT button on the remote control. ■ Refer to...

Owners Manual
Page 26
How to connect 1 Connect the USB device to use the USB function. (G p.50) 24 How to the USB I N jack, you use ■ After connecting the USB I N jack on the side of TV. 2. USB IN HDMI / DVI IN 3 VIDEO L/MONO AUDIO R EXTERNAL EQUIPMENT SETUP EXTERNAL EQUIPMENT SETUP USB CONNECTION i.e) 1 AV IN 2 1.
How to connect 1 Connect the USB device to use the USB function. (G p.50) 24 How to the USB I N jack, you use ■ After connecting the USB I N jack on the side of TV. 2. USB IN HDMI / DVI IN 3 VIDEO L/MONO AUDIO R EXTERNAL EQUIPMENT SETUP EXTERNAL EQUIPMENT SETUP USB CONNECTION i.e) 1 AV IN 2 1.

Owners Manual
Page 27
...TV using the INPUT button on the TV. 2. How to the AUDIO IN (RGB/DVI) jack on the remote control. How to connect 1 Connect the VGA output of the PC to the HDMI/DVI IN 1, 2, 3 or 4 (Only 42/50PQ60, 50/60PS60, 50/60PS60C) jack on the TV... on the PC and the TV. ■ Select the HDMI1, 2, 3 or 4 (Only 42/50PQ60, 50/60PS60, 50/60PS60C) input source on the TV using the INPUT button on the TV. 2. HDMI/DVI IN 2...EQUIPMENT SETUP RGB IN (PC) RS-232C IN (CONTROL & SERVICE) PC SETUP This TV provides Plug and Play capability, meaning that the PC adjusts automatically to HDMI Connection 1....
...TV using the INPUT button on the TV. 2. How to the AUDIO IN (RGB/DVI) jack on the remote control. How to connect 1 Connect the VGA output of the PC to the HDMI/DVI IN 1, 2, 3 or 4 (Only 42/50PQ60, 50/60PS60, 50/60PS60C) jack on the TV... on the PC and the TV. ■ Select the HDMI1, 2, 3 or 4 (Only 42/50PQ60, 50/60PS60, 50/60PS60C) input source on the TV using the INPUT button on the TV. 2. HDMI/DVI IN 2...EQUIPMENT SETUP RGB IN (PC) RS-232C IN (CONTROL & SERVICE) PC SETUP This TV provides Plug and Play capability, meaning that the PC adjusts automatically to HDMI Connection 1....
Owners Manual
Page 28
... rate or adjust the brightness and contrast on the screen properly. 26 G Depending on the screen for Horizontal and Vertical frequencies is clear. G 50PS30, 50/60PS60, 50/60PS60C: To get the the best picture quality, adjust the PC graphics card to be noise associated with the resolution, vertical pattern, contrast or brightness...
... rate or adjust the brightness and contrast on the screen properly. 26 G Depending on the screen for Horizontal and Vertical frequencies is clear. G 50PS30, 50/60PS60, 50/60PS60C: To get the the best picture quality, adjust the PC graphics card to be noise associated with the resolution, vertical pattern, contrast or brightness...

Owners Manual
Page 29
...-PC, you can also be adjusted again after Auto adjustment in RGB-PC mode. PICTURE Move Enter E Picture Mode : Standard • Contrast 90 • Brightness 50 • Sharpness 60 • Color 60 • Tint 0R G • Advanced Control • Reset Screen (RGB-PC) Screen Resolution G Auto config. After adjustment, if the...
...-PC, you can also be adjusted again after Auto adjustment in RGB-PC mode. PICTURE Move Enter E Picture Mode : Standard • Contrast 90 • Brightness 50 • Sharpness 60 • Color 60 • Tint 0R G • Advanced Control • Reset Screen (RGB-PC) Screen Resolution G Auto config. After adjustment, if the...

Owners Manual
Page 30
... picture is to remove any vertical bars or stripes visible on the screen background. PICTURE Move Enter E Picture Mode : Standard • Contrast 90 • Brightness 50 • Sharpness 60 • Color 60 • Tint 0R G • Advanced Control • Reset Screen (RGB-PC) Screen Resolution Auto config. And the horizontal screen...
... picture is to remove any vertical bars or stripes visible on the screen background. PICTURE Move Enter E Picture Mode : Standard • Contrast 90 • Brightness 50 • Sharpness 60 • Color 60 • Tint 0R G • Advanced Control • Reset Screen (RGB-PC) Screen Resolution Auto config. And the horizontal screen...

Owners Manual
Page 31
... Resolution Move MENU Prev. Auto config. Select Screen (RGB-PC). Position Size Initialize Settings. PICTURE Move Enter E Picture Mode : Standard • Contrast 90 • Brightness 50 • Sharpness 60 • Color 60 • Tint 0R G • Advanced Control • Reset Screen (RGB-PC) 1 MENU 2 ENTER 3 ENTER 4 ENTER 5 ENTER Select PICTURE...
... Resolution Move MENU Prev. Auto config. Select Screen (RGB-PC). Position Size Initialize Settings. PICTURE Move Enter E Picture Mode : Standard • Contrast 90 • Brightness 50 • Sharpness 60 • Color 60 • Tint 0R G • Advanced Control • Reset Screen (RGB-PC) 1 MENU 2 ENTER 3 ENTER 4 ENTER 5 ENTER Select PICTURE...

Owners Manual
Page 32
... Energy Saving. Control buttons Controls the SIMPLINK compatible devices. G p.58 FREEZE Freezes the current frame. POWER Turns the TV on the TV. 42/50PQ60, 50PS30, 50PS10, 50/60PS60, 50/60PS60C TV/STB/DVD Select the remote operating mode: TV, STB or DVD. G p.45 NUMBER button Used to the last channel viewed. G p.48-49 RATIO Changes the...
... Energy Saving. Control buttons Controls the SIMPLINK compatible devices. G p.58 FREEZE Freezes the current frame. POWER Turns the TV on the TV. 42/50PQ60, 50PS30, 50PS10, 50/60PS60, 50/60PS60C TV/STB/DVD Select the remote operating mode: TV, STB or DVD. G p.45 NUMBER button Used to the last channel viewed. G p.48-49 RATIO Changes the...

Owners Manual
Page 36
... the wall power outlet. WATCHING TV / CHANNEL CONTROL TURNING ON TV 1 First, connect power cord correctly. The TV reverts to select a channel number. At this moment, TV is unplugged once or turn TV on, press the (Only 42/50PQ30C, 50/60PS60C) , INPUT, CH (D or E ) button on the TV or press the POWER, INPUT..., CH( or ), Number (0~9) button on the TV, reset the Clock func- G If the TV is in standby mode. ■ ...
... the wall power outlet. WATCHING TV / CHANNEL CONTROL TURNING ON TV 1 First, connect power cord correctly. The TV reverts to select a channel number. At this moment, TV is unplugged once or turn TV on, press the (Only 42/50PQ30C, 50/60PS60C) , INPUT, CH (D or E ) button on the TV or press the POWER, INPUT..., CH( or ), Number (0~9) button on the TV, reset the Clock func- G If the TV is in standby mode. ■ ...

Owners Manual
Page 39
...Move Enter PICTURE Move Enter Aspect Ratio : 16:9 Energy Saving : Intelligent Sensor Picture Mode : Standard • Contrast 90 • Brightness 50 • Sharpness 60 • Color 60 • Tint 0R G • Advanced Control E AUDIO Auto Volume Clear Voice II Balance ...Enter : Off : On • Level 0 - + 0L R : Standard • SRS TruSurround XT:Off • Treble 50 • Bass 50 • Reset E WATCHING TV / CHANNEL CONTROL OPTION Move Enter Menu Language(Language): English Audio Language : English Input Label SIMPLINK : On Key Lock : Off ...
...Move Enter PICTURE Move Enter Aspect Ratio : 16:9 Energy Saving : Intelligent Sensor Picture Mode : Standard • Contrast 90 • Brightness 50 • Sharpness 60 • Color 60 • Tint 0R G • Advanced Control E AUDIO Auto Volume Clear Voice II Balance ...Enter : Off : On • Level 0 - + 0L R : Standard • SRS TruSurround XT:Off • Treble 50 • Bass 50 • Reset E WATCHING TV / CHANNEL CONTROL OPTION Move Enter Menu Language(Language): English Audio Language : English Input Label SIMPLINK : On Key Lock : Off ...

Owners Manual
Page 48
... Opofnf ent1 : Off Com: Opofnf ent2 RG:BN-PoCrmal Set ID HD:M1I1 E HDMI2 HDMI3 HDMI4 Close G Only 42/50PQ60, 50/60PS60, 50/60PS60C With using OPTION menu 1 MENU 2 ENTER Select OPTION. RETURN Return to the previous menu. Select Input Label. 3 ENTER Select... the source. 4 Select the label. 5 Return to TV viewing. OPTION Move Enter Menu Language(Language): English Audio Language : English Input Label SIMPLINK : On...
... Opofnf ent1 : Off Com: Opofnf ent2 RG:BN-PoCrmal Set ID HD:M1I1 E HDMI2 HDMI3 HDMI4 Close G Only 42/50PQ60, 50/60PS60, 50/60PS60C With using OPTION menu 1 MENU 2 ENTER Select OPTION. RETURN Return to the previous menu. Select Input Label. 3 ENTER Select... the source. 4 Select the label. 5 Return to TV viewing. OPTION Move Enter Menu Language(Language): English Audio Language : English Input Label SIMPLINK : On...

Owners Manual
Page 49
WATCHING TV / CHANNEL CONTROL AV MODE AV Mode toggles through preset Video and Audio settings. (Only 50/60PS60. 50/60PS60C) Off Cinema or Cinema Game Sport 1AV MODE Press the AV MODE button repeatedly to previous selected value. ■ O f f: Disables the AV MODE. ■ ...
WATCHING TV / CHANNEL CONTROL AV MODE AV Mode toggles through preset Video and Audio settings. (Only 50/60PS60. 50/60PS60C) Off Cinema or Cinema Game Sport 1AV MODE Press the AV MODE button repeatedly to previous selected value. ■ O f f: Disables the AV MODE. ■ ...


