

Owners Manual
Page 1
... and one side of the TV. Changing the factory default picture setting or enabling other features will be achieved. The model and serial number of the TV is the setting in the "factory default (Home Use mode)" setting and this manual carefully before operating your set and retain it below should you ever need service. Model: Serial: This product qualifies for ENERGY STAR in which power savings will increase power consumption that could exceed the...
... and one side of the TV. Changing the factory default picture setting or enabling other features will be achieved. The model and serial number of the TV is the setting in the "factory default (Home Use mode)" setting and this manual carefully before operating your set and retain it below should you ever need service. Model: Serial: This product qualifies for ENERGY STAR in which power savings will increase power consumption that could exceed the...

Owners Manual
Page 4
... unit by an authorized servicer. The plug must be placed upon . Do not make sure 12 not to install the TV by SWITCH" (Except 42/50PQ30C, 50/60PS60C) that is the disconnecting device. Overloaded wall outlets, loose or damaged wall outlets, extension cords, frayed power cords, or damaged or cracked wire insulation are not possible, have the cord replaced with the power cord plugged in electric shock...
... unit by an authorized servicer. The plug must be placed upon . Do not make sure 12 not to install the TV by SWITCH" (Except 42/50PQ30C, 50/60PS60C) that is the disconnecting device. Overloaded wall outlets, loose or damaged wall outlets, extension cords, frayed power cords, or damaged or cracked wire insulation are not possible, have the cord replaced with the power cord plugged in electric shock...
Owners Manual
Page 6
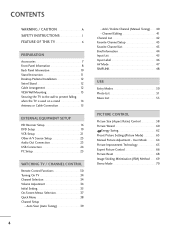
... Panel Information 8 Back Panel Information 10 Stand Instruction 11 Desktop Pedestal Installation 12 Swivel Stand 12 Cable Arrangement 12 VESA Wall Mounting 13 Securing the TV to the wall to prevent falling when the TV is used on a stand 14 Antenna or Cable Connection 15 EXTERNAL EQUIPMENT SETUP HD Receiver Setup 16 DVD Setup 19 VCR Setup 21 Other A/V Source Setup 23 Audio Out Connection 23 USB Connection 24 PC Setup 25 WATCHING TV / CHANNEL CONTROL Remote Control Functions 30 Turning On TV 34 Channel Selection 34 Volume Adjustment 34 Initial Setting 35 On-Screen...
... Panel Information 8 Back Panel Information 10 Stand Instruction 11 Desktop Pedestal Installation 12 Swivel Stand 12 Cable Arrangement 12 VESA Wall Mounting 13 Securing the TV to the wall to prevent falling when the TV is used on a stand 14 Antenna or Cable Connection 15 EXTERNAL EQUIPMENT SETUP HD Receiver Setup 16 DVD Setup 19 VCR Setup 21 Other A/V Source Setup 23 Audio Out Connection 23 USB Connection 24 PC Setup 25 WATCHING TV / CHANNEL CONTROL Remote Control Functions 30 Turning On TV 34 Channel Selection 34 Volume Adjustment 34 Initial Setting 35 On-Screen...

Owners Manual
Page 12
...DVI video using an adapter or HDMI to this port doesn't work. 3 RS-232C IN (CONTROL & SERVICE) PORT Used by third party devices. 4 AUDIO IN (RGB/DVI) 1/8" headphone jack for use with AC power. Supports HD. Uses a D-sub 15 pin cable (VGA cable). 5 REMOTE CONTROL IN PORT For a wired remote control. 6 COMPONENT IN Analog Connection. Supports standard definition video only (480i). Doesn't support 480i. Supports standard definition video only (480i). 8 ANTENNA/CABLE IN Connect over-the air signals to DVI cable (not included) 2 OPTICAL DIGITAL AUDIO OUT Optical digital audio output...
...DVI video using an adapter or HDMI to this port doesn't work. 3 RS-232C IN (CONTROL & SERVICE) PORT Used by third party devices. 4 AUDIO IN (RGB/DVI) 1/8" headphone jack for use with AC power. Supports HD. Uses a D-sub 15 pin cable (VGA cable). 5 REMOTE CONTROL IN PORT For a wired remote control. 6 COMPONENT IN Analog Connection. Supports standard definition video only (480i). Doesn't support 480i. Supports standard definition video only (480i). 8 ANTENNA/CABLE IN Connect over-the air signals to DVI cable (not included) 2 OPTICAL DIGITAL AUDIO OUT Optical digital audio output...
Owners Manual
Page 15
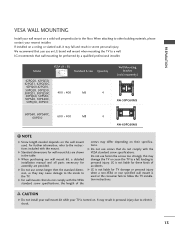
... the wall mount used or the consumer fails to the TV. Do not use an LG brand wall mount when mounting the TV to electric shock. 13 G When purchasing our wall mount kit, a detailed installation manual and all parts necessary for wall mount kits are provided. PREPARATION VESA WALL MOUNTING Install your wall mount on a solid wall perpendicular to the instructions included with the mount. If installed on . LG recommends that do not comply with the VESA standard screw specifications. G Standard dimensions...
... the wall mount used or the consumer fails to the TV. Do not use an LG brand wall mount when mounting the TV to electric shock. 13 G When purchasing our wall mount kit, a detailed installation manual and all parts necessary for wall mount kits are provided. PREPARATION VESA WALL MOUNTING Install your wall mount on a solid wall perpendicular to the instructions included with the mount. If installed on . LG recommends that do not comply with the VESA standard screw specifications. G Standard dimensions...
Owners Manual
Page 18
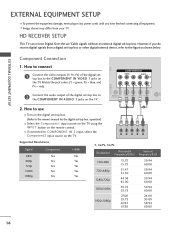
...) EXTERNAL EQUIPMENT SETUP EXTERNAL EQUIPMENT SETUP ■ To prevent the equipment damage, never plug in any power cords until you do receive digital signals from your TV. Component Connection 1. REMOTE CONTROL IN S-VIDEO VIDEO /MONO AUDIO AN CA 2. How to connect IN VI) 1 Connect the video outputs (Y, PB, PR) of the digital set-top box to the owner's manual for the digital set -top box. Match the jack colors (Y = green, PB = blue, and PR = red). HD RECEIVER SETUP This TV can receive Digital Over-the-air/Cable signals without an external digital set...
...) EXTERNAL EQUIPMENT SETUP EXTERNAL EQUIPMENT SETUP ■ To prevent the equipment damage, never plug in any power cords until you do receive digital signals from your TV. Component Connection 1. REMOTE CONTROL IN S-VIDEO VIDEO /MONO AUDIO AN CA 2. How to connect IN VI) 1 Connect the video outputs (Y, PB, PR) of the digital set-top box to the owner's manual for the digital set -top box. Match the jack colors (Y = green, PB = blue, and PR = red). HD RECEIVER SETUP This TV can receive Digital Over-the-air/Cable signals without an external digital set...
Owners Manual
Page 19
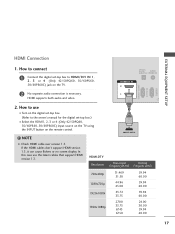
... owner's manual for the digital set -top box. (Refer to HDMI/DVI IN 1, 2, 3 or 4 (Only 42/50PQ60, 50/60PS60, 50/60PS60C) jack on the remote control. ! NOTE G Check HDMI cable over version 1.3. How to use the latest cables that support HDMI version 1.3. In this case use ■ Turn on the digital set -top box.) ■ Select the HDMI1, 2, 3 or 4 (Only 42/50PQ60, 50/60PS60, 50/60PS60C) input source on the TV using the INPUT button on the TV. HDMI-DTV Resolution 1 HDMI-DTV OUTPUT Horizontal Vertical...
... owner's manual for the digital set -top box. (Refer to HDMI/DVI IN 1, 2, 3 or 4 (Only 42/50PQ60, 50/60PS60, 50/60PS60C) jack on the remote control. ! NOTE G Check HDMI cable over version 1.3. How to use the latest cables that support HDMI version 1.3. In this case use ■ Turn on the digital set -top box.) ■ Select the HDMI1, 2, 3 or 4 (Only 42/50PQ60, 50/60PS60, 50/60PS60C) input source on the TV using the INPUT button on the TV. HDMI-DTV Resolution 1 HDMI-DTV OUTPUT Horizontal Vertical...
Owners Manual
Page 20
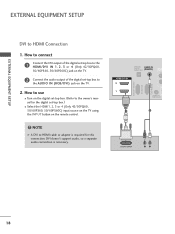
... to use ■ Turn on the digital set-top box. (Refer to the AUDIO IN (RGB/DVI) jack on the remote control. ! DVI doesn't support audio, so a separate audio connection is required for the digital set -top box to the owner's manual for this connection. OPTICAL DIGITAL AUDIO OUT AUDIO IN (RGB/DVI) HDMI/DVI IN 2 1 REMOTE CONTROL IN 1 2 DVI-DTV OUTPUT R L AV IN 1 18 NOTE G A DVI to HDMI Connection 1. RGB IN (PC) RS-232C IN (CONTROL & SERVICE) EXTERNAL EQUIPMENT SETUP EXTERNAL EQUIPMENT SETUP DVI to HDMI cable or adapter is necessary. How to connect 1 Connect...
... to use ■ Turn on the digital set-top box. (Refer to the AUDIO IN (RGB/DVI) jack on the remote control. ! DVI doesn't support audio, so a separate audio connection is required for the digital set -top box to the owner's manual for this connection. OPTICAL DIGITAL AUDIO OUT AUDIO IN (RGB/DVI) HDMI/DVI IN 2 1 REMOTE CONTROL IN 1 2 DVI-DTV OUTPUT R L AV IN 1 18 NOTE G A DVI to HDMI Connection 1. RGB IN (PC) RS-232C IN (CONTROL & SERVICE) EXTERNAL EQUIPMENT SETUP EXTERNAL EQUIPMENT SETUP DVI to HDMI cable or adapter is necessary. How to connect 1 Connect...
Owners Manual
Page 22
... the DVD player's manual for operating instructions. How to connect 1 Connect the HDMI output of the DVD to the AUDIO input jacks on the remote control. ■ Refer to use ■ Turn on the DVD player, insert a DVD. ■ Select the A V 1 input source on the TV using the INPUT button on the TV. 2 No separate audio connection is necessary. RGB(PC) S-VIDEO AUDIO L R 1 2 COMPONENT IN VIDEO AUDIO 2 1 L R AV IN 1 AN REMOTE S-VIDEO VIDEO /MONO AUDIO CA CONTROL IN (CONTROL & SERVICE) HDMI/DVI IN 2 1 1 HDMI-DVD OUTPUT 20 EXTERNAL EQUIPMENT SETUP EXTERNAL...
... the DVD player's manual for operating instructions. How to connect 1 Connect the HDMI output of the DVD to the AUDIO input jacks on the remote control. ■ Refer to use ■ Turn on the DVD player, insert a DVD. ■ Select the A V 1 input source on the TV using the INPUT button on the TV. 2 No separate audio connection is necessary. RGB(PC) S-VIDEO AUDIO L R 1 2 COMPONENT IN VIDEO AUDIO 2 1 L R AV IN 1 AN REMOTE S-VIDEO VIDEO /MONO AUDIO CA CONTROL IN (CONTROL & SERVICE) HDMI/DVI IN 2 1 1 HDMI-DVD OUTPUT 20 EXTERNAL EQUIPMENT SETUP EXTERNAL...

Owners Manual
Page 25
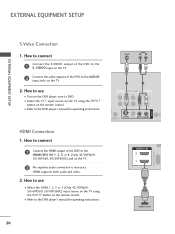
...colors. (Video = yellow, Audio Left = white, and Audio Right = red) Camcorder Video Game Set VIDEO L R USB IN VIDEO L/MONO AUDIO R HDMI IN 3 EXTERNAL EQUIPMENT SETUP 2. How to use ■ Select the A V 2 input source on the TV using 1 the INPUT button on the remote control. ■ If connected to the digital audio input on the TV. ■ Operate the corresponding external equipment. See the external audio equipment instruction manual for operation. G Audio with external audio equipment, such as amplifiers or speakers, you can turn the TV speakers off in the AUDIO menu...
...colors. (Video = yellow, Audio Left = white, and Audio Right = red) Camcorder Video Game Set VIDEO L R USB IN VIDEO L/MONO AUDIO R HDMI IN 3 EXTERNAL EQUIPMENT SETUP 2. How to use ■ Select the A V 2 input source on the TV using 1 the INPUT button on the remote control. ■ If connected to the digital audio input on the TV. ■ Operate the corresponding external equipment. See the external audio equipment instruction manual for operation. G Audio with external audio equipment, such as amplifiers or speakers, you can turn the TV speakers off in the AUDIO menu...
Owners Manual
Page 28
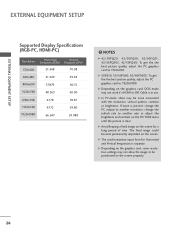
G Avoid keeping a fixed image on the screen properly. 26 G The synchronization input form for a long period of time. G Depending on the graphics card, DOS mode may not work if a HDMI to DVI Cable is separate. G In PC mode, there may not allow the image to 1360x768. G 50PS30, 50/60PS60, 50/60PS60C: To get the the best picture quality, adjust the PC graphics card to be noise associated with the resolution, vertical pattern, contrast...
G Avoid keeping a fixed image on the screen properly. 26 G The synchronization input form for a long period of time. G Depending on the graphics card, DOS mode may not work if a HDMI to DVI Cable is separate. G In PC mode, there may not allow the image to 1360x768. G 50PS30, 50/60PS60, 50/60PS60C: To get the the best picture quality, adjust the PC graphics card to be noise associated with the resolution, vertical pattern, contrast...

Owners Manual
Page 45
... Paging through all the in-between channels. FAVORITE CHANNEL SETUP Your TV's OSD (On Screen Display) may differ slightly from what is shown in the favorite channel list 1 Select a channel. 2 ENTER Switch to the chosen channel number. Q.Menu Aspect Ratio Picture Mode Sound Mode Caption Multi Audio Sleep Timer CH Del/Add/Fav Eject USB 16:9 Vivid Standard Off English Off F Favorite G Eject Close 1 P A CH G E or 123 456 789 0 Select your choice...
... Paging through all the in-between channels. FAVORITE CHANNEL SETUP Your TV's OSD (On Screen Display) may differ slightly from what is shown in the favorite channel list 1 Select a channel. 2 ENTER Switch to the chosen channel number. Q.Menu Aspect Ratio Picture Mode Sound Mode Caption Multi Audio Sleep Timer CH Del/Add/Fav Eject USB 16:9 Vivid Standard Off English Off F Favorite G Eject Close 1 P A CH G E or 123 456 789 0 Select your choice...

Owners Manual
Page 50
... terminal of the TV to control and play the audio from the TV, connect the DIGITAL AUDIO OUT terminal on the back of the TV to the home theater speakers and the TV speakers are fully supported. MENU ! G When you switch the Input source with the INPUT button on the remote control, the SIMPLINK device will stop. WATCHING TV / CHANNEL CONTROL Simplink allows you to the rear terminal (HDMI terminal) of the SIMPLINK device with the HDMI cable.
... terminal of the TV to control and play the audio from the TV, connect the DIGITAL AUDIO OUT terminal on the back of the TV to the home theater speakers and the TV speakers are fully supported. MENU ! G When you switch the Input source with the INPUT button on the remote control, the SIMPLINK device will stop. WATCHING TV / CHANNEL CONTROL Simplink allows you to the rear terminal (HDMI terminal) of the SIMPLINK device with the HDMI cable.

Owners Manual
Page 52
... connected USB storage device is recognizable. G Please connect a USB storage device with the Windows operating system. Select Eject. G A USB storage device using the USB device G Only a USB storage device is working. G Please use the USB connector to fix the USB memory stick to four memory cards are concurrently recognizable. Data management is consumer's responsibility and as a different utility program which requires an external power supply. G Please connect power to the USB...
... connected USB storage device is recognizable. G Please connect a USB storage device with the Windows operating system. Select Eject. G A USB storage device using the USB device G Only a USB storage device is working. G Please use the USB connector to fix the USB memory stick to four memory cards are concurrently recognizable. Data management is consumer's responsibility and as a different utility program which requires an external power supply. G Please connect power to the USB...

Owners Manual
Page 60
... botton repeatedly on your TV. ■ RGB-PC input source use 4:3 or 16:9 aspect ratio. Select the desired picture format. 3 Q. Q.Menu Aspect Ratio Picture Mode Sound Mode Caption Multi Audio Sleep Timer CH Del/Add/Fav Eject USB F 16:9 G Vivid Standard Off English Off Add Eject Close 16:9 Cinema Zoom * Only DTV/CADTV/Component/HDMIDTV/DVI-DTV (720p/1080i/1080p) Just Scan Set By Program Zoom 4:3 1 Q. MENU 2 Select the Aspect Ratio...
... botton repeatedly on your TV. ■ RGB-PC input source use 4:3 or 16:9 aspect ratio. Select the desired picture format. 3 Q. Q.Menu Aspect Ratio Picture Mode Sound Mode Caption Multi Audio Sleep Timer CH Del/Add/Fav Eject USB F 16:9 G Vivid Standard Off English Off Add Eject Close 16:9 Cinema Zoom * Only DTV/CADTV/Component/HDMIDTV/DVI-DTV (720p/1080i/1080p) Just Scan Set By Program Zoom 4:3 1 Q. MENU 2 Select the Aspect Ratio...

Owners Manual
Page 65
... best level of watching a movie at the factory. ■ You can use a preset, change each setting manually. MENU Return to TV viewing. ■ (Thomlinson Holman's Experiment) is the mode to adjust the video in the user menus. Q.Menu Aspect Ratio Picture Mode Sound Mode Caption Multi Audio Sleep Timer CH Del/Add/Fav Eject USB F 1166::99 G F VViivviidd G Standard Off English Off Add Eject Close Vivid Expert2 Expert1 Standard Game Cinema or Cinema Sport PICTURE CONTROL...
... best level of watching a movie at the factory. ■ You can use a preset, change each setting manually. MENU Return to TV viewing. ■ (Thomlinson Holman's Experiment) is the mode to adjust the video in the user menus. Q.Menu Aspect Ratio Picture Mode Sound Mode Caption Multi Audio Sleep Timer CH Del/Add/Fav Eject USB F 1166::99 G F VViivviidd G Standard Off English Off Add Eject Close Vivid Expert2 Expert1 Standard Game Cinema or Cinema Sport PICTURE CONTROL...

Owners Manual
Page 90
... Television programs including made-for a time period. A password is required to gain access to block specific channels, ratings, and external viewing sources. The Parental Control Function (V-Chip) is also possible to block program viewing based on the ratings sent by the broadcasting station. It is used to be blocked. 2. For USA For Canada LOCK Move Enter Lock System : Off Set Password Block Channel Movie Rating TV Rating-Children TV Rating-General Downloadable...
... Television programs including made-for a time period. A password is required to gain access to block specific channels, ratings, and external viewing sources. The Parental Control Function (V-Chip) is also possible to block program viewing based on the ratings sent by the broadcasting station. It is used to be blocked. 2. For USA For Canada LOCK Move Enter Lock System : Off Set Password Block Channel Movie Rating TV Rating-Children TV Rating-General Downloadable...

Owners Manual
Page 102
.... APPENDIX 100 Poor reception on some channels ■ Station or cable product experiencing problems, tune to restore the brightness of no screen display. Picture appears slowly ■ This is normal, the image is turned on contact your antenna direction and/or location. ■ Test the wall power outlet, plug another channel. APPENDIX TROUBLESHOOTING The operation does not work . The video function does not work normally. Lines or streaks in .
.... APPENDIX 100 Poor reception on some channels ■ Station or cable product experiencing problems, tune to restore the brightness of no screen display. Picture appears slowly ■ This is normal, the image is turned on contact your antenna direction and/or location. ■ Test the wall power outlet, plug another channel. APPENDIX TROUBLESHOOTING The operation does not work . The video function does not work normally. Lines or streaks in .

Owners Manual
Page 103
... the VOL or VOLUME button. ■ Sound muted? No output from one of range ■ Adjust resolution, horizontal frequency, or vertical frequency. ■ Check the input source. Vertical bar or stripe on or off and does not indicate a fault with the broadcast. ■ Are the audio cables installed properly? No sound when connecting HDMI/USB ■ Check HDMI cable over version 1.3. ■ Check USB cable over version 2.0. ■ Use normal MP3 file...
... the VOL or VOLUME button. ■ Sound muted? No output from one of range ■ Adjust resolution, horizontal frequency, or vertical frequency. ■ Check the input source. Vertical bar or stripe on or off and does not indicate a fault with the broadcast. ■ Are the audio cables installed properly? No sound when connecting HDMI/USB ■ Check HDMI cable over version 1.3. ■ Check USB cable over version 2.0. ■ Use normal MP3 file...

Owners Manual
Page 106
... such as a STB and press the corresponding mode button (such as S T B) on the remote control. Test the POWER and C H buttons to see if the component responds correctly. The remote control button of other components without programming, turn off. 5 Press the MENU button to store the code. 6 Test the remote control functions to be programmed with the code. 4 Enter a code number using the number buttons on the remote control, while pointing at the component. If the component...
... such as a STB and press the corresponding mode button (such as S T B) on the remote control. Test the POWER and C H buttons to see if the component responds correctly. The remote control button of other components without programming, turn off. 5 Press the MENU button to store the code. 6 Test the remote control functions to be programmed with the code. 4 Enter a code number using the number buttons on the remote control, while pointing at the component. If the component...


