
Owners Manual
Page 2
... and receiver. - Any changes or modifications not expressly approved by one or more of the FCC Rules. NO USER SERVICEABLE PARTS INSIDE. Reorient or relocate the receiving antenna. - Consult the dealer or an experienced radio/TV technician for...digital device, pursuant to radio or television reception, which the receiver is connected. - These limits are designed to constitute a risk of the cable entry as close to the point of electric shock to the presence of the National Electric Code (U.S.A.). This equipment generates, uses and can be determined by turning...
... and receiver. - Any changes or modifications not expressly approved by one or more of the FCC Rules. NO USER SERVICEABLE PARTS INSIDE. Reorient or relocate the receiving antenna. - Consult the dealer or an experienced radio/TV technician for...digital device, pursuant to radio or television reception, which the receiver is connected. - These limits are designed to constitute a risk of the cable entry as close to the point of electric shock to the presence of the National Electric Code (U.S.A.). This equipment generates, uses and can be determined by turning...

Owners Manual
Page 4
... TV. 15 WARNING - on the power cord to install the TV by an authorized servicer. When mounting a TV on the wall, make the TV with liquids, such as vases, cups, etc. on the back of the appliance, and have a qualified electrician install a separate circuit breaker. Do not install this apparatus or antenna during a thunder or lighting storm. Do not overload wall outlets. Short-circuit Breaker Power Supply...
... TV. 15 WARNING - on the power cord to install the TV by an authorized servicer. When mounting a TV on the wall, make the TV with liquids, such as vases, cups, etc. on the back of the appliance, and have a qualified electrician install a separate circuit breaker. Do not install this apparatus or antenna during a thunder or lighting storm. Do not overload wall outlets. Short-circuit Breaker Power Supply...

Owners Manual
Page 5
... antenna system is turned off, unplugged and all cables have been removed. Ground Clamp Electric Service Equipment NEC: National Electrical Code Antenna Lead in a confined space such as alcohol, thinners or benzene. 3 Do not spray water or other odors coming from the TV or hear strange sounds, unplug the power cord contact an authorized service center. 25 Do not press strongly upon the panel...
... antenna system is turned off, unplugged and all cables have been removed. Ground Clamp Electric Service Equipment NEC: National Electrical Code Antenna Lead in a confined space such as alcohol, thinners or benzene. 3 Do not spray water or other odors coming from the TV or hear strange sounds, unplug the power cord contact an authorized service center. 25 Do not press strongly upon the panel...

Owners Manual
Page 6
... Panel Information 9 Stand Instruction 10 Cable Management 11 Desktop Pedestal Installation 12 Swivel Stand 12 VESA Wall Mounting 13 Securing the TV to the wall to prevent falling . . . . 14 Antenna or Cable Connection 15 EXTERNAL EQUIPMENT SETUP HD Receiver Setup 16 DVD Setup 19 VCR Setup 21 Other A/V Source Setup 23 Audio Out Connection 23 PC Setup 24 WATCHING TV / CHANNEL CONTROL Remote Control Functions 30 Turning On TV 32 Channel Selection 32 Volume Adjustment 32 Initial Setting 33 Quick Menu 34 On-Screen Menus Selection 35 Channel Setup - Preset 47 Manual Picture...
... Panel Information 9 Stand Instruction 10 Cable Management 11 Desktop Pedestal Installation 12 Swivel Stand 12 VESA Wall Mounting 13 Securing the TV to the wall to prevent falling . . . . 14 Antenna or Cable Connection 15 EXTERNAL EQUIPMENT SETUP HD Receiver Setup 16 DVD Setup 19 VCR Setup 21 Other A/V Source Setup 23 Audio Out Connection 23 PC Setup 24 WATCHING TV / CHANNEL CONTROL Remote Control Functions 30 Turning On TV 32 Channel Selection 32 Volume Adjustment 32 Initial Setting 33 Quick Menu 34 On-Screen Menus Selection 35 Channel Setup - Preset 47 Manual Picture...
Owners Manual
Page 11
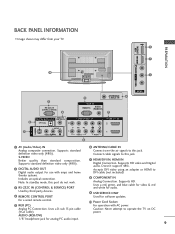
.... Doesn't support 480i. Uses a red, green, and blue cable for video & red and white for use with AC power. Analog PC Connection. Used by third party devices. 9 USB SERVICE ONLY 4 REMOTE CONTROL PORT Used for analog PC audio input. 9 For a wired remote control. 10 Power Cord Socket 5 RGB (PC) For operation with amps and home theater systems. Includes an optical connection. Uses a D-sub 15 pin cable (VGA cable). Connect cable signals to this jack. 7 HDMI/DVI IN, HDMI IN Digital Connection. AUDIO (RGB/DVI) 1/8" headphone jack for software updates. Caution: Never...
.... Doesn't support 480i. Uses a red, green, and blue cable for video & red and white for use with AC power. Analog PC Connection. Used by third party devices. 9 USB SERVICE ONLY 4 REMOTE CONTROL PORT Used for analog PC audio input. 9 For a wired remote control. 10 Power Cord Socket 5 RGB (PC) For operation with amps and home theater systems. Includes an optical connection. Uses a D-sub 15 pin cable (VGA cable). Connect cable signals to this jack. 7 HDMI/DVI IN, HDMI IN Digital Connection. AUDIO (RGB/DVI) 1/8" headphone jack for software updates. Caution: Never...

Owners Manual
Page 15
... use screws that you use an LG brand wall mount when mounting the TV to follow the TV installation instructions. A B Product PLASMA TV Model 42PG10, 42PG20, 42PG20C 50PG10, 50PG20, 50PG20C 50PG30, 50PG30C 60PG30, 60PG30C VESA (A * B) Standard Screw Quantity 400 * 400 M6 4 600 * 400 M8 4 ! For further information, refer to electric shock. 13 PREPARATION VESA WALL MOUNTING Install your wall mount on their specifications. G For wall mounts that do not comply with the mount. CAUTION G Do not install your wall mount...
... use screws that you use an LG brand wall mount when mounting the TV to follow the TV installation instructions. A B Product PLASMA TV Model 42PG10, 42PG20, 42PG20C 50PG10, 50PG20, 50PG20C 50PG30, 50PG30C 60PG30, 60PG30C VESA (A * B) Standard Screw Quantity 400 * 400 M6 4 600 * 400 M8 4 ! For further information, refer to electric shock. 13 PREPARATION VESA WALL MOUNTING Install your wall mount on their specifications. G For wall mounts that do not comply with the mount. CAUTION G Do not install your wall mount...

Owners Manual
Page 18
.../Cable signals without an external digital set-top box. How to use I Turn on 1 the TV. How to connect MOTE TROL IN 2 1 Connect the video outputs (Y, PB, PR) of the digital set-top box to the COMPONENT IN AUDIO 1 jacks on the remote control. RGB(PC) (RGB/DVI) COMPONENT IN VIDEO AUDIO HDMI/ 2 1 2 Connect the audio output of the digital settop box to the COMPONENT IN VIDEO 1 jacks on the digital set-top box. (Refer to the owner's manual for the digital set-top box. EXTERNAL EQUIPMENT SETUP EXTERNAL EQUIPMENT SETUP...
.../Cable signals without an external digital set-top box. How to use I Turn on 1 the TV. How to connect MOTE TROL IN 2 1 Connect the video outputs (Y, PB, PR) of the digital set-top box to the COMPONENT IN AUDIO 1 jacks on the remote control. RGB(PC) (RGB/DVI) COMPONENT IN VIDEO AUDIO HDMI/ 2 1 2 Connect the audio output of the digital settop box to the COMPONENT IN VIDEO 1 jacks on the digital set-top box. (Refer to the owner's manual for the digital set-top box. EXTERNAL EQUIPMENT SETUP EXTERNAL EQUIPMENT SETUP...
Owners Manual
Page 19
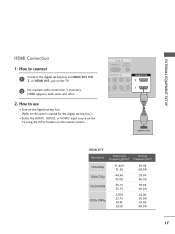
... 60.00 24.00 30.00 59.94 60.00 ( ) 17 How to connect 1 Connect the digital set-top box to the owner's manual for the digital set-top box.) I Turn on the digital set-top box. (Refer to HDMI/DVI IN1, 2, or HDMI IN3 jack on the remote control. How to use I Select the HDMI1, HDMI2, or HDMI3 input source on the TV using the INPUT button on the TV. 2 No separate audio connection is necessary. ( ) HDMI supports both audio and video. 2.
... 60.00 24.00 30.00 59.94 60.00 ( ) 17 How to connect 1 Connect the digital set-top box to the owner's manual for the digital set-top box.) I Turn on the digital set-top box. (Refer to HDMI/DVI IN1, 2, or HDMI IN3 jack on the remote control. How to use I Select the HDMI1, HDMI2, or HDMI3 input source on the TV using the INPUT button on the TV. 2 No separate audio connection is necessary. ( ) HDMI supports both audio and video. 2.
Owners Manual
Page 20
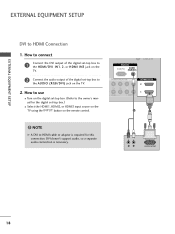
... digital set -top box. (Refer to the owner's manual for this connection. DVI doesn't support audio, so a separate audio connection is required for the digital set-top box.) I Turn on the digital set -top box to use ( ) I Select the HDMI1, HDMI2, or HDMI3 input source on the TV using the INPUT button on the TV. 2. How to the AUDIO (RGB/DVI) jack on the remote control. R L DVI-DTV OUTPUT 18 NOTE G A DVI to HDMI Connection 1. RGB IN RGB(PC) AUDIO (RGB/DVI) CABLE IN COMPONENT IN PB PR L R VIDEO AUDIO HDMI/DVI...
... digital set -top box. (Refer to the owner's manual for this connection. DVI doesn't support audio, so a separate audio connection is required for the digital set-top box.) I Turn on the digital set -top box to use ( ) I Select the HDMI1, HDMI2, or HDMI3 input source on the TV using the INPUT button on the TV. 2. How to the AUDIO (RGB/DVI) jack on the remote control. R L DVI-DTV OUTPUT 18 NOTE G A DVI to HDMI Connection 1. RGB IN RGB(PC) AUDIO (RGB/DVI) CABLE IN COMPONENT IN PB PR L R VIDEO AUDIO HDMI/DVI...
Owners Manual
Page 21
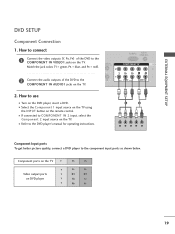
... (RGB/DVI) COMPONENT IN VIDEO AUDIO HDM 2 1 2. I Refer to the DVD player's manual for operating instructions. 1 2 Y PB PR L R Component Input ports To get better picture quality, connect a DVD player to the component input ports as shown below. I If connected to use I Select the Component 1 input source on the TV using the INPUT button on the TV. How to COMPONENT IN 2 input, select the Component 2 input source on the remote control. EXTERNAL EQUIPMENT SETUP DVD SETUP Component Connection 1. I Turn on the TV. EMOTE NTROL IN 2 2 Connect the audio outputs of...
... (RGB/DVI) COMPONENT IN VIDEO AUDIO HDM 2 1 2. I Refer to the DVD player's manual for operating instructions. 1 2 Y PB PR L R Component Input ports To get better picture quality, connect a DVD player to the component input ports as shown below. I If connected to use I Select the Component 1 input source on the TV using the INPUT button on the TV. How to COMPONENT IN 2 input, select the Component 2 input source on the remote control. EXTERNAL EQUIPMENT SETUP DVD SETUP Component Connection 1. I Turn on the TV. EMOTE NTROL IN 2 2 Connect the audio outputs of...

Owners Manual
Page 22
...DVD to use I Turn on the remote control. How to the AUDIO input jacks on the remote control. ( ) ( ) EXTERNAL EQUIPMENT SETUP EXTERNAL EQUIPMENT SETUP S-Video Connection 1. How to connect 1 Connect the HDMI output of the DVD to use I Select the HDMI1, HDMI2, or HDMI3 input source on the TV using the INPUT button on the DVD player, insert a DVD. I Refer to the DVD player's manual for operating instructions. I Refer to the DVD player's manual for operating instructions. AV IN 1 S-VIDEO S-VIDEO AUDIO L R 1 2 RS-232C IN (CONTROL & SERVICE) DIGITAL AUDIO...
...DVD to use I Turn on the remote control. How to the AUDIO input jacks on the remote control. ( ) ( ) EXTERNAL EQUIPMENT SETUP EXTERNAL EQUIPMENT SETUP S-Video Connection 1. How to connect 1 Connect the HDMI output of the DVD to use I Select the HDMI1, HDMI2, or HDMI3 input source on the TV using the INPUT button on the DVD player, insert a DVD. I Refer to the DVD player's manual for operating instructions. I Refer to the DVD player's manual for operating instructions. AV IN 1 S-VIDEO S-VIDEO AUDIO L R 1 2 RS-232C IN (CONTROL & SERVICE) DIGITAL AUDIO...

Owners Manual
Page 25
... speakers, you can turn the TV speakers off in the AUDIO menu. (G p.61). I Select the A V 2 input source on the TV using 1 the INPUT button on the remote control. Off" in the menu. (G p.61) CAUTION G Do not look into the optical output port. AV IN 1 S-VIDEO RS-232C IN (CONTROL & SERVICE) DIGITAL AUDIO OUT REMOTE CONTROL IN OPTICAL 2 AU1DIO Y 1 ! Match the jack colors. (Video = yellow, Audio Left = white, and Audio Right = red) Camcorder Video Game Set VIDEO L R USB SERVICE ONLY HDMI IN 3 VIDEO L/MONO AUDIO R 2. How to AV IN1 input, select the A V 1 input source...
... speakers, you can turn the TV speakers off in the AUDIO menu. (G p.61). I Select the A V 2 input source on the TV using 1 the INPUT button on the remote control. Off" in the menu. (G p.61) CAUTION G Do not look into the optical output port. AV IN 1 S-VIDEO RS-232C IN (CONTROL & SERVICE) DIGITAL AUDIO OUT REMOTE CONTROL IN OPTICAL 2 AU1DIO Y 1 ! Match the jack colors. (Video = yellow, Audio Left = white, and Audio Right = red) Camcorder Video Game Set VIDEO L R USB SERVICE ONLY HDMI IN 3 VIDEO L/MONO AUDIO R 2. How to AV IN1 input, select the A V 1 input source...

Owners Manual
Page 27
EXTERNAL EQUIPMENT SETUP Supported Display Specifications (RGB-PC, HDMI-PC) Resolution 640x350 Horizontal Vertical Frequency(KHz) Frequency(Hz) 31.468 70.09 720x400 31.469 70.08 640x480 31...50 60.00 * Only RGB-PC mode ! If noise is present, change the PC output to another resolution, change the refresh rate to be noise associated with the resolution, vertical pattern, contrast or brightness. G Depending on the graphics card, some resolution settings may not allow the image to another rate or adjust the brightness and contrast on the PICTURE menu until the picture is in use...
EXTERNAL EQUIPMENT SETUP Supported Display Specifications (RGB-PC, HDMI-PC) Resolution 640x350 Horizontal Vertical Frequency(KHz) Frequency(Hz) 31.468 70.09 720x400 31.469 70.08 640x480 31...50 60.00 * Only RGB-PC mode ! If noise is present, change the PC output to another resolution, change the refresh rate to be noise associated with the resolution, vertical pattern, contrast or brightness. G Depending on the graphics card, some resolution settings may not allow the image to another rate or adjust the brightness and contrast on the PICTURE menu until the picture is in use...
Owners Manual
Page 33
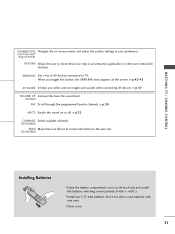
... user to move return one full set images and sounds when connecting AV devices. UP/DOWN Installing Batteries I Open the battery compartment cover on the back side and install the batteries matching correct polarity (+with +,-with new ones. WATCHING TV / CHANNEL CONTROL THUMBSTICK Navigate the on or off. I Close cover. 31 G p.42-43 AV MODE It helps you toggle this button, the SIMPLINK menu...
... user to move return one full set images and sounds when connecting AV devices. UP/DOWN Installing Batteries I Open the battery compartment cover on the back side and install the batteries matching correct polarity (+with +,-with new ones. WATCHING TV / CHANNEL CONTROL THUMBSTICK Navigate the on or off. I Close cover. 31 G p.42-43 AV MODE It helps you toggle this button, the SIMPLINK menu...

Owners Manual
Page 34
... to select a channel number. The TV reverts to , even if the power cord is programmed to remember which power state it was last set to standby mode. ! I In standby mode to switch the sound off, press the MUTE button. 3 You can cancel the Mute function by using the TV, press the POWER button on vacation, disconnect the power plug from the wall power outlet. At this moment, the TV switches to standby mode. WATCHING TV / CHANNEL CONTROL TURNING ON TV 1 First, connect power cord correctly.
... to select a channel number. The TV reverts to , even if the power cord is programmed to remember which power state it was last set to standby mode. ! I In standby mode to switch the sound off, press the MUTE button. 3 You can cancel the Mute function by using the TV, press the POWER button on vacation, disconnect the power plug from the wall power outlet. At this moment, the TV switches to standby mode. WATCHING TV / CHANNEL CONTROL TURNING ON TV 1 First, connect power cord correctly.

Owners Manual
Page 36
... the power consumption of time before your desired picture format. MENU 2 Display each menu. Make appropriate adjustments. 3 Q. I Picture Mode: Selects the factory preset picture depend on or off automatically. I Sleep Timer: Select the amount of the TV. I Sound Mode: Selects the factory preset sound for type of features which users might use frequently. I Clear Voice: By differentiating the human sound range from what is a menu of program. Q.Menu Aspect Ratio Power Saving Clear Voice Picture Mode Sound Mode Caption Multi Audio Sleep Timer...
... the power consumption of time before your desired picture format. MENU 2 Display each menu. Make appropriate adjustments. 3 Q. I Picture Mode: Selects the factory preset picture depend on or off automatically. I Sleep Timer: Select the amount of the TV. I Sound Mode: Selects the factory preset sound for type of features which users might use frequently. I Clear Voice: By differentiating the human sound range from what is a menu of program. Q.Menu Aspect Ratio Power Saving Clear Voice Picture Mode Sound Mode Caption Multi Audio Sleep Timer...

Owners Manual
Page 44
... Language Input Label SIMPLINK Key Lock Caption ISM Method Power Saving Set ID E : English : On Off : Off On : Off : Normal : Level 0 : 1 WATCHING TV / CHANNEL CONTROL 1 MENU Select OPTION. 2 ENTER Select SIMPLINK. 3 ENTER Select O n or O f f. 4 RETURN Return to the DIGITAL AUDIO IN terminal on the back of the SIMPLINK device with the INPUT button on in the user menus. G When you switch the Input source with an OPTICAL cable. 42...
... Language Input Label SIMPLINK Key Lock Caption ISM Method Power Saving Set ID E : English : On Off : Off On : Off : Normal : Level 0 : 1 WATCHING TV / CHANNEL CONTROL 1 MENU Select OPTION. 2 ENTER Select SIMPLINK. 3 ENTER Select O n or O f f. 4 RETURN Return to the DIGITAL AUDIO IN terminal on the back of the SIMPLINK device with the INPUT button on in the user menus. G When you switch the Input source with an OPTICAL cable. 42...

Owners Manual
Page 48
... picture settings available in the user menus. Preset There are not adjustable. You can use a preset, change each setting manually. PICTURE CONTROL PRESET PICTURE SETTINGS Picture Mode - PICTURE CONTROL 46 Q.Menu Aspect Ratio Power Saving Clear Voice Picture Mode Sound Mode Caption Multi Audio Sleep Timer CH Del/Add/Fav 16:9 3 Off F Vivid G Standard Off English Off Add Close Vivid Expert2 Expert1 Standard Game Cinema Sport 1 PICTURE Select Vivid, Standard, Cinema, Sport, Game, Expert1, or Expert2. 2 RETURN Return to TV viewing...
... picture settings available in the user menus. Preset There are not adjustable. You can use a preset, change each setting manually. PICTURE CONTROL PRESET PICTURE SETTINGS Picture Mode - PICTURE CONTROL 46 Q.Menu Aspect Ratio Power Saving Clear Voice Picture Mode Sound Mode Caption Multi Audio Sleep Timer CH Del/Add/Fav 16:9 3 Off F Vivid G Standard Off English Off Add Close Vivid Expert2 Expert1 Standard Game Cinema Sport 1 PICTURE Select Vivid, Standard, Cinema, Sport, Game, Expert1, or Expert2. 2 RETURN Return to TV viewing...

Owners Manual
Page 76
... to block specific channels, ratings, and external viewing sources. For USA For Canada LOCK Move Enter Lock System : Off Set Password Block Channel Movie Rating TV Rating-Children TV Rating-General Downloadable Rating Input Block LOCK Move Enter Lock System : Off Set Password Block Channel TV Rating-English TV Rating-French Downloadable Rating Input Block Enter Password **** Close 1 MENU ENTER Select L O C K. 21 2 3 456 789 0 Input the password. 74 I The TV is required to gain access to block program viewing based on the...
... to block specific channels, ratings, and external viewing sources. For USA For Canada LOCK Move Enter Lock System : Off Set Password Block Channel Movie Rating TV Rating-Children TV Rating-General Downloadable Rating Input Block LOCK Move Enter Lock System : Off Set Password Block Channel TV Rating-English TV Rating-French Downloadable Rating Input Block Enter Password **** Close 1 MENU ENTER Select L O C K. 21 2 3 456 789 0 Input the password. 74 I The TV is required to gain access to block program viewing based on the...
Owners Manual
Page 88
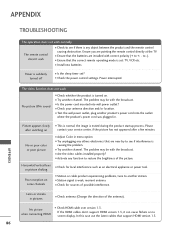
... the correct remote operating mode is set ? to +, - I Try unplugging any others electronics that support HDMI version 1.3. 86 Power is turned on. I Is the sleep timer set : TV, VCR etc. The problem may be with the broadcast. No picture when connecting HDMI I Is the power cord inserted into the outlet where the product's power cord was plugged in. I Check HDMI cable over version 1.3. I Try another station. Please after switching on some channels I This...
... the correct remote operating mode is set ? to +, - I Try unplugging any others electronics that support HDMI version 1.3. 86 Power is turned on. I Is the sleep timer set : TV, VCR etc. The problem may be with the broadcast. No picture when connecting HDMI I Is the power cord inserted into the outlet where the product's power cord was plugged in. I Check HDMI cable over version 1.3. I Try another station. Please after switching on some channels I This...


