
Specification (English)
Page 1
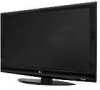
... Automatically enhances and amplifies the sound of the DTV system used in strategic spots behind the front cabinet and use minute vibrations to turn the entire front bezel into the speaker system. It's a wide screen, high-resolution video image, coupled with a convenient button ... TVs include a unique invisible speaker system, tuned by increasing the "sweet spot", giving a wider sound field. INVISIBLE SPEAKERS SYSTEM LG's 2008 line of programming such as sports and action movies. AV Modes can be easily set with multi-channel, compact-disc-quality sound. 50PG20 PLASMA HDTV 50"...
... Automatically enhances and amplifies the sound of the DTV system used in strategic spots behind the front cabinet and use minute vibrations to turn the entire front bezel into the speaker system. It's a wide screen, high-resolution video image, coupled with a convenient button ... TVs include a unique invisible speaker system, tuned by increasing the "sweet spot", giving a wider sound field. INVISIBLE SPEAKERS SYSTEM LG's 2008 line of programming such as sports and action movies. AV Modes can be easily set with multi-channel, compact-disc-quality sound. 50PG20 PLASMA HDTV 50"...
Owner's Manual (English)
Page 2
... sufficient magnitude to constitute a risk of the FCC Rules. Increase the separation between the equipment and receiver. - NOTE TO CABLE/TV INSTALLER This reminder is connected. - WARNING / CAUTION To prevent fire or shock hazards, do not expose this equipment does cause ...) instructions in a particular installation. Unauthorized modification could void the user's authority to correct the interference by turning the equipment off and on a circuit different from LG Electronics. WARNING / CAUTION TO REDUCE THE RISK OF ELECTRIC SHOCK DO NOT REMOVE COVER (OR BACK). Connect...
... sufficient magnitude to constitute a risk of the FCC Rules. Increase the separation between the equipment and receiver. - NOTE TO CABLE/TV INSTALLER This reminder is connected. - WARNING / CAUTION To prevent fire or shock hazards, do not expose this equipment does cause ...) instructions in a particular installation. Unauthorized modification could void the user's authority to correct the interference by turning the equipment off and on a circuit different from LG Electronics. WARNING / CAUTION TO REDUCE THE RISK OF ELECTRIC SHOCK DO NOT REMOVE COVER (OR BACK). Connect...
Owner's Manual (English)
Page 5
...in excessively dusty places. 24 If you smell smoke or other liquids directly on the front panel of antenna discharge unit, connection to carry larger TVs. Do not install in a confined space such as electric shock may take 2 or more people to grounding electrodes and requirements for the grounding ... or power circuits, or where it . Be sure the antenna system is proper ventilation. 20 ANTENNAS Outdoor antenna grounding If an outdoor antenna is turned off, unplugged and all cables have been removed. Do not cover the product with chemicals such as nail, pencil or pen, or make a ...
...in excessively dusty places. 24 If you smell smoke or other liquids directly on the front panel of antenna discharge unit, connection to carry larger TVs. Do not install in a confined space such as electric shock may take 2 or more people to grounding electrodes and requirements for the grounding ... or power circuits, or where it . Be sure the antenna system is proper ventilation. 20 ANTENNAS Outdoor antenna grounding If an outdoor antenna is turned off, unplugged and all cables have been removed. Do not cover the product with chemicals such as nail, pencil or pen, or make a ...
Owner's Manual (English)
Page 6
Auto Scan (Auto Tuning 36 - Add / Delete Channel (Manual Tuning 37 - Expert Control 49 Picture Improvement Technology 50 Advanced Control - Picture Mode - Preset 46 Color Tone - Preset 47 Manual Picture Adjustment - User Mode 48 - Film Mode 52 Picture Reset 53 Image ... Setup 16 DVD Setup 19 VCR Setup 21 Other A/V Source Setup 23 Audio Out Connection 23 PC Setup 24 WATCHING TV / CHANNEL CONTROL Remote Control Functions 30 Turning On TV 32 Channel Selection 32 Volume Adjustment 32 Initial Setting 33 Quick Menu 34 On-Screen Menus Selection 35 Channel Setup - ...
Auto Scan (Auto Tuning 36 - Add / Delete Channel (Manual Tuning 37 - Expert Control 49 Picture Improvement Technology 50 Advanced Control - Picture Mode - Preset 46 Color Tone - Preset 47 Manual Picture Adjustment - User Mode 48 - Film Mode 52 Picture Reset 53 Image ... Setup 16 DVD Setup 19 VCR Setup 21 Other A/V Source Setup 23 Audio Out Connection 23 PC Setup 24 WATCHING TV / CHANNEL CONTROL Remote Control Functions 30 Turning On TV 32 Channel Selection 32 Volume Adjustment 32 Initial Setting 33 Quick Menu 34 On-Screen Menus Selection 35 Channel Setup - ...
Owner's Manual (English)
Page 15
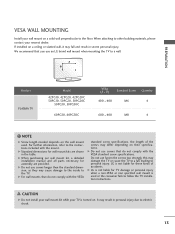
... wall. A B Product PLASMA TV Model 42PG10, 42PG20, 42PG20C 50PG10, 50PG20, 50PG20C 50PG30, 50PG30C 60PG30, 60PG30C VESA (A * B) Standard Screw Quantity 400 * 400 M6 4 600 * 400 M8 4 ! G Do not use an LG brand wall mount when mounting the TV to the TV. G LG is not liable for TV damage or personal injury when... ceiling or slanted wall, it may result in severe personal injury. CAUTION G Do not install your wall mount kit while your TV is turned on a solid wall perpendicular to personal injury. It may fall , leading to the floor. G For wall mounts that you ...
... wall. A B Product PLASMA TV Model 42PG10, 42PG20, 42PG20C 50PG10, 50PG20, 50PG20C 50PG30, 50PG30C 60PG30, 60PG30C VESA (A * B) Standard Screw Quantity 400 * 400 M6 4 600 * 400 M8 4 ! G Do not use an LG brand wall mount when mounting the TV to the TV. G LG is not liable for TV damage or personal injury when... ceiling or slanted wall, it may result in severe personal injury. CAUTION G Do not install your wall mount kit while your TV is turned on a solid wall perpendicular to personal injury. It may fall , leading to the floor. G For wall mounts that you ...
Owner's Manual (English)
Page 18
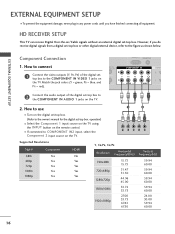
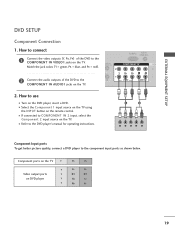
..., refer to COMPONENT IN2 input, select the Component 2 input source on 1 the TV. How to use I If connected to the figure as shown below. Component Connection 1. I Turn on the remote control. How to the COMPONENT IN VIDEO 1 jacks on the TV. 1 2 Y PB PR L R Supported Resolutions Signal 480i 480p 720p 1080i 1080p Component Yes... 59.94 60.00 59.94 60.00 1920x1080i 33.72 33.75 59.94 60.00 1920x1080p 27.00 33.75 67.43 67.50 24.00 30.00 59.94 60.00 ( 16 RGB(PC) (RGB/DVI) COMPONENT IN VIDEO AUDIO HDMI/ 2 1 2 Connect the audio output of the digital...
..., refer to COMPONENT IN2 input, select the Component 2 input source on 1 the TV. How to use I If connected to the figure as shown below. Component Connection 1. I Turn on the remote control. How to the COMPONENT IN VIDEO 1 jacks on the TV. 1 2 Y PB PR L R Supported Resolutions Signal 480i 480p 720p 1080i 1080p Component Yes... 59.94 60.00 59.94 60.00 1920x1080i 33.72 33.75 59.94 60.00 1920x1080p 27.00 33.75 67.43 67.50 24.00 30.00 59.94 60.00 ( 16 RGB(PC) (RGB/DVI) COMPONENT IN VIDEO AUDIO HDMI/ 2 1 2 Connect the audio output of the digital...
Owner's Manual (English)
Page 19
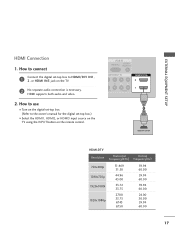
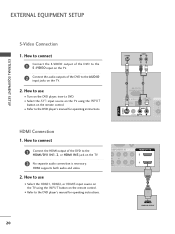
EXTERNAL EQUIPMENT SETUP HDMI Connection 1. How to use I Turn on the digital set -top box.) I Select the HDMI1, HDMI2, or HDMI3 input source on the TV using the INPUT button on the TV. 2 No separate audio connection is necessary. ( ) HDMI supports both audio and video. 2. RGB IN RGB(PC) AUDIO (RGB/DVI) OMPONENT IN... OUTPUT HDMI-DTV Resolution Horizontal Vertical Frequency(KHz) Frequency(Hz) 720x480p 1280x720p 1920x1080i 1920x1080p 31.469 31.50 44.96 45.00 33.72 33.75 27.00 33.75 67.43 67.50 59.94 60.00 59.94 60.00 59.94 60.00 24.00 30.00 59.94...
EXTERNAL EQUIPMENT SETUP HDMI Connection 1. How to use I Turn on the digital set -top box.) I Select the HDMI1, HDMI2, or HDMI3 input source on the TV using the INPUT button on the TV. 2 No separate audio connection is necessary. ( ) HDMI supports both audio and video. 2. RGB IN RGB(PC) AUDIO (RGB/DVI) OMPONENT IN... OUTPUT HDMI-DTV Resolution Horizontal Vertical Frequency(KHz) Frequency(Hz) 720x480p 1280x720p 1920x1080i 1920x1080p 31.469 31.50 44.96 45.00 33.72 33.75 27.00 33.75 67.43 67.50 59.94 60.00 59.94 60.00 59.94 60.00 24.00 30.00 59.94...
Owner's Manual (English)
Page 20
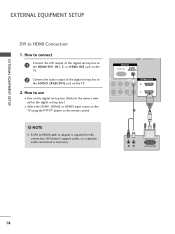
...doesn't support audio, so a separate audio connection is required for the digital set -top box. (Refer to the AUDIO (RGB/DVI) jack on the TV. 2. R L DVI-DTV OUTPUT 18 EXTERNAL EQUIPMENT SETUP EXTERNAL EQUIPMENT SETUP DVI to HDMI cable or adapter is necessary. How to connect 1 Connect the DVI...COMPONENT IN PB PR L R VIDEO AUDIO HDMI/DVI IN 2 1 2 1 ! How to use ( ) I Turn on the digital set -top box.) I Select the HDMI1, HDMI2, or HDMI3 input source on the TV using the INPUT button on the TV. 2 Connect the audio output of the digital set-top box to the HDMI/DVI...
...doesn't support audio, so a separate audio connection is required for the digital set -top box. (Refer to the AUDIO (RGB/DVI) jack on the TV. 2. R L DVI-DTV OUTPUT 18 EXTERNAL EQUIPMENT SETUP EXTERNAL EQUIPMENT SETUP DVI to HDMI cable or adapter is necessary. How to connect 1 Connect the DVI...COMPONENT IN PB PR L R VIDEO AUDIO HDMI/DVI IN 2 1 2 1 ! How to use ( ) I Turn on the digital set -top box.) I Select the HDMI1, HDMI2, or HDMI3 input source on the TV using the INPUT button on the TV. 2 Connect the audio output of the digital set-top box to the HDMI/DVI...
Owner's Manual (English)
Page 21
... DVD to the COMPONENT IN AUDIO1 jacks on the TV. How to use I Select the Component 1 input source on the TV using the INPUT button on the DVD player, insert a DVD. Component ports on the TV Y Y Video output ports Y on the TV. Match the jack colors (Y = green, PB ...= blue, and PR = red). O 1 ( ) RGB(PC) AUDIO (RGB/DVI) COMPONENT IN VIDEO AUDIO HDM 2 1 2. I Turn on the remote control. I If connected to the component...
... DVD to the COMPONENT IN AUDIO1 jacks on the TV. How to use I Select the Component 1 input source on the TV using the INPUT button on the DVD player, insert a DVD. Component ports on the TV Y Y Video output ports Y on the TV. Match the jack colors (Y = green, PB ...= blue, and PR = red). O 1 ( ) RGB(PC) AUDIO (RGB/DVI) COMPONENT IN VIDEO AUDIO HDM 2 1 2. I Turn on the remote control. I If connected to the component...
Owner's Manual (English)
Page 22
How to connect 1 Connect the S-VIDEO output of the DVD to the S -VIDEO input on the TV. 2 Connect the audio outputs of the DVD to use I Turn on the DVD player, insert a DVD. AV IN 1 S-VIDEO S-VIDEO AUDIO L R 1 2 RS-232C IN (CONTROL & SERVICE) DIGITAL AUDIO OUT REMOTE CONTROL IN OPTICAL AUDIO .... OMPONENT IN PB PR L R DEO AUDIO HDMI/DVI IN 2 1 1 HDMI-DVD OUTPUT 20 I Select the HDMI1, HDMI2, or HDMI3 input source on the TV using the INPUT button on the TV. 2. How to connect 1 Connect the HDMI output of the DVD to use I Select the A V 1 input source on the...
How to connect 1 Connect the S-VIDEO output of the DVD to the S -VIDEO input on the TV. 2 Connect the audio outputs of the DVD to use I Turn on the DVD player, insert a DVD. AV IN 1 S-VIDEO S-VIDEO AUDIO L R 1 2 RS-232C IN (CONTROL & SERVICE) DIGITAL AUDIO OUT REMOTE CONTROL IN OPTICAL AUDIO .... OMPONENT IN PB PR L R DEO AUDIO HDMI/DVI IN 2 1 1 HDMI-DVD OUTPUT 20 I Select the HDMI1, HDMI2, or HDMI3 input source on the TV using the INPUT button on the TV. 2. How to connect 1 Connect the HDMI output of the DVD to use I Select the A V 1 input source on the...

Owner's Manual (English)
Page 25
.... How to external audio equipment via the Audio Output port. 1. I Select the A V 2 input source on the TV using 1 the INPUT button on the TV. AV IN 2 AUDIO OUT CONNECTION Send the TV's audio to use I Operate the corresponding external equipment. EXTERNAL EQUIPMENT SETUP OTHER A/V SOURCE SETUP 1. AV IN 1 S-VIDEO...IN OPTICAL 2 AU1DIO Y 1 ! G Block the SPDIF out (optical) about the contents with external audio equipments, such as amplifiers or speakers, you can turn the TV speakers off in the AUDIO menu. (G p.61). How to connect 1 Connect the AUDIO/VIDEO jacks between...
.... How to external audio equipment via the Audio Output port. 1. I Select the A V 2 input source on the TV using 1 the INPUT button on the TV. AV IN 2 AUDIO OUT CONNECTION Send the TV's audio to use I Operate the corresponding external equipment. EXTERNAL EQUIPMENT SETUP OTHER A/V SOURCE SETUP 1. AV IN 1 S-VIDEO...IN OPTICAL 2 AU1DIO Y 1 ! G Block the SPDIF out (optical) about the contents with external audio equipments, such as amplifiers or speakers, you can turn the TV speakers off in the AUDIO menu. (G p.61). How to connect 1 Connect the AUDIO/VIDEO jacks between...

Owner's Manual (English)
Page 26
... HDMI/DVI IN 1, 2, or HDMI IN3 jack on the TV. ( ) 2 Connect the PC audio output to use ( ) I O( ) 2. A U D I Turn on the TV. 2. How to the A U D I Turn on the TV. I Select the HDMI1, HDMI2 or HDMI3 input source on the TV using the INPUT button on the remote control. I Select the... RGB-PC input source on the TV using the INPUT button on the remote control. How to...
... HDMI/DVI IN 1, 2, or HDMI IN3 jack on the TV. ( ) 2 Connect the PC audio output to use ( ) I O( ) 2. A U D I Turn on the TV. 2. How to the A U D I Turn on the TV. I Select the HDMI1, HDMI2 or HDMI3 input source on the TV using the INPUT button on the remote control. I Select the... RGB-PC input source on the TV using the INPUT button on the remote control. How to...
Owner's Manual (English)
Page 32
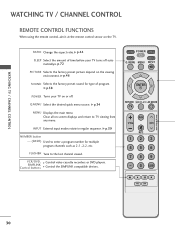
G p.58 POWER Turns your TV turns off . G p.39 NUMBER button - (DASH) Used to enter a program number for type of time before your TV on -screen displays and return to the last channel viewed. G p.46 SOUND Selects the factory preset sound for multiple program ...on or off automatically.G p.72 PICTURE Selects the factory preset picture depend on the TV. FLASHBK Tune to TV viewing from any menu. RATIO POWER SLEEP SOUND PICTURE Q. WATCHING TV / CHANNEL CONTROL WATCHING TV / CHANNEL CONTROL REMOTE CONTROL FUNCTIONS When using the remote control, aim it at ...
G p.58 POWER Turns your TV turns off . G p.39 NUMBER button - (DASH) Used to enter a program number for type of time before your TV on -screen displays and return to the last channel viewed. G p.46 SOUND Selects the factory preset sound for multiple program ...on or off automatically.G p.72 PICTURE Selects the factory preset picture depend on the TV. FLASHBK Tune to TV viewing from any menu. RATIO POWER SLEEP SOUND PICTURE Q. WATCHING TV / CHANNEL CONTROL WATCHING TV / CHANNEL CONTROL REMOTE CONTROL FUNCTIONS When using the remote control, aim it at ...
Owner's Manual (English)
Page 34
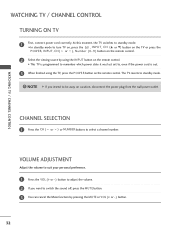
... button. 3 You can cancel the Mute function by using the TV, press the POWER button on the remote control. At this moment, the TV switches to standby mode. ! The TV reverts to standby mode. WATCHING TV / CHANNEL CONTROL TURNING ON TV 1 First, connect power cord correctly. WATCHING TV / CHANNEL CONTROL CHANNEL SELECTION 1 Press the CH ( or ) or...
... button. 3 You can cancel the Mute function by using the TV, press the POWER button on the remote control. At this moment, the TV switches to standby mode. ! The TV reverts to standby mode. WATCHING TV / CHANNEL CONTROL TURNING ON TV 1 First, connect power cord correctly. WATCHING TV / CHANNEL CONTROL CHANNEL SELECTION 1 Press the CH ( or ) or...
Owner's Manual (English)
Page 35
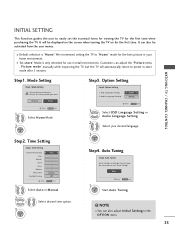
... Select Auto or Manual. 2 Select desired time option. 3 ENTER Step3. Auto Tuning Auto Tuning can also be displayed on the screen when turning the TV on for the first time. Mode Setting ! INITIAL SETTING This Function guides the user to "H o m e" mode for the best picture...OPTION menu. 33 Choose the setting mode you want . I Default selection is only intended for use in -store mode after 5 minutes. WATCHING TV / CHANNEL CONTROL Step1. Audio Language Setting F English G French Enter RETURN Exit 1 Select OSD Language Setting or Audio Language Setting. 2 Select ...
... Select Auto or Manual. 2 Select desired time option. 3 ENTER Step3. Auto Tuning Auto Tuning can also be displayed on the screen when turning the TV on for the first time. Mode Setting ! INITIAL SETTING This Function guides the user to "H o m e" mode for the best picture...OPTION menu. 33 Choose the setting mode you want . I Default selection is only intended for use in -store mode after 5 minutes. WATCHING TV / CHANNEL CONTROL Step1. Audio Language Setting F English G French Enter RETURN Exit 1 Select OSD Language Setting or Audio Language Setting. 2 Select ...
Owner's Manual (English)
Page 36
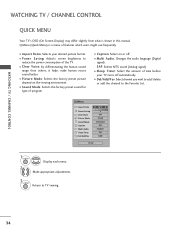
... each menu. MENU Return to reduce the power consumption of time before your desired picture format. I Aspect Ratio: Selects your TV turns off . Q.Menu (Quick Menu) is shown in this manual. Q.Menu Aspect Ratio Power Saving Clear Voice Picture Mode Sound ... on or off automatically. I P o w e r S a v i n g: Adjusts screen brightness to TV viewing. 34 Make appropriate adjustments. 3 Q. WATCHING TV / CHANNEL CONTROL WATCHING TV / CHANNEL CONTROL QUICK MENU Your TV's OSD (On Screen Display) may differ slightly from others, it helps make human voices sound better. I Del/...
... each menu. MENU Return to reduce the power consumption of time before your desired picture format. I Aspect Ratio: Selects your TV turns off . Q.Menu (Quick Menu) is shown in this manual. Q.Menu Aspect Ratio Power Saving Clear Voice Picture Mode Sound ... on or off automatically. I P o w e r S a v i n g: Adjusts screen brightness to TV viewing. 34 Make appropriate adjustments. 3 Q. WATCHING TV / CHANNEL CONTROL WATCHING TV / CHANNEL CONTROL QUICK MENU Your TV's OSD (On Screen Display) may differ slightly from others, it helps make human voices sound better. I Del/...
Owner's Manual (English)
Page 38
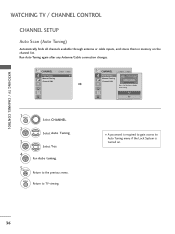
Yes No 1 MENU Select CHANNEL. 2 ENTER Select Auto Tuning. 3 ENTER Select Y e s. 4 ENTER Run Auto tuning. 5 RETURN Return to TV viewing. WATCHING TV / CHANNEL CONTROL WATCHING TV / CHANNEL CONTROL CHANNEL SETUP Auto Scan (Auto Tuning) Automatically finds all channels available through antenna or cable inputs, and stores them in memory on . 36 ... Channel Edit Move Enter CHANNEL Auto Tuning Manual Tuning Channel Edit Move Enter Press 'Yes' button to Auto Tuning menu if the Lock System is turned on the channel list.
Yes No 1 MENU Select CHANNEL. 2 ENTER Select Auto Tuning. 3 ENTER Select Y e s. 4 ENTER Run Auto tuning. 5 RETURN Return to TV viewing. WATCHING TV / CHANNEL CONTROL WATCHING TV / CHANNEL CONTROL CHANNEL SETUP Auto Scan (Auto Tuning) Automatically finds all channels available through antenna or cable inputs, and stores them in memory on . 36 ... Channel Edit Move Enter CHANNEL Auto Tuning Manual Tuning Channel Edit Move Enter Press 'Yes' button to Auto Tuning menu if the Lock System is turned on the channel list.

Owner's Manual (English)
Page 39
... 2 ENTER 3 ENTER 4 5 Select CHANNEL. Select Manual Tuning. ENTER Select A d d or D e l e t e. 6 RETURN Return to TV viewing. MENU Return to the previous menu. Select channel you can view the on . 37 Channel 2 DTV 2-1 Bad Normal Good Delete Close I A password is turned on -screen signal strength monitor to see the quality of the signal being...
... 2 ENTER 3 ENTER 4 5 Select CHANNEL. Select Manual Tuning. ENTER Select A d d or D e l e t e. 6 RETURN Return to TV viewing. MENU Return to the previous menu. Select channel you can view the on . 37 Channel 2 DTV 2-1 Bad Normal Good Delete Close I A password is turned on -screen signal strength monitor to see the quality of the signal being...

Owner's Manual (English)
Page 44
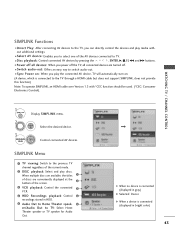
... (HDMI terminal) of the SIMPLINK device with the logo. To start using it on in the user menus. WATCHING TV / CHANNEL CONTROL This function operates only with devices with an OPTICAL cable. 42 OPTION Move Enter Language Input Label SIMPLINK...Off : Off On : Off : Normal : Level 0 : 1 WATCHING TV / CHANNEL CONTROL 1 MENU Select OPTION. 2 ENTER Select SIMPLINK. 3 ENTER Select O n or O f f. 4 RETURN Return to TV viewing. ! The TV might not function properly when using SIMPLINK, turn it with other AV devices connected with the HDMI cable. G When you switch...
... (HDMI terminal) of the SIMPLINK device with the logo. To start using it on in the user menus. WATCHING TV / CHANNEL CONTROL This function operates only with devices with an OPTICAL cable. 42 OPTION Move Enter Language Input Label SIMPLINK...Off : Off On : Off : Normal : Level 0 : 1 WATCHING TV / CHANNEL CONTROL 1 MENU Select OPTION. 2 ENTER Select SIMPLINK. 3 ENTER Select O n or O f f. 4 RETURN Return to TV viewing. ! The TV might not function properly when using SIMPLINK, turn it with other AV devices connected with the HDMI cable. G When you switch...
Owner's Manual (English)
Page 45
...an HDMI cable over Version 1.3 with - I Power off all devices: When you power off the TV, all connected devices are conveniently displayed at the 2 bottom of discs are turned off. WATCHING TV / CHANNEL CONTROL 1 Display SIMPLINK menu. 2 ENTER Select the desired device. 3 ENTER Control connected...way to switch audio-out. SIMPLINK Functions I Direct Play: After connecting AV devices to the TV, you can directly control the devices and play the connected AV device, TV will automatically turn on. (A device, which is connected (displayed in HDD. 5 Audio Out to Home Theater...
...an HDMI cable over Version 1.3 with - I Power off all devices: When you power off the TV, all connected devices are conveniently displayed at the 2 bottom of discs are turned off. WATCHING TV / CHANNEL CONTROL 1 Display SIMPLINK menu. 2 ENTER Select the desired device. 3 ENTER Control connected...way to switch audio-out. SIMPLINK Functions I Direct Play: After connecting AV devices to the TV, you can directly control the devices and play the connected AV device, TV will automatically turn on. (A device, which is connected (displayed in HDD. 5 Audio Out to Home Theater...


