Specification (English)
Page 1
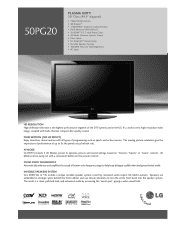
.... 50PG20 PLASMA HDTV 50" Class (49.9" diagonal) • 720p HD Resolution • XD Engine™ • 1,000,000:1 Dynamic Contrast Ratio • Fluid Motion (180Hz Effect) • 3x HDMI™ V.1.3 with Deep Color • AV Mode (Cinema, Sports, Game) • Clear Voice • LG SimpLink™ Connectivity • Invisible Speaker System • 100,000 Hours to optimize picture and sound settings based on the remote control. It's a wide screen...
.... 50PG20 PLASMA HDTV 50" Class (49.9" diagonal) • 720p HD Resolution • XD Engine™ • 1,000,000:1 Dynamic Contrast Ratio • Fluid Motion (180Hz Effect) • 3x HDMI™ V.1.3 with Deep Color • AV Mode (Cinema, Sports, Game) • Clear Voice • LG SimpLink™ Connectivity • Invisible Speaker System • 100,000 Hours to optimize picture and sound settings based on the remote control. It's a wide screen...
Specification (English)
Page 2
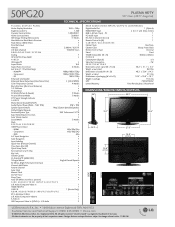
...; Closed Caption • LG SimpLink™ (HDMI CEC) • Trilingual Menus English/French/Spanish EZ Menus (High Performance Interface) • Channel Add/Delete • Favorite Channel • Auto Clock • Manual Clock • On/Off Timer • Sleep Timer • Auto Off (When no video is present) • SIDE AUDIO/VIDEO INPUTS/OUTPUTS L/R Audio/Composite Video In 1 HDMI/HDCP In 1 USB 2.0 1 (Service Only) REAR AUDIO/VIDEO INPUTS/OUTPUTS RF In (Antenna/Cable) 1 L/R Audio/Component...
...; Closed Caption • LG SimpLink™ (HDMI CEC) • Trilingual Menus English/French/Spanish EZ Menus (High Performance Interface) • Channel Add/Delete • Favorite Channel • Auto Clock • Manual Clock • On/Off Timer • Sleep Timer • Auto Off (When no video is present) • SIDE AUDIO/VIDEO INPUTS/OUTPUTS L/R Audio/Composite Video In 1 HDMI/HDCP In 1 USB 2.0 1 (Service Only) REAR AUDIO/VIDEO INPUTS/OUTPUTS RF In (Antenna/Cable) 1 L/R Audio/Component...
Owner's Manual (English)
Page 4
... authorized servicer. When mounting a TV on the power cord to unplug the TV. 15 WARNING - Overloaded wall outlets, loose or damaged wall outlets, extension cords, frayed power cords, or damaged or cracked wire insulation are not possible, have the cord replaced with an exact replacement part by connecting it to telephone wires, lightening rods, or gas pipes. Do not pull on the wall, make the TV with the power cord plugged in...
... authorized servicer. When mounting a TV on the power cord to unplug the TV. 15 WARNING - Overloaded wall outlets, loose or damaged wall outlets, extension cords, frayed power cords, or damaged or cracked wire insulation are not possible, have the cord replaced with an exact replacement part by connecting it to telephone wires, lightening rods, or gas pipes. Do not pull on the wall, make the TV with the power cord plugged in...
Owner's Manual (English)
Page 5
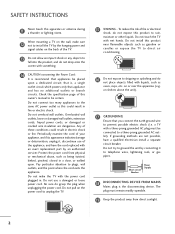
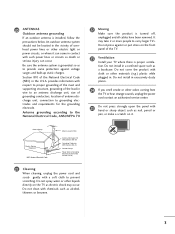
..., thinners or benzene. 3 Section 810 of the TV. 23 Ventilation Install your TV where there is proper ventilation. Do not spray water or other odors coming from the TV or hear strange sounds, unplug the power cord contact an authorized service center. 25 Do not press strongly upon the panel with such power lines or circuits as a bookcase. Do not clean with...
..., thinners or benzene. 3 Section 810 of the TV. 23 Ventilation Install your TV where there is proper ventilation. Do not spray water or other odors coming from the TV or hear strange sounds, unplug the power cord contact an authorized service center. 25 Do not press strongly upon the panel with such power lines or circuits as a bookcase. Do not clean with...
Owner's Manual (English)
Page 6
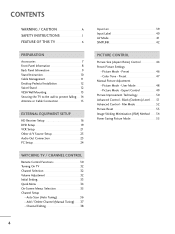
...Front Panel Information 8 Back Panel Information 9 Stand Instruction 10 Cable Management 11 Desktop Pedestal Installation 12 Swivel Stand 12 VESA Wall Mounting 13 Securing the TV to the wall to prevent falling . . . . 14 Antenna or Cable Connection 15 EXTERNAL EQUIPMENT SETUP HD Receiver Setup 16 DVD Setup 19 VCR Setup 21 Other A/V Source Setup 23 Audio Out Connection 23 PC Setup 24 WATCHING TV / CHANNEL CONTROL Remote Control Functions 30 Turning On TV 32 Channel Selection 32 Volume Adjustment 32 Initial Setting 33 Quick Menu 34 On-Screen Menus Selection 35 Channel Setup...
...Front Panel Information 8 Back Panel Information 9 Stand Instruction 10 Cable Management 11 Desktop Pedestal Installation 12 Swivel Stand 12 VESA Wall Mounting 13 Securing the TV to the wall to prevent falling . . . . 14 Antenna or Cable Connection 15 EXTERNAL EQUIPMENT SETUP HD Receiver Setup 16 DVD Setup 19 VCR Setup 21 Other A/V Source Setup 23 Audio Out Connection 23 PC Setup 24 WATCHING TV / CHANNEL CONTROL Remote Control Functions 30 Turning On TV 32 Channel Selection 32 Volume Adjustment 32 Initial Setting 33 Quick Menu 34 On-Screen Menus Selection 35 Channel Setup...

Owner's Manual (English)
Page 11
Doesn't support 480i. Used by third party devices. 9 USB SERVICE ONLY 4 REMOTE CONTROL PORT Used for audio. Note: In standby mode, this port do not work. 3 RS-232C IN (CONTROL & SERVICE) PORT Connect over-the air signals to operate the TV on DC power. Caution: Never attempt to this jack. 7 HDMI/DVI IN, HDMI IN Digital Connection. Uses a red, green, and blue cable for video & red and white for software updates. AUDIO (RGB/DVI) 1/8" headphone jack for use with AC power. Supports HD. For a wired remote control. 10 Power Cord Socket 5 RGB (PC) For ...
Doesn't support 480i. Used by third party devices. 9 USB SERVICE ONLY 4 REMOTE CONTROL PORT Used for audio. Note: In standby mode, this port do not work. 3 RS-232C IN (CONTROL & SERVICE) PORT Connect over-the air signals to operate the TV on DC power. Caution: Never attempt to this jack. 7 HDMI/DVI IN, HDMI IN Digital Connection. Uses a red, green, and blue cable for video & red and white for software updates. AUDIO (RGB/DVI) 1/8" headphone jack for use with AC power. Supports HD. For a wired remote control. 10 Power Cord Socket 5 RGB (PC) For ...
Owner's Manual (English)
Page 15
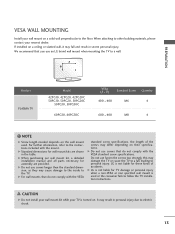
... floor. A B Product PLASMA TV Model 42PG10, 42PG20, 42PG20C 50PG10, 50PG20, 50PG20C 50PG30, 50PG30C 60PG30, 60PG30C VESA (A * B) Standard Screw Quantity 400 * 400 M6 4 600 * 400 M8 4 ! G For wall mounts that do not comply with the VESA standard screw specifications, the length of accidents. Do not use screws that do not comply with the mount. G When purchasing our wall mount kit, a detailed installation manual and all parts necessary for wall mount kits are...
... floor. A B Product PLASMA TV Model 42PG10, 42PG20, 42PG20C 50PG10, 50PG20, 50PG20C 50PG30, 50PG30C 60PG30, 60PG30C VESA (A * B) Standard Screw Quantity 400 * 400 M6 4 600 * 400 M8 4 ! G For wall mounts that do not comply with the VESA standard screw specifications, the length of accidents. Do not use screws that do not comply with the mount. G When purchasing our wall mount kit, a detailed installation manual and all parts necessary for wall mount kits are...
Owner's Manual (English)
Page 18
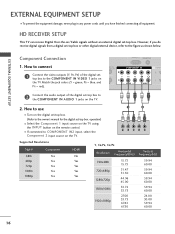
... the figure as shown below. RGB(PC) (RGB/DVI) COMPONENT IN VIDEO AUDIO HDMI/ 2 1 2 Connect the audio output of the digital settop box to the COMPONENT IN VIDEO 1 jacks on the remote control. However, if you have finished connecting all equipment. Match the jack colors (Y = green, PB = blue, and( ) PR = red). HD RECEIVER SETUP This TV can receive Digital Over-the-air/Cable signals without an external digital set -top box. Component Connection 1. I If connected to the owner's manual for the digital set -top box.
... the figure as shown below. RGB(PC) (RGB/DVI) COMPONENT IN VIDEO AUDIO HDMI/ 2 1 2 Connect the audio output of the digital settop box to the COMPONENT IN VIDEO 1 jacks on the remote control. However, if you have finished connecting all equipment. Match the jack colors (Y = green, PB = blue, and( ) PR = red). HD RECEIVER SETUP This TV can receive Digital Over-the-air/Cable signals without an external digital set -top box. Component Connection 1. I If connected to the owner's manual for the digital set -top box.
Owner's Manual (English)
Page 19
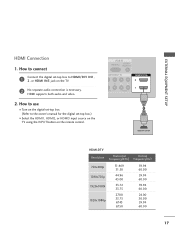
How to use I Turn on the digital set -top box.) I Select the HDMI1, HDMI2, or HDMI3 input source on the TV using the INPUT button on the TV. 2 No separate audio connection is necessary. ( ) HDMI supports both audio and video. 2. EXTERNAL EQUIPMENT SETUP HDMI Connection 1. RGB IN RGB(PC) AUDIO (RGB/DVI) OMPONENT IN B PR L R EO AUDIO HDMI/DVI IN 2 1 1 HDMI-DTV OUTPUT HDMI-DTV Resolution Horizontal Vertical Frequency(KHz) Frequency(Hz) 720x480p 1280x720p 1920x1080i 1920x1080p 31.469 31.50 44.96 45.00...
How to use I Turn on the digital set -top box.) I Select the HDMI1, HDMI2, or HDMI3 input source on the TV using the INPUT button on the TV. 2 No separate audio connection is necessary. ( ) HDMI supports both audio and video. 2. EXTERNAL EQUIPMENT SETUP HDMI Connection 1. RGB IN RGB(PC) AUDIO (RGB/DVI) OMPONENT IN B PR L R EO AUDIO HDMI/DVI IN 2 1 1 HDMI-DTV OUTPUT HDMI-DTV Resolution Horizontal Vertical Frequency(KHz) Frequency(Hz) 720x480p 1280x720p 1920x1080i 1920x1080p 31.469 31.50 44.96 45.00...
Owner's Manual (English)
Page 20
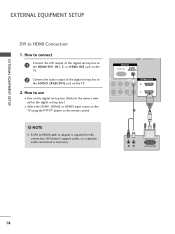
... L R VIDEO AUDIO HDMI/DVI IN 2 1 2 1 ! DVI doesn't support audio, so a separate audio connection is required for the digital set -top box to the owner's manual for this connection. R L DVI-DTV OUTPUT 18 EXTERNAL EQUIPMENT SETUP EXTERNAL EQUIPMENT SETUP DVI to the HDMI/DVI IN1, 2, or HDMI IN3 jack on the TV. 2 Connect the audio output of the digital set -top box.) I Turn on the digital set-top box. (Refer to the AUDIO (RGB/DVI) jack on the remote control. How to use ( ) I Select the HDMI1, HDMI2, or HDMI3 input source on the TV using the INPUT button...
... L R VIDEO AUDIO HDMI/DVI IN 2 1 2 1 ! DVI doesn't support audio, so a separate audio connection is required for the digital set -top box to the owner's manual for this connection. R L DVI-DTV OUTPUT 18 EXTERNAL EQUIPMENT SETUP EXTERNAL EQUIPMENT SETUP DVI to the HDMI/DVI IN1, 2, or HDMI IN3 jack on the TV. 2 Connect the audio output of the digital set -top box.) I Turn on the digital set-top box. (Refer to the AUDIO (RGB/DVI) jack on the remote control. How to use ( ) I Select the HDMI1, HDMI2, or HDMI3 input source on the TV using the INPUT button...
Owner's Manual (English)
Page 21
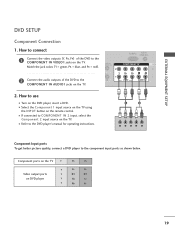
... VIDEO AUDIO HDM 2 1 2. I Turn on the TV. How to use I If connected to the COMPONENT IN VIDEO1 jacks on the remote control. Component ports on the TV Y Y Video output ports Y on the TV. I Select the Component 1 input source on the TV using the INPUT button on the TV. EMOTE NTROL IN 2 2 Connect the audio outputs of the DVD to COMPONENT IN 2 input, select the Component 2 input source on the DVD player, insert a DVD. Match the jack colors (Y = green, PB = blue, and PR = red). EXTERNAL EQUIPMENT SETUP DVD SETUP Component Connection...
... VIDEO AUDIO HDM 2 1 2. I Turn on the TV. How to use I If connected to the COMPONENT IN VIDEO1 jacks on the remote control. Component ports on the TV Y Y Video output ports Y on the TV. I Select the Component 1 input source on the TV using the INPUT button on the TV. EMOTE NTROL IN 2 2 Connect the audio outputs of the DVD to COMPONENT IN 2 input, select the Component 2 input source on the DVD player, insert a DVD. Match the jack colors (Y = green, PB = blue, and PR = red). EXTERNAL EQUIPMENT SETUP DVD SETUP Component Connection...
Owner's Manual (English)
Page 22
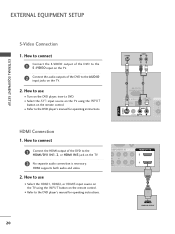
... Connect the HDMI output of the DVD to use I Select the HDMI1, HDMI2, or HDMI3 input source on the TV using the INPUT button on the TV. 2. How to the AUDIO input jacks on the remote control. I Turn on the TV. 2 No separate audio connection is necessary. ( ) HDMI supports both audio and video. 2. How to the DVD player's manual for operating instructions. OMPONENT IN PB PR L R DEO AUDIO HDMI/DVI IN 2 1 1 HDMI-DVD OUTPUT 20 AV IN 1 S-VIDEO S-VIDEO AUDIO L R 1 2 RS-232C IN (CONTROL & SERVICE) DIGITAL AUDIO OUT REMOTE CONTROL IN OPTICAL AUDIO VIDEO...
... Connect the HDMI output of the DVD to use I Select the HDMI1, HDMI2, or HDMI3 input source on the TV using the INPUT button on the TV. 2. How to the AUDIO input jacks on the remote control. I Turn on the TV. 2 No separate audio connection is necessary. ( ) HDMI supports both audio and video. 2. How to the DVD player's manual for operating instructions. OMPONENT IN PB PR L R DEO AUDIO HDMI/DVI IN 2 1 1 HDMI-DVD OUTPUT 20 AV IN 1 S-VIDEO S-VIDEO AUDIO L R 1 2 RS-232C IN (CONTROL & SERVICE) DIGITAL AUDIO OUT REMOTE CONTROL IN OPTICAL AUDIO VIDEO...

Owner's Manual (English)
Page 25
... cable to the TV's OPTICAL port of DIGITAL AUDIO OUT. 2 Connect the other end of the optical cable to connect 1 Connect the AUDIO/VIDEO jacks between TV and external equipment. EXTERNAL EQUIPMENT SETUP OTHER A/V SOURCE SETUP 1. How to use I If connected to external audio equipment via the Audio Output port. 1. AV IN 2 AUDIO OUT CONNECTION Send the TV's audio to AV IN1 input, select the A V 1 input source on the remote control. Match the jack colors. (Video = yellow, Audio Left = white, and Audio Right = red) Camcorder Video Game Set VIDEO L R USB SERVICE ONLY HDMI...
... cable to the TV's OPTICAL port of DIGITAL AUDIO OUT. 2 Connect the other end of the optical cable to connect 1 Connect the AUDIO/VIDEO jacks between TV and external equipment. EXTERNAL EQUIPMENT SETUP OTHER A/V SOURCE SETUP 1. How to use I If connected to external audio equipment via the Audio Output port. 1. AV IN 2 AUDIO OUT CONNECTION Send the TV's audio to AV IN1 input, select the A V 1 input source on the remote control. Match the jack colors. (Video = yellow, Audio Left = white, and Audio Right = red) Camcorder Video Game Set VIDEO L R USB SERVICE ONLY HDMI...

Owner's Manual (English)
Page 27
EXTERNAL EQUIPMENT SETUP Supported Display Specifications (RGB-PC, HDMI-PC) Resolution 640x350 Horizontal Vertical Frequency(KHz) Frequency(Hz) 31...card, DOS mode may be positioned on the screen properly. 25 G Depending on the graphics card, some resolution settings may not allow the image to another resolution, change the refresh rate to be noise associated with the resolution, vertical pattern, contrast or brightness. NOTES G To get the the best picture quality, adjust the PC graphics card to DVI Cable is clear. G Depending on the PICTURE menu until the picture is in use...
EXTERNAL EQUIPMENT SETUP Supported Display Specifications (RGB-PC, HDMI-PC) Resolution 640x350 Horizontal Vertical Frequency(KHz) Frequency(Hz) 31...card, DOS mode may be positioned on the screen properly. 25 G Depending on the graphics card, some resolution settings may not allow the image to another resolution, change the refresh rate to be noise associated with the resolution, vertical pattern, contrast or brightness. NOTES G To get the the best picture quality, adjust the PC graphics card to DVI Cable is clear. G Depending on the PICTURE menu until the picture is in use...
Owner's Manual (English)
Page 34
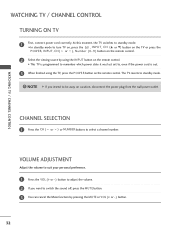
... to standby mode. ! I In standby mode to , even if the power cord is programmed to remember which power state it was last set to turn TV on, press the , INPUT, C H (D or E) button on the TV or press the POWER, INPUT, C H ( or ), Number (0~9 ) button on the remote control. I This TV is out. 3 When finished using the INPUT button on the remote control. 2 Select the viewing source by pressing the MUTE or VOL (+ or -) button. 32 WATCHING TV / CHANNEL CONTROL TURNING ON TV 1 First, connect power cord correctly. WATCHING TV / CHANNEL CONTROL CHANNEL...
... to standby mode. ! I In standby mode to , even if the power cord is programmed to remember which power state it was last set to turn TV on, press the , INPUT, C H (D or E) button on the TV or press the POWER, INPUT, C H ( or ), Number (0~9 ) button on the remote control. I This TV is out. 3 When finished using the INPUT button on the remote control. 2 Select the viewing source by pressing the MUTE or VOL (+ or -) button. 32 WATCHING TV / CHANNEL CONTROL TURNING ON TV 1 First, connect power cord correctly. WATCHING TV / CHANNEL CONTROL CHANNEL...
Owner's Manual (English)
Page 36
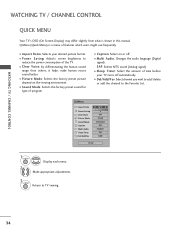
... TV. Make appropriate adjustments. 3 Q. MENU Return to reduce the power consumption of time before your desired picture format. Q.Menu (Quick Menu) is shown in this manual. I Multi Audio: Changes the audio language (Digital signal). MENU 2 Display each menu. I Sound Mode: Selects the factory preset sound for type of features which users might use frequently. I Del/Add/Fav: Select channel you want to add/delete or add the channel to the Favorite List. SAP: Selects MTS sound (Analog signal). Q.Menu Aspect Ratio Power...
... TV. Make appropriate adjustments. 3 Q. MENU Return to reduce the power consumption of time before your desired picture format. Q.Menu (Quick Menu) is shown in this manual. I Multi Audio: Changes the audio language (Digital signal). MENU 2 Display each menu. I Sound Mode: Selects the factory preset sound for type of features which users might use frequently. I Del/Add/Fav: Select channel you want to add/delete or add the channel to the Favorite List. SAP: Selects MTS sound (Analog signal). Q.Menu Aspect Ratio Power...

Owner's Manual (English)
Page 44
... OPTICAL cable. 42 G When you to control and play the audio from the TV, connect the DIGITAL AUDIO OUT terminal on the back of the TV to TV viewing. ! This allows you switch the Input source with the logo. The TV might not function properly when using SIMPLINK, turn it with other AV devices connected with the HDMI cable. WATCHING TV / CHANNEL CONTROL This function operates only with devices with the INPUT button on in the user...
... OPTICAL cable. 42 G When you to control and play the audio from the TV, connect the DIGITAL AUDIO OUT terminal on the back of the TV to TV viewing. ! This allows you switch the Input source with the logo. The TV might not function properly when using SIMPLINK, turn it with other AV devices connected with the HDMI cable. WATCHING TV / CHANNEL CONTROL This function operates only with devices with the INPUT button on in the user...
Owner's Manual (English)
Page 48
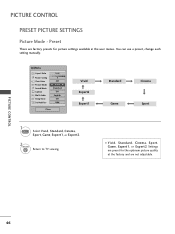
.... Q.Menu Aspect Ratio Power Saving Clear Voice Picture Mode Sound Mode Caption Multi Audio Sleep Timer CH Del/Add/Fav 16:9 3 Off F Vivid G Standard Off English Off Add Close Vivid Expert2 Expert1 Standard Game Cinema Sport 1 PICTURE Select Vivid, Standard, Cinema, Sport, Game, Expert1, or Expert2. 2 RETURN Return to TV viewing. I Vivid, Standard, Cinema, Sport, Game, Expert1, or Expert2 Settings are not adjustable. PICTURE CONTROL 46 You can use a preset, change each setting manually.
.... Q.Menu Aspect Ratio Power Saving Clear Voice Picture Mode Sound Mode Caption Multi Audio Sleep Timer CH Del/Add/Fav 16:9 3 Off F Vivid G Standard Off English Off Add Close Vivid Expert2 Expert1 Standard Game Cinema Sport 1 PICTURE Select Vivid, Standard, Cinema, Sport, Game, Expert1, or Expert2. 2 RETURN Return to TV viewing. I Vivid, Standard, Cinema, Sport, Game, Expert1, or Expert2 Settings are not adjustable. PICTURE CONTROL 46 You can use a preset, change each setting manually.

Owner's Manual (English)
Page 76
... Set Password Block Channel TV Rating-English TV Rating-French Downloadable Rating Input Block Enter Password **** Close 1 MENU ENTER Select L O C K. 21 2 3 456 789 0 Input the password. 74 I The TV is set up blocking schemes to be viewed. PARENTAL CONTROL / RATINGS Parental Control can be blocked by TV Rating and/or Individual Categories. The Parental Control Function (V-Chip) is also possible to block all programs to block specific channels, ratings, and external viewing sources. To use the...
... Set Password Block Channel TV Rating-English TV Rating-French Downloadable Rating Input Block Enter Password **** Close 1 MENU ENTER Select L O C K. 21 2 3 456 789 0 Input the password. 74 I The TV is set up blocking schemes to be viewed. PARENTAL CONTROL / RATINGS Parental Control can be blocked by TV Rating and/or Individual Categories. The Parental Control Function (V-Chip) is also possible to block all programs to block specific channels, ratings, and external viewing sources. To use the...
Owner's Manual (English)
Page 88
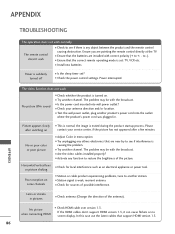
... screen display. I Try unplugging any object between the product and the remote control causing obstruction. The video function does not work normally. Lines or streaks in menu option. I Check whether the product is turned on contact your antenna direction and/or location. I Check HDMI cable over version 1.3. No picture &No sound I Ensure that support HDMI version 1.3. 86 Horizontal/vertical bars I Try another product's power cord into wall power outlet? Ensure you are installed...
... screen display. I Try unplugging any object between the product and the remote control causing obstruction. The video function does not work normally. Lines or streaks in menu option. I Check whether the product is turned on contact your antenna direction and/or location. I Check HDMI cable over version 1.3. No picture &No sound I Ensure that support HDMI version 1.3. 86 Horizontal/vertical bars I Try another product's power cord into wall power outlet? Ensure you are installed...


